
17. Wired Networking with Mac OS X
Networking and Mac OS X
If you have just a single Mac in your home or small office, and if you’re the only person who uses that computer, your setup is inherently efficient. You can use the Mac whenever you like, and all the things you need—your applications, your printer, your CD/DVD drive, your Internet connection, and so on—are readily available.
Things become noticeably less efficient if you have to share the Mac with other people. For instance, you might have to wait for someone else to finish a task before you can get your own work done; you might need to have separate applications for each person’s requirements; and you might need to set up separate folders to hold each person’s data. User accounts and fast user switching in Mac OS X ease these problems (see Chapter 21, “Working with User Accounts”), but they don’t eliminate them. For example, you still have to twiddle a thumb or two while waiting for another person to complete his work.
A better solution is to increase the number of Macs available. Now you have several computers kicking around the house or office, but they’re all islands unto themselves. If you want to print something using another Mac’s printer, you’re forced to copy the file to a memory card or other removable media, walk that media over to the other computer, and then print from there. Similarly, if multiple computers require Internet access, you face the hassle (and expense) of configuring separate connections
So now you need to take the final step on this road: Connect everything together to create your own small network. This will give you all kinds of benefits:
• A printer (or just about any peripheral) that’s attached to one Mac can be used by any other Mac on the network.
• You can transfer files from one computer to another.
• Users can access disk drives and folders on network computers as though they were part of their own computer. In particular, you can set up a folder to store common data files, and each user will be able to access these files from the comfort of her machine. (For security, you can restrict access to certain folders and drives.)
• You can set up an Internet connection on one device and share that connection with other machines on the network.
• You can set up a wireless portion of your network, which enables you to access other computers and the Internet from just about anywhere in your house or office.
Mac OS X supports both Ethernet (wired) networking and AirPort (wireless) networking. I cover the former in this chapter, and you learn about wireless networking with AirPort in Chapter 18, “Wireless Networking with Mac OS X.”
There are two general steps to preparing a wired Ethernet network. The first is to connect the devices on that network using Ethernet cables, and this chapter assumes you’ve done that. The second is to configure the services you’ll be providing on the network, which is what you’ll learn here.
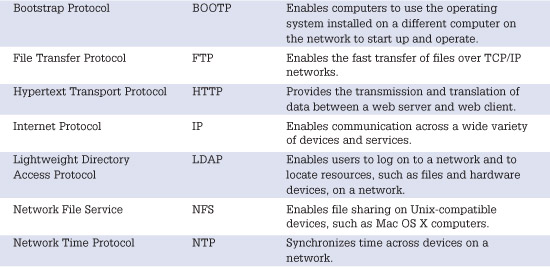
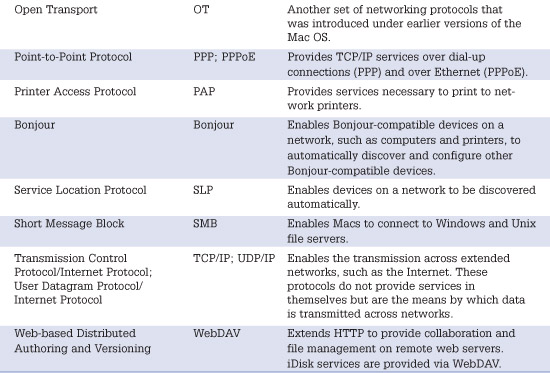
Mac OS X supports a variety, in both range and depth, of network services, as you can see in Table 17.1.
Table 17.1 Networking Services Provided by Mac OS X
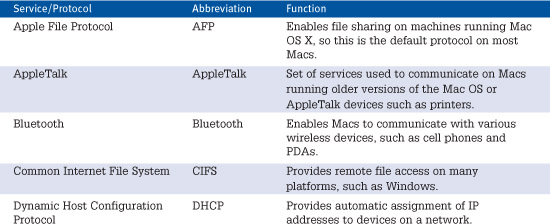
All the services listed in Table 17.1 can be useful, but in this chapter, you will learn how to implement the two services you are most likely to use: file sharing and FTP. After you’ve learned to configure these services, you can apply similar principles to configure additional services on your network.
Note
![]()
Support for SMB and CIFS enables you to integrate Macs onto Windows and Unix networks with no additional software installations. You can also integrate Windows computers into networks that mostly consist of Macs. See “Networking Mac OS X with Windows Computers,” later in this chapter.
Configuring and Using File Sharing
The Mac OS has long provided peer-to-peer file-sharing capabilities to enable Macintosh computers on a network to share files. Mac OS X provides robust file-sharing services along with more tools you can use to control and configure a network.
Note
![]()
Peer-to-peer file sharing implies that the files being shared are stored on workstations that people use to accomplish work. The other type of file sharing is based on a server/client arrangement in which the primary purpose of the server machine is to provide network resources, such as files to share. The technology involved is similar. If you are managing a relatively small network, you are probably not likely to have a dedicated server on it, but that’s okay because peer-to-peer file sharing works just as well for these kinds of networks.
Under Mac OS X, you can share files with Macs running Mac OS X, Macs running OS 9 and earlier, Windows file servers, and Unix file servers. For Macs running earlier versions of the Mac OS (such as Mac OS 9), you can use AppleTalk to share files. For Windows and Unix, you can use SMB and CIFS services.
When connecting to other Macs for file sharing, the machines communicate through either AFP or TCP/IP. To log in to a Mac OS X file-sharing machine serving files via TCP/IP, that machine must have an IP address. Typically, this IP address is assigned as part of connecting that machine to the Internet, such as by a DHCP server provided by a router or an AirPort Base Station.
Mac OS X includes support for Bonjour, which enables devices to seek out other Bonjour-compatible devices on a network and automatically configure access to those devices. All Macs that have Mac OS X version 10.2 or later are Bonjour-aware and can therefore take advantage of this technology to easily and quickly connect to other Macs. However, other devices, such as printers, can also support Bonjour, so those devices can be configured automatically as well.
Note
![]()
Bonjour is also being used in some “non-computer” devices. For example, TiVos use Bonjour.
AppleTalk is the Mac’s original network protocol and continues to be supported in Mac OS X. When you are connecting to Macs running OS version 8.6 or earlier, you have to use AppleTalk as support for file sharing over TCP/IP, which was added in Mac OS 9.0.
In Chapter 19, you will learn how to share an Internet account using a DHCP server. Such a server assigns IP addresses to the machines connected to it. The D stands for dynamic, meaning these addresses can change. This can make locating a specific machine by its IP address tough because each machine’s address can be changed by the DHCP server. Fortunately, with most DHCP servers, you can choose to manually assign IP addresses to the devices attached to it. When you do this, machines have the same IP address even though they are using a DHCP server to obtain that address.
Note
![]()
If other devices on your network, such as printers, have dynamic IP addresses assigned to them and you use the IP address to configure that device, you can lose the connection to those devices when the DHCP server assigns a new address to them. (This typically happens if the hub loses power for some reason or the device is removed from the network for a while.) In such cases, you need to reconfigure any computers that access the device with the new address assigned by the DHCP server. For such devices, consider assigning a static address that remains constant for that device.
With Bonjour, you don’t need to worry about the IP addresses of individual machines because your Mac seeks out the devices that are communicating on a network and automatically configures access to those devices.
To identify the current IP address of a Mac OS X machine, open the Network pane of the System Preferences application. Select a connection type from the Services list and the machine’s current IP address will be shown in the Status section (see Figure 17.1).
Figure 17.1 On the Network pane, you see the current IP address of a Mac OS X computer; the address is shown next to the active network port (in this case, the address is 10.0.0.110).

Configuring File Sharing on a Mac Running Mac OS X
To share the files stored on a Mac OS X machine, you must enable the Personal File Sharing service on that computer. This includes turning on the File Sharing service, naming the machine, and so on.
Tip
![]()
If your purpose in file sharing is one-way—for example, enabling others to download files from a specific machine but not to upload files to it—consider using FTP services on a machine rather than file sharing. You learn how to provide FTP services in a later section of this chapter.
The following steps assume that a Mac has access to the network (via Ethernet or AirPort) and that the default security privileges are in place on the file-sharing machine. You can change the default privileges for items you share to make them more or less available, as you will learn in a later section of this chapter.
To provide file-sharing services from a Mac running Mac OS X, do the following steps:
1. Open the System Preferences application.
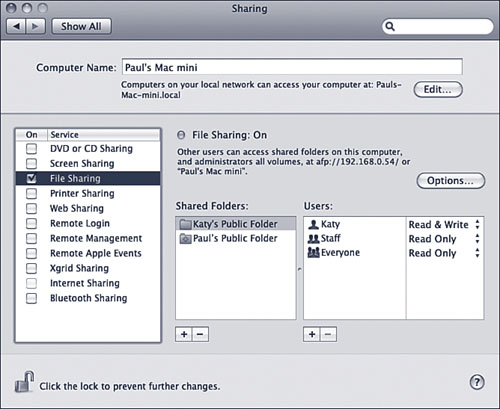
2. Click the Sharing icon to open the Sharing pane (see Figure 17.2). At the top of the pane is the computer’s name and just below that, its hostname.
Figure 17.2 You enable the network services a Mac provides by using the controls on the Services tab of the Sharing pane.
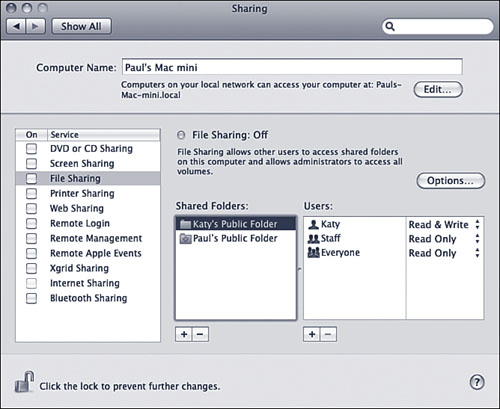
3. Provide the computer’s name by entering a name in the Computer Name text box; use a name that will help others on the network easily identify the machine. The default computer name is the first user’s name entered when the machine was registered, with an apostrophe, an s, and the word Computer (where computer is the type of Mac you have) tacked onto it. You can use the default computer name or change it to one you prefer.
After you provide a name, the machine’s hostname is automatically created. Some characters, such as spaces, aren’t allowed in a hostname, which is the name by which the machine is identified on the network. If you enter such characters in the computer name, the machine name that people see on the network won’t be exactly what you entered. For example, if you include a space in the computer name, it is replaced by a hyphen for the machine’s network name. The Mac automatically removes and replaces any disallowed characters.
4. If you want to manually enter a hostname, click the Edit button; then, in the resulting sheet, enter the hostname for the machine and click OK. The extension .local is added to the hostname you type to indicate that the host is on the local network.
5. Activate the On check box beside File Sharing. After a moment or two, you see the AFP address of the machine and the browsing name (which is the name by which others on the network will be able to identify the computer when they browse the network), as shown in Figure 17.3.
Figure 17.3 Activate the On check box beside File Sharing to enable file sharing for your Mac.
Using Firewalls and Network Services
If you have a firewall installed on the machine you are configuring as a server, you must configure that firewall to allow the type of access needed for others to access it from the network. For example, to enable the machine to provide file-sharing services, you must configure the firewall to allow machines from the network to connect to the file server. With some firewalls, you can allow access to specific services, such as AFP, only from specific IP addresses. All other requests for services will be denied.
If you use the Mac OS X built-in firewall, the services you enable on the Services pane are allowed automatically. You can use the Firewall tab of the Security pane to manually configure the services that are allowed if you need to.
If you use another type of firewall or configure the built-in firewall using another method (such as the Unix commands), you must enable access to the services you are providing through that firewall.
Similarly, if some machines on your network are connected through an AirPort Base Station, you won’t be able to access those machines from machines connected outside the network. Because an AirPort Base Station provides protection for the machines it connects, machines outside the network can’t see any of the machines on the network.
Always be aware of the security settings of the networks you are configuring and using. Sometimes, you can waste a lot of time troubleshooting a network problem that is actually a case of things working just as planned (such as when you try to figure out why no one can connect to a machine protected by a firewall that isn’t configured to allow those services to be accessed on the machine).
Accessing Shared Files from a Mac OS X Computer
There are two basic ways you can access shared files. One is to browse the network for available machines sharing files. The other is to move to the services on a machine directly using the URL for the specific service you want to access.
In either case, when you connect to a server, you must log in to that server to access its resources. You can log in under a user account that is valid for that server, or you can log in as a guest. When you log in under a valid user account, you have access to all the items on that machine just as if you were logged in to the machine directly (rather than over a network). If you are logged in as a guest, you can access only the items on the machine that allow public access, such as each user’s Public folder.
Note
![]()
To access a network resource by browsing, it must support Bonjour or SMB. If not, you have to access it by entering its URL via the Connect to Server command.
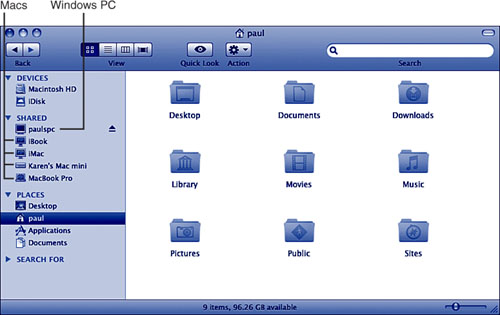
In Finder, the Shared section of the Sidebar always shows the network resources that are visible to your Mac (see Figure 17.4). You usually see two types of icons:
• Macs display an icon that indicates the type of Mac. For example, an iMac uses an icon that looks like an iMac, while a MacBook Pro displays a notebook icon.
• Windows PCs show a generic icon.
Figure 17.4 In Finder, the Shared section of the Sidebar shows an icon for each network computer your Mac can access.
To access shared files stored on a Mac OS X computer that is sharing its files from a Mac OS X machine by browsing the network, do the following steps:
1. Open a Finder window and select Go, Network or press Shift-![]() -K. The Network directory will appear. Depending on the network to which you are connected, you will see a number of icons representing various network resources available to you.
-K. The Network directory will appear. Depending on the network to which you are connected, you will see a number of icons representing various network resources available to you.
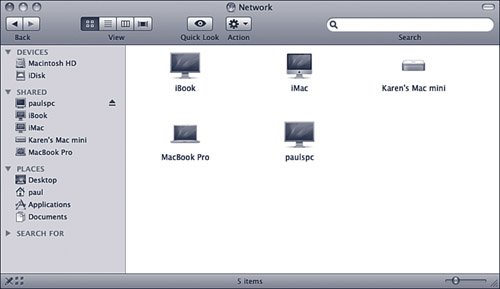
2. To access other Macs providing services, open the Network icon if you see it; if not, the individual servers with which you can work will appear directly under the Network folder. In either case, you will see the names of the computers on your network that are providing services to you (see Figure 17.5).
Figure 17.5 The Network folder provides access to other Macs providing services on your network; in this case, I can see an iMac on my network. Note you also see this iMac in the Shared section of the Sidebar.
Note
![]()
It can take a few minutes for your Mac to successfully browse the network to which it is connected. If you don’t see the resources you think you should after you start the browse process, refresh the Network window by moving away from it and then back again or by clicking its icon to update the list of available network resources.
3. Double-click the icon for the server and services you want to access. In most cases, Mac OS X connects you as a guest.
4. Click Connect As. The Connect to Server dialog box appears (see Figure 17.6).
Figure 17.6 You use this dialog box to log in to a server.
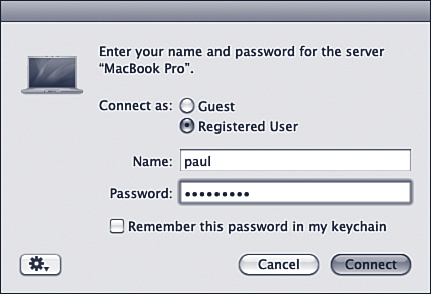
5. To log in as a registered user, which provides the same access to resources you would have when you log in directly to that machine, click the Registered User radio button and enter the username and password for the account under which you want to log in. Click Connect to connect to the server. A window appears that lists each volume or user’s Home folder (which is the Home folder of the user account under which you logged in) you can access (see Figure 17.7).
Figure 17.7 Log in to a network server to see its shared resources.

Tip
![]()
Activate the Remember This Password In My Keychain check box in the Connect to Server dialog box to add a network resource’s login information to your keychain. The next time you access that resource, the login information will be input automatically, so you can just click Connect to connect to it.
6. Open the folders available via the shared resource to work with them. For example, you can open files, drag them to your Mac to copy them, and so on.
For more precise access to services on a Bonjour machine (such as to choose to access FTP services when file sharing and FTP are being provided) or to access services on a machine that doesn’t support Bonjour, you can use a computer’s address to access it manually. To do so, perform the following steps:
1. From the Finder, select Go, Connect to Server (![]() -K) or open the Finder’s Dock menu and choose Connect to Server. The Connect to Server dialog box will appear (see Figure 17.8).
-K) or open the Finder’s Dock menu and choose Connect to Server. The Connect to Server dialog box will appear (see Figure 17.8).
Figure 17.8 Use the Connect to Server dialog box to move to servers by entering their URL.
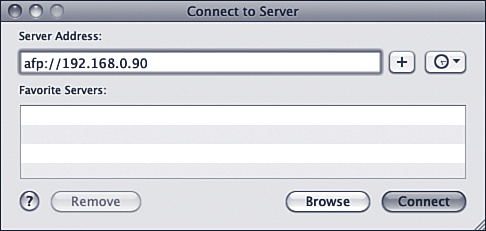
2. Type the server address you want to access in the Server Address box. The address you use depends on how you want to access the server. For example, to open all of a computer’s resources, type its hostname, which is hostname.local, where hostname is the hostname of the machine you are accessing. To access file-sharing services, use the URL for File Sharing services, which will be something like afp://192.168.0.55/. You can obtain the address for the specific service you want to access on the Sharing pane of the System Preferences application on the computer you are accessing over the network. Select the specific service you want to access and the related address will appear at the bottom of the pane.
3. Click Connect. Your Mac will attempt to locate the resource via the address you entered. You can monitor the progress of this via the Connecting to Server progress window. If the connection is made successfully, you see the Connecting to Server dialog box (see Figure 17.9).
Figure 17.9 Notice the progress window that indicates the Mac is trying to connect to the specified URL. Use this dialog box to log in to a network server.
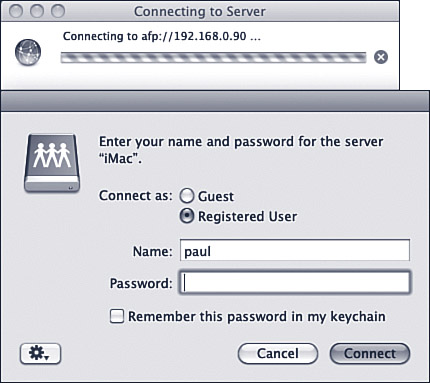
4. Enter the username and password for the account under which you want to log in and click Connect, or click the Guest radio button and click Connect instead. The server’s volumes that you can access appear in the Select Volume dialog box (see Figure 17.10). The resources that appear depend on the user account under which you are logged in. If you logged in as a guest, you can access only public resources.
Figure 17.10 The machine called iMac has a number of volumes that can be mounted on the computer being used to access that server.
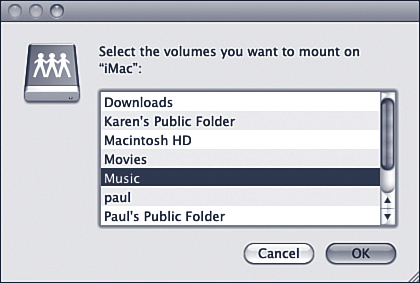
5. Select the volume you want to mount—hold down the Shift or ![]() key to select multiple volumes—and click OK. A Finder window opens and the volume you chose to access appears (see Figure 17.11).
key to select multiple volumes—and click OK. A Finder window opens and the volume you chose to access appears (see Figure 17.11).
Figure 17.11 Finder displays the shared volume from the network server.
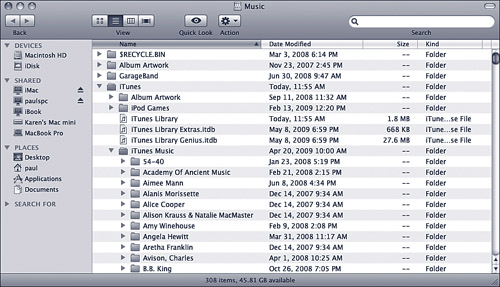
6. Access the network volumes just like those directly connected to or installed in your Mac.
Following are some additional tips about using a Mac OS X machine to access file-sharing services via the Connect to Server command:
• When you are logged in to a file-sharing machine, you can quickly choose other volumes to mount by clicking the server in the Shared section of the Sidebar. All of the volumes that you have access to are shown here, and you can then move to the resources you need.
• The address to which you most recently connected is remembered in the Connect to Server dialog box so you can reconnect to it by opening that dialog box and clicking Connect.
• To remove access to a network resource, click the Eject button shown next to it in the Shared section of the Sidebar, or select the mounted folder or volume and choose File, Eject or press ![]() -E.
-E.
• To log back in to the same file-sharing machine under a different user account, such as an administrator account, you must log off that machine and repeat the initial login process. You do this by ejecting all the mounted volumes provided by that server.
• At the upper-right corner of the Connect to Server dialog box is the Recent Servers pop-up menu (the Clock icon) that shows a list of the most recent servers you have accessed. You can select a server from this list to return to it, or you can clear the list by selecting Clear Recent Servers.
• Just below the Server Address box on the Connect to Server dialog box is the Favorite Servers list. You can add a server to your favorites list by entering its URL and clicking the Add to Favorites button (+). You can return to any favorite server by selecting it on the list and clicking Connect. Remove a favorite by selecting it and clicking the Remove button.
Tip
![]()
You can add a volume from a network server to the Login Items tab of the Accounts pane of the System Preferences application to mount that server each time you log in.
• You can place an alias to a networked volume on your Mac, such as by adding it to the Dock. When you open such an alias, you are prompted to log in to the server and, upon doing so, you can access that volume. If you add the password to your keychain, you will skip the login process.
Using the Network Utility to Assess Your Network
The Network Utility application provides a set of tools you can use to assess the condition of communication across machines on your network as well as a set of tools that enable you to get information about various sites on your network and the Internet.
When you launch the Network Utility (Applications/Utilities), you will see a window with eight tabs, one for each service the application provides (see Figure 17.12).
Figure 17.12 The Network Utility offers network information and troubleshooting tools.
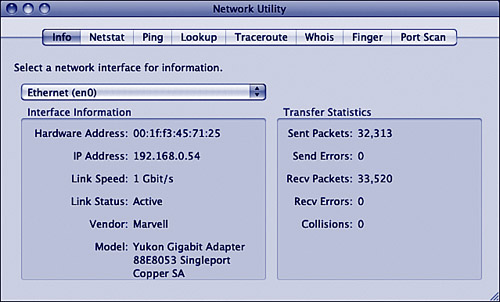
Table 17.2 summarizes the tabs in the Network Utility application.
Table 17.2 Tabs in the Network Utility Application

Covering each of these services in detail is beyond the scope of this chapter, but the next couple of examples should be helpful in getting you started using this tool.
Checking Network Connections with Ping
Troubleshooting network problems can be difficult because identifying where the source of the problem is can be hard—for example, with the machine you are using, with the machine you are accessing, with an application, and so on. Ping is a way to check on the fundamental communication between two machines. If the ping is successful, you know that a valid communication path exists between two machines. If it isn’t successful, you know that a fundamental problem exists with the communication between the machines, and this helps you know where to troubleshoot.
To ping a machine, perform the following steps:
1. Open the Network Utility application and click the Ping tab.
2. Enter the IP address or URL for the machine you want to ping.
3. Click Send an Unlimited Number of Pings to send a continuous number of pings, or click Send Only X Pings and enter the number of pings if you want to send a specific number.
4. Click Ping.
Watch the results in the lower part of the window. You will see your machine attempt to communicate with the machine whose address you entered. If they are able to successfully communicate, you see statistics about how fast the pings are (refer to Figure 17.13). If the pings are successful, you know the communication path between the machines is valid. If not, you know you have a fundamental connection problem between the two machines.
Figure 17.13 Ping is a useful way to test your connection to another machine (in this case, I pinged 192.168.0.90, which is another Mac on my network).

Tracing a Route with Traceroute
Sometimes looking at the specific route between two machines can help identify the source of problems you might be having:
1. Open the Network Utility application and click the Traceroute tab.
2. Enter the domain name or IP address to which you want to trace a route.
3. Click Trace. The lower pane of the window will be filled with information that shows each step of the path from your machine to the one whose information you entered (see Figure 17.14).
Figure 17.14 This Traceroute window shows the path from my machine to www.wordspy.com.

Understanding and Setting Permissions
Access to items on your Mac OS X machine, whether from the machine directly or over a network, is determined by the access privileges set for those items. Three levels of access privilege can be set for any item; these are the following:
• Owner
• Group
• Others
The owner is the owner of the item. When you are the owner of an item, this will be your short username followed by (Me).
The group is a set of users. By default, Mac OS X includes several groups for which various permissions are assigned to different volumes and directories. Many of these default groups look odd, and some are even nonexistent (for example, in certain places, you will see Members of group “”). You can also create your own groups and place users in those groups to provide access to a collection of people.
![]() To learn about creating user groups, see “Creating Groups of Users,” p. 455.
To learn about creating user groups, see “Creating Groups of Users,” p. 455.
Others include those users who are neither the owners nor members of a group.
For any object, there are four levels of access that can be assigned to people or groups:
• Read & Write—This is the broadest level of access and lets the user to whom it is assigned read and write to the item to which it is assigned.
• Read only—This privilege lets a user see items in a directory but not change them. For example, if a user has read-only access to a folder, they can copy its files, but they can’t change the files stored in that folder. If this permission is applied to a file, the user can open the file, but not make any changes to it.
• Write only (Drop Box)—With this access, a user can place items in a directory but can’t see the contents of that directory. By default, each user has a Drop Box folder in the Public folder in her Home folder.
• No Access—The user can’t do anything with the item, including seeing it.
If you open the Info window for an item and expand the Ownership & Permissions area, the current access permissions for the item will be shown. For example, Figure 17.15 shows the Permissions information for a document, whereas Figure 17.16 shows similar information for the current startup volume.
Figure 17.15 This Info window for a document shows that the user account paul (Me) has Read & Write access, but the staff and everyone accounts have Read only access.
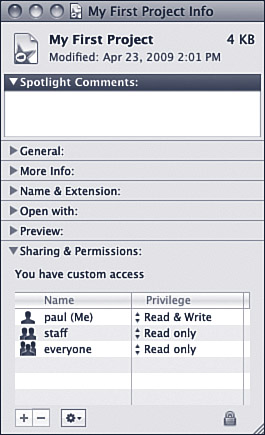
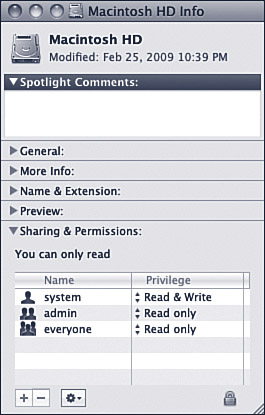
Figure 17.16 This info window for the current startup volume shows that only the root account (system) has Read & Write access, but the administrator account (admin) and the everyone account have Read Only access.
There are several things you need to know about the Ownership & Permissions information shown in the Info window.
First, unless you are logged in under the root or administrator account, you can’t use the pop-up menus to change the permissions assigned to items on the Mac OS X startup volume above the current user’s Home directory. However, when you open the Ownership & Permissions area of the Info window for an item on another volume or within a user’s Home directory, the pop-up menus become active and you can use them to change the privileges for the items that folder contains. You can select the user or group on the pop-up menu in the Name column and set the privilege for that user or group using the pop-up menu in the Privilege column.
You can add more users or groups to the list, or remove users or groups from the list, using the Add (plus) or Remove (minus) buttons at the bottom of the Info window.
Second, the groups you see in the Info window are default groups created when you install Mac OS X. The user accounts that are members of these groups can access the item with the group’s privileges. You can use the Accounts pane of the System Preferences application to create and manage user groups.
To configure access privileges for most items, you need to either be logged in as an administrator or authenticate yourself in the Info window.
To set the access privileges for any item, perform the following steps:
1. Log in under an administrator or the root account.
2. Select the item for which you want to set permissions and press ![]() -I.
-I.
3. Expand the Ownership & Permissions section in the Info window.
4. If you are the owner of the item, use Privilege pop-up menu to set your access to the item.
5. If you select the Add button at the bottom of the Name column, you see the People tool. This tool presents all of the contact information in your Address Book along with all the user accounts and groups you have created on your Mac. Find the user with which you want to share the item, select it, and click Select. The person you selected will be shown on the user list and you can configure the user’s permission.
6. Use the pop-up menu in the Privilege column to set the access permission for the user or group you selected (see Figure 17.17).
Figure 17.17 Use the pop-up menus in the Ownership and Permissions section of the Info window to set access permission for people and user groups.

7. To add additional users or groups, click the Add button (the plus sign). Then choose the user or group and select the access permission.
Tip
![]()
Under Mac OS X, you can open multiple Info windows at the same time. This is a handy way to compare and contrast the permissions provided for different items.
8. To remove a user or group from the list, select it and click the Remove button (the minus sign).
9. Continue adding, configuring, and removing users and permissions until you have configured all the permissions for the item.
Networking Mac OS X with Windows Computers
Because support for Windows and Unix file-sharing protocols is built in to Mac OS X, using a Mac on a Windows or Unix network is easy. It is simple to add a Windows computer to a Mac-based network.
Sharing Files with Windows Computers
You can use Mac OS X to access files provided on a Windows computer on your network via the SMB protocol without doing any additional configuration. To use files provided on a Windows or Unix network that uses SMB, perform the following steps:
1. Connect your Mac OS X machine to the network.
2. Open the Connect to Server dialog box and click Browse. Depending on the SMB servers on your network and how the network is configured, the SMB servers might or might not appear in the list of available servers when you browse the network, so you might have to enter the server address manually.
3. If you don’t see the SMB server to which you want to connect, enter the address of the server to which you want to connect; the form of the address is smb:// where ServerName/ShareName/ServerName is the IP address for the Windows machine you are attempting to access, and ShareName is the name of the item being shared with you, such as a volume or folder.
Tip
![]()
To determine the IP address (ServerName) for a Windows machine, open the Command Prompt window, type ipconfig, and press Enter. The IP address of the Windows machine will be shown.
4. Click Connect. You are prompted to enter your workgroup/domain, username, and password for that server.
5. Enter the required information and click OK. You are logged in to the shared resource and can use the files it contains just like a Mac that is acting as a file server.
Note
![]()
Connecting to Windows computers can be problematic depending on the specific network you are using. If the preceding steps don’t enable you to connect to a Windows computer, try using the Apple support document located at the following address: http://docs.info.apple.com/article.html?artnum=106660.
To enable Windows users to access files stored on your Mac, carry out the following steps:
1. Open the Sharing pane of the System Preferences application.
2. Click on the File Sharing service in the Services list. Click on the Options button.
3. On the resulting sheet, click the Share Files and Folders Using SMB (Windows) check box, as shown in Figure 17.18.
Figure 17.18 Activate the Share Files and Folders Using SMB check box to share your resources with Windows PCs.

4. You must enable a user account for Windows sharing to be accessed from a Windows computer. Check the On check box for a user account that you want to be accessible from a Windows computer. A password sheet appears.
5. Enter the password for the account and click OK.
6. Repeat steps 4 and 5 for each account you want to enable.
7. When you have finished enabling accounts, click Done to return to the Sharing pane of the System Preferences application. Take note of the IP address to provide to users so they can access your Mac from their Windows computer.
8. Provide the user account, password, and address to the Windows users you want to be able to log in.
A Windows user can use the URL, username, and password you provided to log in to your Mac to share files just like Macs on your network (see Figure 17.19).
Figure 17.19 This Mac is being accessed from a Windows 7 computer.

Accessing Virtual Private Networks
Virtual Private Network (VPN) service enables networked computers to access file servers, email servers, and other network resources over a WAN connection just as machines connected via a LAN can. Using Mac OS X, you can connect a Mac to a VPN. To access a VPN, perform the following steps:
1. Open the Network pane of the System Preferences application.
Note
![]()
Before you will be able to access a VPN, you’ll need to talk to that network’s administrator to get all of the information you will need such as connection method, address, user name, password, and so on.
2. Click the plus sign to Add a Service at the bottom of the Services list.
3. On the resulting sheet, select VPN from the Interface pop-up menu. When you do, you will be presented with two additional pop-up menus to work with.
4. Use the VPN Type pop-up menu to specify which VPN protocol to use. Your network administrator should specify which to use. L2TP over IPSec is more secure.
5. Enter a name for the service. This name will appear in the Services list on the Network pane.
6. Click the Create button. You will return to the Services list and the new VPN service will be selected.
7. Enter a Server Address. This can be in the form of a URL or an IP address.
8. You may need to enter an Account Name. Some VPN servers that you might connect to require this.
9. Click the Authentication Settings button to configure how you log in to the VPN. Use the information provided by your network admin to configure this sheet. Click OK when you are done.
Tip
![]()
If you use VPN regularly, add the VPN status menu to the Finder menu bar by activating the Show VPN Status in Menu Bar check box in the Internet Connect window.
10. Click Connect. You will be connected to the VPN and should be able to access the resources on the remote network.