
30. Working with Mice, Keyboards, and Other Input Devices
Choosing an Input Device
An input device is any device you use to move data into your Mac. Some input devices enable you to input data to create documents, images, movies, and so on. The other type of data input devices enables you to control your Mac.
In the context of this chapter, the term input device refers to the essential devices you use to input data and to control your Mac. Other sorts of input devices used only for data input, such as cameras, scanners, and so on, are covered elsewhere in this book.
Note
![]()
Introduced in Mac OS X version 10.2 was the built-in handwriting recognition system called Ink. Now called Inkwell, this technology allows you to use a tablet to write or draw and the Inkwell system converts your writing into text and graphics. Because of space limitations, I can’t provide detail about using Inkwell in this chapter. However, if you have a graphics tablet, you can use the Ink pane of the System Preferences application to configure Inkwell. Then, you can write on your graphics tablet to input text and graphics and to control your Mac.
There are two types of essential input devices: keyboards and mouse devices. However, many varieties of each device exist, and in the case of mouse devices, some of the varieties are hardly recognizable as being a device of that type. There are other types of input devices you might want to use, such as a graphics tablet.
Many of the devices described in this chapter use the USB interface.
Since Mac OS X version 10.2, Mac OS X has supported wireless devices that use Bluetooth technology. Many of these devices are available, including keyboards, mouse devices, PDAs, cell phones, and so on. Bluetooth enables your Mac to wirelessly communicate with multiple devices at the same time.
Choosing, Installing, and Configuring a Keyboard
The keyboard is one of the most fundamental, and at the same time, simplest devices in your system. You are likely to spend most of your “Mac” time pounding on its keys, so it pays to make sure you have a keyboard you like.
Choosing and Installing a Keyboard
All Macs come with a keyboard of one type or another, so if you are happy with the keyboard that came with your Mac, there is no need to consider another type. The most recent Apple Keyboard combines a very nice feel with good ergonomics and features. The Apple Keyboard also provides several control keys, which are the mute, volume, and eject keys; these are located along the top of the number pad. And it looks pretty cool, too. Apple has also recently introduced the Apple Wireless Keyboard, which connects to your Mac using Bluetooth wireless technology.
However, other types of keyboards are available, such as those designed for maximum ergonomics, to provide additional controls (such as an Internet button), and so on.
Many modern keyboards use the USB interface, so installing a keyboard is a trivial matter of plugging it in to an available USB port. Some keyboards are wireless; two basic types of these devices are available. One type includes a transmitter you plug in to a USB port. The other type, such as the Apple Wireless Keyboard, uses Bluetooth. The advantage of Bluetooth is that you don’t consume a USB port and can communicate with many Bluetooth devices at the same time. The disadvantage is that your Mac must have a Bluetooth module built in or have a Bluetooth adapter installed.
If at all possible, you should obtain a wireless keyboard; being without wires is very freeing, especially if you move your keyboard or mouse around much. And who needs all the clutter that so many wires bring? If you use a USB-based wireless keyboard, connect its transmitter to a USB port and then use its controls to get the transmitter and keyboard communicating. If you use a Bluetooth keyboard, use the Bluetooth configuration tools to install and configure it.
![]() To learn more about Bluetooth devices, see “Choosing, Installing, and Using Bluetooth Devices,” p. 601.
To learn more about Bluetooth devices, see “Choosing, Installing, and Using Bluetooth Devices,” p. 601.
If the keyboard you select includes additional features, such as additional buttons and controls, it probably also includes software you need to install. This typically adds a new pane to the System Preferences application that you use to configure the device. An example of this is provided in the next section.
Configuring a Keyboard
With the Keyboard pane of the System Preferences application, you can change the key repeat rate and the delay-until-repeat time. You can also configure the function keys and set the language in which your keyboard is configured. Here’s how:
1. Open the System Preferences application, click the Keyboard icon to open the Keyboard pane, and click the Keyboard tab if it isn’t selected already (see Figure 30.1).
Figure 30.1 Use the tabs on the Keyboard preferences pane to configure your keyboard.
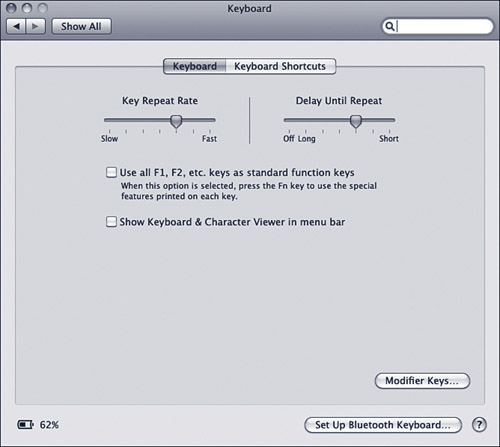
2. Use the Key Repeat Rate slider to set how fast a key repeats itself. Move the slider to the right to cause keys to repeat more quickly.
3. Use the Delay Until Repeat slider to set the amount of time it takes for a key to repeat itself. You can test your settings in the text area below the sliders.
4. If you prefer to use your keyboard’s Fn (F1, F2, and so on) keys as standard function keys rather than to invoke the special features printed on each key, activate the Use All F1, F2, Etc. Keys as Standard Function Keys check box.
5. If you want easy access to the Character Viewer and the Keyboard Viewer utilities, activate the Show Keyboard & Character Viewer in Menu Bar check box.
6. Click the Modifier Keys button. The Modifier Keys sheet appears.
7. For each of the four modifier keys (Caps Lock, Control, Option, and Command), select the action that you want to occur when you press that key. The options are one of the modifier keys or No Action. For example, if your keyboard preference is such that the Control key is more convenient for you, you might want to set it to be the Command key since you use that key more frequently. You can select No Action to disable a key.
8. Click OK to set your preferences and close the sheet.
Note
![]()
If you rarely use the Caps Lock key, but find that you often press it accidentally and end up with a string of uppercase letters, consider either disabling the key or using it as an alternate ![]() key.
key.
Configuring Keyboard Shortcuts
One of the best things you can do to increase your personal productivity is to learn to use keyboard shortcuts, and I’ve shown you many Mac OS X shortcuts throughout this book. You should take the time to learn and practice the shortcuts for the OS, as well as shortcuts for any applications you use frequently. The Mac Help Center also lists some keyboard shortcuts if you need to look them up.
Using the Keyboard Shortcuts tab of the Keyboard pane, you can configure many of the available keyboard shortcuts. You can enable or disable some of the standard keyboard shortcuts and add keyboard shortcuts for commands in applications you use.
Using the Full Keyboard Access feature, you can access the interface elements with the designated keys. Open the Keyboard pane of the System Preferences application and click the Keyboard Shortcuts tab (see Figure 30.2). You see a list of standard Mac OS X keyboard shortcuts in a number of areas, such as Screen Shots, Universal Access, Keyboard & Text Input, and so on.
Figure 30.2 Use the Keyboard Shortcuts tab to configure your own keyboard shortcuts.

Disable any of the listed shortcuts by deactivating the shortcut’s check box. Typically, you would do this when that shortcut conflicts with a shortcut in an application you use. For example, the default shortcut to capture the screen to an image file is Shift-![]() -3. However, one of the most popular Mac screenshot applications—Snapz Pro X—also uses this shortcut by default. So if you use Snapz Pro X instead of the Mac OS X built-in shortcut, you’d disable the default screenshot shortcut so it won’t interfere with the default Snapz Pro X shortcut.
-3. However, one of the most popular Mac screenshot applications—Snapz Pro X—also uses this shortcut by default. So if you use Snapz Pro X instead of the Mac OS X built-in shortcut, you’d disable the default screenshot shortcut so it won’t interfere with the default Snapz Pro X shortcut.
![]() To see an explanation of the standard keyboard shortcuts you can configure and use, see “Getting the Most from Keyboard Shortcuts,” p. 606.
To see an explanation of the standard keyboard shortcuts you can configure and use, see “Getting the Most from Keyboard Shortcuts,” p. 606.
In the Keyboard & Text Input section, many of the commands start with the phrase Move Focus To. Moving the focus means highlighting the item that you want to access via the keyboard. For example, if you want to use the keyboard to access a menu command for which a keyboard shortcut isn’t defined, you can press Control-F2 (the default) to highlight the first item on the active menu bar, which is always the Apple menu. Then use the right arrow key to select the menu you want to open. Then press the down arrow key to open the menu and move to the command you want to activate. Press Return to activate the command.
![]() For more on navigating the screen using the keyboard, see “Using Keyboard Navigation,” p. 607.
For more on navigating the screen using the keyboard, see “Using Keyboard Navigation,” p. 607.
Configuring Your Keyboard’s Language Settings and the Input Menu
You can configure the languages you use for the keyboard along with other input preferences using the International pane of the System Preferences application. You can also configure the Input menu, which enables you to quickly choose among languages and select some other handy keyboard tools:
1. Open the Language & Text pane of the System Preferences application.
2. On the Language tab, move the language you want to be the default to the top of the list by dragging it there. Move the other languages on the list to set the order in which they are used.
3. Click the Input Sources tab. Use this area to show the Input menu on the Finder menu bar and to configure the items you see on it (see Figure 30.3).
Figure 30.3 You can configure the Input menu with the Input Sources tab of the International pane.

4. Activate the Show Input Menu in Menu Bar check box.
5. Activate the boxes next to the other languages you want to be available on the Input menu.
6. Activate the Keyboard & Character Viewer check box to add that to the menu. The Keyboard Viewer shows you the keys for a selected font; the Character Viewer enables you to select, configure, and use special characters like accent marks.
7. If you want to change the keyboard shortcuts for selecting the source on the Input menu, click Keyboard Shortcuts and use the controls you learned about in the previous section to set the appropriate keyboard shortcuts.
When you open the Input menu, which is indicated by a flag representing the language you have made the default, you will see the items you configured there (see Figure 30.4). You can change the current input source, which is indicated by the check mark, to a different one by selecting a different source on the menu. You can open the Character Viewer or Keyboard Viewer by selecting the command from the Input menu for the item you want to show. If you select Show Input Source Name, the source name appears as the menu title in addition to the flag icon.
Figure 30.4 The Input menu enables you to select the language setting for your keyboard and open the Character Viewer and Keyboard Viewer.

Choosing, Installing, and Configuring a Mouse
When the Mac was first introduced, its mouse separated it from all the computers that came before it, and those that came after it, for a long time. Until Windows and other platforms adopted the mouse as one of their primary input devices, the Mac and its mouse really stood out from the crowd. Now, Apple’s Mighty Mouse stands out because its design and controls are quite different from most other mice.
Choosing and Installing a Mouse
All desktop Macs come with the Apple Mighty Mouse. This is an optical mouse, which means it uses light to translate your movements into input information (as opposed to the rolling ball in previous generations of mouse devices). The Apple Mighty Mouse uses the entire top half as its two “buttons,” which makes using it even easier, and it shares the same clear or white plastic look as the Apple keyboard. It also includes a tiny scroll ball that you can use to scroll vertically or horizontally and you can press the ball down for an additional button control. There is yet another button at the base of the mouse on each side (though there are two buttons, they perform the same action).
Whatever mouse you use, I strongly recommend that you get a mouse that has at least two buttons. The ability to right-click things to activate contextual menus and to perform other commands is much more convenient than using a key and clicking the single mouse button. Plus, if you use a mobile Mac, you might want to add a mouse for those times when you are using your notebook at a desk.
There are three main considerations when choosing a mouse.
One is its comfort in your hand. Mouse devices come in various shapes and sizes. Using one that is suited to your own hand cuts down on fatigue in your hand and lower arm.
Another factor is the number of buttons and other features on the mouse. Apple’s mouse devices all provide four mouse buttons, but other mouse devices come with even more or fewer buttons. These buttons can be programmed to accomplish specific tasks, such as opening contextual menus. Also, most mouse devices include a scroll wheel that enables you to scroll in a window, such as a web page, without moving the mouse (the Mighty Mouse’s scroll ball enables you to scroll in two directions).
Because support for a two-button mouse with a scroll wheel is built in to the OS (even though you won’t find this indicated on the Mouse pane of the System Preferences application unless you have such a device installed), you should get at least a two-button mouse. This makes opening contextual menus, which are used throughout the OS and in most applications, much easier. Even better, get a mouse that includes a scroll wheel or a scroll ball like the Mighty Mouse has. This makes scrolling much more convenient and faster at the same time.
Third, you need to decide whether you want a wireless mouse. Because of the amount of time you spend moving a mouse, you should really consider a wireless mouse. Getting rid of the wire provides much more freedom of movement for you. As with keyboards, two types of wireless mouse devices are available—those that use a USB transmitter and those that use Bluetooth (such as Apple’s Wireless Mouse).
Like installing a keyboard, installing a mouse isn’t hard.
If you use a wired mouse, just plug it in to an available USB port; Apple keyboards include USB ports that you can use for this. If you use a USB-based wireless mouse, plug its transmitter in to an available USB port and use its controls to get the mouse and transmitter communicating.
Note
![]()
Apple’s wireless keyboard and mouse use Bluetooth to communicate with a Mac. You must purchase these devices separately. Hopefully, someday soon Apple will include Bluetooth support into all Macs and include the wireless keyboard and mouse for all desktop models.
If you use a Bluetooth mouse, use the Bluetooth configuration controls to set it up.
![]() To learn more about Bluetooth devices, see “Choosing, Installing, and Using Bluetooth Devices,” p. 601.
To learn more about Bluetooth devices, see “Choosing, Installing, and Using Bluetooth Devices,” p. 601.
Configuring a Mouse
Configuring a mouse is much like configuring a keyboard; however, if you use a mouse that offers additional features, you need to install and configure the software that comes with that device first to take advantage of all its features. Without this software, the second button and scroll wheel will likely work as you expect, but more advanced features might not work.
To configure an Apple Mighty Mouse, do the following:
1. Open the Mouse pane of the System Preferences application (see Figure 30.5).
Figure 30.5 In System Preferences, open the Mouse pane to configure your mouse.
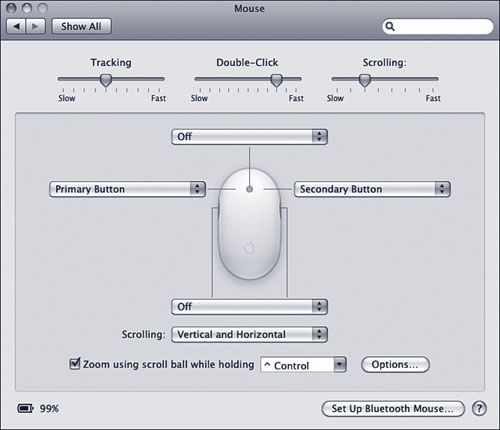
2. Use the Tracking slider to set the tracking speed of the mouse. A faster tracking speed means that the pointer moves farther (faster) with less movement of the mouse.
3. Use the Scrolling slider to set the speed at which the scroll ball scrolls. Moving the slider to the right makes the scroll action faster, meaning you move up or down or across the screen faster.
4. Use the Double-Click slider to set the rate at which you have to click the mouse buttons to register a double-click.
5. Click the pop-up menu for the left mouse button and choose the action that you want to be performed when you click the button. For example, if you want the left button to be your primary button, choose Primary Button (which is the default). Other actions include:
• Secondary button—Choose this to have a button perform the secondary action, such as opening an item’s contextual menu.
• Exposé—Choose Exposé actions to trigger Exposé. The All Windows option minimizes all windows on the desktop; the App Windows minimizes all windows open in the current application and presents them on the desktop; and the Desktop option shows the desktop.
• Dashboard—Choose this option to open the Dashboard when you press the button.
• Application Switcher—This option causes the Application Switcher to open so that you can quickly move among your open applications.
• Spotlight—This action moves you into Spotlight so you can search for information.
• Other—If you choose Other, you’re prompted to select a script or other executable file to associate with the button. For example, if you’ve created an application with Automator, you can associate it with a mouse button so it runs when you click that button.
6. Using the same menu options, configure the action for the right button, the side buttons, and the scroll ball button (when you press on the scroll ball).
Note
![]()
Mobile Macs use a trackpad instead of a mouse (although you can connect a mouse to one of these machines just as you can any other Mac).
7. If you want to be able to zoom using the scroll ball, activate the Zoom Using Scroll Ball While Holding check box and choose the modifier key you’ll need to press to trigger zooming on the pop-up menu. Click the Options button and use the resulting sheet to control how zooming occurs. You can control how the screen image moves when zoomed (stays with pointer, moves when the pointer reaches an edge, or so the pointer is always at the center of the image). Activate the Smooth Images check box to have your Mac smooth zoomed images. Click Done to save your zoom preferences.
Note
![]()
Two of the best input device makers are Logitech and Kensington. You can learn more about their products at their websites: www.logitech.com and www.kensington.com.
![]() For information about working with a trackpad, see “Using and Configuring the Trackpad,” p. 555.
For information about working with a trackpad, see “Using and Configuring the Trackpad,” p. 555.
Caution
![]()
If you experience fatigue or pain when using any input device, make sure that you experiment to see whether you can find a more comfortable position for the device. If you can’t, consider replacing the device with another type that is more suited to you. Discomfort, even of a mild nature, can indicate that some damage is being done to your body. If this happens over a long period of time, you can end up with serious health problems.
If you do experience problems, consider obtaining several different devices and set up positions among which you can rotate so you can avoid repeating exactly the same actions over an extended period of time. For example, you might want to have both a mouse and a trackball and switch between those devices every so often
Choosing, Installing, and Using a Trackball
Trackballs are really upside-down, roller-bearing mouse devices. Instead of the ball being inside the body (modern mice don’t use a ball any more, but I’m sure you get the idea), the ball is on the top of a trackball style mouse and you move just the ball instead of the mouse body. Trackballs have several advantages over mouse devices. Because you don’t actually move the trackball itself, it takes up less space than a mouse does. And you don’t have to lift it up to move it when you run out of room or reach. Because your hand remains stationary, you don’t rub the sensitive areas of your wrist across the edge of your desk, which can lead to damage of the tissues in your forearm. Trackballs also have more than one button, and you can program the other buttons to perform various functions. For example, you can set a button to add a modifier key when you click with the trackball. In addition, trackballs can move the cursor either more quickly to cover more screen real estate or more slowly to give you more precise control than a mouse.
Choosing a trackball is similar to choosing a keyboard or mouse (except that desktop Macs don’t ship with a default trackball). Look for one that fits your hand and has the features you want—such as the number of buttons it has.
Installing trackballs is also similar to installing keyboards and mouse devices. You attach the device through an available USB port and then install and configure its software. Some of these devices are wireless and are set up similarly to wireless keyboards and mouse devices.
Providing Universal Access
You can use the Universal Access pane of the System Preferences application to configure input devices in different ways to enable those with disabilities to be better able to use a Mac. For example, you can use the Sticky Keys feature to cause a series of modifier key presses (such as ![]() or Option) to be treated as if those keys were pressed at the same time. You can also use Mouse Keys to enable the pointer to be moved with the keyboard for folks who have difficulties using a mouse.
or Option) to be treated as if those keys were pressed at the same time. You can also use Mouse Keys to enable the pointer to be moved with the keyboard for folks who have difficulties using a mouse.
![]() For the details of configuring Universal Access, see Chapter 24, “Making Your Mac Accessible to Everyone,” p. 495.
For the details of configuring Universal Access, see Chapter 24, “Making Your Mac Accessible to Everyone,” p. 495.
Choosing, Installing, and Using Bluetooth Devices
Bluetooth is a wireless communication standard used by many devices, including computers, keyboards, mouse devices, personal digital assistants (PDAs), cell phones, printers, and so on. Mac OS X is designed to be Bluetooth capable so your Mac can communicate with Bluetooth devices, such as to synchronize your iCal calendar on your Mac with the calendar on your Palm PDA.
Preparing for Bluetooth
Two elements are required to be able to use Bluetooth devices:
• The software component, which is installed as part of Mac OS X.
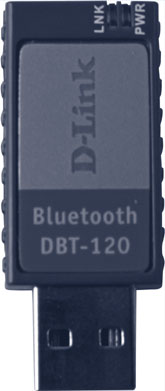
• The hardware component, which is the transmitter and receiver that sends and receives Bluetooth signals. Most Mac models have this device built in. For those models, you don’t need anything else. For models without this, however, you need to obtain and install a Bluetooth USB adapter. This device connects to a USB port and enables a Mac to send and receive Bluetooth signals (see Figure 30.6).
Figure 30.6 For less than $40, you can add Bluetooth support to any Mac that has USB ports and is running OS X.
Bluetooth communication is set up between two devices—a single device can be communicating with more than one other Bluetooth device at the same time. Each device with which your Mac communicates over Bluetooth must be configured separately so your Mac recognizes that device and that device recognizes your Mac.
Two steps are involved in setting up Bluetooth. First, configure Bluetooth for your Mac using the Bluetooth pane of the System Preferences application. Then configure your Mac to work with each Bluetooth device you want to use.
Configuring Bluetooth on Your Mac
When your Mac recognizes that it has the capability to communicate via Bluetooth, the Bluetooth pane appears in the System Preferences application (see Figure 30.7). Use this to configure the general aspects of Bluetooth on your Mac and to see the list of devices your Mac recognizes.
Figure 30.7 Use the Bluetooth pane of the System Preferences application to control general aspects of Bluetooth on your Mac.

Note
![]()
If your Mac isn’t capable of using Bluetooth, the Bluetooth pane won’t appear in the System Preferences application.
Use the Bluetooth pane to configure your Mac’s Bluetooth configuration. It includes the following controls:
• Bluetooth Power—Use the On check box at the top of the pane to turn Bluetooth services on or off. Obviously, Bluetooth has to be turned on for your Mac to be able to communicate with Bluetooth devices.
Tip
![]()
In most cases, the default settings will work for you. You should try to configure a Bluetooth device before you adjust your Mac’s Bluetooth settings. If it doesn’t work properly, come back to these controls to make adjustments.
• Discoverable—Activating this check box makes your Mac “discoverable” by other devices because your Mac transmits signals that other devices can detect. If you don’t want this, you can deactivate the check box. For example, if you work in a area in which there are many Bluetooth devices, you might want to hide your Mac so other devices won’t be able to detect it. You can still connect to your configured Bluetooth devices when this box is unchecked; your Mac just won’t be capable of being detected by other devices automatically.
• Devices List—If you have already configured your Bluetooth devices to communicate with your Mac, you see them in this list (assuming they are turned on). If you have not yet paired your device to your Mac, you can click Add (the plus sign) to open the Bluetooth Setup Assistant to guide you through this process.
• Advanced—Several additional configuration options are available on the Advanced sheet of the Bluetooth pane. If your primary keyboard and mouse connect to your Mac with Bluetooth, you can have the Bluetooth Setup Assistant start automatically if your Mac doesn’t recognize a keyboard or mouse. You can make sure that your keyboard or mouse can wake your Mac. You can even share your Internet connection with Bluetooth devices. Explore the Advanced sheet to see what settings make the most sense for your computer.
• Bluetooth menu—Activate the Show Bluetooth Status In the Menu Bar check box to add the Bluetooth menu to the menu bar.
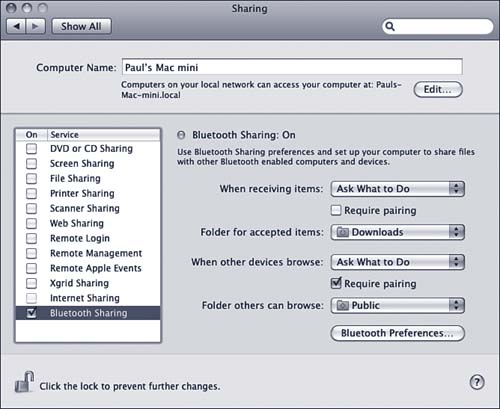
Many Bluetooth interactions allow the transfer of files between the devices. Configure this using the Sharing pane of the System Preferences application (see Figure 30.8). For example, you can use these settings to move files from your Mac to a Bluetooth cell phone or PDA.
Figure 30.8 Use the Sharing pane of the System Preferences application to configure file transfers over Bluetooth.
Installing a New Bluetooth Device
Before your Mac can communicate with a Bluetooth device, that device must be configured on your Mac. And because Bluetooth devices are paired, your Mac must also be configured on the Bluetooth device with which you are communicating. After you have established a pair, your Mac can communicate with its partner via Bluetooth, and vice versa.
To set up a new device, use the Bluetooth Setup Assistant. The general steps to do this are the following:
1. Open the Bluetooth Setup Assistant by either clicking the Add (+) button on the Bluetooth pane of the System Preferences application or selecting Set up Bluetooth Device on the Bluetooth menu. The Bluetooth Setup Assistant opens (see Figure 30.9).
Figure 30.9 The Bluetooth Setup Assistant walks you through the steps required to set up a Bluetooth device.

2. If you see your device in the list (it might take a minute or two for your Mac to discover it), skip to step 5; otherwise, click Continue.
3. Select the type of Bluetooth device you want to set up, such as Mouse, Keyboard, Mobile phone, or one of the other devices listed, and then click Continue. Your Mac searches for available Bluetooth devices.
4. If the device is not auto-discoverable (most mice and keyboards are not), press the communicate button on the device. This causes the device to start broadcasting a Bluetooth signal that your Mac can detect. As your Mac discovers devices, they are listed in the search results pane of the Bluetooth Setup Assistant window. The devices should be easily recognizably by their names, such as Kensington PocketMouse For Bluetooth when a mouse of that type is detected.
5. Select the device you want to configure and click Continue.
6. Follow the onscreen instructions to configure the device. When the process is complete, the devices can communicate. When Bluetooth devices are connected as a trusted pair, the same passkey is required on each device for those devices to communicate. Depending on the device, you may need to enter a passcode the Mac generates and shows in the assistant window on the device or enter a passcode the device generates on the Mac. When dealing with a mouse, keyboard, or other “dumb” device, this is done automatically and you’ll seem to skip over this part of the process.
When the process is done, you see the Conclusion screen in the assistant.
7. Click Set Up Another Device to configure another Bluetooth device or Quit to stop the assistant.
Working with Bluetooth Devices
After you have configured a Bluetooth device to work with your Mac, use the device’s applications or controls to communicate with your Mac or use a Mac application to work with the device.
For example, one of the most useful Bluetooth devices is a Bluetooth-capable cell phone. You can use the iSync application to synchronize the phone’s contact list with your Address Book so that you have the same information available on both devices. Because you can communicate wirelessly, you don’t need to bother connecting any wires to synchronize. You can also transfer files between the two devices, such as to install applications on the cell phone if it supports them.
Although synchronizing a cell phone wirelessly is one of the most useful Bluetooth-enabled tasks, it isn’t the only one. Consider the following examples:
• Using wireless keyboards and mouse devices
• Printing wirelessly
• Connecting to the Internet through a Bluetooth modem or cell phone
• Communicating with other Bluetooth-equipped Macs to share files
• Transferring photos wirelessly from a Bluetooth digital camera
Getting the Most from Keyboard Shortcuts
Using keyboard shortcuts is a great way to work both faster and smarter. Mac OS X includes support for many keyboard shortcuts by default. As you have seen throughout this book, many areas of the OS and within applications provide keyboard shortcuts you can use.
Using Keyboard Navigation
One of the least used, but most useful, aspects of using keyboard shortcuts is keyboard navigation. You can use the keyboard to access almost any area on your Mac in any application, including the Finder. For example, you can open any menu item by using only keys even if that item does not have a keyboard shortcut assigned to it.
First, configure keyboard navigation:
1. Open System Preferences, click Keyboard, and then click the Keyboard Shortcuts tab.
2. Review the list of shortcuts in the Dashboard & Dock, Exposé & Spaces, and Keyboard & Text Input sections to make sure the ones you want to use are enabled (see Table 30.1 for the default shortcuts).
Table 30.1 Keyboard Navigation and Dock, Exposé, and Dashboard Keyboard Shortcuts
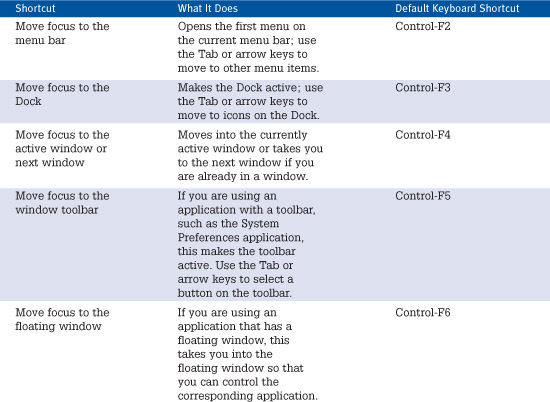


3. If you want to use a keyboard shortcut that is different from the default, click the default shortcut, wait for a moment for it to become editable, and change it to a new combination.
Using the shortcuts in Table 30.1, you can move to and select just about anything you can see. For example, to select a menu command, press the Focus on Menu shortcut (Control-F2 by default) and use the right arrow or Tab key to move to the menu on which the command is located. Use the down arrow key to move to the command on the menu that you want to select, and press Return to activate the command.
Note
![]()
If you use a mobile Mac, some of the defaults might be different from those listed in Table 30.1. Check the Keyboard Shortcuts pane to see the current shortcuts for your specific system.
As another example, when you are working with an application that has a toolbar, press the shortcut for the Move Focus to the Window Toolbar command, use the Tab key to select the tool you want to use, and press Return to use it.
Note
![]()
Some applications don’t support all aspects of keyboard navigation. For example, in some versions of Microsoft Word, you can’t select radio button options using the arrow keys, which is too bad.
Adding Keyboard Shortcuts for Application Commands
You can add keyboard shortcuts for commands within Mac OS X applications using the following steps:
1. Open System Preferences, click Keyboard, and then click the Keyboard Shortcuts tab.
2. Click the Add Shortcut button (+) at the bottom of the pane. The Add Application sheet appears.
3. Select the application for which you want to create a shortcut on the Application pop-up menu. If the application for which you want to create a shortcut isn’t listed, select Other and use the Open Application dialog box to select the application. To create a shortcut for all applications, select All Applications.
4. In the Menu Title box, type the exact command name for which you want to create a shortcut. If the command contains an ellipsis, you need to include that as well.
5. In the Keyboard Shortcut field, press the key combination for the shortcut that you want to use to access the command. You need to be careful not to use a keyboard shortcut that is used elsewhere or you might get unexpected results. Figure 30.10 shows a completed sheet that applies the keyboard shortcut Shift-![]() -X to Safari’s Close Tab command.
-X to Safari’s Close Tab command.
Figure 30.10 Using this simple sheet, you can add a keyboard shortcut for any command in any application.

Tip
![]()
To type an ellipsis, use the Character palette to select it or press Option--.
6. Click Add. When you return to the Keyboard Shortcuts tab, the shortcut you added is listed under the related application under the Application Keyboard Shortcuts section.
7. If the application for which you configured a shortcut is currently running, quit and restart it. If it isn’t currently running, open it. The keyboard command you created will be shown next to the command on the application’s menu and you can execute the command by pressing the keyboard shortcut.
Tip
![]()
You can expand or collapse the applications listed in the Application Keyboard Shortcuts section to see all of the keyboard shortcuts configured using this tool.