
27. Using the Mac OS X Notebook Features
Using Mac OS X on a Mobile Computer
Whether you have a MacBook, a MacBook Pro, or a MacBook Air, using Mac OS X on your notebook isn’t fundamentally different than using it on a desktop system. You interact with the same desktop, run the same applications, deal with the same types of files and folders, and set most of the same preferences. This is good news if you’re moving from a desktop machine to a notebook (or adding a notebook to your Mac collection), because it means there’s only a small learning curve ahead of you, as you see in this chapter.
Managing Your Mobile Mac’s Power
The factor that makes a mobile Mac mobile is the capability to run using battery power. This is obviously an advantage, but it also adds another task for you, which is managing that power so you maximize your battery life and thus your working time while on the move.
Monitoring Battery Status
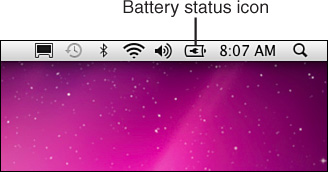
On a mobile machine, Mac OS X displays the battery status icon in the menu bar by default, and you use this icon to monitor the current power state of your Mac. When the battery is fully charged and you’re running on the AC adapter, you see the plug icon, as shown in Figure 27.1.
Figure 27.1 The battery status icon on the menu bar keeps you informed of the power state of your mobile Mac.
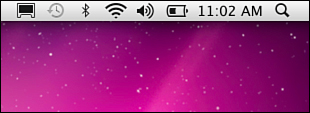
When you switch to battery power, the battery status icon’s plug changes to a solid black rectangle. This rectangle represents the amount of power you have left. At first, the rectangle fills the icon because you have 100% power. As you use your Mac, the battery slowly drains, and this drain is represented by the rectangle shrinking within the battery status icon. For example, when your Mac’s battery power reaches 50%, the rectangle takes up only half the icon (see Figure 27.2).
Figure 27.2 When the Mac is running without AC, the battery status icon shows a graphic representation of the remaining battery power.
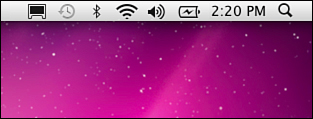
When you plug the power adapter back into the Mac, you see a lightning bolt inside the battery status icon (see Figure 27.3) to indicate that the battery is charging.
Figure 27.3 When you connect the Mac to a power source again, the battery status icon displays a lightning bolt while the battery is recharging.
Using the Battery Status Menu
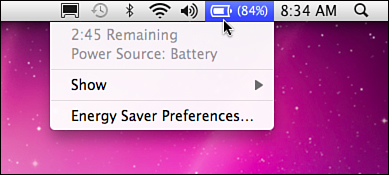
The battery status icon is useful for getting a general overview of the current state of the battery. To get a bit more detail, click the battery status icon to open the battery status menu. As you can see in Figure 27.4, the first item in the menu gives you an approximation of the amount of time you have left before running out of battery power. The second items tells you the current source of power for your mobile Mac (Power Adapter or Battery).
Figure 27.4 Click the battery status icon to display the battery status menu.
Note
![]()
When you are running on battery power and choose to show time or percentage, the first item on the battery status menu is always the opposite of what you have selected to display with the icon. For example, when you choose to display percentage on the icon, the time is shown on the menu (see Figure 27.4), and the reverse. If you don’t show time or percentage with the icon, you still see the time remaining on the menu.
You can also use this menu to configure the battery status icon:
• Select Show, Time to show the time remaining for the battery or for the charging process next to the icon.
• Select Show, Percentage to show the percent of power remaining for the battery (see Figure 27.4) or for the charging process next to the icon.
• Select Show, Icon Only to show just the icon.
Maximizing Battery Life
Tip
![]()
To remove the battery status icon and menu from the menu bar, open the Energy Saver pane of the System Preferences application and deactivate the Show Battery Status In the Menu Bar check box.
The ultimate and constant challenge of using a mobile Mac when running on the battery is to make your power last as long as possible. You should consider the following steps to maximize your battery life:
• Dim your screen—Your Mac’s screen is a major source of power consumption. If you dim the screen, it requires less power and thus extends your battery life. To dim your screen, use the Brightness slider on the Displays pane of the System Preferences application or the appropriate function key. Dim the display as much as you can while still being able to see it comfortably. For example, when you are traveling on a darkened airplane, you can set your display brightness to a lower level than when you are using it in a well-lit room.
Tip
![]()
Recent notebook Macs have dedicated function keys to control screen brightness, typically F1 to lower brightness and F2 to increase it. When you press one of these keys, an onscreen level indicator pops up to show you the relative brightness level and how you are changing it.
• Configure the Energy Saver pane for the work you are doing while you are on the move—Use the Energy Saver pane to configure your mobile Mac’s power usage to maximize battery life. You learn how this works in the next section (“Configuring Power Use”).
• Avoid applications that constantly read from a CD or DVD—The CD or DVD drive is another major source of power use. If you can copy files you need onto your hard drive and use them from there, you will use power at a lower rate than if your Mac is constantly accessing its removable media drive. In some cases, such as when you are watching a DVD movie, this isn’t possible. At other times, however, you can store the files you need on the hard drive. For example, when you want to listen to music, you can add the songs to your iTunes Music Library so you don’t need to use the CD or DVD drive.
• Turn off AirPort if you don’t need it—When AirPort is on, it regularly checks for available wireless networks, which drains the battery. If you don’t need to connect to a wireless network, turn off AirPort to conserve energy. Click the AirPort status icon in the menu bar and then click Turn AirPort Off. (If you aren’t displaying the AirPort status icon, open System Preferences, click Network, click AirPort, and then click Turn AirPort Off.)
• Turn off Bluetooth if you don’t need it—When Bluetooth is running, it constantly checks for nearby Bluetooth devices, and this also drains the battery. If you aren’t using any Bluetooth devices, turn off Bluetooth to save energy. Click the Bluetooth status icon in the menu bar and then click Turn Bluetooth Off. (If you aren’t displaying the Bluetooth status icon, open System Preferences, click Bluetooth, and then deactivate the On check box.)
Note
![]()
When your Mac sleeps, all active processes are stopped, the screen goes dark, and the disk or disc drives stop. This reduces your Mac’s power use to the bare minimum. A Mac in Sleep mode can survive a long time, but of course, it can’t do anything while it is asleep. You need to strike a balance between the length of pauses in your work and the sleep time.
• Put your Mac to sleep whenever you aren’t actively using it—You can put your Mac to sleep by selecting Apple menu, Sleep, by pressing Option-![]() -Eject, or by closing your mobile Mac’s lid. Your Mac instantly wakes up when you open it or press a key, so putting it to sleep frequently doesn’t cause a lot of wasted time for you.
-Eject, or by closing your mobile Mac’s lid. Your Mac instantly wakes up when you open it or press a key, so putting it to sleep frequently doesn’t cause a lot of wasted time for you.
Tip
![]()
Because the screen is such a major consumer of power, you should have the display sleep after only a few minutes of inactivity when you configure your mobile Mac for operating in battery power.
Configuring Power Use
One of the most important power management tasks is to actively use the Mac’s Energy Saver pane of the System Preferences application. This enables you to customize your Mac’s energy settings to maximize battery life for the type of work you are doing. Follow these steps:
1. Open the System Preferences application and click Energy Saver. (You can also click the battery status icon and then click Open Energy Saver.) The Energy Saver preferences appear, as shown in Figure 27.5.
Figure 27.5 Use the Energy Saver preferences to configure your Mac’s power usage.
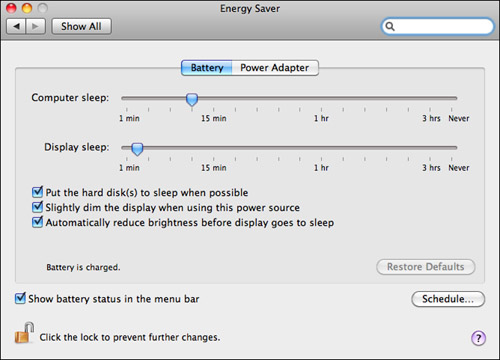
2. Click the Battery tab.
Note
![]()
Normally, when you’re running on battery power you want the screen to sleep rather than have the screen saver kick in because the screen saver consumes battery power for processing and screen display. Therefore, it’s a good idea to set the Display Sleep value to a lower idle time than your screen saver.
3. Use the Computer Sleep slider to control the amount of idle time before the entire system goes to sleep. Setting a shorter sleep time causes your Mac to sleep frequently, thus conserving battery power. But this can also interrupt your work. Set the Sleep slider to a value that is just longer than normal pauses in your work.
4. Use the Display Sleep slider to set the amount of idle time before the screen goes dark.
5. Unless you have a very good reason not to, leave the Put the Hard Disk(s) to Sleep When Possible check box activated. The hard disk is another major consumer of power, and putting it to sleep saves significant amounts of energy. This setting causes your Mac to put the hard drives to sleep when they aren’t actively being used, which is a good thing when your goal is to minimize power consumption.
Note
![]()
When your battery power starts getting low (about 10% remaining), you start to see low-power warning dialog boxes. If you continue to use your Mac to lower power levels, eventually the screen dims. When your Mac is on its last electron, it goes to sleep, which prevents you from losing any data. The only way to revive your Mac is to connect it to the power adapter.
6. By default, Mac OS X automatically dims the display to conserve power when you switch to the battery. If you find the dimmed screen hard to read, deactivate the Slightly Dim the Display When Using This Power Source check box.
7. If you leave the Automatically Reduce Brightness Before Display Goes to Sleep check box activated, Mac OS X dims the display automatically before it puts your Mac to sleep. This saves a bit of battery power, but it’s also a useful indicator that display sleep mode is about to start, so if you want to keep reading what’s on the screen, jiggle the mouse to return to normal brightness.
8. If you also want to configure power options for when your Mac is using the AC adapter, click the Power Adapter tab and then repeat steps 3–7.
Controlling Your Mobile Mac with Function Keys
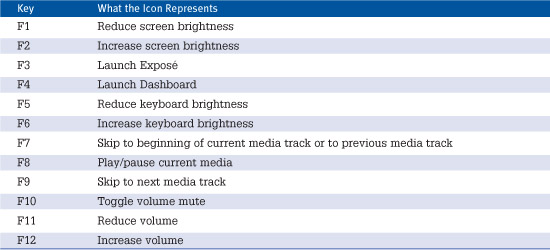
As with all Mac keyboards, the function keys on a mobile Mac are the top row of keys, and they usually show both an icon and standard function key text. On mobile Mac keyboards, the function keys run F1 to F12. Table 27.1 presents a summary of the special features associated with F1 through F12 on modern notebook Mac keyboards.
Table 27.1 Special Features Associated with Standard Function Keys
Caution
![]()
The function key associations for the special features listed in Table 27.1 are standard on current Mac notebook keyboards, but Apple seems to change them regularly. So your old Mac keyboard might not be set up this way, and it’s quite possible that future keyboard designs might change this layout yet again.
What if you want to use a key as a standard function key? For example, in some applications pressing F1 invokes the Help system. To get a standard function keystroke (such as F1) instead of a special function, hold down Fn and press the key (for example, Fn+F1).
Tip
![]()
If you prefer to have F1, F2, and so on work as standard function keys without having to hold the Fn key down while you press them, open the System Preferences application, click the Keyboard icon, and then click the Keyboard tab. Activate the Use All F1, F2, etc. Keys as Standard Function Keys check box. If you do this, you have to hold down the FN while pressing the appropriate hardware control key (such as F1 to lower the screen’s brightness).
Using and Configuring the Trackpad
If you have a MacBook, MacBook Pro, or MacBook Air, you can always connect an external mouse, but you might prefer just to use the trackpad. If so, it helps to know how to use the hidden features of the trackpad. You saw earlier that you can unlock the trackpad’s ability to display shortcut menus, but it also has a few other features:
• Two-finger scrolling—If you need to scroll a window or document, don’t bother dragging the scroll bar. Instead, drag two fingers along the trackpad: drag them left and right to scroll horizontally; drag them up and down to scroll vertically. (Or, if you prefer, place two fingers on the trackpad and then drag just one finger to scroll.)
• Dragging—To drag an object with the trackpad, press and hold the trackpad button and then drag a finger along the trackpad.
• Control+scroll—Use this technique to zoom the Mac window. Hold down Control and drag two fingers toward the top of the trackpad to zoom in; hold down Control and drag two fingers toward the bottom of the trackpad to zoom out.
If you’ve got a Mac notebook with a multi-touch trackpad (such as the MacBook Air or the latest MacBook and MacBook Pro models), you get even more techniques to play around with:
• Pinch and spread—Use these techniques to zoom in on or out of an object such as a photo or a web page. To pinch means to move two fingers closer together on the trackpad to zoom in; to spread means to move two fingers apart on the trackpad to zoom out.
• Rotate—Use this technique to rotate an object such as a photo clockwise or counterclockwise. Place two fingers on the trackpad, about an inch apart. Drag the fingers clockwise on the trackpad to rotate the object clockwise; drag your fingers counterclockwise on the trackpad to rotate the object counterclockwise.
• Three-finger navigation—Use this technique to move from one object to the next in applications that can display multiple objects. For example, if you have multiple photos open in the Preview application, swipe three fingers quickly across the trackpad to the right to navigate to the next item; swipe three fingers to the left to navigate to the previous item.
• Invoke Exposé—Place four fingers on the trackpad and swipe down to launch Exposé and tile the open windows; swipe down to use Exposé to display the desktop.
• Switch applications—Place four fingers on the trackpad and swipe left or right to display icons for your running applications. Then use a single finger to drag the mouse pointer to the application icon you want, then click to switch to the application.
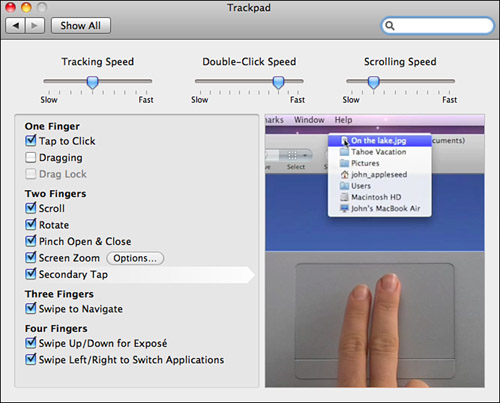
The techniques above are built into the trackpad, but they don’t represent everything you can do with a modern trackpad. Open System Preferences and click the Trackpad icon to display the Trackpad preferences, as shown in Figure 27.6.
Figure 27.6 Use the Trackpad preferences to configure your mobile Mac’s trackpad.
Here are the trackpad features you can activate using these preferences:
• Trackpad clicking—Although older Mac notebooks support trackpad clicking, many recent models do not. Instead, you have to click the button. However, Mac OS X provides a solution. In the Trackpad preferences, activate the Tap to Click check box.
• One-finger dragging—The two-finger drag methods explained earlier work, but it would be easier if you could just use one finger to do it. In the Trackpad preferences, activate the Tap to Click check box, and then activate the Dragging check box. You can now drag windows and other objects without having to hold down the trackpad button. To do this, move the mouse pointer over the object and double-tap the trackpad, but leave your finger on the trackpad. (If you take your finger off, your Mac assumes you’re double-clicking.) Drag your finger along the trackpad to drag the object along with it.
• Drag Lock—If you’ve got a long way to drag something, even the simple one-finger drag might not work very well. To work around this, you can use the Drag Lock feature. To turn this on, activate the Tap to Click check box, activate the Dragging check box, and then activate the Drag Lock check box. To use Drag Lock, position the mouse pointer over the object and double-tap the trackpad, but leave your finger on the trackpad. Drag your finger along the trackpad to drag the object along with it. After you’ve dragged the object, you can remove your finger, and then resume dragging at any time because your Mac is “locked” in drag mode. To exit drag mode, tap the trackpad.
• Right-clicking—You might have noticed that the button below the trackpad doesn’t right-click, which means you need to hold down Control and click any part of the button to bring up a shortcut menu. Fortunately, you can configure the trackpad to display shortcut menus without needing to press the Control key. In the Trackpad preferences, activate the Secondary Tap check box. What you’ve done here is configured your Mac notebook to display a shortcut menu by tapping the trackpad with two fingers instead of just one.
Configuring and Using Locations
As you move your mobile Mac around, you will probably want to connect to different networks from different locations. For example, you might use an AirPort network to connect to the Internet at home, an Ethernet network to connect when you are at work, and a wireless hotspot when you are on the road.
Note
![]()
You can have more than one active port on the same machine, meaning you can have different means of connecting to a network active at the same time (such as AirPort and Ethernet). You don’t need to have a location for each active port. You should use locations when you want to be able to switch easily among different sets of active ports.
The Mac OS X Location Manager feature enables you to configure multiple network configurations on your Mac. You can then switch among these configurations easily (rather than having to manually reconfigure your Mac each time you change locations).
Creating a New Location
To configure a new network location, use the following steps:
1. Open the Network pane of the System Preferences application.
2. On the Location pop-up menu, select Edit Locations. The Locations sheet appears. In the pane, you see the locations on your Mac.
3. Click the Add Location button (the plus sign) at the bottom of the Locations. A new location is created and its name is highlighted to show you it can be edited.
4. Type a name for the new location (see Figure 27.7) and then press Return.
Figure 27.7 Use the Location sheet to create a new location.
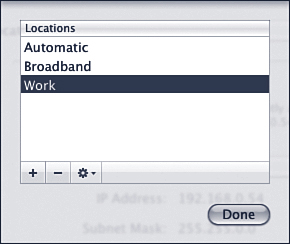
5. Click Done. The sheet closes and you return to the Network pane with the new Location automatically selected in the Location pop-up menu.
6. Click Add Service (the plus sign). Mac OS X prompts you to select an interface.
7. Choose a network interface (such as AirPort or Ethernet), type a name for the service, and then click Done.
8. Repeat steps 6–8 to add any other services you need for this location.
9. Configure each service for the location. For example, select Ethernet and then use the tools in the right pane of the window to configure the Ethernet connection for the new location.
![]() For help configuring an Internet connection, see Chapter 13, “Connecting Your Mac to the Internet,” p. 267.
For help configuring an Internet connection, see Chapter 13, “Connecting Your Mac to the Internet,” p. 267.
![]() For help configuring an Ethernet network connection, see Chapter 17, “Wired Networking with Mac OS X,” p. 361.
For help configuring an Ethernet network connection, see Chapter 17, “Wired Networking with Mac OS X,” p. 361.
![]() For help configuring an AirPort connection, see Chapter 18, “Wireless Networking with Mac OS X,” p. 385.
For help configuring an AirPort connection, see Chapter 18, “Wireless Networking with Mac OS X,” p. 385.
10. Open the Action menu at the bottom of the Services pane and choose Set Service Order.
11. In the resulting sheet, arrange the order of the connection methods in the list to be the order in which you want your Mac to try to connect to the network. Drag the first method you want to be tried at the top of the list, the second one in the second spot, and so on. For example, if you want to use Ethernet first and then AirPort, drag Ethernet to the top of the list and place AirPort underneath it. When your Mac connects to the network, it will try these connections in the order in which they are listed. When you’re done, click OK. When you return to the Network pane, you see the services in the order you configured them.
12. Click Apply to apply your new location settings.
Changing Your Mac’s Location
To change the location your Mac is using, open the Network pane of the System Preferences application and choose the location you want to use on the Location pop-up menu. If the Apply button becomes active, click it to Apply the location; some configuration changes require this while others don’t.
Editing or Deleting Locations
You can edit or remove locations by following these steps:
1. Open the Network pane of the System Preferences application.
2. Select Edit Locations from the Location pop-up menu. The Locations sheet appears.
3. Select the location you want to change.
4. Rename the location by selecting it, pressing the Return key, entering the new name, and pressing Return again.
5. Delete a location you no longer use by selecting it and choosing Delete Location (minus sign).
6. To duplicate a location select it, open the Action menu at the bottom of the Locations pane, and choose Duplicate Location; you can then rename it to something that describes that location.
7. Click Done. You return to the Network pane.
Tip
![]()
To protect your mobile Mac’s data in the event someone swipes it, use Mac OS X’s FileVault feature to encrypt your data so anyone who takes your mobile Mac won’t be able to use its data.
8. Make any other changes to the location selected in the Location pop-up menu and click Apply.
9. Close the System Preferences application.
![]() To learn how to use FileVault, see “Securing Your Mac with FileVault,” p. 707.
To learn how to use FileVault, see “Securing Your Mac with FileVault,” p. 707.
Keeping Your Files in Sync
As you move around with your mobile Mac, you’ll find all kinds of great things to do with it. Some of these might even involve work. If you work on files on your mobile Mac, it is highly likely that you will want to move those files to or from another Mac, such as your desktop Mac. There are a lot of ways to accomplish this:
• Store the files you are going to share between your mobile Mac and other machines on your MobileMe iDisk. Then set your iDisk to synchronize automatically on all machines. The same versions of those files will be accessible on all your Macs automatically (and they will be backed up on your iDisk, too).
![]() To learn how to use an iDisk, see “Using Your iDisk,” p. 427.
To learn how to use an iDisk, see “Using Your iDisk,” p. 427.
• Before and after a session on your mobile Mac, connect the mobile Mac to the network that your desktop Mac is on and use file sharing to move the files back and forth between the machines. (Make sure you move the correct version so you don’t accidentally replace a newer version with an older one.)
• Email files to yourself. This is easier to do if you have more than one email account. For example, use a MobileMe email account for your regular email and another account just on one machine. You can send files to yourself via that address. The big problem with this method is that most email gateways allow only relatively small files to be sent (usually less than 5MB).
• Put files on CD, DVD, or an external hard drive (an iPod is excellent for this), and then copy them onto a different machine.
One of the harder aspects of keeping files synchronized between a mobile Mac and other machines is knowing exactly which files changed during your most recent use of the mobile Mac. With Mac OS X’s smart folders, you can make even this easy to do:
1. Create a new smart folder.
2. Configure it to find files whose Kind is Documents and that were Last Modified Within Last 2 Days (or some other timeframe that you choose).
3. Save the smart folder.
Each time you open this smart folder, you will see the document files that have changed within the timeframe you specify. This makes it simple to know which files you need to move to your desktop Mac or other location.
![]() To learn how to configure and use smart folders, see “Searching Your Mac with Smart Folders,” p. 97.
To learn how to configure and use smart folders, see “Searching Your Mac with Smart Folders,” p. 97.