24. Making Your Mac Accessible to Everyone
Understanding Universal Access
Although the physical world has, over the past few years, striven to increase access for the disabled (in the form of Braille elevator buttons, wheelchair ramps, and handicapped parking spaces, to name just a few changes), the virtual world of the computer interface has been a more difficult challenge. That’s not surprising because the typical computer interface offers small text and objects, occasional audio feedback, and the need for precision when performing actions such as mouse clicks, all of which makes life difficult for people who are visual-, hearing-, or mobility-impaired.
Fortunately, the computer industry in general, and Mac OS X in particular, have made great strides in recent years toward the goal of making computers universally accessible. In Mac OS X, this goal is realized using the aptly named Universal Access feature, which is found on the Universal Access pane of the System Preferences application.
You normally use Universal Access to make your Mac more accessible to users who have various physical or mental challenges. However, even if you don’t have such challenges or don’t provide technical support to other users who do, you can use the Universal Access tools to make your Mac better suited to the way in which you like to work. For example, using the Zoom feature, you can zoom using the same keyboard shortcut in any application.
Setting up Universal Access involves configuring any or all of the following areas:
• Seeing—Using the Seeing controls, you can configure visual aspects of your system. You can use VoiceOver to have your Mac speak interface elements, and you can use zoom to increase the size of items on the screen. You can change the display to be white on a black background or grayscale. You can also configure the display’s contrast.
• Hearing—The Hearing controls enable you to set the screen to flash when an alert sound plays.
• Keyboard—Using the Keyboard controls, you can configure Sticky Keys, which enable users to choose key combinations by typing only one key at a time. You can also provide assistance to users who have difficulty with initial or repeated keystrokes with the Slow Keys feature. Slow Keys enables you to set a delay for the time between when a key is pressed and when the input is accepted by the system.
Note
![]()
On mobile Macs, the Mouse controls are the Mouse & Trackpad controls.
• Mouse—The Mouse controls enable you to control the mouse by using the numeric pad on the keyboard and to control the size of the cursor that appears on screen.
This chapter takes you through the configuration of all these aspects of Universal Access. To get started, open System Preferences and click the Universal Access icon.
Configuring and Using Seeing Assistance
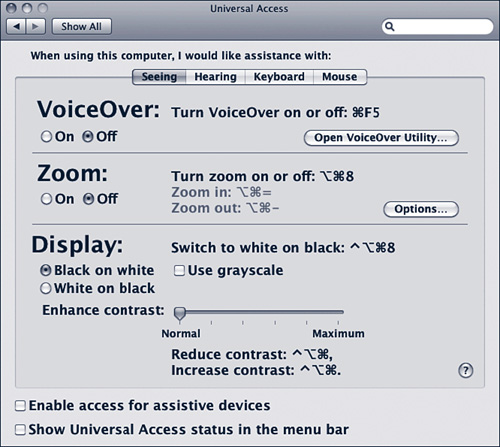
The Seeing assistance functions are designed to make the Mac’s display more visible to users who have difficulty seeing the screen. There are three basic areas of configuration: VoiceOver, Zoom, and Display. You start configuring all of these areas by moving to the Universal Access pane of the System Preferences application and clicking the Seeing tab, shown in Figure 24.1.
Figure 24.1 The Seeing tab of the Universal Access pane enables you to configure how your Mac displays information and to have the OS use VoiceOver to speak interface elements.
Note
![]()
If you have an assistive device, such as a Braille display, you can activate the Enable Access for Assistive Devices check box to enable that device. You can also display the Universal Access status in the menu bar by activating the Show Universal Access Status in the Menu Bar check box.
Understanding and Using VoiceOver
VoiceOver causes your Mac to speak the current position of the VoiceOver cursor in the interface so that you can tell where you are on the screen even if you can’t see it clearly. For example, if you have VoiceOver active when you open the Universal Access pane, your Mac would speak the following text to you, “System Preferences, Universal Access, Toolbar” because that is the first interface element that gets selected with the VoiceOver cursor when you open that particular pane. VoiceOver also speaks commands you issue when you activate them. When VoiceOver is active, your Mac will also speak the contents of dialog boxes and other interface elements.
You can customize VoiceOver to work in very specific ways by using the VoiceOver Utility.
Using Default VoiceOver Settings to Have Your Mac Speak to You
To turn VoiceOver on, use the following steps:
1. Open the System Preferences application and click the Universal Access icon to open the Universal Access pane.
2. Click the Seeing tab.
3. Click the On radio button in the VoiceOver section. The first time you do this, the Welcome to VoiceOver dialog box appears.
4. If you want to learn more about VoiceOver, press the Spacebar; otherwise, press V to start using VoiceOver. On the screen, you see the VoiceOver cursor (which is a box around the specific interface element currently selected; see Figure 24.2) and the Mac speaks its current location to you.
Figure 24.2 When VoiceOver is active, the VoiceOver cursor is used to speak a specific part of the interface (in this case, the Back button).
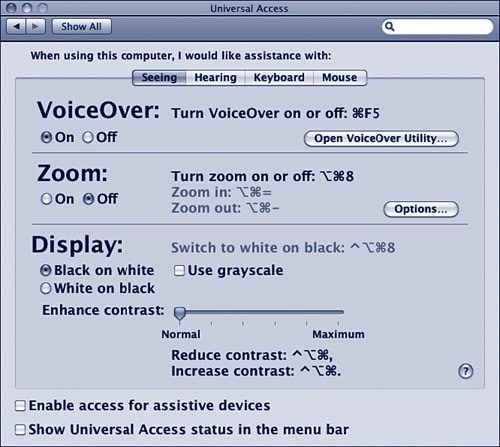
After you have activated VoiceOver, your Mac begins to speak to you. Each time something changes, the Mac always speaks the current location of the VoiceOver cursor. You navigate the interface by pressing the Control-Option-Arrow keys to move the VoiceOver cursor around the screen. Each time the cursor moves onto a new element, the element’s name is spoken as it becomes highlighted by the cursor (that is, when the VoiceOver cursor is placed around the element).
Note
![]()
When something appears on the screen that needs your input, such as a sheet, your Mac will speak the words “interactive dialog” to let you know that such an element has appeared on screen.
When you change applications, VoiceOver speaks the application name and the current location of the VoiceOver cursor within that application.
Note
![]()
If you move around quickly, your Mac might not be able to speak each element as you move to it. It will continue speaking each element you have moved the cursor over until it catches up with you.
If you move into an editable text field, your Mac speaks each letter of the text as you move onto it.
By default, the position of the mouse cursor is not tied to the VoiceOver cursor. To activate a command or control, you must still use the mouse cursor to point to it. The idea is that you use the VoiceOver cursor to point to interface elements so that you know what they are because the Mac will speak them. When you want to activate an element, you still select it with the mouse cursor. For example, suppose you are looking at a screen with tabs on it. You can use the Control-Option-Arrow keys to move the VoiceOver cursor to each tab. When you find the tab you want to move into, you would move the mouse cursor to the tab and then click the mouse button to open the tab.
Using the VoiceOver Utility to Configure VoiceOver
VoiceOver is a useful tool even when you use its default configuration, but you can also customize it in many ways by using the VoiceOver utility. To access this utility, click the Open VoiceOver Utility button on the Seeing tab. The VoiceOver Utility has nine sections, each of which enables you to configure a specific aspect of how VoiceOver works (see Figure 24.3).
Figure 24.3 The VoiceOver Utility enables you to customize nine aspects of how it works.
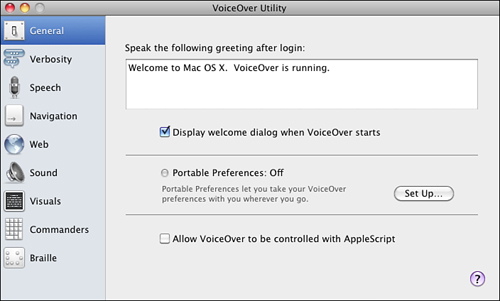
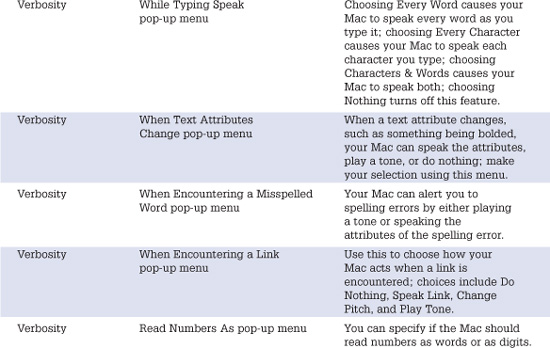
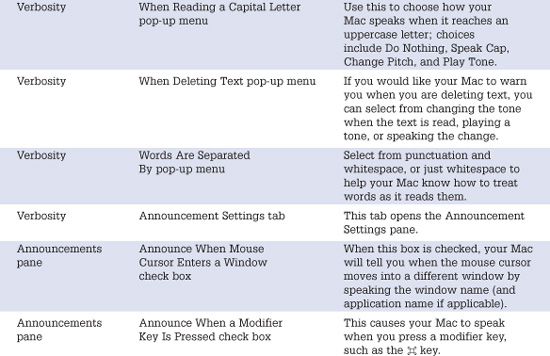
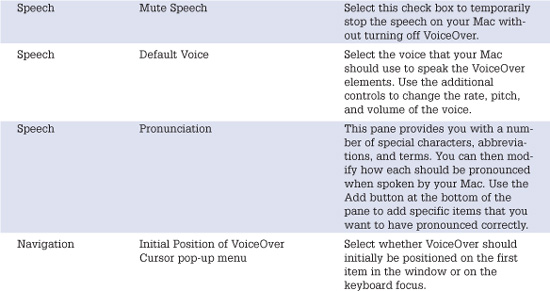
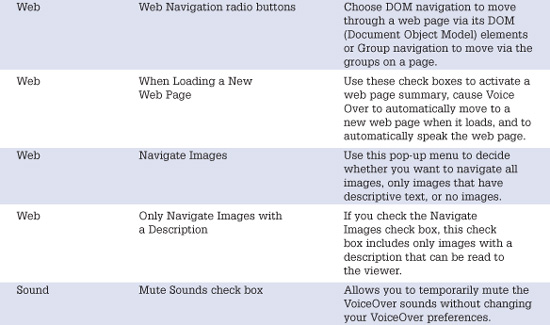
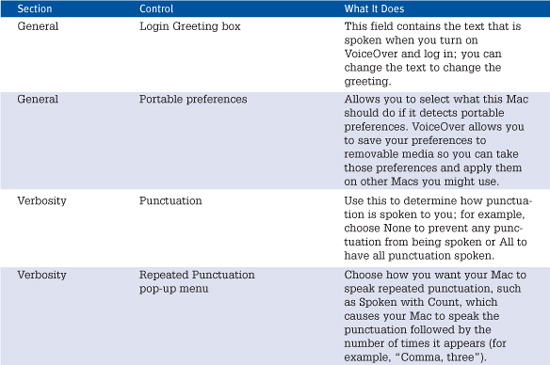
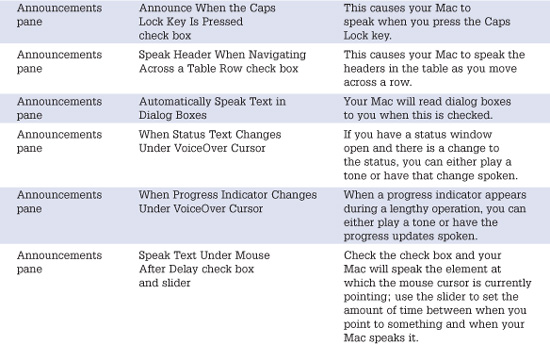
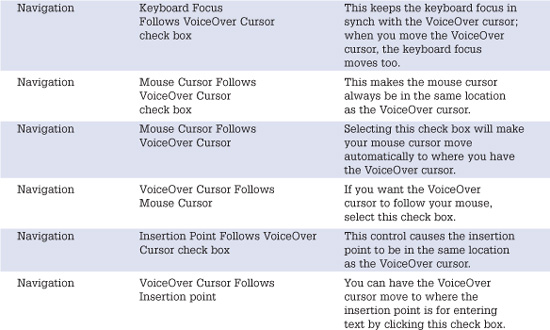
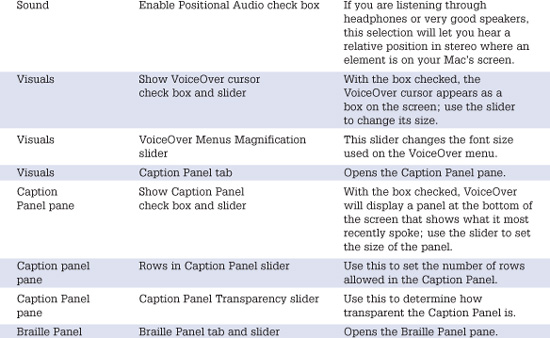
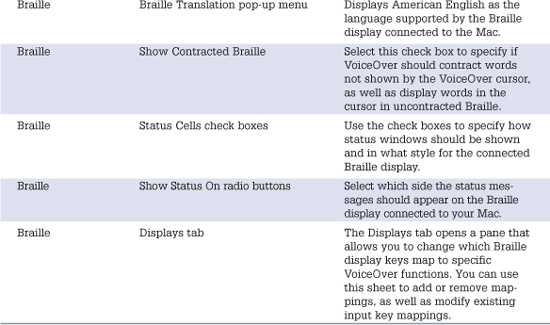
Unfortunately, going into the details of each control in the VoiceOver Utility is beyond the scope of this book. However, Table 24.1 provides a description of some of the configuration tools available to you.
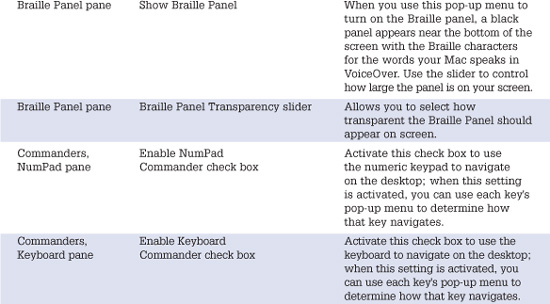
Table 24.1 Useful VoiceOver Utility Configuration Controls
Understanding and Using Zoom
The Zoom function enables you to zoom in on the screen to make things easier to see.
Using Zoom
First, activate zoom by using the following steps:
1. Open the Seeing tab in the Universal Access pane of the System Preferences application.
Tip
![]()
You can also turn Zoom on or off by pressing ![]() -Option-8.
-Option-8.
2. Click the On radio button in the Zoom section.
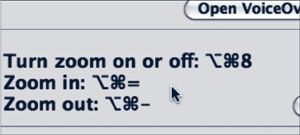
After Zoom is turned on press ![]() -Option-= to zoom in or
-Option-= to zoom in or ![]() -Option-– to zoom out (see Figure 24.4). When you are zoomed in, you can move around in the display by moving your mouse.
-Option-– to zoom out (see Figure 24.4). When you are zoomed in, you can move around in the display by moving your mouse.
Figure 24.4 Here, I have zoomed in on the Zoom controls.
Configuring Zoom
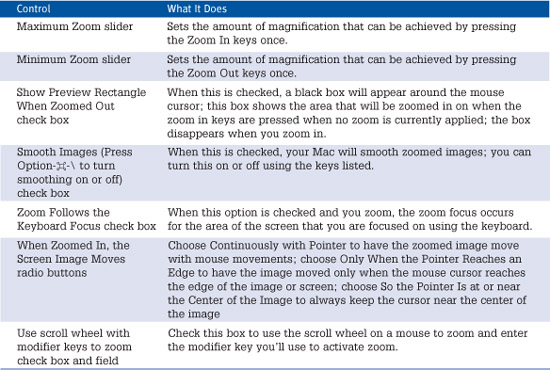
There are several options you can configure for Zoom as listed in Table 24.2. You can access these controls by clicking the Options button in the Zoom section. When you do, the Options sheet appears. Choose the options you want and click Done to save them.
Understanding and Using Display Options
The Display options section of the Seeing tab enables you to configure the following settings:
• Black on White—Check this check box to use the default black text on a white background in Mac OS X screens.
• White on Black—This check box causes your Mac to display white text on a black background.
Tip
![]()
Use the keyboard shortcuts listed next to the Display options on the Seeing tab to be able to turn them on or off quickly.
• Use Grayscale—This check box removes the color from the display and instead uses shades of gray.
• Enhance Contrast—Use this slider to change the contrast of the display. Contrast is the visual difference between the light and dark elements presented onscreen.
Configuring and Using Hearing Assistance
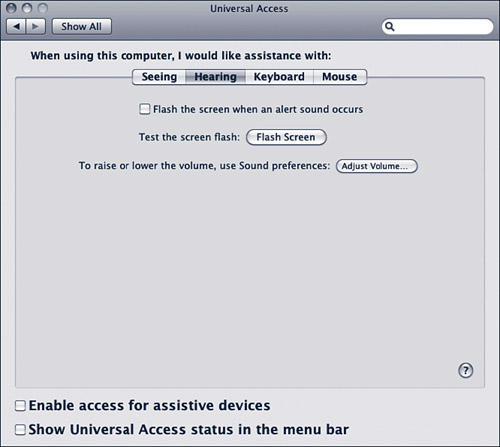
The Hearing tab of the Universal Access pane enables you to have your Mac display an onscreen visual alert when it needs to get your attention (see Figure 24.5). To set this, open the tab and activate the Flash the Screen When an Alert Sound Occurs check box. When your Mac plays the alert sound, it will also flash the screen. Click the Flash Screen button on the Hearing tab to see what the flash alert looks like.
Figure 24.5 If you prefer your Mac to flash the screen when it needs your attention, use this check box to make it so.
Configuring Keyboard Assistance
The Keyboard tools make your Mac easier to control for those who have difficulty manipulating the keys on the keyboard. There are two general features: Sticky Keys and Slow Keys. Sticky Keys helps users press more than one modifier key at a time because each key pressed “sticks” on. You can also configure Slow Keys to tailor how keys can be pressed to register them with the system. To configure the Keyboard settings, perform the following steps:
1. Open the Keyboard tab on the Universal Access pane of the System Preferences application.
2. Click the Sticky Keys On radio button to activate that feature.
3. If you want users to be able to turn on Sticky Keys by pressing the Shift key five times, activate the Press the Shift Key Five Times to Turn Sticky Keys On or Off check box.
4. If you want audio feedback when the modifier key is set, activate the Beep When a Modifier Key Is Set check box.
5. If you want each key press to be shown on the screen, activate the Display Pressed Keys on Screen check box.
6. Turn Slow Keys on by clicking the Slow Keys On radio button.
7. To play a key sound each time a key is pressed, activate the Use Click Key Sounds check box.
8. Use the Acceptance Delay slider to set the amount of time a key must be pressed before it is registered. Move the slider to the left to increase the delay between the time the key is pressed and when it is registered as a key press by the system.
Configuring and Using Mouse Assistance
Mouse Keys enables users to control the location of the pointer by using the numeric keys on the keypad; this can be useful if a person has difficulty manipulating a mouse or trackpad. To configure Mouse Keys, perform the following steps:
1. Open the Mouse (or Mouse & Trackpad on a mobile Mac) tab of the Universal Access pane of the System Preferences application.
2. Click the On radio button to turn Mouse Keys on.
3. If you want users to be able to turn on Mouse Keys by pressing the Option key five times, activate the Press the Option Key Five Times to Turn Sticky Keys On or Off check box.
4. Use the Initial Delay slider to set the amount of time a key must be pressed before the pointer starts moving. Move the slider to the left to make the pointer start moving sooner when a key is pressed or to the right to increase the delay.
5. Use the Maximum Speed slider to determine how fast and far the pointer moves when a key is pressed. Drag the slider to the right to increase the speed of movement or to the left to decrease it.
6. To change the size of the pointer on the screen, use the Cursor Size slider. Drag the slider to the right to increase the size of the cursor (see Figure 24.6).
Figure 24.6 You can increase the size of the cursor if someone who uses your Mac has difficulty seeing the standard pointer.

7. If you are using a mobile Mac you can activate the Ignore Trackpad When Mouse Keys Is On check box so that moving your hand across the trackpad does not interfere with using the keyboard to navigate.
Configuring and Using Speech Recognition
Mac OS X has built-in support for speech recognition. This works both ways—you can speak to your Mac to issue commands and your Mac can read onscreen text to you. Whether controlling your Mac with speech works for you or not depends on a lot of variables, such as your speaking voice, the position of your mouth relative to your Mac’s microphone, the microphone itself, and so on. Also, don’t expect your Mac to start working like the computer on the Starship Enterprise; it will take some time for you to get voice recognition working effectively.
Note
![]()
I’ve tried several voice recognition systems, including the Mac’s built-in one. Frankly, beyond the initial gee-whiz factor of being able to speak a command and have the computer respond by doing something, I have found that using the keyboard and mouse is a much more effective way to work. But, you might want to experiment to see if it works better for you, particularly if you have special needs when it comes to interacting with your Mac. This section will get you started, but it is certainly not intended to explain all the details.
Configuring Your Mac for Voice Control
To configure speech recognition on your Mac, perform the following steps:
1. Open the Speech pane of the System Preferences application.
2. Click the Speech Recognition tab and use the controls to configure how speech recognition works. This pane has two tabs: Settings and Commands (see Figure 24.7). Use the Settings tab to configure basic settings of speech recognition.
Figure 24.7 Use the Settings tab of the Speech Recognition pane to configure how your Mac listens to you.
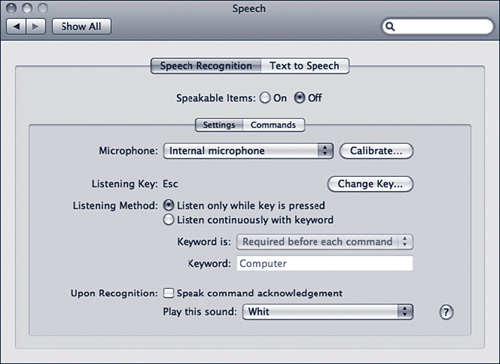
3. Use the Microphone pop-up menu to choose the microphone you want to use. The options you have will depend on the configuration of your system.
4. Click the Calibrate button. The Microphone Calibration window will appear (see Figure 24.8).
Figure 24.8 Using the Microphone Calibration window, you adjust your microphone’s input to easily pick up spoken commands.

5. Speak into the microphone and drag the slider to the left or right until your voice is mostly registered near the center of the green band above the slider.
6. Speak each phrase listed along the left edge of the window. If the phrase is recognized by your Mac, it will flash. If it isn’t recognized, adjust the slider and repeat the phrase until it is.
Tip
![]()
When you speak to your Mac, you’ll probably have to slow down and make sure you enunciate each word more clearly than you probably do in normal conversation.
7. Continue this process until you can speak all of the phrases and have them recognized without changing the slider.
8. When your Mac registers each phrase when you speak it, click Done. The Microphone Calibration window will close.
9. By default the listen key is Esc; if you want to change this, click Change Key and choose the key you want to use. The listen key makes your Mac listen for spoken commands.
10. If you want to press the listen key before you speak a command, click the Listen Only While Key Is Pressed radio button. With this setting active, you must press the listen key before you speak a command.
11. If you want your Mac to listen continuously for commands, click the Listen Continuously with Keyword radio button. Then, choose when the keyword is required on the Keyword Is pop-up menu. Then enter your keyword in the Keyword field. The default is Computer, which means you need to say the word “Computer” to get your Mac to listen to your commands, but you can change this to something else if you prefer to use a different term.
12. If you want your Mac to acknowledge your command by speaking it, activate the Speak Command Acknowledgment check box. When your Mac acknowledges your command, it will speak the command it thinks it heard.
13. Use the Play this Sound pop-up menu to choose the sound you want your Mac to play when it recognizes a command.
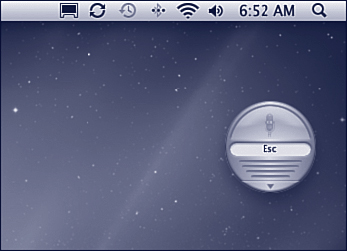
14. Activate speech recognition by clicking the Speakable Items On radio button at the top of the pane. A sheet appears that provides some tips for success; read these tips and click OK. A round feedback window will appear on the desktop. In the center of this, you see either the current listen key or the phrase you need to speak (see Figure 24.9). When your Mac is listening to you, the lower part of this window will show you how the sound is being registered.
Figure 24.9 The feedback window indicates that the word “Computer” needs to be spoken before voice commands.
15. Click the Commands tab. You use this pane to determine the command sets you can speak (see Figure 24.10).
Figure 24.10 Use the Commands tab to choose command sets that you want to be able to speak.
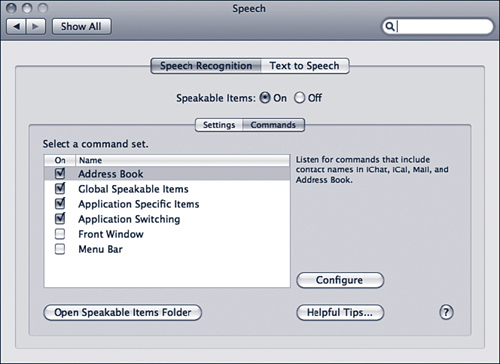
16. Select a command set, such as the Font Window set. A description of the commands appears to the right of the list.
Tip
![]()
If a command set has additional configuration options, the Configure button becomes active when you select that command set. Use this button and the resulting sheet to set options for the command set.
17. To activate a command set, activate its check box. You will then be able to speak the commands in that set. You are ready to start talking to your Mac.
Using Speech Recognition
After you have configured speech recognition, it will either be easy to use or extremely frustrating depending on how well your Mac recognizes the commands you speak. The only way to find out is to try it.
Note
![]()
There are a number of commands available in the Speakable Items folder. When you activate the Global Speakable Items command set, these commands will be available to you. To see these commands, click the Open Speakable Items Folder button. A Finder window will appear and you will see Speakable items available to you. (For kicks, check out the “Tell me a joke” command.)
If you configured speech recognition to require the listening key, press it and speak a command. If your Mac recognizes the command, it will act on it and provide you with the feedback you configured it to, such as repeating the command or playing the sound you selected.
If you have your Mac listen continuously, speak the keyword you set and then speak the command. If your Mac recognizes the command, it will act on it and provide you with the feedback you configured it to, such as repeating the command or playing the sound you selected.
Tip
![]()
To see which commands you can speak, click the arrow at the bottom of the feedback window and select Open Speech Commands window. In the Speech Commands window is the list of commands you can speak. When you open an application that supports speech recognition, that application appears in the Speech Commands window and the list of spoken commands it supports is shown.
If you double-click the feedback window, it moves to the Dock.
If your Mac does nothing, it doesn’t recognize the command. This can be because it didn’t “hear” you, didn’t understand what you said, or the command you spoke isn’t a Speakable command.
If you find speaking commands useful, you can continue to talk to your Mac to control it. However, if you are like me, you will quickly grow tired of trying to get it to work reliably and even if you do get it to work well, it is still faster to use your hands to control your Mac. But, this can be kind of fun to play around with.
Using Text to Speech
As you saw earlier in this chapter, using VoiceOver, your Mac can speak to you. The Text to Speech feature takes this concept much further and can be used across many applications and OSes to have your Mac speak to you.
To configure Text to Speech, perform the following steps:
1. Open the Text to Speech tab of the Speech pane of the System Preferences application.
2. Select the voice you want your Mac to use on the System Voice pop-up menu and then set the rate at which the voice speaks using the slider. Click the Play button to hear a sample.
3. If you want your Mac to speak alerts to you, activate the Announce When Alerts Are Displayed check box and use the Set Alert Options button to open a sheet that enables you to configure the voice used, the alert phrase, and the delay time. Click OK to set the options you selected.
4. If you want applications to speak when they need your attention, activate the Announce When an Application Requires Your Attention check box.
5. If you want to be able to quickly have your Mac read selected text to you, activate the Speak Selected Text When the Key Is Pressed check box. In the resulting sheet, type the key combination you want to use to cause your Mac to read text you select and click OK.
Tip
![]()
You can change this key combination later by clicking the Set Key button.
Your Mac will start speaking to you when the conditions you selected occur, such when an alert is played.
If you enabled the Speak Selected Text feature, you can select any text and press the keyboard shortcut to cause your Mac to read it.
Tip
![]()
Your Mac can speak the time to you, as well. Use the Date & Time Preferences pane to configure this option.
In applications that support text-to-speech, you can have your Mac read to you by choosing Edit, Speech, Start Speaking. You can shut your Mac up by choosing Edit, Speech, Stop Speaking.

