10. Managing Your Contacts
Getting to Know Address Book
Although I imagine there are quite a few people who still use a physical address book, the practice has a decidedly anachronistic feel to it these days. That’s particularly true for Mac users, who have the Address Book application a mere click away. Address Book is a contact management application, which means you can use it to store all kinds of information about the people you know and work with. With Address Book you can track basic data such as the person’s name, company name, phone numbers, email addresses, and physical address, but Address Book also supports a wide array of contact data, including instant messaging (IM) user names, job title, website URL, birthday, maiden name, and lots more.
Address Book acts as the central contact database for Mac OS X, so other applications can dip into this database whenever they need contact data. For example, you can use Address Book to select recipients for an outgoing message in Mail, and you can select contacts for an IM conversation in iChat.
Tip
![]()
Address Book is not the only application that can work with vCards. Many other applications can use vCards. For example, Microsoft Entourage can read vCards, so you can provide your vCard to someone who uses that application and that person can easily add your contact information to her contact database. Microsoft Outlook, the dominant email, calendar, and contact information application on Windows computers, also supports vCards.
Address Book is based on virtual cards, or vCards. A vCard is a kind of electronic business card that stores contact data. vCard is a standard contact file format, so you can drag and drop vCards between applications to transfer the information contained on that card. You can also share vCards with other users to exchange information. For example, you can drag someone else’s vCard onto your Address Book to quickly add that person’s information to your contacts.
Exploring Address Book
You launch Address Book by clicking the Address Book icon on the Dock or by opening the Applications folder and double-clicking the Address Book icon. When you open Address Book, you see that its window consists of three columns. The first two columns are:
• The Group column shows All Contact by default but you also see Last Input if you’re imported and the groups you create later on will also appear here (see “Working with Address Groups,” later in this chapter).
• The Name column lists each card in your Address Book, listed alphabetically.
Note
![]()
The contact information entered for you is whatever you provided when you registered your copy of Mac OS X. If you entered a username and password for an Apple ID account when you installed Mac OS X, your contact information is retrieved from your Apple account as well.
The rest of the Address Book window displays the data for the card that you’ve selected in the Name column (see Figure 10.1). Before you add any contact information, your Address Book includes a card for you and one for Apple. You can build your Address Book over time so that it includes all your contacts.
Figure 10.1 The Address Book is a powerful tool you can use to manage all your contact information.
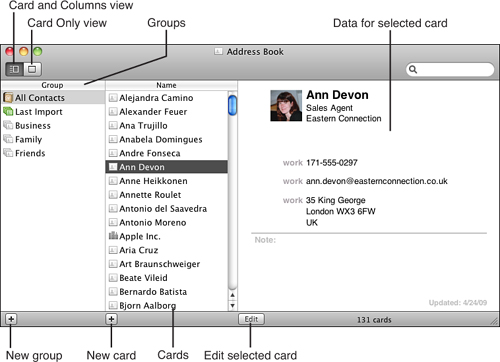
Just above the Group column are buttons you can use to control the look and features of Address Book:
• Card and Columns view—Click this button (or press ![]() -1) to present Address Book’s default view (the Group and Name columns and the current card data).
-1) to present Address Book’s default view (the Group and Name columns and the current card data).
• Card Only view—Click this button (or press ![]() -2) to show only the current card data. Address Book’s back and forward arrows enable you to navigate the cards in this view.
-2) to show only the current card data. Address Book’s back and forward arrows enable you to navigate the cards in this view.
In the upper-left corner of each card is an image well that you can use to place an image for your contact, such as a photo of the person for whom you created the card or the logo for a company (such as the apple for Apple). You can add a photo to a card by dragging a photo onto this well. The photo you use can be a JPEG, GIF, TIFF, or PDF file and should be 64×64 pixels.
Note
![]()
When you send email to or receive email using Mail from a contact who has an image in the related Address Book card, that image appears in the email.
The card marked with a silhouette is your card. This is important because your card can be used to add your contact information in various locations automatically.
Although Address Book provides the standard functions you expect, such as email addresses and phone numbers, the information in Address Book is dynamic. For example, when a contact’s card includes an email address, you can click the address to send the contact email. When you include a URL for a contact, you can click it to visit that web page, and when the contact has a MobileMe account, you can open the contact’s iDisk. You can also use the contact’s card to chat with the person using iChat and visit the contact’s website from within Safari. Address Book information is also accessible in many other places, such as when you are faxing documents using Mac OS X’s built-in fax capability.
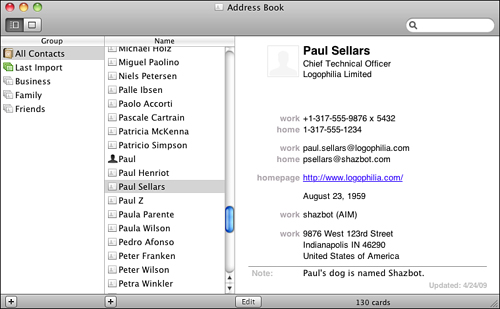
The information in Address Book is extremely flexible. The fields displayed for each contact can be configured individually. When you display a card, only the fields that contain information are displayed. For example, compare Figure 10.1 and Figure 10.2 to see how Address Book has reconfigured the card display for cards with different amounts of information.
Figure 10.2 Address Book supports many fields, so you can populate a contact with lots of useful information.
Finding Information in Address Book
To locate information within Address Book itself, you can browse your contacts or search for specific contacts.
To search for a contact’s information, type your criteria in Address Book’s Search box. You can enter text found in any of the contact’s information, including name, address, home page, and so on. As you type, the list of names shown in the Name column is narrowed so it includes only those contacts whose data contains the text you enter. If you see the contact whose information you want to view, select the card. The contact’s card is displayed, and you can see the contact’s information.
To view all your contacts again, click the X button that appears in the Search box when you perform a search.
Using Information in Address Book
When working with the Address Book, you can do the following tasks:
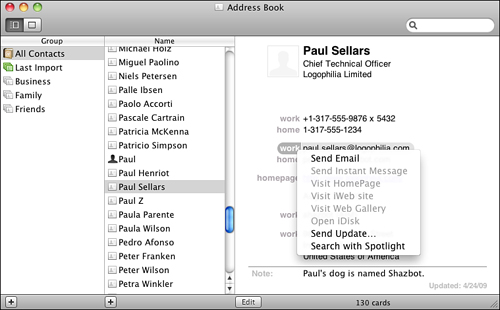
• Send an email—To send an email to one of your contacts, view the contact to which you want to send an email. Then click the label next to the email address to which you want to send an email. A pop-up menu appears. Select Send Email (see Figure 10.3). Your default email application will open and a new message addressed to the contact.
Figure 10.3 Click an email address label to display the Send Email command.
Note
![]()
When you click a data label, such as an email or physical address, the pop-up menu that appears has different commands for different items. For example, when you open an email address pop-up menu, one of the options is Send Email. However, if you click a physical address, you see different options including Map This Address, which enables you to retrieve a map for the address.
• Visit the contact’s website or home page—Click a URL shown on the card. (Alternatively, click the label next to a website you want to visit, and then click Open URL.) Your default web browser opens and displays the website.
• View a map to an address—Click the label next to an address and select Map This Address from the resulting pop-up menu. Your default web browser opens and displays the Google Maps website. A map to the selected address is then displayed.
• Copy a mailing label—Click the label next to a physical address and then click Copy Mailing Label to copy the address. You can then paste the address into an application, such as a program you use to create envelopes or mailing labels.
• Open an iDisk—If the contact has a MobileMe account and you have added the contact’s MobileMe email address to the card, you can open the person’s iDisk by clicking the label next to the MobileMe email address and selecting Open iDisk. The contact’s iDisk will open in a new Finder window.
Note
![]()
Oddly, the Open iDisk command is only enabled for MobileMe addresses that use the .mac domain, not the new .me domain. Also, the pop-up menu for a MobileMe address includes a Visit HomePage command that used to display the HomePage for a .Mac account. HomePages are no longer supported by MobileMe, so choosing the Visit HomePage command produces an error.
• Scroll through your contacts—Select Card, Next Card (or press ![]() -]) or select Card, Previous Card (or press
-]) or select Card, Previous Card (or press ![]() -[) to browse through your contacts.
-[) to browse through your contacts.
• Edit your contacts—Click the Edit button to move into the Edit mode (more on this later in the chapter).
Configuring Your Address Book
Tip
![]()
Explore the contextual menus for various card elements along with the options in the menus to discover even more Address Book commands.
You can configure several aspects of the Address Book by using its Preferences dialog box (see Figure 10.4). To open this dialog box, select Address Book, Preferences or press ![]() -,.
-,.
Figure 10.4 Maximize the benefits of your Address Book by customizing it using the Preferences dialog box.

Configuring Address Book General Preferences
Using the General tab of the Preferences dialog box, you can configure the following preferences:
• Show First Name—Click the Before Last Name radio button to have Address Book display contact information in the first name, last name format. Click the Following Last Name radio button to display contacts in the last name, first name format.
• Sort By—Use this pop-up menu to specify how you want Address Book to sort the Cards column: by First Name or by Last Name.
• Address Format—Use this pop-up menu to select the address format you want to use by country.
• Font Size—Use this pop-up menu to select the Small, Medium, or Large font size for the information shown in the Address Book window.
Configuring Address Book Accounts Preferences
You can use the Account tab of the Preferences dialog box to configure the following preferences:
• Synchronization via MobileMe—If you use more than one Mac and have a MobileMe account, you can keep your Address Book synchronized on all your computers. Activate the Synchronize with MobileMe check box and click the MobileMe button. You’ll move to the MobileMe pane of the System Preferences application, where you can configure your options.
![]() To learn how to use MobileMe to synchronize information, see “Using MobileMe to Integrate a Mac onto the Internet,” p. 421.
To learn how to use MobileMe to synchronize information, see “Using MobileMe to Integrate a Mac onto the Internet,” p. 421.
• Synchronization with Yahoo!—If you have a Yahoo! account, activate this check box to synchronize the contacts in that account with your Address Book. Enter your Yahoo! ID and password and click OK to connect to your Yahoo! account.
• Synchronization with Google—If you have a Google account, activate this check box to synchronize the contacts in that account with your Address Book. Enter your Google ID and password and click OK to connect to your Google account.
Note
![]()
Address Book can also work with Lightweight Directory Access Protocol (LDAP) directories, which can provide address information over a network. Explaining how to use such directories is beyond the scope of this chapter. If you need help, see the administrator of the network that is providing one or more LDAP directories to you.
Customizing Your Address Book Card Template
You can customize the information and layout of the cards in your Address Book.
Open the Address Book Preferences window and click the Template button to open the Template preferences pane.
To change the layout of and the information contained on the cards in your Address Book, you can do any of the following:
• Add fields—Use the Add Field pop-up menu at the top of the dialog box to add fields to the cards in your Address Book. To add a field, select it on the menu. The field will be added and it will be greyed out on the pop-up menu to indicate that it is part of the current template.
• Remove fields—Click the minus sign next to a field to remove it from the card.
Tip
![]()
You can also edit the card template by selecting Card, Add Field, Edit Template.
• Add more fields of the same kind—Click the plus sign next to a field to add another field of the same type to the card.
• Change a field’s label—Use the pop-up menu next to a field’s label to change that label. You can select one of the labels on the menu or select Custom and create a custom label.
Using these tools, you can customize the contents of cards and the specific fields they contain as much as you like. Because Address Book displays only those fields that contain data (when you view a card), you don’t need to be concerned about having too many fields on your cards because on each card, you’ll only see those fields that contain data.
Configuring Address Book’s Phone Number Format
You can change the phone number format used in Address Book by using the following steps:
1. Open the Phone pane of the Address Book Preferences dialog box.
2. To have Address Book format phone numbers automatically, activate the Automatically Format Phone Numbers check box. With this active, Address Book will automatically add hyphens, periods, or other formatting elements to phone numbers when you enter them on a card.
3. If you activate the check box mentioned in the previous step, use the Formats pop-up menu to select the format that should be used.
Tip
![]()
You can create custom phone number formats by clicking the down arrow next to the Formats pop-up menu, which opens a pane showing the configured formats. Select one and click Edit to change it. To add a new format, click the plus sign. To remove a format, select it and click the minus sign.
Choosing vCard Preferences
On the vCard pane of the Address Book Preferences dialog box, you can set the following preferences:
• vCard Format—Click the 3.0 radio button to use the newer vCard format. Click the 2.1 radio button to use an older version of the vCard standard.
• vCard 2.1 Encoding—Use the Encoding pop-up menu to choose the encoding you want to use, such as Western (Mac OS Roman). This is only used with the older 2.1 vCard format.
• Enable Private Me Card—You can use this option to hide information on your vCard so that information won’t be exported when you provide your vCard to someone else. To do so, activate this check box. Edit your card and deactivate the check boxes for the data that you don’t want to include on your vCard when you share it.
• Export Notes in vCards—If you activate this check box, when you export vCards, any notes you have entered for a card are exported with the card. If you put information in the notes on cards, be careful with this one because any information you put in notes will be exported with the vCards!
• Export Photos in vCards—If you activate this check box, when you export vCards, any vCards you export that contain photos will have those photos included when you export them.
Sharing Your Address Book with MobileMe Users
You can share your Address Book information with other people who use MobileMe. To do so, perform the following steps:
1. Open the Accounts pane of the Address Book Preferences dialog box.
2. Click the Sharing tab.
3. Activate the Share Your Address Book check box.
4. Click the Add button (+). The information in your Address Book will appear in the resulting sheet.
5. Select the people who use MobileMe with whom you’d like to share your Address Book and click OK. You’ll move back to the Sharing tab and the people whom you selected will be shown in the list.
6. Activate the Allow Editing check box for those people whom you want to be able to change information in your Address Book.
7. Select the people you have added and click the Send Invitation button. An email will be created and addressed to those people. This email will contain the link they need to be able to access your Address Book information.
Tip
![]()
To remove someone from the list of people who can access your Address Book, select his name on the list and click the Remove button (-).
Adding Contacts to Your Address Book
Obviously, before an address book is of much value, it has to have some information in it. There are several ways to get information into your Address Book:
• Edit your own address card.
• Add contacts manually.
• Add a contact from an email message you have received.
• Import a contact’s vCard.
• Import contacts from an email application.
• Synchronize your Exchange Google, or Yahoo! account contacts with your Address Book.
Editing Your Own Address Card
The first time you open Address Book, a card is created for you automatically based on the information you entered when you installed Mac OS X. If you entered one or more email addresses when you installed Mac OS X, those addresses are included in your address card automatically. You should edit this card, mostly so that you can easily send your contact information to other people simply by sending them your vCard.
Note
![]()
Another place your card’s information is used is for Safari’s AutoFill feature. When you complete a form on the Web, your card’s information is used if you choose to enable Safari’s AutoFill feature.
You can jump to your card by selecting Card, Go to My Card. Your card will be selected. Your card’s icon has a silhouette next to your name. When you select your name in the Name column, your card appears; its image well is marked with the text me.
If you want to create a different card for yourself for some reason, you can create a new card and enter your contact information in it. After you have created your new card, select it and select Card, Make This My Card (this is disabled if you have already selected your card).
Tip
![]()
You can export a vCard by viewing it and selecting File, Export, Export vCard. Select a location, name the vCard, and click Save.
You can edit your own card using the same steps you use to edit any other cards (editing cards is explained shortly).
Adding Contacts Manually
As you might expect, you can add people to your Address Book by inputting their information manually.
To manually add an address, do the following:
1. Click the Plus button in the Name column; select File, New Card; or press ![]() -N to see a new, empty address card. The first name is highlighted by default so you can edit it immediately (see Figure 10.5). The fields on the card are those that are defined in your current template.
-N to see a new, empty address card. The first name is highlighted by default so you can edit it immediately (see Figure 10.5). The fields on the card are those that are defined in your current template.
Figure 10.5 This is a new card, ready for the contact’s information.

2. Input the first name.
3. Press Tab to move to and select the Last field, and then enter the contact’s last name.
4. Press Tab to move to and select the Company field, and then enter the person’s company information if applicable.
5. If you want the company to be listed above the name, activate the Company check box.
6. Press Tab to move to and select the first contact information, which is work phone by default.
7. Click the menu icon to reveal the label pop-up menu (see Figure 10.6).
Figure 10.6 Use this pop-up menu to label contact information.
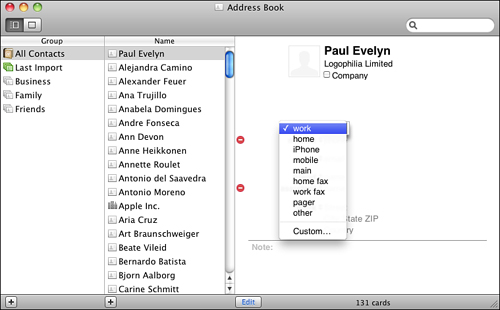
8. Select the label for the contact information, such as home.
Note
![]()
Two entries on the label pop-up menu require some explanation. The selection called other inserts the label other. If you select Custom, you can create a custom label for a field.
9. Enter the contact information, such as a work phone number if you chose the label work.
10. Continue tabbing to each field on the card, selecting the label for that field and editing the information to fill in the rest of the card.
11. If the contact has a home page, select the home page field and enter the URL of the home page with which you want to associate the contact.
12. If you want to remove fields from the card, click the Remove Field button (the minus sign) next to the field you want to remove. The field is removed from the current card only.
13. If you want to add more fields of the same type to the card, click the Add Field button (+) next to one of the existing fields. After you have added a field, you can edit it in the same way as the default fields. Similar to removing a field from a card, when you add a field to the card, it is added on the current card only.
![]() To learn how to add a field to all cards in the Address Book, see “Customizing Your Address Book Card Template,” p. 219.
To learn how to add a field to all cards in the Address Book, see “Customizing Your Address Book Card Template,” p. 219.
14. If you have an image you want to associate with the contact, drag the image onto the contact’s image well. (You can add images in the usual graphics formats, such as JPEG or TIFF.) When you are over the image well, the cursor changes to a green circle with a plus sign in it. Release the mouse button and you see the image in a new window (see Figure 10.7).
Figure 10.7 When you drop a picture on the photo well, Address Book displays the image in this window.

15. Use the slider at the bottom of the window to crop the image.
Tip
![]()
When you are editing a card, you can double-click an image or the image well to open the image editing window. You can also select Card, Choose Custom Image to open the same window. In that window, click the Choose button to move to and select an image to display in the window. If you have a camera, such as an iSight camera, connected to your Mac, click the camera button to capture the image being taken by the camera. With either an imported or captured photo you can apply Photo Booth effects by clicking the effects gallery button.
16. When the image appears as you want it, click the Set button.
17. Add notes for the card by clicking next to the Note label and typing the note.
18. Click the Edit button to move out of the Edit mode. Your new card is now ready to use.
Adding a Contact from an Email Message
You can create a contact in your Address Book by adding the sender’s information from an email message to it. To add a contact from an email that you receive in the Mail application, do the following:
1. Use Mail to open an email message from the person whom you want to add to your Address Book.
2. Select Message, Add Sender to Address Book (or press Shift-![]() -Y). The person’s name and email address are entered on a new address card.
-Y). The person’s name and email address are entered on a new address card.
Using vCards to Add Contacts to Your Address Book
The benefit to using a vCard is that you can add a lot of information about a contact with very little work on your part. When you receive a vCard from someone, use the following steps to add that person’s address card to your Address Book:
1. Drag the vCard onto the Name column in Address Book.
Note
![]()
When you import vCards to your Address Book, the group called Last Import always contains the cards you most recently added.
2. Click OK when prompted. The vCard will be added to your Address Book.
3. Select the card and click the Edit button.
4. Edit the information as needed (you learn how to edit cards later in this chapter).
Note
![]()
vCard files have the filename extension .vcf (virtual card file).
Importing Contacts from Another Application
If you have used another email application in the past, you probably have an Address Book or Contact database in that application. If that application supports vCards, you can easily export vCards from the application and then add them to the Address Book.
As an example of how this works, the following steps show you how to export contacts from Microsoft’s Entourage email application and then add those contacts to the Address Book. Because Entourage supports vCards, you can create vCards for your Entourage contacts and then import those contacts into the Address Book:
1. Create a folder to temporarily store the vCards you export from Entourage. You will probably want this folder visible on the Desktop or in the Dock so you can access it easily.
2. Open Entourage.
3. Click the Address Book button to move into the Address Book mode.
Note
![]()
If you drag an Entourage group to create a vCard, a text clipping file is created instead. You need to re-create your groups within Address Book.
4. Drag the contacts for whom you want to create vCards from the Entourage window onto the folder you created in step 1, and drop them in that folder. A vCard is created for each of your Entourage contacts.
5. Open Address Book.
6. Drag the vCards from the folder in which you stored them onto the Name column. The contacts you added are now available for you to use and edit.
It is unlikely that all the information in your current address book or contact list will make it into the Address Book application. For example, if you have added Category information for your Entourage contact list, that information is not imported into the Address Book. After you have imported contacts into the Address Book, you should activate them so you know exactly what information made it in, and what didn’t. If you lost any important information, you might have to spend some time re-creating it within Address Book.
Note
![]()
When you import addresses into your Address Book and it finds duplicates, you have the opportunity to review the addresses you are adding so you can remove the duplicated entries. You can also merge the multiple entries together.
Editing Contacts in Your Address Book
To edit an address in your Address Book, use the following steps:
1. In Address Book, view the card containing the information you want to edit.
2. Click the Edit button. Address Book moves into the Edit mode. The first name is selected and is ready to edit.
3. Use the same steps to change the information on the card that you do to create a card (see the earlier section on creating cards for the details).
Tip
![]()
You can use the Add Field button on the Template pane of the Address Book Preferences dialog box to add fields to the card. You can also add fields by using the Card, Add Field command. On the Add Field menu, you can select the type of field you want to add.
Many of the data fields have pop-up menus containing the data field’s label. You can open these menus and select a new label for that field. The changes you make by doing this affect only the current address card; this means you can configure the information for a specific card independent of other cards. For example, if you know someone who has three mobile phones, you can select mobile as the label for three of the fields on that person’s address card. You can also select Custom to create custom field labels for existing or new fields.
Note
![]()
After you add a field, you can’t remove it. You can only delete its data so that it doesn’t appear on the card any more.
You can quickly swap the last name with the first name for the card by viewing the card and selecting Card, Swap First/Last Name.
To remove an image from a card, view the card and select Card, Clear Custom Image.
If you don’t want a field’s data to appear on a card, select the data and click the Delete data button (the minus sign). The data is replaced with the type of data it is, such as Email for an email address. The data does not appear on the card when it is viewed.
To delete a card from the Address Book, select it and press Delete. Click Yes in the resulting prompt and the card is removed from Address Book.
Tip
![]()
You can view a card in an independent window by viewing it and selecting Card, Open in Separate Window (or by pressing ![]() -I). You can also edit a card when it is displayed in a separate window.
-I). You can also edit a card when it is displayed in a separate window.
Working with Address Groups
Address groups (just called groups in Address Book) enable you to email multiple people using a single object. Working with an address group is similar to working with other address cards in your Address Book.
There are two types of groups. A group is a collection of cards that you add to the group manually. A smart group defines a set of criteria; cards that meet these criteria are added to the group automatically.
Creating and Configuring a Basic Address Group
Creating an address group is simple, as you can see in the following steps:
1. Click the New Group button, which is the plus sign in the Group column; select File, New Group; or press Shift-![]() -N. You will see a new group in the Group column, and the name of the group will be selected and ready to edit.
-N. You will see a new group in the Group column, and the name of the group will be selected and ready to edit.
2. Change the group’s name to something meaningful and press Return.
3. Click All in the Group column to view all the cards in the Address Book.
4. Search or browse for the cards you want to add to your Address Book.
5. Drag the cards you want to be included in the group onto the group’s icon in the Group column. Those cards become part of the group.
Tip
![]()
You can create a new group and add selected address cards to it by first selecting the cards you want to place in the new group and selecting File, New Group From Selection. A new group is created and includes the cards you selected.
You can view a group by selecting it on the Group column. The Name column shows only those cards that are included in the group. You work with the cards in a group just as you do individual cards. For example, you can edit a card, use it to send email to that individual, and so on.
To remove a card from a group, view the group, select the card you want to remove, and press Delete. After you confirm the action, the card is removed from the group. However, the card still exists in the Address Book.
You can also export a group as a vCard. Select the group, Control-click it or right-click with a two-button mouse, and select Export Group vCard. Select a location, name the card, and click Save. You can use the group’s vCard in the same way you use vCards for individuals.
If any of the cards you add to a group includes more than one email address, you can edit the mailing list for the group to set the specific addresses that are used:
1. Select the group for which you want to configure the mailing list.
2. Select Edit, Edit Distribution List. The Edit Distribution List dialog box will appear.
3. Select the email address you want to use for an individual by clicking it. The address that will be used appears in bold; other addresses are grayed out to show that they won’t be used.
4. Click OK. When you send a message to the group, the addresses you selected are used.
Tip
![]()
You can change all the email addresses used for the group to be of the same kind by selecting a type on the Change All Labels pop-up menu. For example, to use only home email addresses, select home.
Creating a Smart Address Group
You can use the Smart Groups feature to have Address Book populate a group based on criteria you define rather than manually placing contacts in the group. Smart groups work just like other smart objects, such as smart playlists in iTunes or smart photo albums in iPhoto. To create a smart address group, perform the following steps:
1. Choose File, New Smart Group or press Option-![]() -N. The Smart Address Book sheet appears (see Figure 10.8).
-N. The Smart Address Book sheet appears (see Figure 10.8).
Figure 10.8 To create a smart address group, define the criteria for contacts that you want included in the group and Address Book will put them there automatically.
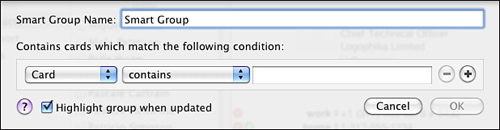
2. Enter the name for the group in the Smart Group Name field.
3. On the first pop-up menu, choose the field on which you want to base the first criterion. For example, to base it on last name, choose Other and then choose Last. Choose Card to base on the criterion on any data on a card.
4. On the second pop-up menu, choose the operator for the condition, such as contains, is, and so on.
5. In the box, type the data for the condition, such as the last name.
6. To add another condition, click the Add Condition button (the plus sign). An empty condition is created.
7. Configure the new condition by repeating steps 3–5.
8. Continue adding conditions until you have all that you want to use.
9. Choose the pop-up menu at the top of the sheet to choose All if all the conditions you configured have to be met to have a card included in the group or Any if you want a card included as long as it meets at least one condition.
10. Activate the Highlight Group When Updated check box if you want Address Book to highlight the group when any changes are made to it. Because Address Book automatically includes or excludes cards in the group based on it conditions, it’s not obvious when the group changes. Use this setting if you want to know whenever a smart group changes.
11. Click OK. The smart group is created and any cards that meet its criteria are added to it automatically.
Following are a few tidbits about smart groups:
• To change the contents of a smart group, open its contextual menu and choose Edit Smart Group. The Smart Group criteria sheet will appear. Use that sheet to change the group’s conditions. When you click OK, the group’s content will reflect its current conditions.
• To remove a condition from a smart group, edit it and click the Remove Condition button (the minus sign) next to the condition you want to delete. That condition no longer impacts the cards included in the group.
• You can perform similar tasks with a smart group that you can with basic groups, such as sending email to the group.
Getting More Out of Address Book
To complete your look at the Address Book application, the rest of this chapters takes you through a few useful techniques, including selecting and printing contacts, using the Address Book widget, subscribing to another person’s address book, and using Address Book keyboard shortcuts.
Addressing Email
There are several ways in which you can address email to people in your Address Book:
• View the contact to whom you want to send a message and click the label for the email address you want to use. Select Send Email on the pop-up menu.
• Drag the contact’s vCard to the To, Cc, or Bcc box of a Mail email message.
• Open a group’s contextual menu and select “Send email to groupname,” where groupname is the name of the group you clicked.
• Drag a group’s vCard to the To, Cc, or Bcc box of a Mail email message.
Note
![]()
When you send email from the Address Book, the email application used is your default email application.
Printing Your Address Book
As you work with your Address Book, you might want to print it to take it with you, to print address labels, and so on. When you print from the Address Book, you have the following four layout options:
• Envelopes—This option prints envelopes for your contacts.
• Lists—This option prints the cards you select in a list. You can select the attributes that are included on the list for each card.
• Pocket Address Book—This option prints a small version of your Address Book that is designed to be carried.
• Mailing Labels—This prints the cards as mailing labels.
To print the Address Book as a list, use the following steps:
1. Select the cards you want to print. To print the entire Address Book, select All in the Groups column.
2. Select File, Print or press ![]() -P. The Print dialog box opens. The first time you go to print in Address Book, the dialog box is collapsed; click on the downward-facing arrow at the right to expand the dialog box and see all of the options.
-P. The Print dialog box opens. The first time you go to print in Address Book, the dialog box is collapsed; click on the downward-facing arrow at the right to expand the dialog box and see all of the options.
3. On the Style pop-up menu, select Lists.
4. Configure the printer, presets, paper size, and orientation just as you do with any print job.
5. Select the attributes you want included for each card by activating their check boxes. You will see a preview of the list in the left side of the dialog box.
6. Select the font size on the Font Size pop-up menu.
7. Print the list.
To print mailing labels, use the following steps:
1. Select the cards you want to print. To print the entire Address Book, select All in the Groups column.
2. Select File, Print or press ![]() -P. The Print dialog box opens.
-P. The Print dialog box opens.
3. On the Style pop-up menu, select Mailing Labels.
4. Click the Layout tab.
5. If you are printing on standard Avery or DYMO labels, select the label type on the Page pop-up menu. If you are creating a custom label, select Define Custom instead; in the Layout Name sheet that appears, enter the name of the label you are creating and click OK. As you make choices, a preview of the labels will appear in the left pane of the dialog box.
6. If you selected a standard label, select the specific label number you are printing on the label number drop-down list that appears next to the Page pop-up menu. If you selected Define Custom in the previous step, use the controls under the Layout tab to design the label, such as by defining the margins, number of rows and columns, and the gutters.
7. Click the Label tab.
8. Select the address type for which you want to print labels on the Addresses pop-up menu. If you want to print labels for all addresses, select All.
9. On the Print In pop-up menu, select how you want the labels to be sorted. The options are Alphabetical Order and Postal Code Order.
10. If you want to include the contact’s company name on their label, activate the Company check box. If you want country to be included on the labels, activate the Country check box. If you don’t want your own country to be included, activate the Except My Country check box.
11. Click the Color box and use the Color Picker to select the color of the text on the labels.
12. Click the Image Set button to place an image on the labels.
13. Click the Font Set button to open the Font panel and select the font you want to use on the labels.
14. Activate the labels in the preview pane.
15. Print the labels.
Note
![]()
The other two types of printing can be done in a similar way. Choose the type of print job you want to do on the Style pop-up menu and use the controls in the dialog box to configure the print job.
Using the Address Book Widget
You can also access your Address Book through the Address Book widget.
![]() To learn how to use the Address Book widget, see “Using the Address Book Widget,” p. 565.
To learn how to use the Address Book widget, see “Using the Address Book Widget,” p. 565.
Subscribing to an Address Book
If other MobileMe users have shared their Address Book with you, you can subscribe to it to view or edit its information by using the following steps:
1. Select File, Subscribe to Address Book.
2. In the resulting sheet, enter the MobileMe user’s username and click OK. You’ll be able to view the other user’s Address Book information, and you can edit it if you have permission to do so.
Using Address Book Keyboard Shortcuts
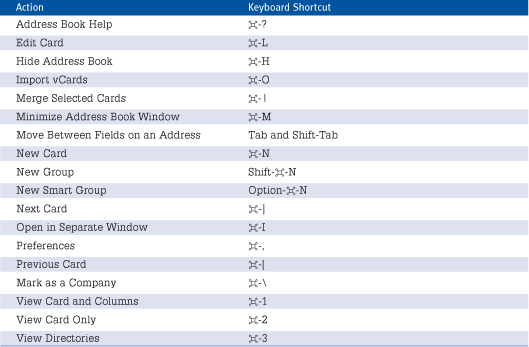
Table 10.1 shows keyboard shortcuts for the Address Book application.
Table 10.1 Keyboard Shortcuts for the Address Book