9. Playing and Managing Movies and Digital Video
Playing Digital Video with QuickTime
Apple’s QuickTime is the technology your Mac uses to handle dynamic data. Dynamic data simply means data that changes over time. This includes video, audio, and other such media. In fact, QuickTime technology and the QuickTime framework enable all the iLife applications, including iTunes. Without QuickTime, using Mac OS X wouldn’t be nearly as interesting as it is.
Under Mac OS X, except for viewing QuickTime movies on your computer and on the Web, you likely won’t deal with QuickTime directly very often. But, in addition to knowing how to handle those tasks, you should have a good understanding of the QuickTime technology.
Since its introduction, Apple’s QuickTime has been one of the most successful multimedia standards on any platform. In fact, it has been so successful that it is also widely used on Windows computers; QuickTime movies on Windows play the same way they do on the Mac. QuickTime has also been widely adopted on the Web, with many websites serving video and animation files as QuickTime movies. And, like on the Mac, QuickTime technology drives iTunes on Windows computers.
Although you are most likely to encounter QuickTime movies on the Web, you will encounter them in many other places, including interactive games, reference titles, entertainment titles, learning tools, and of course web pages.
Opening QuickTime Player
QuickTime Player is the basic application you use to view QuickTime content stored on your computer or in the QuickTime format on CD or DVD, such as those you create using iMovie. Although the appearance of the QuickTime Player controls varies a bit among these contexts, the controls you use to watch movies work similarly.
To launch QuickTime Player, open it from within the Applications folder.
Watching QuickTime Movies Stored Locally
If you use a VCR, CD player, or DVD player, you won’t have any trouble using the QuickTime Player controls to view QuickTime content. Find a QuickTime movie on your hard drive or on a disc and open it. QuickTime Player launches and you see the QuickTime Player window (see Figure 9.1).
Figure 9.1 The QuickTime Player window provides the basic controls you use to watch QuickTime movies.
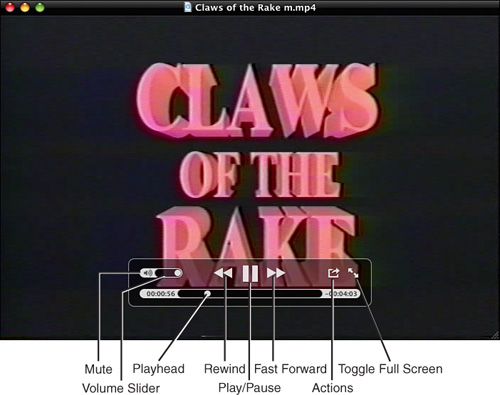
Most of the controls in the QuickTime Player window are easy to understand. For example, the Rewind button plays the movie in reverse, the Fast Forward button plays the movie in fast forward mode, and so on.
Tip
![]()
QuickTime movie files use the extension .mov. If you don’t know where a QuickTime movie is, use Spotlight to search for files with this extension.
However, you need to become familiar with the less obvious parts of the QuickTime Player window, especially if you have never worked with digital video before. The current frame is shown in the viewing window (if you haven’t played the movie, it is the first frame in the movie). Just below the viewing window is the movie’s Timeline bar (also known as the Scrubber bar). This represents the total length of the movie. The location of the playhead shows where in the movie the current frame is located. As you play a movie, the playhead moves to the right in the Timeline bar so that it always shows the location of the frame displayed in the viewing window.
Tip
![]()
You can also change the size of the QuickTime Player window using the Resize handle. The window remains in proportion to the size in which the movie was created. If you hold down the Shift key, you can resize the window any way you want (with sometimes amusing effects on the movie itself). You can quickly return a movie to its default size by selecting View, Actual Size or by pressing ![]() -1.
-1.
Control the size of the movie using the commands on the View menu. You can view it at Full Screen, Actual Size, or Fit to Screen. Increasing the size of a movie beyond the size at which it was created sometimes decreases its image quality and frame rate. With some movies, this is hardly noticeable; with others, increasing the size can make them unwatchable. You can experiment to see which size is the best compromise for a particular movie on your specific system.
Tip
![]()
To mute a movie, click the speaker icon at the left edge of the Volume slider.
Click the Play button (or press the spacebar) to view the movie and use the Volume slider to adjust its sound level.
![]() QuickTime Player offers many keyboard shortcuts; to learn which shortcuts are available, see “Using QuickTime Player Keyboard Shortcuts,” p. 197.
QuickTime Player offers many keyboard shortcuts; to learn which shortcuts are available, see “Using QuickTime Player Keyboard Shortcuts,” p. 197.
Note
![]()
When you minimize a movie you are watching, it moves onto the Dock and continues to play.
If the movie contains chapter markers, such as those you can add to your iMovie projects, jump to a specific chapter in the movie by opening the Chapter pop-up menu and selecting the chapter you want to view. If you are playing the movie when you use this menu, you will jump to the chapter you selected and the movie will continue to play. If it isn’t playing, you’ll see the first frame in the chapter you selected.
Note
![]()
QuickTime movies can also be inserted into many types of documents, such as Word files, presentations, and so on. When you view such a file, you will see a “mini” QuickTime controller that enables you to watch the movie embedded in a particular document. Applications can add or remove controls to customize the interface you see in that application, but when you understand how to view movies with the QuickTime Player, you won’t have any trouble with these other controllers.
You can move to any point in the movie by dragging the playhead to the frame you want to view.
You can get more information about a movie by selecting Window, Show Movie Inspector. In the resulting window, you see technical information about the movie, such as its format, resolution, and size.
You can cause a movie to loop so that it plays over and over again by selecting View, Loop or by pressing ![]() -L.
-L.
Watching QuickTime Movies Stored on the Web
QuickTime is a major format for movies on the Web. Using the QuickTime plug-in, you can watch QuickTime movies from within a web browser, such as Safari. When you do so, you use controls that are similar to those in the QuickTime Player application.
One of the best places to view QuickTime movies is at Apple’s Movie Trailer site. Here, you can view trailers for the latest creations from Hollywood.
Caution
![]()
If you use a slow Internet connection, watching movies, such as the movie trailers on the Apple website, can be an exercise in patience. High-quality movie files are big. Watching them on the Web, even with the streaming feature and the MPEG-4 format, can take more time than it is worth. If you use a slow connection, try watching some movies to see whether you can tolerate the length of time it takes to download enough of the movie so you can begin watching it. If you can, great. If not, you might have to find smaller movies to watch or, even better, move up to a faster connection. You can also use the Instant-On preference to configure the delay before a movie begins to play.
To view a movie or video online, you have two choices:
• If you know the address of the movie file, select File, Open URL (or press ![]() -U), type the address in the Movie URL text box, and then click OK.
-U), type the address in the Movie URL text box, and then click OK.
• Use Safari to surf to the page that contains the movie you want to view, and then click the link to the movie.
The movie will start to download. As soon as enough has been downloaded that it can play without interruption the rest of the way, it will begin to play. The movie will appear in a window that contains QuickTime controls you can use to watch the trailer (see Figure 9.2). (Note that if you open an HD version, the QuickTime Player application will launch for you to watch the trailer.) If you use a fast connection and use the Instant-On feature, this happens quickly. If you use a slow connection or have configured a delay using the Instant-On slider, it can take longer. You can see how much of a movie has been downloaded by looking at the dark shaded part of the Timeline bar. Use the QuickTime controls listed in Table 9.1 to control playback.
Figure 9.2 You can use QuickTime Player to view movies online.
Depending on how the movie is presented, you might not see the window shown in Figure 9.2. For example, some QuickTime content will play in the iTunes window. Others, especially those that offer full-screen versions, will provide a customized playback window or will play in the QuickTime Player.
Tip
![]()
You can start a movie at any time by pressing the spacebar. If you don’t wait for the automatic start, the movie might stop before it finishes if it runs out of downloaded movie before it gets to the end.
Using QuickTime Player Keyboard Shortcuts
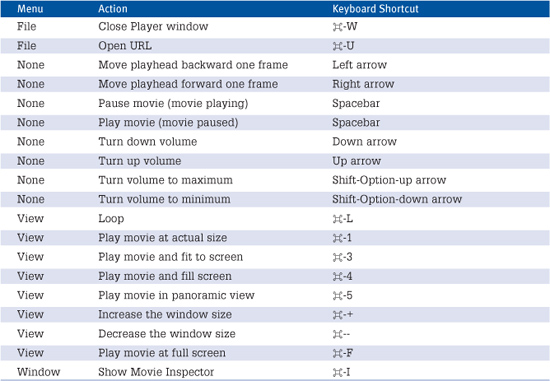
Some useful QuickTime Player keyboard shortcuts are shown in Table 9.1.
Table 9.1 Keyboard Shortcuts for QuickTime Player
Watching DVD Movies with DVD Player
DVDs are a great way to watch movies, TV shows, and other content. Because they are digital, the image and sound quality of DVD movies is superb (well, except for poorly produced ones, that is). And the digital format enables special features that can’t be duplicated with other means, such as videotape. For example, with DVD movies, you can get true 5-, 6-, or even 7-track soundtracks to provide unbelievable surround sound and sound fidelity. Plus, DVDs usually have a lot of features—missing scenes, trailers, and so on.
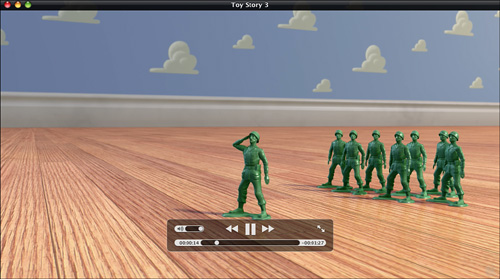
Mac OS X supports the playback of DVD movies with its DVD Player application. When you insert a DVD, your Mac automatically starts the DVD Player application. In most cases, DVD Player will enter into Full Screen mode and start playing your DVD. Moving your mouse to the top of the screen reveals the Image bar, along with the menu bar (see Figure 9.3). Moving your mouse to the bottom of the screen reveals the Controller. Your movie plays in the Viewer, which is the main part of your screen.
Figure 9.3 With DVD Player, you can enjoy all the amazing content available on DVD.
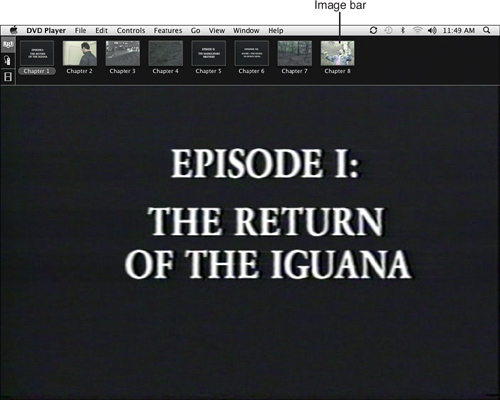
In Full Screen mode, the Mac OS interface disappears and you can see only the DVD content and the DVD windows you choose to display by moving the mouse to reveal them. If you need to resize the window so that you can have your movie running while you work on other things, move your mouse to the top of the screen to reveal the menu bar and use the View menu to change the window size. Your options include Half Size, Actual Size, Double Size, and Fit to Screen.
Note
![]()
When you view a movie at a size other than full screen, DVD Player will have a separate Viewer window, a Controller that you can move around to different locations on the screen, and the ability to open a window to see the Chapters/Bookmarks/Video Clips.
![]() To learn how to add digital sound to your Mac, see Chapter 32, “Working with Your Mac’s Sound,” p. 625.
To learn how to add digital sound to your Mac, see Chapter 32, “Working with Your Mac’s Sound,” p. 625.
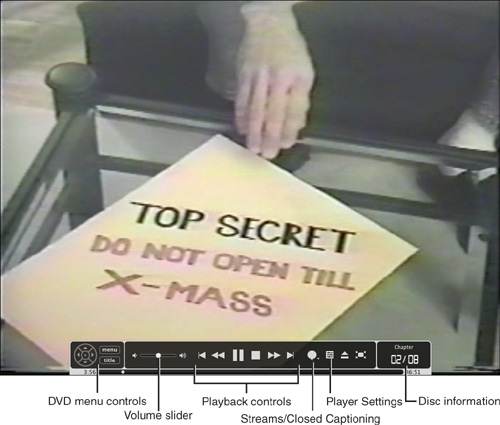
The Controller contains the controls you use to watch movies (see Figure 9.4).
Figure 9.4 The Controller does just what you think: It enables you to control DVD playback.
Note
![]()
To really enjoy DVD content, you should connect your Mac to a digital sound system.
The Player settings and Streams/Closed Captioning buttons provide additional control over what you hear and see from your DVD. Clicking on the Streams/Closed Captioning button presents you with a menu to select different languages, subtitles, closed captioning, and viewing angles.
If you have used a standard DVD player or VCR, the DVD Player controls will be easy to understand. To play and control a movie, use the following steps:
1. Insert the DVD into your Mac’s DVD drive. After a moment, the DVD is mounted on the machine. By default, DVD Player opens and begins to play the DVD. Depending on the DVD, the disc’s main menu might appear or you might be prompted to select a soundtrack or other features.
Tip
![]()
To configure what action your Mac takes when you insert a DVD, use the CDs & DVDs pane of the System Preferences application.
2. Select the menu option you want, such as Play Movie, by clicking it. You can also use the arrow keys to move among the menu options and then press Return to select an option. The movie begins to play in the Viewer. When you activate a control, the upper-left corner of the Viewer briefly displays an icon or text describing the control you used most recently (such as Play).
Tip
![]()
Click in the Disc information section on the Controller to cycle through the available data, such as chapter, remaining time, and so on. Click the Title or Chapter text to change the display to the related information.
3. Use the commands on the View menu to control the size of the Viewer.
4. To bring the Controller back, move the pointer, press a key, or press Option-![]() -C.
-C.
Note
![]()
If you’re running a fairly powerful Mac and you minimize the Viewer, it moves into the Dock and the movie continues to play. Be sure to take a look at the DVD Player preferences and deactivate the Pause Playback option (it’s in the Player tab) when the viewer is minimized.
5. If you move the pointer to the bottom of the screen, the Controller will appear displaying the Timeline bar. At the left end, you see the current position of the playhead while at the right end you see the time remaining. You can drag the playhead to move to a different position in the movie.
6. Use any of the controls on the Player settings button on the Controller to modify how the DVD Player application displays your movie. You can modify the video zoom and color, as well as display an audio equalizer using the small triangle at the top-right corner of the Player settings window.
Tip
![]()
You can also control a movie by selecting onscreen controls with the mouse.
Following are some other DVD playback notes:
• DVD menus—All DVD movies include a menu that provides access to the content of the disc and its special features. You can highlight and select commands on these menus using the keyboard’s arrow buttons, using the mouse to point to them, or using the mouse to point to them on the Controller. You can move back to the most recent menu you viewed by clicking the menu button on the Controller; selecting Go, DVD Menu; or pressing ![]() -d. Depending on how the DVD is structured, clicking the title button might take you to the same place or it might move you to the DVD’s main menu.
-d. Depending on how the DVD is structured, clicking the title button might take you to the same place or it might move you to the DVD’s main menu.
Tip
![]()
When you move to a menu and then back to the DVD, you will move back to the same spot at which you were viewing the DVD when you selected the menu command.
• Use the Controller to quickly change the movie’s settings—For example, you can control subtitles, closed captioning, and select different angles (when available) from the Streams/Closed Captioning button.
• Scan forward or backward—When you scan forward or backward, you can control the rate of the scan by selecting Controls, Scan Rate, and then the rate at which you want to scan (such as 8x speed). DVD Player supports scan rates up to 32x, which is really fast. The scan rate you select controls both forward and backward scanning.
• Go menu—Many commands are available on this menu that you can use to quickly access various areas on the DVD, including the DVD menu, the beginning of the disc, the content you were viewing the last time you played the disc, bookmarks, titles, chapters, and so on.
• Bookmarks—You can use this feature to mark specific areas of a DVD so you can quickly return to them. When viewing content to which you want to add a bookmark, select Controls, New Bookmark. In the New Bookmark sheet, name the bookmark and click Add. You can return to that bookmark by selecting Go, Bookmarks, Bookmarkname, where Bookmarkname is the name of a bookmark you have created. You can also jump to a bookmark by selecting it on the Bookmark menu on the Image bar or by using the Bookmarks window. (You learn more about bookmarks later in this chapter.)
• Chapters—Most DVD content is organized by chapter. Moving your mouse to the top of the screen will reveal the Image bar; click on the icon of a book to see the chapters on your DVD. Choose Go, Chapter Number to jump to a chapter. You can also choose Window, Chapters (![]() -B) to move into the Chapters window on which you can click a chapter’s thumbnail to jump to it.
-B) to move into the Chapters window on which you can click a chapter’s thumbnail to jump to it.
Tip
![]()
If thumbnails don’t appear for the chapters, open the Action pop-up menu and choose Generate Missing Thumbnails.
• Keyboard commands work best—As you watch movies, you will find that the best way to control them is using the keyboard. Most of the major functions in the player have keyboard shortcuts. For the best DVD experience, learn to use these shortcuts.
![]() To learn about bookmarks, see “Working with Bookmarks,” p. 207.
To learn about bookmarks, see “Working with Bookmarks,” p. 207.
![]() To learn the many keyboard shortcuts for playback and configuration DVD Player offers, see “Using DVD Player Keyboard Shortcuts,” p. 210.
To learn the many keyboard shortcuts for playback and configuration DVD Player offers, see “Using DVD Player Keyboard Shortcuts,” p. 210.
Configuring DVD Player
Note
![]()
You can’t control a movie while the Preferences dialog box is open.
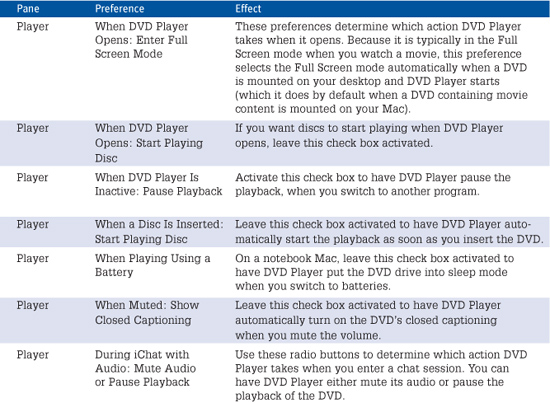
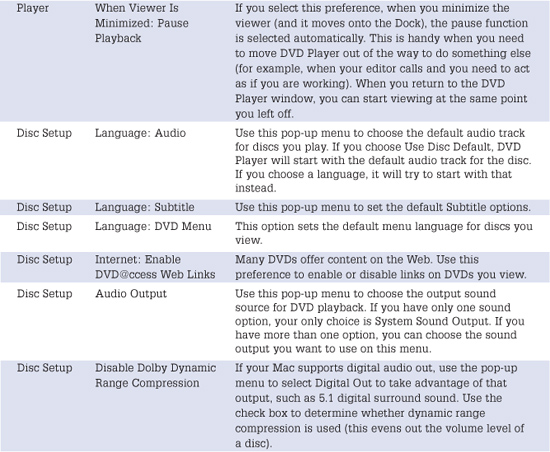
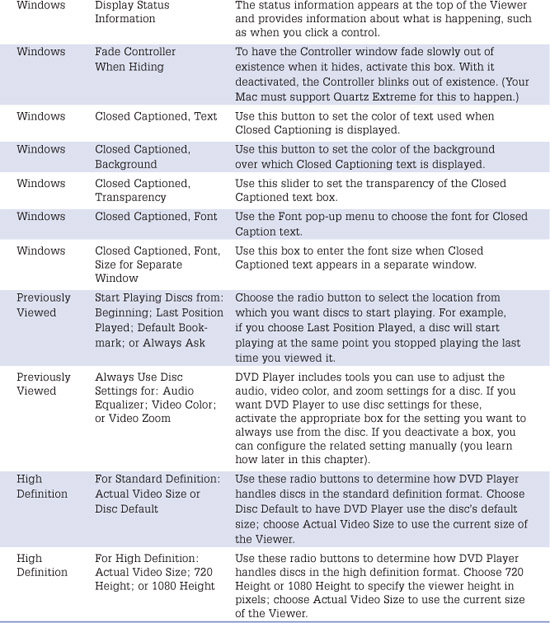
DVD Player is a relatively simple application, but you can do some configuration to make it work the way you want it to. The DVD Player preferences window has six panes: Player, Disc Setup, Full Screen, Windows, Previously Viewed, and High Definition. These preference settings are summarized in Table 9.2.
Table 9.2 DVD Player Preferences

Working with Disc Info
You can use the Disc Info window to rename a disc and set an image to display in the Viewer window when the disc isn’t playing, such as an image from the DVD. Here’s how:
1. Insert the DVD you want to work with.
Tip
![]()
If you watch a TV series on DVD and choose the Last Position Played preference, it can be somewhat confusing for you because when you insert a new disc, DVD Player will sometimes resume playing from a point that you haven’t viewed previously. This happens because the markers on the discs for different episodes during the same season might be the same. Thus, DVD Player can’t tell the difference between discs within the same season or series and moves to the same spot on the new disc where you left off on the previous one. If this happens, just select Go, DVD Menu to move to the disc’s menu. Then you can choose which part you want to view.
2. Move to the frame in the DVD that you want to display when the DVD is stopped—this image will be shown instead of a black Viewer window.
3. Select File, Get Disc Info. The Disc Info window will appear. This window has four panes. The Info pane provides detailed information about the disc including its audio and video formats, media type, and so on.
4. To rename a disc, type the name of the disc in the Title box. This doesn’t actually change the disc, but Mac OS X will substitute the name you enter for the disc’s name when it appears at the top of the separate Viewer window. Because discs are often named according to filename limitations, it’s often better to have DVD Player use a more meaningful name.
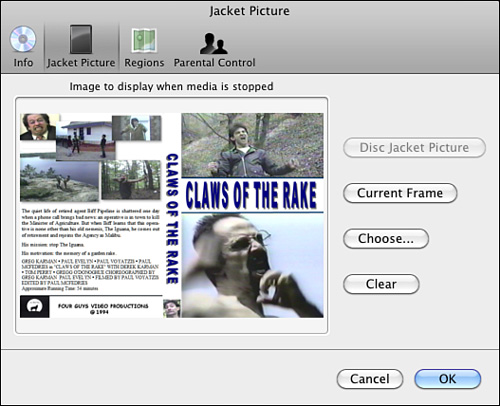
5. Click Jacket Picture. The image that appears in the image well is the image that will be shown on the screen when you stop playback. In most cases, this is the image from the DVD’s case. However, you can set this to be the frame at which you are currently located by clicking Current Frame. You can also choose a different graphic by clicking Choose and selecting the graphic you want to use instead (see Figure 9.5). You can return the image to the disc jacket’s image by clicking Disc Jacket Picture.
Figure 9.5 When this disc is stopped, the image shown in the image well will be displayed in the Viewer.
Caution
![]()
Many DVDs that claim to offer DVD-ROM or web content are not compatible with the Mac. However, you can often open these DVDs via the Finder to access some of this additional content.
Caution
![]()
You can only change the region four times, so you should be sure you want to change the drive’s region setting because after you’ve hit the limit, you won’t be able to change it again and you’ll only be able to play discs from that region from that point on. At the bottom of the Regions pane, you see how many region changes you have left.
6. Click the Regions icon to open the Regions pane. All DVDs are encoded with specific geographic regions. Likewise, all DVD players are encoded with a region. In order for a disc to be played, the player and disc’s region must be the same. On the Regions tab, you see the disc’s region and the drive’s region. When you insert a disc from a different region, you’ll be prompted to change the region setting for the drive to match so that you can play the disc.
7. Click the Parental Control icon to open that pane. When you’ve enabled Parental Controls for a user account, you can use the controls on this pane to determine what happens when the disc is inserted. For example, you can require authorization before the disc will be able to be played.
8. Click OK. The Disc Info window closes and any changes you made are saved. All your settings are remembered for the specific disc. For example, the name you gave the disc will be the title of the Viewer window. When you stop the disc, the image you selected will be shown in the Viewer.
Using Closed Captioning
Closed Captioning presents text on the screen for the speaking parts and some sound effect portions of a disc’s soundtrack. You can control Closed Captioning for a disc using the following pointers:
• Turn on Closed Captioning by selecting Features, Closed Captioning, Turn On. You can also press Option-![]() -T or you can select Streams/Closed Captioning from the Controller when viewing your DVD in Full Screen mode.
-T or you can select Streams/Closed Captioning from the Controller when viewing your DVD in Full Screen mode.
• To have the Closed Captioning appear in a window separate from the Viewer, select Features, Closed Captioning, Separate Window. (Remember that you can configure this window using preferences you learned about earlier in this chapter.) When you play this disc, the Closed Captioning will appear in a window called Closed Caption.
Note
![]()
If you have Closed Captioning displayed in a separate window, when you close the Closed Caption window, the Closed Captioning will move back into the Viewer window.
• Turn off Closed Captioning by selecting Features, Closed Captioning, Turn Off. You can also press Option-![]() -T.
-T.
Working with Bookmarks
Bookmarks enable you to set locations within a disc and move back to them easily. Bookmarks work just like chapters on a disc, except that you set them rather than the disc’s producer.
Setting Bookmarks
To set a bookmark, perform the following steps:
1. Move to the point at which you want to set a bookmark.
2. Select Controls, New Bookmark or press ![]() -=. The disc will be paused and the New Bookmark sheet will appear.
-=. The disc will be paused and the New Bookmark sheet will appear.
3. Name the bookmark. You can name the bookmark almost anything you want.
4. If you want the bookmark to be the default for the disc, activate the Make Default Bookmark check box.
5. Click Add. The bookmark will be added for the disc.
Using Bookmarks
There are a number of ways to work with the bookmarks you create, including the following:
• To jump to a bookmark, select Go, Bookmarks, bookmarkname, where bookmarkname is the name of a bookmark you have created. You’ll move to the bookmarked frame and the disc will play from there (if it was playing when you selected the bookmark).
• When viewing a DVD in Full Screen mode, move your mouse to the top of the screen to reveal the Image bar. Click the icon at the left end of the Image bar that looks like a bookmark; the Image bar will display the bookmarks you have created for the movie.
• Select Window, Bookmarks. The Bookmarks window will open. Here, you’ll see a list of all the bookmarks you have set for a disc.
• Double-click a bookmark in the window to jump to it.
• Click the Add button (+) to add a new bookmark.
• Select a bookmark and click the Delete button (-) to delete it.
• Open the Action menu and select Show Thumbnails. A thumbnail will be shown for each bookmark.
• Select a bookmark and open the Action menu. Select Rename and then rename the bookmark, or select Delete to delete it.
• If you make a bookmark the default, you can use the Default bookmark preference to have the disc always start playing from the bookmark each time you view it.
Working with Video Clips
You can mark video clips from DVDs you view and watch them. For example, there might be scenes you love to watch over and over. You can mark these segments as video clips and then easily view them anytime you want.
Note
![]()
The term “video clip” is a bit misleading. You aren’t actually creating a clip. Instead, you are marking a portion of the DVD as a clip so that you can watch that clip easily. It isn’t really a clip, which implies that you are saving the clip as a QuickTime movie or some other object that you could use in another application.
Capturing a Video Clip
To create a video clip, perform the following steps:
1. Move to the point at which you want the video clip to start.
2. Select Controls, New Video Clip or press ![]() --. The new Video Clip sheet appears, and the start time is set to the current location (see Figure 9.6).
--. The new Video Clip sheet appears, and the start time is set to the current location (see Figure 9.6).
Figure 9.6 Using the Video Clip sheet, you can create custom video clips for a disc.

3. Use the playback controls or playhead to move the point at which you want the video clip to end.
4. Click the Set button next to the End preview window. The end point of the clip is set.
Tip
![]()
You can use the same steps to set the starting point of the clip as well. The default start is set to be the current frame.
5. Name the clip.
6. Click Save. The sheet closes and the clip is saved.
Working with Video Clips
There are a number of ways to work with video clips you create, including the following:
• To jump to a video clip, select Go, Video Clips, videoclipname, where videoclipname is the name of a video clip you have created. The clip will play; when it starts, you will see its name in the upper-left corner of the window. When the clip is done, it will stop playing and you’ll see the complete message.
• To exit clip mode, select Go, Video Clips, Exit Clip Mode.
• To repeat a clip, select Go, Video Clips, Repeat Clip.
• When viewing a DVD in Full Screen mode, move your mouse to the top of the screen to reveal the Image bar. Click the icon at the left end of the Image bar that looks like a film strip; the Image bar will display the video clips you have created for the movie.
• Select Window, Video Clips. The Video Clips window opens. In this window, you’ll see the video clips you have created for a disc.
• Double-click a video clip in the window to play it.
• Click the Add button (+) to add a new clip.
• Select a clip and click the Delete button (-) to delete it.
• Open the Action menu and select Show Thumbnails. A thumbnail will be shown for each clip.
• Select a clip and open the Action menu. Select Rename and then rename the bookmark, or select Delete to delete it. Select Exit Clip Mode to move back to regular playing mode or Repeat Clip to repeat the video clip.
Using the DVD Player Timer
The Timer feature will cause a specific action to be performed when an event happens. For example, if you tend to fall asleep watching DVDs, you can configure the Timer to put your Mac to sleep at a specific time.
To configure the Timer, do the following:
1. Insert a DVD.
2. Select Controls, Timer, Set Timer or press ![]() -T. The Timer sheet appears.
-T. The Timer sheet appears.
3. Choose the action you want to be performed on the Action pop-up menu. The options are Quit DVD Player, Sleep, Shut Down, and Log Out.
4. Use the radio buttons to set when the action you selected will happen. The options are in a specific amount of time or when the DVD ends.
5. Click OK. You return to the Viewer and the Timer On message is displayed briefly. When the time you specified occurs, the action you selected will be done.
Following are a few other Timer tricks:
• Select Controls, Timer, Display Timer to cause the current time remaining and action to be performed to appear on the screen. It disappears again after a few seconds.
Note
![]()
Some discs prevent you from resizing video. If this is the case, you will get the NOT PERMITTED message when you try to use the Video Zoom function.
• Select Controls, Timer, Pause to pause the timer.
• Select Controls, Timer, Cancel Timer or press Option-![]() -. to stop the timer.
-. to stop the timer.
Setting Custom Playback Size
You can customize the size of the video shown in the Viewer window by using the Video Zoom controls.
1. Select Window, Video Zoom. The Video Zoom window appears.
Note
![]()
Using the Video Zoom tool changes the size of the video being displayed in the Viewer window, not the size of the Viewer window itself. To change the size of the Viewer, use the commands on the View menu.
2. Activate the On check box to turn on the Video Zoom.
3. Use the sliders to set the width and height of the video.
4. If you want to maintain the video’s aspect ratio, activate the Lock Aspect Ratio check box. When you move one slider, the other will also move to keep the same proportion between the two dimensions.
Tip
![]()
Open the pop-up menu located in the upper-right corner of the window for additional options, such as presets including Standard Display – Widescreen Movie. You can also create your own presets.
Configuring DVD Player Audio
DVD Player also includes a built-in graphic equalizer so you can customize audio playback for your DVDs and sound system. Here’s how:
1. Select Window, Audio Equalizer. The Audio Equalizer window appears.
2. Turn it on by clicking the On check box.
3. Use the sliders to set the relative volume levels of various frequencies.
Tip
![]()
Just like the Video Zoom and Video Color tools, you can use the Audio Equalizer’s pop-up menu to work with presets. Also, you can open any of these tools from the same window by selecting the tool with which you want to work from the pop-up menu in the window’s title bar.
Using DVD Player Keyboard Shortcuts
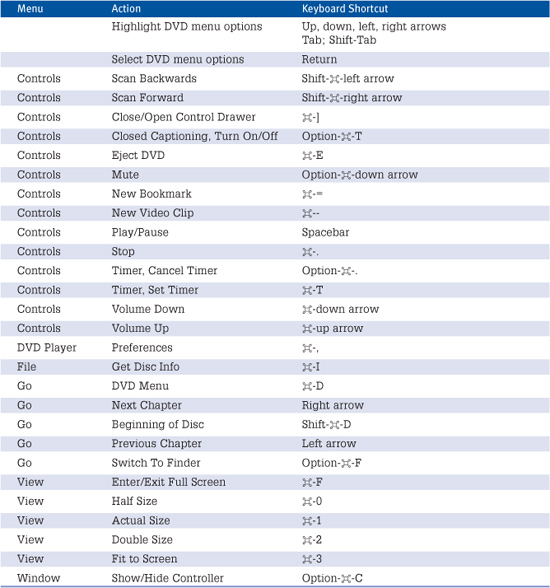
Table 9.3 contains keyboard shortcuts for DVD Player.
Table 9.3 Keyboard Shortcuts for DVD Player