
31. Working with Your Mac’s Display
Getting the Most out of Your Mac’s Displays
Most improvements to productivity save you only a few seconds here and a few seconds there. However, save a few seconds a few dozen times a day, and you’re finishing your day thirty minutes earlier than usual. These improvements are almost always marginal, but occasionally you come across a new way of doing things that offers a radical increase in efficiency. Over the past few years, study after study has shown that you can greatly improve your productivity by doing one thing: adding a second monitor to your system. This makes sense because you can have whatever you’re working on displayed on one monitor, and your reference materials (or your email client or whatever) on the second monitor.
The good news is that you can easily add a second display to all Macs except the Mac mini; if you have a Mac Pro, you can even add up to eight displays.
In the next section, you learn how to configure a Mac’s display. From there, you learn about adding and configuring a second display to your system to expand your desktop real estate (or even more if you have a Mac Pro). And for maximum effectiveness, you learn how to synchronize the color across the various devices you use with your Mac.
Configuring a Mac’s Display
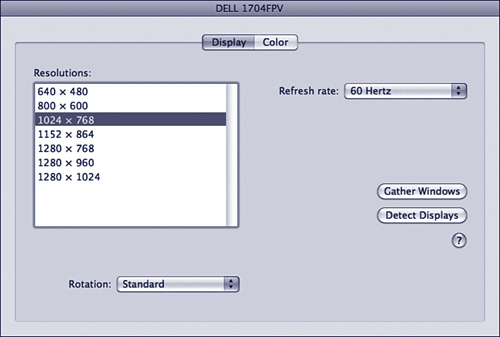
Use the Display pane of the System Preferences application to configure the displays connected to your Mac. If you use a single display, this pane has two tabs—Display and Color, as shown in Figure 31.1. If you use multiple displays, the pane also includes the Arrangement tab, which you learn about later in this chapter.
Figure 31.1 If your Mac has a single display, you see this version of the Display pane.
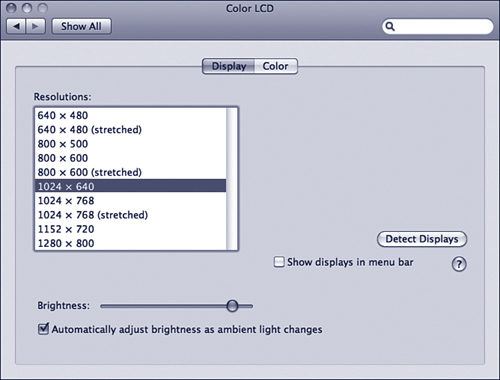
Use the Display tab to configure the resolution, color depth, refresh rate, and, depending on the display you are using, the rotation and the brightness of the display. The specific options you have depend on the graphics card and display you are using. In any case, you use the menus, sliders, pop-up menus, and other controls to configure the display. Generally, you should use the highest resolution that is comfortable for you to view. Then, choose the largest color depth and highest refresh rate that are available at that resolution. Finally, set the brightness to a comfortable level for you.
Configuring Resolution
A display’s resolution is the number of pixels (picture elements) shown in the horizontal direction by the number of pixels in the vertical direction. For example, a setting of 1024×768 means the display presents 1024 pixels horizontally and 768 pixels vertically.
When you increase the resolution for a display, the objects on the screen get smaller. That’s because a display has a fixed physical display size, such as a 23-inch Apple Cinema HD Display. As you increase a display’s resolution, the number of pixels displayed on the fixed screen area of the display increases. This means that each pixel gets smaller. Higher resolutions display more information in the same physical space, requiring that the information is smaller.
Setting the resolution of a display is a matter of personal preference, but generally you can use higher resolutions on larger displays. For example, on the 24-inch iMac, a resolution of 1920×1200 is comfortable for many people. On smaller displays, such as a 13-inch MacBook, 1024×768 might be appropriate. The resolution also depends on the sharpness and clarity of the display. Higher-quality displays, such as those produced by Apple, can display higher resolutions more clearly so that they are more comfortable to view.
All displays also have a maximum resolution that can be used. This maximum is determined by the Mac’s video capabilities and the display’s hardware. For example, a 24-inch iMac can display resolutions up to 1920×1200, whereas a 13-inch MacBook’s maximum resolution is 1280×800.
Note
![]()
The “standard” resolution for Macs has continued to increase along with the size and clarity of displays. For most of the Mac’s early life, the standard display resolution was 640×480 (which also happens to be the resolution of non-HD television). When Macs included larger screens and bigger displays became available, this increased to 800×600. Currently, the minimum resolution you likely use on most displays is 1024×768. In fact, some applications, such as iMovie, won’t even run at 800×600 or less.
You can resize your Mac’s resolution on the fly (you don’t have to restart for the change to be applied) by simply clicking the resolution that you want to try on the Display pane. The display is immediately resized according to the resolution you selected. So trying different resolutions to see which works best for you is easy. The trade-off is between more screen space at higher resolutions versus everything appearing smaller. Find the best fit for the type of data you work with and your eyesight.
Some displays support a “stretched” resolution, such as 1024×768 (stretched). This takes the standard 1024×768 resolution and “stretches” pixels in the horizontal direction so the image fills a widescreen display. (If you use a nonstretched resolution on these displays, black vertical bars appear on each side of the screen.)
Configuring Color Depth
Select the color depth on the Colors pop-up menu. In almost all cases, you should select Millions. However, if you use an older graphics card and display, you might have to settle for Thousands.
Select the highest refresh rate available on the Refresh Rate pop-up menu. If you use a digital signal with a flat-panel display, the Refresh Rate pop-up menu is grayed out because refresh rate isn’t applicable to these displays when you use a digital signal over the DVI interface.
Configuring Rotation and Brightness
If your display supports multiple orientations, you usually see a Rotation pop-up menu, which has four values: Standard, 90 Degrees, 180 Degrees, and 270 Degrees. Choose the rotation value that corresponds to the display’s current orientation.
Some displays support software brightness controls, in which case you see a Brightness slider on the Display pane. If you don’t see this, use the physical controls located on the display itself to set its brightness (and contrast, if applicable). If you do see the Brightness slider in the Display pane, move it to the right to increase the brightness of the display or to the left to decrease it.
Note
![]()
Non-Apple displays provide hardware controls for a lot of display settings, such as brightness and contrast, color adjustments, and so on. If you use one of these displays, check out its configuration menu to see what options you have.
Using the Displays Menu in the Menu Bar
Activate the Show Displays in Menu Bar check box to turn on the Displays menu in the menu bar. You can configure a display, such as setting its resolution, by selecting the resolution you want to use from the Displays menu (see Figure 31.2).
Figure 31.2 The Displays menu on the menu bar makes it easy to configure the display.
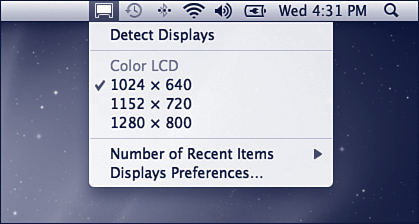
On the Displays menu, use the Number of Recent Items menu to set the number of resolution settings to display. For example, if you select 3 on this menu, the Displays menu on the menu bar shows the three most recent settings you have selected. This makes changing among your most commonly used resolution settings even easier.
You can also select the Displays Preferences command to open the Display pane of the System Preferences application. Other commands appear on the menu when you have multiple displays connected to your Mac. You learn about those commands later in this chapter.
After you have configured the Display tab, use the Color tab to select a ColorSync profile for your display.
![]() To learn more about ColorSync, see “Synchronizing Color Among Devices,” p. 622.
To learn more about ColorSync, see “Synchronizing Color Among Devices,” p. 622.
Setting Up and Using Multiple Displays
To create the greatest amount of desktop working space, consider adding multiple displays to your system. With the Mac OS, you have always had the capability to have two or more displays working at the same time, with each display showing different portions of the desktop. For example, you can display a document on one display and all the toolbars and palettes you are using on a second. Or you might want to have a document open on one screen and your email application open on the other.
With all Macs except the Mac mini it is easy to connect a second display to your system to give yourself even more working room. If you have Mac Pro, you can use up to eight displays at the same time.
Installing a Display
Installing a display requires two steps. First, connect the appropriate cable to the display and the Mac. Second, install any software that was provided with the display (you won’t need to do this for most displays, such as Apple displays). Some displays include a ColorSync profile; if yours does, you should install and use it. If you have to install an additional graphics card in a Mac Pro, the graphics card you install might also have software that provides its special features.
![]() To learn more about ColorSync, see “Synchronizing Color Among Devices,” p. 622.
To learn more about ColorSync, see “Synchronizing Color Among Devices,” p. 622.
The details of these steps depend on the kind of Mac you have. Each type is covered in the following sections.
Installing a Second Display for Macs with a Built-In Display
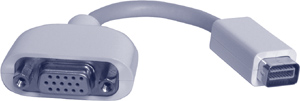
In addition to their internal displays, newer iMacs, MacBooks, and MacBook Pros have a Mini DisplayPort port, while older machines come with a Mini-DVI port. To attach a display to this port, you either need a newer Apple LED Cinema Display, which supports Mini DisplayPort, or you need one of Apple’s adapters. There are three types, and the type you need depends on the type of display you are going to connect:
• If you have a DVI display, you need either the Mini DisplayPort to Dual-Link DVI Adapter or the Mini-DVI to DVI Adapter.
• If you use a VGA display, you should get either the Mini DisplayPort to VGA Adapter or the Mini-DVI to VGA Adapter (see Figure 31.3).
Figure 31.3 With a Mini-DVI to VGA Adapter, you can easily connect a second display to older iMacs, MacBooks, and MacBook Pros that use the Mini-DVI port.
• If you want to connect your older Mac to a television or other video device, you need the Mini-DVI to Video Adapter (as I write this, there is no video adapter for the Mini DisplayPort interface).
Each of these is available from Apple or other retailers.
Connect the mini-DVI end of the adapter to the mini-DVI port on your Mac. Connect the other end to the display. If you are using the Video Adapter, you can use its S-video connector or the composite (RCA) video connector depending on the input port available on the video device you are using.
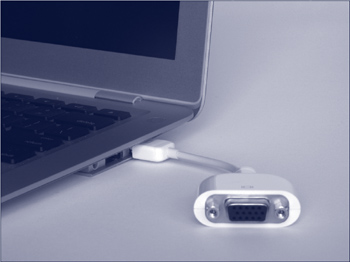
On an older MacBook Air, the display connection is a Micro-DVI port. To connect the MacBook Air’s Micro-DVI port to a DVI port on an external display, use the Micro-DVI to DVI adapter that comes with the MacBook Air package. (If you can’t find yours, you can buy one from the Apple Store or a Mac dealer for about $19.) To connect the MacBook Air to an external display that offers only a VGA connector, use the Micro-DVI to VGA adapter, as shown in Figure 31.4, which comes in the MacBook Air box. To connect the MacBook Air to an external display that only offers either Composite or S-Video connectors, use the Micro-DVI to Video adapter, which is available from the Apple Store or most Apple retailers.
Figure 31.4 With a Micro-DVI to VGA Adapter, you can connect a second display to your older MacBook Air.
Installing a Second Display for Mac Minis
The most recent version of the Mac mini is designed from the ground up to support two displays because it comes with two video output ports: one Mini DisplayPort and one Mini-DVI. (As an added bonus, the new Mac mini even comes with a Mini-DVI to DVI Adapter right in the box.) This means you can connect one display to each port, although you’ll probably need an adapter for the Mini DisplayPort interface (unless you have a newer Apple LED Cinema Display, which supports the Mini DisplayPort natively.)
Note
![]()
There are a lot of splitters and other specialized devices that enable you to connect more than two displays to iMacs, MacBooks, MacBook Pros, and MacBook Airs. Some of these devices also enable you to connect two displays to a Mac mini. Providing details about these devices is beyond the scope of this chapter, but if you do a quick search of the Web, you’ll find a lot of information about this topic.
The older Mac mini is the most limited model with respect to displays. That’s because the older Mac mini only has one DVI port, so it is the only Mac that doesn’t support multiple displays out of the box. However, you can use Apple’s DVI to Video Adapter to connect the Mac mini to a television or other video device. This can be useful to view the mini’s output over a big screen TV, but isn’t all that useful for working with your Mac because it doesn’t expand your working space.
Installing Multiple Displays for Mac Pros
The Mac Pro is definitely the most expandable in all ways, including multiple display support. All Mac Pro models support two displays out of the box. For even more displays, you can add more graphics cards to a Pro, with each supporting up to two displays for a grand total of eight displays.
The specific number and type of displays a Mac Pro supports depend on the video cards installed in it. The current low-end (which is a relative term) graphics card includes one Mini DisplayPort and one dual-link DVI port. You can connect a display to each port; you can connect one of Apple’s monster 30-inch cinema displays to the dual-link port. Other cards include two dual-link ports if you want to use two of the 30-inch displays.
After you’ve connected displays to both ports on the Pro’s first graphics card, you can add additional graphics cards to work with more than two displays.
Many graphics cards are available, each offering differing levels of performance and special features. When choosing a graphics card, consider the following factors:
• Mac OS X compatibility—Not all graphics cards are Mac OS X–compatible, so any that you consider should be.
• Performance—Graphics cards offer varying levels of performance, such as 2D and 3D acceleration and the display resolution they support. The amount of memory installed on a card is a large determinant of this performance, with more memory being better. Common memory amounts are 256MB or 512MB. Generally, you should obtain the highest-performance card you are willing to pay for.
• Video interface support—Most modern graphics cards support the DVI interface used by almost all flat-panel displays. Some offer support for multiple interfaces, such as DVI and VGA.
• Special features—These include video digitizers that enable you to digitize video from analog sources, TV tuners that enable you to watch TV or the output from a VCR on your display, and other features for which you might have a use.
Note
![]()
If software is provided for the card, such as drivers and applications, you should install the software before you install the card. However, check with the instructions that came with the card to see the order in which the manufacturer recommends the items be installed.
Installing a PCI Express graphics card in a Mac Pro is a relatively easy process.
To install an additional graphics card, do the following:
1. Turn off and unplug the Mac Pro.
2. Put the Mac Pro upright on a solid surface, preferably one where the computer is within easy reach.
3. Pull up the lever on the back of the Mac Pro. This unlocks the side panel, which is the panel on the left when you’re looking at the back of the Mac Pro.
4. Open the side panel from the top, and then pull the panel away from the case.
5. Touch something metal to ground yourself.
6. Remove the two screws that hold the slot bracket, as shown in Figure 31.5, and then remove the bracket.
Figure 31.5 Remove the two screws that hold the slot bracket.
7. Place the new graphics card so that its bracket is flush with the open slot cover, and slowly slide the card toward the slot.
8. When the card’s connectors are touching the slot and are perfectly aligned with the slot opening, place your thumbs on the edge of the card and press the card gently but firmly into the slot.
9. Reattach the slot bracket.
10. Close the case.
11. Attach displays to the DVI ports of the graphics card.
12. Restart your Mac.
Tip
![]()
The easiest way to tell whether or not the card is completely inserted into the slot is to look at the portion of the bracket that touches the case. If that portion isn’t flush with the case, the card isn’t fully inserted.
Working with Two (or More) Displays
After your Mac is connected to multiple displays, you need to configure the displays to work together. When you have more than one display installed, one of the displays is the primary display. This is the display on which the menu bar, Dock, mounted volumes, and other desktop items are displayed. The rest of the displays contain the windows that you place on them.
To view items on more than one display, do the following:
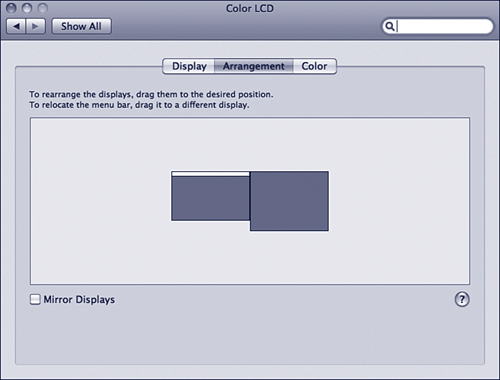
1. Open the Display pane of the System Preferences application. When you do so, you see a Display pane on each display. On the primary display, this is included in the System Preferences application window. On the other displays, this is an independent window with the name of the display at the top of the window. The settings shown in each Display pane are those that are currently being used for that display. On the primary display, a third tab called Arrangement appears in the Display pane (see Figure 31.6). The Display pane on the other displays contains the normal tabs, but it does not contain any part of the System Preferences interface (see Figure 31.7).
Figure 31.6 This Display pane contains the Arrangement tab, which means it is for the primary display.

Figure 31.7 This Display pane is shown on a secondary display.
Tip
![]()
The Display preferences window for each display is independent. By default, each Display preference window appears on the display it controls. If you want to move all the open Display preference windows together, click the Gather Windows button. This stacks all the open Display preference windows under the current one.
2. Set the resolution, color depth, and refresh rates for each display using its Display pane. You can use different settings for each display; for example, if one display is larger than the other, you might want a higher resolution on the larger display.
Tip
![]()
If you want your Mac to detect the displays you have attached to it, click the Detect Displays button (it won’t be available in all circumstances). The name shown at the top of the System Preferences application and each Display settings window (there’s one for each display) should identify the display you are using. Similarly, if you connect another display to your Mac but it doesn’t become active, click the Detect Displays button. Your Mac should recognize and start using the additional display.
3. Click the Arrangement tab on the primary display’s Display pane. You see a graphical representation of the displays attached to your system (see Figure 31.8). The primary display is indicated by the menu bar across the top of the display window (on the left display in Figure 31.8).
Figure 31.8 This system has two displays attached to it with the primary display located on the left.
4. Organize the displays by dragging them on the pane so they correspond to the physical arrangement of the displays. For example, drag the display you want to display “to your left” to the left side of the pane. This configures the virtual desktop so you move the mouse pointer to the left to work on the left display. The display icons should be in the same orientation as the physical displays.
5. Set the primary display by dragging the menu bar onto it. The menu bar, Dock, and other elements move onto the primary display.
Note
![]()
If a display supports additional features, controls for those features may appear in the Display pane. For example, in Figure 31.7 you can see that the display can be rotated and the current orientation of the display can be selected on the Rotate pop-up menu.
Because the desktop stretches across all the displays connected to your system, they act as one large desktop. You can drag windows, palettes, and other elements from one display to another by moving them from one side of the desktop to the other. You can move between the displays by moving the pointer across the divide between them. For example, you might have an image open in Photoshop on one display and all the Photoshop palettes on another. Or, you can have a Word document open on one display and a web browser on another.
Note
![]()
You can drag windows between the displays, but the menu bar and Dock always remain on the primary display.
You can have multiple displays show the same image by turning on display mirroring. When you do this, each display shows the same desktop. You are limited to the same amount of working space, but that same space is displayed on multiple displays. This is especially useful when you connect a projector to one video port and use a display on the other. You can work using the display while the audience sees what you are doing via the projected image.
Or, if you connect a mobile Mac to an external display, you can have that display face the audience while you work on the internal display.
To configure display mirroring, set the displays to the same resolution. In the Arrangement tab of the Display pane, activate the Mirror Displays check box. All displays connected to the machine then display the same image.
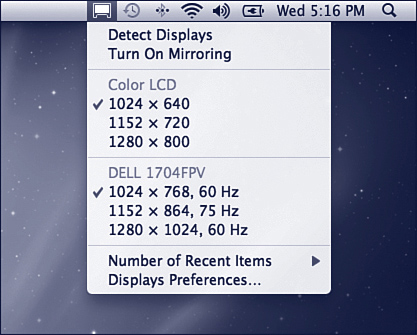
If you add the Displays menu to your menu bar, you can control display mirroring, the resolution, and the color depth of each display by choosing the setting you want from the menu (see Figure 31.9).
Figure 31.9 Control the resolution and other settings of all the displays attached to your Mac from the Displays menu in the Mac OS X menu bar.
Synchronizing Color Among Devices
One of the most challenging aspects of creating color documents for output on paper or electronically is maintaining consistent color among the images and text in those documents. Each device you use, such as displays, printers, scanners, cameras, and so on, can have a slightly different interpretation of particular colors and can use a different color space. This makes creating a document that contains the exact colors you really want difficult.
Apple’s ColorSync technology is an attempt to solve this problem. With ColorSync, you configure a ColorSync profile for each device with which you work. If all your devices use a ColorSync profile, the colors across the elements of your document should be more consistent because ColorSync translates colors across different color spaces.
The two general steps to use ColorSync are the following:
1. Use the ColorSync Utility to select and configure a ColorSync profile for each device you use.
2. To select the ColorSync profile for a project, use the color management features of the application in which you want to create that document.
Configuring ColorSync
To configure a ColorSync profile for your devices, do the following:
1. Open the ColorSync Utility (found in Applications, Utilities). The first time you run this, you’re prompted to run Profile First Aid, which attempts to repair the various profiles stored on your Mac.
Note
![]()
To use ColorSync, a device must have a ColorSync profile installed. For many devices, this profile is built into Mac OS X. For others, the profile is installed when you install software related to that device.
2. Click Verify. The Profile First Aid utility runs and finds all the profiles stored on your Mac. It looks for problems and reports any it finds.
3. Click the Devices button to open the Devices pane. On this pane, you see the list of devices with color implications connected to your Mac, such as cameras, printers, displays, and so on (see Figure 31.10).
Figure 31.10 Expand a device type to see a list of devices of that type connected to your Mac.

4. Choose the device you want to configure. The current ColorSync profile for that device is shown.
5. To select a different profile, click the Current Profile pop-up menu and choose the profile you want to use. If the one you want to use is not shown on the menu, choose Open and then move to and select the profile you do want to use.
6. Repeat steps 4 and 5 for each device you want to use with ColorSync.
Note
![]()
Understanding and using ColorSync effectively is a very complex topic. For detailed information, see Apple’s ColorSync website located at www.apple.com/colorsync.
Using ColorSync
After you have installed and configured your device profiles and workflows, the way you use ColorSync depends on the particular applications you use. For example, you can employ the ColorSync profiles when you print a document by using the ColorSync option on the Options pop-up menu in the Print dialog box. Other applications, such as Photoshop, enable you to employ more sophisticated ColorSync features.