Chapter 2: Combining PPC and Search Engines
In This Chapter
![]() Choosing which search engines to use
Choosing which search engines to use
![]() Setting up a Google AdWords account
Setting up a Google AdWords account
![]() Setting up an MSN adCenter account
Setting up an MSN adCenter account
Not all search engines have a pay-per-click (PPC) platform to display ads with their search results. Some search engines have partnerships with larger search engines such as Google and Bing — both of which have their own PPC services — to show their ads on those engines, thereby generating revenue for the partners to split.
Before you start investigating smaller search engines, be sure that you’ve evaluated Google and Bing to see whether those search engines alone can meet your advertising needs. This chapter shows you how to set up an account in each of those search engines, expand that account, and adjust its settings to suit your preferences.
Selecting a PPC Search Engine
Before you bring out the credit card and keyword list, you want to make sure that you’ve done your homework when it comes to selecting a search engine’s PPC platform. Although the search engines may seem to be pretty similar, they differ on some big points. Also, depending on the industry or field that you’re advertising for, one engine could be much more beneficial than another in terms of return on investment (ROI), audience reach for volume and targeting, costs, and time spent managing your campaigns. The following sections give you some research pointers.
Researching search engines
Before you set up a new account on a search engine for PPC advertising, be sure to research the engine to see whether it meets your needs and those of your industry. Some PPC platforms are geared to business-to-consumer sales, for example; others target business-to-business sales. Some engines have considerably more traffic than others and are on the rise; others are falling off.
The best way to check out a search engine is to use it yourself. Perform some searches for items in your keyword list (see Chapter 3 in this minibook) to see how much competition you have, how much search volume the engine has, and what the results page looks like overall. If the engine’s user interface is clunky and the ads are hard to find on the results page, those results are indicative of the performance of the ads. If you can’t find what you’re looking for, how would you expect anyone else to find it? If the ads aren’t in prominent places on the results page (such as across the top or down the right side), users aren’t going to look at them; they’ll go straight for the prominent results or move their search to another engine.
Comparing the top three search engines
The top three search engines, in order of search volume, are Google, Yahoo!, and Bing. They’re tops in terms of volume of traffic (searches performed), quality of results, quality of the ads that appear with the results (relevancy), and the average cost per click (CPC) compared with ROI. Here’s how the top three compare:
• Google: This engine is by far the most sophisticated PPC search-engine platform overall, and it delivers the best bang for your buck. It has the most traffic and the best management tools, and it garners you results faster than any other search engine. Through Google, you should be able to find out what works and what doesn’t work within a short period.
The audience that uses Google is greatly varied; therefore, a large, diverse audience will be searching for your product or service.
• Yahoo!: This engine teamed up with MSN in 2010, and ads served on Yahoo.com and Bing.com now come from MSN adCenter. You cannot segment whether your ads are shown on Yahoo.com or Bing.com; all search traffic is aggregated and shown as one source. If you want to show ads on Yahoo.com, you’ll need an MSN adCenter account.
• Bing: This engine has less search volume than Google does, even with the addition of Yahoo.com search traffic. While it is lower in volume, MSN adCenter can be lower in costs and simpler to manage overall. It has the advantage of being the default search engine for many Windows and PC machines. If you’re targeting a less technically savvy audience, this could be an advantage for you.
In the following sections, you find out how to establish a PPC account with Google AdWords and MSN adCenter.
Managing multiple PPC accounts
If you plan to have an account that encompasses more than one PPC account, you’ll want to look into setting up a main account so that you have to log in to each engine only once to access all the accounts.
![]() Google provides a My Client Center account for this purpose.
Google provides a My Client Center account for this purpose. http://www.google.com/intl/en/adwords/myclientcenter
![]() MSN’s comparable multiple account service doesn’t have a special name. You need a customer service representative to help you set up this account. If you don’t want to do that, you could also use its Agency Management option instead to handle multiple logins and access. See
MSN’s comparable multiple account service doesn’t have a special name. You need a customer service representative to help you set up this account. If you don’t want to do that, you could also use its Agency Management option instead to handle multiple logins and access. See http://adcenterhelp.microsoft.com/help.aspx?project=adcenter_live_std&market=en-us&querytype=keyword&query=682yek&tmt=&domain=adcenter.microsoft.com&format=b1 for more information.
Using Google AdWords
If you’ve decided to give Google AdWords a try, the following sections walk you through the process, from setting up your account to getting it activated and getting your ads running. If you need help during setup, Google AdWords provides a toll-free number with live operator assistance during weekdays. See the sign-up page for hours of operation and contact numbers.
Creating an account
Follow these steps to sign up for AdWords:
1. Go to the sign-in page for Google AdWords at http://adwords.google.com/select/Login and click the Start Now button.
You need a Google account to sign up for AdWords.
2. Sign up for a brand-new account or sign in to an existing account:
• If you don’t have an account: Select the I Do Not Use These Other Services radio button, and follow the prompts to set up your account.
• If you have an account you’d like to add AdWords to: Select the I Have an Email Address and Password option and then the I’d Like to Use My Existing Google Account for AdWords option.
 If the e-mail address you choose is associated with another AdWords account, you’ll have to choose a different address or create a new e-mail address to use with AdWords. You can only have one AdWords account associated with an e-mail address. However, you can have as many different e-mail addresses associated with a single AdWords account as you want.
3. Use your Google account username and password to sign in to AdWords at www.adwords.google.com.
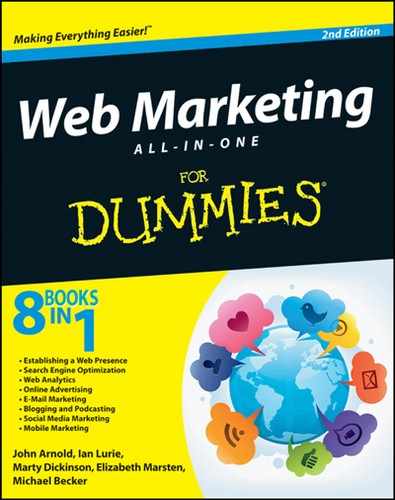
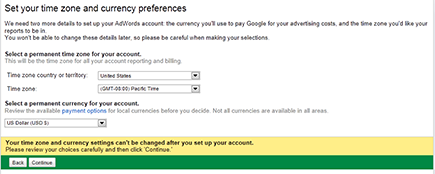
4. Select the country, time zone, and currency you’ll be paying in (USD$ is the default), and click Continue. See Figure 2-1.
Figure 2-1: Selecting currency, time zone, and country settings.
 The settings on this page cannot be changed after you click Continue.
Google sends an e-mail message to your Google account e-mail address to verify the account creation.
5. When you receive the e-mail, click the link in it to go to the AdWords verification page.
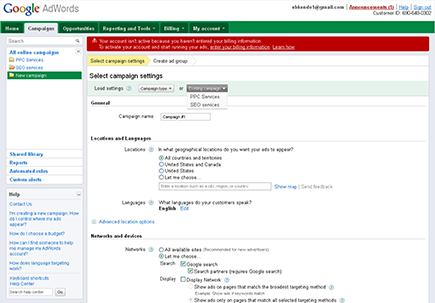
Setting up your first campaign
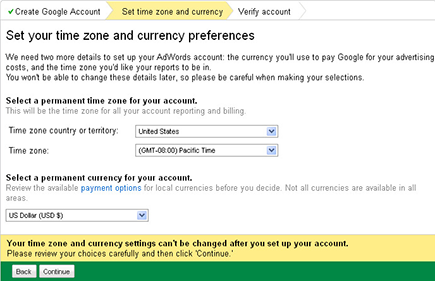
After you create your AdWords account, you’re ready to set up your first campaign. Follow these steps:
1. Sign in to AdWords.
2. Click the Create Your First Campaign button.
3. Click the Campaign Type button and select the Search Only radio button for your first campaign.
See Chapter 7 in this minibook for more on the additional campaign types.
4. Name your new campaign something descriptive in the Campaign Name text box.
This name is for your purposes only; come up with something you’ll remember.
5. Select where you want the ads in this campaign to display.
The United States and Canada option is selected by default. If you want to change that setting, click the radio button for the country that you want to target or select the Let Me Choose option to enter an address or more specific area like a state or metro area.
As you type in the location field, a list will pop up, allowing you to edit your preference (see Figure 2-2) and to see the traffic estimates for that area. For more on geotargeting, see Chapter 7 in this minibook.
Figure 2-2: Traffic estimates and location.
6. Leave the Location options (advanced) set to the defaults:
• Target: People in, searching for, or viewing pages about your targeted location (recommended)
• Exclude: People in, searching for, or viewing people about your excluded location (recommended)
These options will enable those within your chosen locations to see your ads the most effectively and efficiently for your budget.
7. Select the language in which you want your ads to display.
The default is English. If you need to change it, click the Edit button.
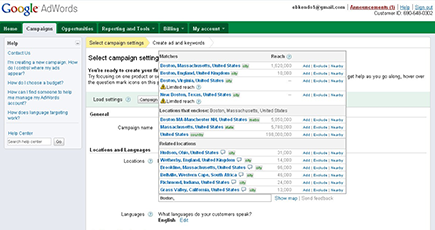
8. In the Network and Devices area, select whether you would like to target different devices like mobile phones or tablets with full browsers.
If you’re unsure at this time, leave the default of all devices enabled, as shown in Figure 2-3.
9. In the Networks section, select the Let Me Choose radio button and leave the Search options enabled. Click the Display Network option to disable it at this time.
For more on using the display network as a new advertiser, see Chapter 7 of this minibook.
Figure 2-3: Bidding, budget, delivery, and advanced settings selections.
10. In the Bidding and Budget area, choose a Basic option to start with:
The Basic options are best to start with because they give you the most control and allow you to see the progression of the account without any of the fancier options enabled until you’re ready to experiment with them.
• I’ll manually set my bids for clicks: Choose a cost-per-click amount and enter a default bid in the default bid box.
• AdWords will set my bids to help maximize clicks within my target budget: Choose this if you have a specific amount of clicks that you would like to reach and are less concerned about your cost per click, but rather your overall daily budget.
11. Choose your daily budget and type it into the box.
See the next section in this chapter for more details.
12. Choose a delivery method:
• Standard: Shows ads evenly throughout the course of the day. This option is enabled by default. Until you know the volume of traffic and conversions your campaign is going to receive, you’ll want to wait to experiment with other options.
• Accelerated: Shows your ads as often as possible until your budget runs out.
13. (Optional) Choose an ad extension.
Ad extensions are enhancements to text ads like sitelinks, locations, or phone numbers.
You can skip this part for now and come back when you are more comfortable with the basics of PPC. You can find out more about extension ads in Chapter 7 in this minibook.
14. (Optional) Set a definite start or end date for your campaign, or adjust your ads so that they rotate evenly.
15. Click the Save and Continue button to move on to the Create ad group, Ad and Keywords section.
16. Name your ad group something descriptive that will help you know what the contents are.
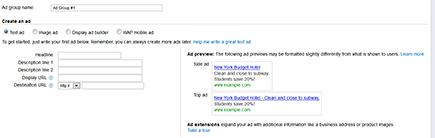
17. Choose the text ad option radio button and fill in the Headline, Description (Line 1 and Line 2), Display URL, and Destination URL text boxes, as shown in Figure 2-4.
 For details on writing your ads and for definitions of the different parts of the ads, see Chapter 4 of this minibook.
Figure 2-4: Enter your ad text, display URL, and destination URL on this page.
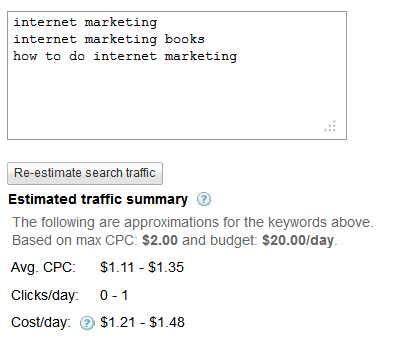
18. In the text box, type the keywords that you want to add to your campaign and click the Estimate Search Traffic button to see amount of searches performed on those keywords.
Google shows you how many impressions you can expect for that CPC amount, ad position, and clicks and how much you might spend in a day. This tool is great to use to adjust your budget. If you make any changes, click the Re-Estimate search traffic button to see what effect your changes have on Google’s estimates (see Figure 2-5).
This option is for traffic-driving, ad-impression purposes only; it doesn’t take into account conversions or other goals of that nature. Google is just estimating how much it would cost to get the most visitors possible to your site.
Figure 2-5: Google results for the keywords internet marketing.
For details on creating a keyword list, see Chapter 3 of this minibook.
19. Scroll down to the Ad Group Bids section and enter the default bid that will apply to your first ad group.
20. Click the Save and Continue to Billing button or the Set Up Billing Later button.
See the “Setting up billing in AdWords” section, later in this chapter, for your options.
If choose to set up billing later, you will be shown your completed campaign setup of ads, keywords, and settings.
You can click the Back link at any time to edit information. Also, Google allows you to change many settings, even after you set up and launch a campaign — add or remove keywords, use the keyword-generation tools, and edit match types, for example. For more information on these features, see Chapter 3 of this minibook.
Setting daily budgets and bids
Now that your account and first campaign is configured and running, you might want to revisit your daily budgets and bids after gathering some statistics. You can change your daily budgets and max CPC bids at any time. From the campaigns tab after signing in to your AdWords account, follow these steps to set some of those options:
1. Click the blue Edit link next to the Budget setting you made during the initial setup.
2. Change the amount by typing your amount in the box.
Click the plus sign next to View Recommended Budget to find what Google recommends your daily budget to be based on your keyword list (see Figure 2-6). For more information on setting budgets and bidding, see Chapter 5 of this minibook.
Figure 2-6: The daily recommended budget tool.
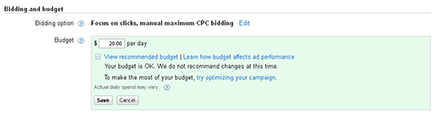
3. Click the Save button to save your new budget amount.
4. To change the bidding option of a campaign, click the blue Edit link in the Bidding and Budget section on the Settings tab:
• I’ll manually set my bids for clicks: Choose this option to specify the maximum amount that you’re willing to spend per click.
• AdWords will set my bids to help maximize clicks within my target budget: In this option, you tell Google what you want your average CPC to be for the entire campaign, and Google does its best to hit that target, getting as many clicks as it can for that price. Choosing this option means that Google decides when, how often, and for which keywords to show your ads to meet that average price. Be sure to click the CPC Bid Limit radio button to be able to enter the maximum CPC you want to target.
• Enhanced CPC: This option requires that conversion tracking be enabled in the account. To enable this option, place a piece of code on the final page in the conversion process on your website to trigger a conversion to be counted in AdWords. This option works best on campaigns with steady conversion data, ten or more a day, every day, in order to work.
• Focus on conversions or CPA Bidding: This option also requires conversion tracking to be enabled. In this option, you tell Google what you like the average cost per action (or conversion) to be for that campaign. Google will then adjust the CPC and how often the ads are served to try and meet that goal.
The best practice is to start with the manual CPC bidding option. Manual CPC is the easiest type of bidding to edit and keep an eye on, because what you see is what you get. If you choose the Automatic CPC bidding option instead, although you set a preferred price, the actual CPCs can vary a lot from that figure and can be confusing if you’re just starting with PPC. (For more information on automatic bidding and other options, see Chapter 5 in this minibook.)
5. Click the Save Changes button.
Setting up billing in AdWords
After you set up your account, you’ll need to set up billing to get your ads running if you didn’t do it before:
1. Click the Billing tab and choose Billing Preferences to open the Billing Options page.
When you’re ready to enter your billing information, you see the page shown in Figure 2-7 only once.
2. Set your country location and currency.
You can’t change this information later so be sure it’s correct before moving on.
To change other pieces of billing information at any time after setup, simply click the My Account tab and the Billing Preferences link. The Billing Preferences page is where you can change your billing address, form of payment, and credit card information.
3. Click Continue.
Figure 2-7: Choose the time zone and currency for your billing address.
4. Fill in the billing profile information with your name, billing address, and phone number. When finished, click Continue.
You’re taken to the Choose Your Settings page (see Figure 2-8), which contains a lot of options.
Figure 2-8: Set your payment option.
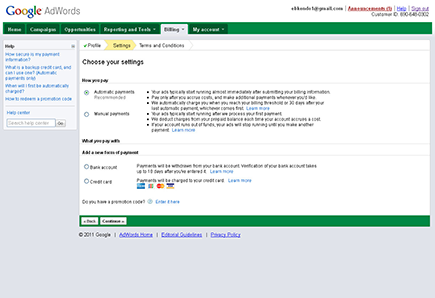
5. Choose to make your payments automatically or manually.
Automatic payments means that you pay Google after your account has accumulated clicks and costs. You have the option of paying by credit card or direct debit from a bank account:
• Bank account: If you choose the bank account, your AdWords account is tied to a bank account that Google can debit after clicks have accrued.
• Credit Card: If you choose this option, Google charges your credit card for clicks in the same manner that it withdraws money from a bank account.
Manual payments means that you deposit a set amount of money from which Google will debit clicks and costs. Your only option is to use a credit card. You set an amount for Google to charge you, and Google credits your AdWords account for that amount. Every so often, as the clicks add up, Google debits that amount from your account, and you have to refill the account as the balance lowers. You can elect to have the account refill automatically or do it yourself manually each time.
Google’s billing cycle is 30 days. Your card is charged after 30 days or as you reach each of the following thresholds, whichever comes first:
• First billing threshold: $50
• Second billing threshold: $200
• Third billing threshold: $350
• Fourth (and final) billing threshold: $500
After you hit all these thresholds, $500 becomes your regular billing rate. If you are a large enterprise, however, you can request to go on invoicing and have your threshold increased. You will need help from an AdWords employee to enable invoicing as well as to meet several spending requirements.
6. Click Continue.
After you select your billing option, Google presents its Terms of Service page.
7. Review and agree to the terms of service; then click Continue.
If you don’t agree to the terms of service, you can’t be an AdWords advertiser.
8. On the Billing Preferences page, input your billing information and credit card number.
9. Click the Save and Activate button.
Google charges your card a one-time, nonrefundable $5 activation fee. Your account is live, and your first campaign is showing ads!
Expanding Google AdWords
When your account is active, you can add campaigns, ad groups, and keywords through the AdWords dashboard. In the following sections, you explore all these expansion options.
When you expand a PPC account, always think beyond just keywords — think of the account as a whole or, at the very least, by campaigns. See Chapters 3 and 4 in this minibook for help with keyword lists and ad copy, respectively; see Chapter 5 in this minibook for help with budgeting and bidding.
Adding a new campaign
When adding your second campaign, the process is identical to the first campaign you set up, with all the options as before with one addition: You can copy the settings from the first campaign by selecting the Existing Campaign option in the Load Settings section, as shown in Figure 2-9.
If you want to keep the same location targeting, search network, daily budget, bidding, and device settings, it’s a great timesaver.
Figure 2-9: Copying the settings from your first campaign.
Adding an ad group to an existing campaign
If you’d like to add ad groups to existing campaigns, you can go back at any time and add as many ad groups as you need. To add an ad group, follow these steps:
1. From the Campaigns tab, click the desired campaign you want to add to.
2. Click the New Ad Group button.
3. Type the name of your ad group.
4. Fill in the Headline, Description (Line 1 and Line 2), Display URL, and Destination URL text boxes.
5. In the text box, type the keywords that you want to add to your ad group.
6. Enter your maximum CPC bid in the default bid box, and click the Save Ad Group button.
For help on setting bids, see Chapter 5 in this minibook.
Adding an ad to an existing ad group
To add an ad to an existing ad group, follow these steps:
1. On the Campaigns tab, select the campaign you want to make changes to and then click the ad group to which you want to add an ad.
Make sure that the screen is open to the Ads tab and is displaying your current ads.
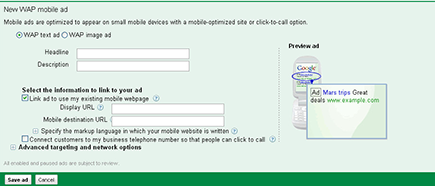
2. Click the +New Ad button and select the type of ad from the drop-down menu. Select Text Ad to create a new text-only ad.
A template appears, providing blank fields where you can create your new ad:
• Text ads: The most common ad is all text, with 25 characters for the headline, 70 characters for the body (35 characters for each line), a display URL, and a destination URL. These ads appear on search engine results pages. This is the default choice.
• Image ads: These are the Google Display Network. Also called banner ads, these ads appear on sites that have opted in to showing AdWords ads. Image ads can be uploaded into ad groups, or you can use one of Google’s many templates to build one. You’ll find myriad technical requirements for Flash ads, editorial content, size of ad, size of file, and images being used. See the AdWords Help Center for the list of requirements.
• Display ad builder: This tool is where you would access the many templates to build your own image ads.
• WAP mobile ad: This ad format is for mobile devices, specifically for sites that have a mobile version to drive clicks to. WAP ads are shorter and allow an image variation as well. See Figure 2-10.
3. Enter your ad copy.
For information on ad testing and ad copy, see Chapter 4 in this minibook.
4. Click Save Ad.
Figure 2-10: WAP mobile ad options.
Using MSN adCenter
Microsoft’s search engine is called Bing, and the PPC ads served alongside those search results are provided through MSN adCenter.
Microsoft has been making strides to improve its PPC service’s interface, tools, search quality, and volume, by adding programs such as Bing Travel, adCenter Desktop (an offline PPC ads editor), product search, and expanded reporting options. For more information on offline editors and analytics programs, see Chapter 7 in this minibook.
If you use Microsoft Excel 2007 to help you keep track of your campaigns, you can enable an add-in for MSN adCenter. For more on the Excel add-in, see the MSN adCenter Help Center.
Creating an account and a campaign
To create an MSN adCenter account, follow these steps:
1. Go to MSN sign-up page at https://adcenter.microsoft.com/customer/Signup.aspx.
2. Fill in the User Information, Company Information, Market Setting, and Marketing Preferences fields.
You’re taken to the Signup Is Complete page with several options (see Figure 2-11).
Figure 2-11: The MSN adCenter account options page.
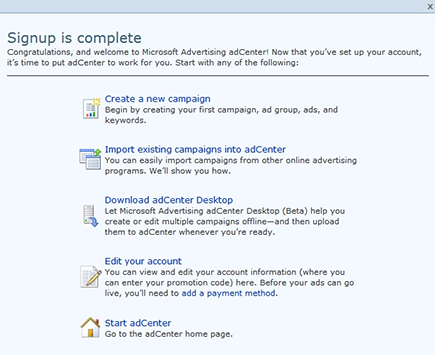
3. Click the Create a New Campaign link.
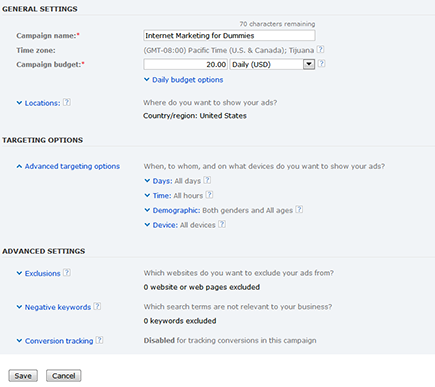
The General Settings page appears, as shown in Figure 2-12.
Figure 2-12: adCenter account general options.
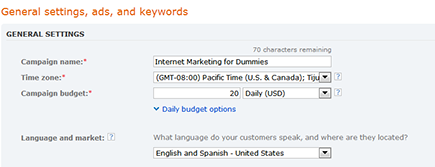
4. Enter the name of your campaign in the Campaign Name text box.
Name your campaign something descriptive that you can remember.
5. Choose the time zone you are in or that you want to use as the default for your campaign from the Time Zone drop-down menu.
For example, if you live in Seattle but are creating a campaign to show ads to customers in New York, choose the Eastern Time option instead of Pacific Time.
6. Enter the amount of budget you want to spend per day or the amount you want to spend per month in the Campaign Budget text box.
Choose Monthly from the drop-down menu if this is your monthly budget.
7. (Optional) Choose the default language for your campaign from the Language and Market drop-down menu.
The default language setting is English and Spanish – United States. If you’re targeting a different type of English or language, change that here.
8. Click the blue Locations link and choose the location where your ads will be shown:
• All locations worldwide: This is the default and means that every country that shows adCenter ads is enabled. You’ll want to change this to the countries you’d like to show ads in.
• Selected cities, metro areas, states/provinces, and countries/regions: Choose this option if you want to target a specific region — the United States, for example, as shown in Figure 2-13. You can then click the drop-down arrow to narrow your locations to states, cities, and metro areas.
• Near a business or other location: This option allows you to target a specific address or location of your choosing.
Figure 2-13: A campaign location targeting options in adCenter.
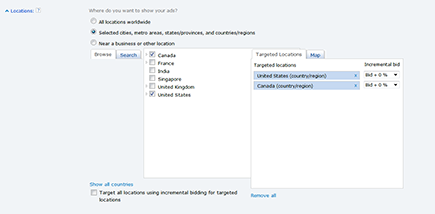
At this time, you can set an incremental bid for each targeted location. If you are new to PPC, leave this setting at +0% for now. For more on incremental bidding, see the section “Setting incremental bidding,” later in this chapter.
9. Choose the ad type.
Text ad is the default choice. Choose it unless doing a mobile ad.
10. Enter your title, text, display URL, and destination URL.
As you enter the destination URL for your ad, adCenter begins generating a suggested keyword list with traffic estimates based on that site.
For more on writing ad copy, see Chapter 4 in this minibook.
11. Select Keywords from the Bid Type drop-down list and enter the keywords you want to bid on into the Keyword box.
If you’re familiar with the different match types, you can identify which ones you would like to use. If you are unfamiliar with match types, type the keywords in by themselves. For more on keyword match types, see Chapter 3 in this minibook.
12. (Optional) To add any of Google’s suggested keywords, click the Add button next to the keyword.
You can add as many or as few of the suggestions as you feel are right for your new campaign, as shown in Figure 2-14.
13. Click Save.
The Bids, Targeting and Advanced Settings page appears, as shown in Figure 2-15.
Figure 2-14: Suggested keyword list in MSN adCenter.
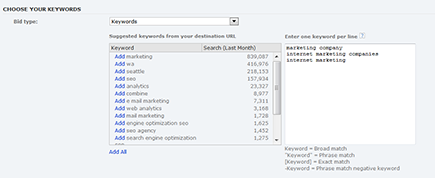
Figure 2-15: Bids and targeting for adCenter.
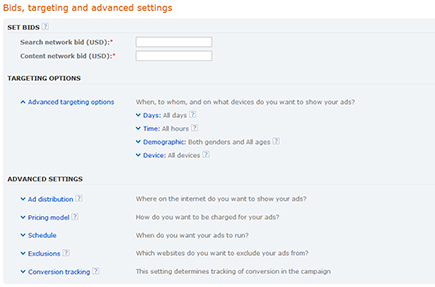
14. Set the maximum bid for both the search and content networks in the Set Bids section.
These bids apply to the Search and Content networks and can be different amounts. Take this step regardless of which network you plan on running. You can always edit this later.
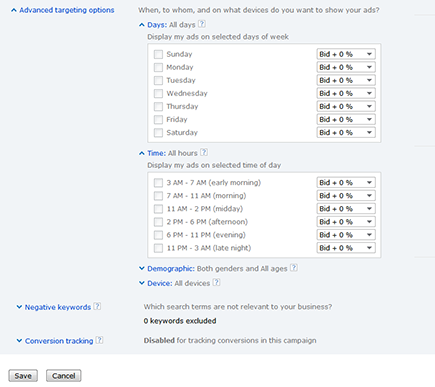
15. (Optional) Specify any targeting and demographic options in the Advanced Targeting Options section.
You can target traffic by a specific time of day, day of the week, or device (mobile devices or desktops). By default, all devices are enabled.
You can also target by demographic in incremental bids. Leave this section disabled for now until you’re more versed in PPC.
16. Click the Ad Distribution link and set up your distribution.
By default your ad group/campaign is enabled to all three networks that adCenter has to offer (see Figure 2-16). For the least complicated and best start, choose the radio button for Bing and Yahoo! Search. And uncheck the box for the Content Network.
See Chapter 7 of this minibook for greater detail on the differences between the networks offered on MSN adCenter and how to choose between them.
If you want to run your campaign on additional networks, set up separate campaigns so that you can track your progress and costs more efficiently. For more on content, display, and syndicated search, see Chapter 7 in this minibook.
17. Set the pricing model:
• Cost per Click (CPC): This is the default option; you pay only for clicks incurred by your ads.
• Cost per Impression (CPM): You pay per thousand impressions.
18. Set your schedule.
This is the start and end dates for your campaign. If you have a specific date that the campaign needs to start, change that here; the same with an end date. If you don’t have an end date, leave the None radio button selected.
Figure 2-16: Advanced settings for adCenter.
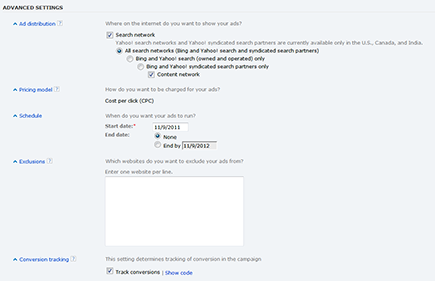
19. (Optional) Enter your exclusions.
Fill in this section if you’re running a content or syndicated search targeted campaign and know of some websites that you would like to exclude from your advertising. If you don’t have any specific sites, leave this section blank.
20. (Optional) Enable conversion tracking in your campaign by selecting this check box.
adCenter displays the code needed for the conversion goal page on your site. For more on how to install conversion tracking on your site, see the adCenter Help Center. It will require a snippet of code to be added to your website.
21. Click Save.
Adding billing information
Your account isn’t quite ready to run yet; you have to add payment information. Follow these steps:
1. Click the Accounts & Billing tab and then click the Payment Methods tab.
2. Click the Add a Payment Method button and choose to add a card or add PayPal account.
3. Fill in all information fields for credit card information or PayPal login, including the billing address and click the Add button.
You should now see your just added payment method to the Payment Methods screen. The nonrefundable $5 setup and activation fee will be charged. That’s it!
Editing settings
You might need to tweak your account or campaign settings after your ads have started running. To do so, follow these steps:
1. Sign in to your account.
You should see everything from your initial setup in the dashboard.
2. Select the campaign you just created and then click the Edit Campaign Settings link.
The Campaign Settings page opens (see Figure 2-17).
Figure 2-17: Edit the campaign name, budget, and negative keywords on this page.
3. Change the settings as desired.
You can change the name of the campaign and edit the budget settings. You can also adjust the days of the week, times of the day, and other targeting options here that you entered during the initial setup. You can also add negative keywords for the campaign. For more on negative keywords, turn to Chapter 3 of this minibook.
4. Click Save.
5. Click the ad group you created during the initial setup.
The Manage Selected Ad Group page opens.
6. Click the Edit Ad Group Settings link.
7. Change the settings as desired.
You can edit the name of the ad group, add negative keywords at the ad-group level, and enable or disable the content network, which is all the MSN partners as well as the syndicated search partner network. You want to retain the search network for Bing and Yahoo! only so that your ads show on those search results pages. This can be found under the Ad Distribution setting. For more help with the content network, see Chapter 7 of this minibook.
For any ad group settings that are different from the campaign level, the ad group settings take precedence and override any campaign level settings.
Setting ad schedules
Ad scheduling allows you to tell MSN what times of day and days of the week you do or don’t want to show your ads. AdCenter offers all seven days of the week, and doesn’t allow for specific hours, but rather blocks of time.
The default settings show your ads on all days at all times. If you know that you have peak hours or days of the week, however, choosing different settings (as shown in Figure 2-18) is a great idea. For best practices on ad scheduling, check out Chapter 5 of this minibook.
To set your ad scheduling options, click the blue link for the option you’d like to edit. Click the check box next to the times/days you want to target and click Save when you finish.
Figure 2-18: Target customers here to have ads appear only during selected days and times.
Adjusting keyword lists
If you accepted the default options when you entered your initial keyword list, the match type was broad and the maximum CPC was applied to all keywords in that ad group. You can always go back and set separate bids for specific keywords or change the overall maximum CPC.
You can enable incremental bidding and target users by gender or age by increasing your bid when MSN detects a user in your desired demographic (age, gender, or time of day).
To adjust your keyword list or use the incremental bidding tool, follow these steps:
1. If you want to edit the match types, click the ad group for which you want to edit the keywords; then click the Keywords tab.
Your selected keyword list appears (see Figure 2-19). If you need more information on the different match types, see Chapter 3 of this minibook.
Figure 2-19: Editing a keyword list.
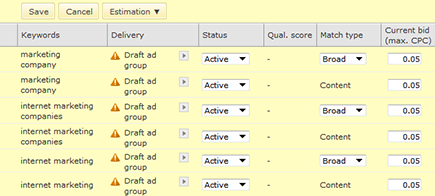
2. Hover your mouse over the keyword to get a pencil icon, and click the pencil to open the drop-down menu.
3. Select the match type per keyword to Phrase or Exact and adjust bids for individual keywords as desired with the same pencil icon in the current bid box next to the keyword you want to edit.
4. Click Save at the top of the page.
5. To bid separately for ads displayed on content pages, click the pencil icon next the site or keyword that you want to adjust the bid for in the current max bid column.
This option allows you to set a separate bid for ads on the content network. By default, MSN selects your maximum CPC bid for all networks. You want to be able to bid separately. Chapter 7 in this minibook goes over content network bidding practices in more detail.
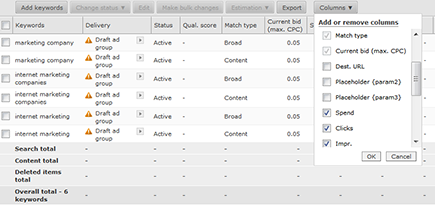
6. Edit negative keywords, {param} options, and destination URLs on a per-keyword basis:
a. Click the Columns button and select the check boxes next to the options you want to display.
b. Select the check boxes for the individual keywords you want to make changes to, and click the Edit link. The columns to adjust these settings are then displayed. See Figure 2-20.
7. Click the Save button at the top of the page.
Figure 2-20: Editing a keyword list with all columns enabled.
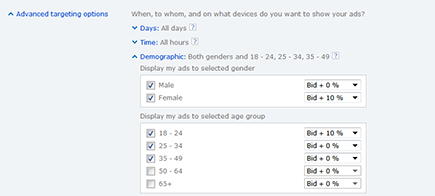
Setting incremental bidding
Incremental bidding increases the amount of your bid when MSN detects a user in the chosen demographic, time of day, or day of the week. You can set this at the ad group or campaign level in the settings area of a campaign or ad group under targeting options.
Suppose that you want to capture more female customers. To set up your incremental bidding, you’d specify 10 percent for Female in the gender section. MSN then increases your maximum CPC when females see your ad, so you gain a better position more often. See Figure 2-21.
Figure 2-21: To set incremental bids for this ad group, make your choices from the drop-down menus.
1. Open the ad group that you want to apply incremental bids to and click Edit Your Ad Group Settings.
If you want to apply incremental bids to all ad groups in a campaign, click the Edit Your Campaign Settings link from the campaign page.
2. In the Advanced Targeting Options area, click the down arrows to open the different sections to set your selected hours of the day, location, and days of the week for incremental bidding.
MSN increases your bids by 10 percent during those times and at those locations. Incremental bids must be set in increments of 10 percent.
3. Set incremental bidding amounts based on males and/or females in the gender section and based on age in the age groups section.
4. Click Save.
Incremental bids add up quickly. You pay the increased price only if the user clicks your ad, but if you enabled a 10 percent boost for females and a 20 percent boost for ages 18–24, and if a 20-year-old female runs a search, your ad receives a 30 percent incremental bid boost. Technically, this user is in the key demographic that you’re targeting, but incremental bids can get expensive fast, so consider your maximum CPC when you choose your incremental bids.
Expanding MSN adCenter
After you create your initial campaign and ad group, you’ll want to expand them at some point. In the following sections, you add campaigns and ad groups, as well as find out how to increase the number of keywords in your keyword lists.
Adding a campaign
To add a campaign to your MSN adCenter account, follow these steps:
1. Open the account to which you want to add a campaign, and click the Campaigns tab. Click the Create Campaign button on your dashboard.
The Create a Campaign page opens.
2. Name your campaign.
3. Select your targeting options and set your budget.
4. Fill in your first ad’s text and keyword list.
5. Click Save.
When you create a new campaign, you’re not given the opportunity to name the ad group that must be created to go with it. adCenter creates a placeholder name of Ad Group #1. To change this name to one that describes your ad group, click Edit Ad Group Settings.
Adding an ad group to an existing campaign
To add an ad group to an existing campaign, follow these steps:
1. Click the campaign from the Campaigns tab to which you want to add the ad group.
2. Click the Create Ad Group button.
3. Name your ad group and determine whether you want to use the campaign level settings for targeting and negative keywords.
If not, click the Define Ad Group Level Settings for Targeting and Exclusions radio button and adjust.
4. Fill in the ad copy and keyword lists, and click Save.
Adding an ad to an existing ad group
To add an ad to an existing ad group, follow these steps:
1. Click the ad group to which you want to add an ad.
2. Click the Ads tab.
3. Click the Create an Ad button.
4. Add your headline, body, and URLs.
5. Click Save.