Chapter 7: Introducing Podcasting
In This Chapter
![]() Setting up an inexpensive production studio
Setting up an inexpensive production studio
![]() Preparing a podcast
Preparing a podcast
![]() Recording a podcast
Recording a podcast
![]() Distributing your creation
Distributing your creation
Blogging puts words on a page. Podcasting puts your voice directly on the web in the form of audio files that your readers can download and play back at their leisure. That creates a kind of direct connection with your audience, as they hear your tone and inflection.
Because of that, podcasting is a great supplement to your blogging strategy as part of your Internet marketing campaign.
This chapter is a very high-level view of podcasting. If you’re going to try it once or twice, the information here will get you through the initial throes. If you’re going to get serious, though, read Podcasting For Dummies, by Tee Morris, Chuck Tomasi, Evo Terra, and Kreg Steppe (published by John Wiley & Sons, Inc.). It covers everything from using special mics to advanced promotion techniques.
Podcasts do require some extra technology as well as a few extra steps on your part. That’s what this chapter is about: getting your blog to a podcast.
Podcasting 101
Podcasting is no longer the realm of audiophiles and sound engineers. Recording, producing, and distributing your very own online audio show has become relatively easy.
A podcast is an audio or video recording you make and then distribute by using a special RSS feed. Don’t let the word special scare you. You can find out more later in the section “Supporting Podcasting on Your Blog.”
Podcasts are always fun to produce, but they’re best when used to deliver
• Training or tutorials
• Interviews
• Any topic where you need to communicate more subtly than you can with writing
• A blog entry when you’re sick of writing
Podcast listeners can then subscribe to your podcast via their favorite RSS feed reader, or audio software such as Windows Media Player or iTunes. That software then downloads the audio and video files and transfers them to listeners’ iPods, iPads, tablets, or other media players so that they can listen to them on the go.
So, obviously, because podcasts are portable, folks can listen to them when and how they like. And because they’re audio/video (compared with print, a visual medium), they provide another way for readers to connect to you, by becoming listeners.
Setting Up Your Podcasting Studio
Setting up a podcasting studio is remarkably similar to setting up a home recording studio. (Go figure.) Think recording device, software, input device, and then (of course) some vehicle for broadcasting. For podcasting, your studio consists of
• Recording device: A laptop or desktop computer.
You can use any newer PC or Mac to record and edit your podcast. Chances are that if you’re reading this book, you already have one of those. So the most expensive tool you need is already in place.
You do want a computer with a fair amount of hard drive space (at least 20 gigabytes) and enough processor oomph to edit audio files. You’ll also likely need an available USB port for your microphone. If your computer is a creaky 8-year-old machine, it probably can’t handle podcasting. But any computer made in the last few years can do the job.
• Software: Software to record and edit (such as GarageBand or Audacity). You can read more about these in the following section.
• Input device: Um, a microphone. Read more about your options in the section “Getting a good microphone,” later in this chapter.
• Broadcasting vehicle: A FeedBurner account with SmartCast (www.feedburner.com).
Oh, and you need a place to record and work. That’s covered later, too.
Getting the right recording software
You can find many software options for podcasting. Search for podcasting software on your favorite search engine to find others if these don’t work out for you.
You can, of course, use higher-end audio software, such as Adobe Audition or Logic Studio Pro. Feel free. These are basic software packages that can get the job done, per OS platform.
If you’re on a Mac running OS X
• GarageBand (www.apple.com/ilife/garageband) comes with everything you need to record, edit, and distribute a podcast. It also allows you to do quite a bit of post-recording editing as well as setting up your podcast feed. GarageBand costs $14.99 and is available in the App Store.
• Übercaster (www.ubercaster.com) is the easiest-to-use podcasting program on the planet. See Figure 7-1 for the Übercaster recording screen. It doesn’t offer the same post-recording editing features as GarageBand, but it’s very streamlined for podcasting. It has exactly the features you need, and it’s easier to figure out. It’s no longer available for purchase, but you can download a demo version.
• Audacity (http://audacity.sourceforge.net) is free and straightforward.
• Adobe Audition (www.adobe.com/products/audition.html) is a cross-platform solution that works well with Windows and Macs.
Figure 7-1: Übercaster offers a nice, intuitive interface.

If you’re on a Windows PC running either Windows XP or later
• Audacity is your first choice. See Figure 7-2 for a look at Audacity in action. Audacity is free (in life, as well as this software). It’s also easy to use and is a very refined tool for podcasters.
• Adobe Audition (www.adobe.com/products/audition.html) is a professional-grade toolset for sound editing. It’s expensive, but integrates with all of Adobe’s other tools, and gives you dozens of effects and editing tools.
Figure 7-2: Audacity in action.

 Pick one program and stick with it for a while. Get comfortable with the ins and outs of audio editing.
 Read. The. Documentation. Sure, you can record audio by pushing a button and talking, but just a little time spent discovering how to tune and tweak your microphone and software will make a huge difference in quality.
Getting a good microphone
The microphone makes or breaks the podcast. The better the mic, the better the audio quality. No software on earth can improve a recording if it was recorded with a lousy mic.
By the way, the mic that comes on the computer is synonymous with lousy. Don’t rely on it for podcasting.
The real problem with choosing a microphone, though, is the thousands of options. Search for podcasting microphones on your favorite search engine if you want to get the whole story.
Try these microphones:
• Internal: If you use a laptop, your laptop’s internal mic might be okay to start. It’s free, and it’s already configured. But the sound quality will be tinny at best, and you’ll sound like you’re talking through a paper cup.
• A USB headset: Headset mics — like the many made by Plantronics (www.plantronics.com) — are great. They’re inexpensive (they start at less than $30) and easy to set up. However, they won’t work if you’re interviewing someone or if you want more radio-style sound.
• The Blue Snowball (www.bluemic.com): This is a fantastic USB microphone for about $120. It can work as a unidirectional or omnidirectional mic (omnidirectional is great for interviews), produces great sound quality, and looks cool to boot. But, it does cost $100.
• The Zoom H4n (www.samsontech.com): This can function as a USB microphone or as a standalone audio recorder. That makes it very flexible. It’s also the best omnidirectional microphone for less than $300. But it costs the most of any microphone in this category, and you’ll want to read the manual before you start recording.
Nothing beats Blue Snowball for ease of use and audio quality. However, you can squeeze better sound quality out of a professional mic, if you really need to.
• The Griffin iMic (www.griffintechnology.com): The Griffin isn’t actually a mic but rather a device with which you can connect most microphones to your computer. It filters a lot of the noise that a computer might add to your recording. It costs $39.99, and despite the i notation, it works on both Mac and PC.
 When setting up your mic, follow the instructions that come with your microphone. And read the entire manual! The manual contains tips for getting the best-quality sound.
Setting Up Your Studio
You need a quiet place to record: your studio. A room where the dog isn’t barking doesn’t count. Background noise — such as appliances, noisy air conditioning, or ticking clocks — will leap out in a recording. And pay attention to how the room is configured and dressed: A room with bare walls or floors might produce echoes.
If you’re really concerned about echoes and other acoustics, you can buy damping tiles. Or, hang a few blankets on the walls. Audiophiles reading this just cringed, but it works.
Here are a few tips for setting up a quiet recording space:
• Close the windows. It never fails. If you leave the windows open, ten minutes into your recording, a train, garbage truck, car with no muffler, or murder of crows will position itself right outside and start rumbling, honking, roaring, or cawing away.
• Stay away from appliances. Even a small office refrigerator produces a lot of noise.
• Unplug the phone.
• Turn off your cellphone and/or PDA.
• Move your microphone as far away from the computer as possible. Your computer’s fans, hard drives, and such can produce quite a racket.
• Exit any instant messaging or other software that produces bells, whistles, or other sound effects.
• Put your microphone at eye level. Use a stack of books, if nothing else. When you look up when you speak, your voice has a much clearer quality. Looking down when you speak makes you mutter.
Most important, stay sane. It’s easy to spend a lot of money setting up a room in your house to be the perfect sound studio. Remember, the audio you record will be compressed and sent over the web. So a professional studio isn’t necessary. Some people record their podcasts in their living room, their car, or the middle of crowded airports.
Testing Your Setup
Before you spend an hour scripting and recording your first podcast, test your setup! Here’s how you do it:
1. Get a passage of text as a test.
Make sure that the sentence mixes in most of the typical consonant and vowel sounds so that you get a good sample.
2. Record the passage a few times using different microphone positions (at eye level, sitting on the desk, held in your hand) and software configurations as suggested by your software’s documentation.
Eye level is almost always best, but it’s possible that your mic works better in a different position.
You did read the documentation, right?!
3. Encode the audio as you would when you upload your podcast to the web.
You can read more about this in the upcoming section “Encoding and Uploading Your Podcast.”
4. Listen to each version and choose the best combination of settings and microphone position and setup.
Listen for background noise, volume, clarity of speech, and overall quality.
A little advance work like this will save you from the heartbreak: You don’t want to record a 20-minute interview using two Blue Snowball microphones, only to discover that you left one of the microphones turned off.
Supporting Podcasting on Your Blog
Podcasting works because the audio you create is inserted right into an RSS feed. You also can set up and edit a separate, custom podcasting RSS feed from your blog and group all your podcasts.
Creating a separate podcast feed has advantages. If, for example, you want to add your podcast to iTunes or other major podcast directories, it’s best to have a separate feed. Remember, though, you can always do this later.
By far the easiest way to generate a podcast feed is to use FeedBurner. Just select the I Am a Podcaster! check box when you add your feed, and FeedBurner includes iTunes podcast data, “rich” media data, and all the other elements necessary to generate your feed.
You can also find separate tools for generating feeds, like Podcast Maker (for Mac; www.lemonzdream.com/podcastmaker) or the tools built into many audio editors. If you’re really a glutton for punishment, you can generate the feed by hand. Don’t.
Preparing Your Podcast Script
Writing for a podcast is a little different than writing a blog post. You’ll almost never write down, word for word, what you’re going to say in your podcast. Instead, you’ll make a list of the items for discussion with an opening sentence or two and then a list of talking points — stuff you absolutely want to mention.
Write at least an outline of your podcast. Go one step further and write a rough draft of everything you want to say as a blog post. You can rehearse your script at least once, have all your thoughts organized, and post the rough draft as a transcript.
If you’re comfortable going the outline route, include — at a minimum — the following:
• Your introduction: “Hi, I’m Harrison and you’re listening to The Sci-Fi Kids’ Podcast. Today is September 20th. . . .”
• The topics you’ll be discussing
• Your closing: “You’ve been listening to The Sci-Fi Kids’ Podcast. I’m Harrison, and I’ll see you next week. . . .”
If you’re doing an interview, write down the questions you’ll ask, as well as follow-up questions if you think you know what the answers will be to the first questions.
Try to aim for a 10- to 20-minute podcast. Scripts tend to expand after you start recording. Unless you have a really dense topic, 30 minutes will be your audience’s maximum attention span.
Making Your First Podcast
You’re ready to go! Time to record your first podcast. Before the rubber really hits the road, though (or, your dulcet tones tickle the airwaves), make sure to take care of the following nuts and bolts:
1. Do a test.
Yes, do it again! Check sound levels and make sure that everything’s working.
2. Double-check that your phone’s unplugged, all noisy appliances are squelched, the neighbor’s dog has a mouth full of peanut butter, and so on.
3. Make sure that your notes are easily visible.
Here are the broad steps to follow when creating your podcast:
1. Click Record and start speaking.
You might feel a little nervous. It happens. Just relax and focus on your topic. Be sure to speak slowly and clearly, and remember to look up while speaking so that you don’t start mumbling.
2. Keep one eye on your recording levels, just in case something goes wrong.
Better to find out halfway through the podcast than when you’re done.
3. After you’re done, save the recording.
4. Listen through the podcast to check for sound quality and so on.
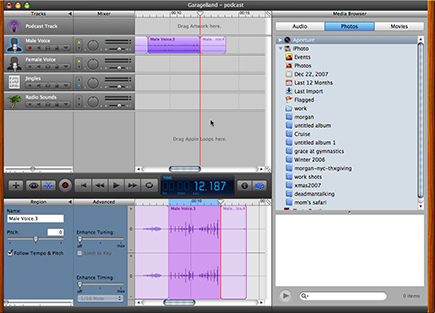
5. If you find any places where you stumbled or stuttered and don’t like how it sounds, use your sound editor to select and cut the guilty seconds, as shown in Figure 7-3.
Figure 7-3: Using GarageBand to erase a sneeze.
6. Add a title and other information to your podcast, as shown in Figure 7-4.
Many podcasting programs, such as GarageBand and Podcast Maker, let you add artwork as well as the date, author name, and title.
Artwork is a chance for you to include your logo or otherwise reinforce your brand in the podcast. That artwork will appear in the listener’s media player and on any podcast directories that support it.
After you’re happy with the audio and the podcast description, it’s time to encode and upload it.
Figure 7-4: Adding descriptive informa- tion to a podcast in GarageBand.

Encoding and Uploading Your Podcast
Whatever software you use, you have to encode your recording. The audio you just recorded is stored on your computer in an uncompressed format. It’s a huge file. By encoding it, you store it in (encoded) MP3 format, which is the standard for audio delivery over the Internet. Figure 7-5 shows an edited podcast in GarageBand.
After you encode your podcast, listen to it again. Whenever you compress an audio file, you’re reducing the quality. The sacrifice you make for the file-size reduction is worth it. Just watch that you don’t overdo it, or it will sound awful: Try encoding a bit of the podcast and listening to it first. Make sure that you’ve used the right balance of sound quality and faster downloading.
Most audio/video software comes with default podcast encoding settings now. Use those and you should be just fine.
The final result of your encoding process will be an MP3 file for audio, or MP4 for video. That’s your podcast.
One step is left: Upload the podcast. If you’re including it in a blog post, attach the file to the post itself using your blog editor, as shown in Figure 7-6.
Figure 7-5: Encoding a podcast.

Figure 7-6: Uploading the podcast in Movable Type.

If you’re doing a manual upload, you’ll need to use some kind of file transfer software, such as an FTP client, to upload your MP3 file. On a Mac, you can use Transmit. On a PC, you can use CuteFTP or FileZilla.
If you’re not sure how to use an FTP client, use your blogging software to upload your podcast. Don’t start messing with a manual upload.
Promoting Your Podcast
Now your podcast is live. How do you get people to listen to it?
You can promote your podcast the same way that you promote blog posts (see Chapter 6 of this minibook) by using pinging, blogger networking, and social media sites.
And here are a few additional (free) opportunities:
• Add your podcast to iTunes. Visit the iTunes Store via your iTunes software (it’s free), and then find Submit Podcasts to the iTunes Directory.
• Blackberry Podcasts. If you want to access a highly focused business audience, submit to Blackberry Podcasts.
• For a little extra juice, add your podcast to directory sites. Try Podcast Alley (www.podcastalley.com), Podcast.com (www.podcast.com), and PodcastBlaster (www.podcastblaster.com).