
Word Lesson 6: Beyond Word: Linking and Collaborating
In this lesson, you’ll compare and combine multiple versions of a single document, use the Track Changes features available in Word to consolidate edits, and link your document to live data in an Excel file.
What you’ll learn in this lesson:
- • Tracking changes to your documents
- • Combining versions of a document
- • Communicating via Word’s comment threads
- • Controlling collaborators’ document access
- • Linking document elements to live external data
Starting up
You will work with files from the Word06lessons folder. Make sure that you have loaded the OfficeLessons folder onto your hard drive from www.digitalclassroombooks.com/Office2013. If you need further instructions, see “Loading lesson files” in the Starting up section of this book.
Group work and Groupware
As part of the Office suite, Word 2013 is built for interoperability: Office works like a single complex app with multiple modules, each suited to a specific kind of work but at its best when connected to the others. A Word file reflects live updates to a linked Excel file; mail merges in Word fill up with records from an Access database, and then get addressed to Outlook contacts; a OneNote notebook turns handwriting into a formatted Word document.
Similarly, Word 2013’s collaboration and sharing features keep group-authored projects from getting scattered throughout everyone’s hard drives; instead of keeping a mental record of a half-dozen different versions of a file, you can track and combine multiple revisions and even multiple documents from a whole team of authors/editors in a single window.
Tracking your edits
When you click Review > Track Changes, Word begins to keep a chronological record of your edits (Changes) to the current document, and visually indicates additions, deletions, formatting/style changes, and reviewer comments. Track Changes is doubly useful: as an individual user, it lets you take back edits if you like; in group work, it lets you see each collaborator’s changes and choose which to keep and which to throw out.
As the tooltip for the Track Changes icon notes, you can visually mark every edit made to the document, which can be cumbersome early in the writing process, since your entire document could be marked up. Track Changes really comes into its own when you share a document, or when you finish a draft and want to treat further work as a revision.

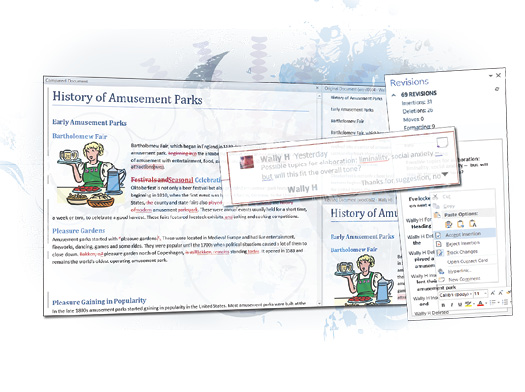
An example of a heavily marked-up Word document.
How Word displays edits
When you turn on Track Changes, you establish the baseline content for the file, which Word treats as the Original document. As long as Track Changes is on, Word will mark any change you’ve made, and allow you to revert to the original.
You can customize the visual presentation of document edits (markup), but for this lesson we’ll assume you’re still using the judiciously chosen default markup style.
1 Open word0602.docx in your Word06lessons folder. Click Review > Track Changes to start cataloguing your new edits.
2 Choose File > Save As and navigate to the Word06lessons folder. Enter word0602_work in the File name text field and click Save.
3 In the top drop-down menu of the Tracking group, choose All Markup.
4 At the beginning of the title line, add the words A Brief. Save your work.
There are three viewing modes for a document with Track Changes enabled in Word 2013: All Markup, which shows a synoptic view of the document revisions (i.e., every revision onscreen at once); the new Simple Markup mode, which indicates the presence of edits but hides their specific content by default; and No Markup, which tracks but doesn’t display edits (what you see is the eventual output only). You can toggle between All and Simple Markup modes by clicking the edit bars in the left-hand margin of the page.
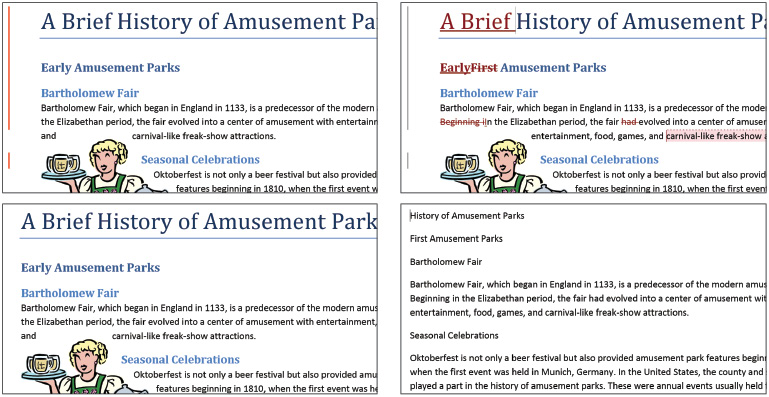
Clockwise from upper left: Simple Markup, All Markup, Original, and No Markup.
5 Toggle between the three markup modes to see the different ways Word can display edits. When you’re ready to move on, select Original from the Display for Review drop-down menu.
Selecting the Original view shows you the state of the document immediately prior to the tracked changes; despite appearances, this is not the actual content of the document, only a record of its previous appearance.
6 Return to All Markup mode.
There’s actually one more viewing mode available: Original: Show Markup, which appears temporarily if you make new changes while in Original document view. This view may be useful if you circulate a copy of your work, solicit feedback/edits from colleagues, and want to see the changes they’ve made against your baseline document (instead of seeing the live document). In general, though, you’ll cycle between the three main viewing modes.
Tracking new changes
Now you’ll make a few more edits to the sample document to see how Word marks them up; in the next section, you’ll incorporate these edits permanently into the document, changing Word’s definition of the Original content.
1 Click Home > Paragraph > Show Hidden Characters to reveal invisible characters and breaks.
2 Delete both page breaks, and then switch to Simple Markup mode; the pagination seems to change.

Rendering a page break (L-R): All Markup and Simple Markup. Only the latter accurately reflects the current pagination.
The pagination changes because when you delete a character in All Markup mode, Word renders the character with a strikethrough, and deleting a page break works the same. Word crosses out the break, but the break character (i.e., all the whitespace) is left onscreen.
The correct pagination (the current state of the document) is reflected in Simple Markup mode.
3 Type the words Toward the Modern World in Heading 1 style below the Pleasure Gardens paragraph; change Pleasure Gaining in Popularity to Heading 2 style. Delete the marked extra space between heavily and influenced in the Beginning of the Future section.
4 Add the caption Figure 1: Tilt-a-Whirl to the photo now on page 2 (select image, then click References > Insert Caption). Center the caption text, and then group the image and caption by selecting both using the Shift key and clicking Format > Arrange > Group.
5 Save your work.
Word doesn’t make a note of the image/caption grouping; it’s not a change to the document content as such, just a convenience for the author.
Controlling the markup that you see
As you can see, Word visually distinguishes your edits from other contributors’ edits. That’s handy, but it can still make for a cluttered document view. Sometimes you’ll want to take one reviewer’s comments/revisions at a time, or unmark certain reviewers’ feedback. (For instance, a colleague might rewrite an entire section of your document; in that case, it’s easier to read the new section without markup, as if it were baseline text.)
To toggle certain authors’ edits and comments, click Review > Show Markup > Specific People and check only the reviewers whose individual feedback you need right now. To return to a synoptic view, click All Reviewers in the same menu. (This tool is also handy when choosing from multiple reviewers’ alterations to one portion of a document.)
Similarly, you can use the Show Markup menu to choose to display only specific edits: ignoring insertions/deletions while rectifying section styles, for instance, or hiding comments and formatting changes to concentrate on raw text. How much review/revision/editing information you need depends on what point you’ve reached in the lifecycle of your document.
The Reviewing pane
In addition to viewing edits inline (in the context of your document), you can use the Reviewing pane, much like the Navigation pane, to move to specific edit points in your document.
1 Click Review Tracking > Reviewing Pane > Vertical. Click several edits in turn to move through the document change by change.
2 In the Reviewing pane, scroll down and click the insertion of lent their DNA... to move to that location in the document.
The Reviewing pane isn’t just a navigational tool; crucially, it also allows you to Accept and Reject changes without picking them out in the main window:
3 Right-click Wally H deleted: played a part in… in the Reviewing pane, and select Accept Deletion. Then right-click the lent their DNA… insertion and Accept Insertion.
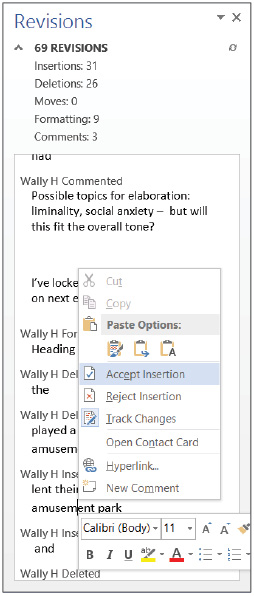
Incorporating an edit in the Reviewing pane.
The edits disappear from the Reviewing pane, the struck-through text disappears from the main document window, and the added lent their DNA text is now unmarked. Unless you Undo the change, Word will forget that the played a part… text was ever there, and accept the new text as part of the Original document state.
Editing and collaborating
Word 2013’s revision tools are built for collaboration. The Track Changes, Combine, and Compare tools can turn a handful of different document versions, each in a different co-author’s hands, into a clean, comprehensive final document. Threaded comments will preserve the details of your collaboration right in the .docx file itself.
Accepting and rejecting changes
When you use the Accept Changes button, you essentially incorporate edits into your document’s baseline, folding those changes back into the document’s Original state. Accepting and Rejecting Changes is usually the job of the document’s primary author, though anyone can accept/reject edits unless restricted from doing so.
1 Make sure you have All Markup selected and then close the Revision pane. Scroll to the top of the document and click the word Early in the first heading.
2 Click Review > Changes > Accept. The word Early loses its underline/coloring, indicating that it’s no longer treated as a change, but rather part of the baseline document. The struck word First is highlighted: Word has moved on to the next edit.
If you clicked the checkmark Accept icon rather than selecting from the drop-down Accept menu, Word defaults to Accept and Move to Next. In this case, Word treats the insertion of Early as having been finalized; it’s no longer an edit that needs to be accepted, but a permanent feature of the draft. (If needed, you can press Ctrl+Z to undo Accept Change.)
3 Accept or reject the edits in the first paragraph until you come to the Possible topics comment from Wally H. In the comment bubble located in the right margin, click the Reply icon.
4 Type a new comment: Thanks for suggestion, no time now. Then right-click the original Possible topics comment and select Mark Comment Done.

Use Mark Comment Done to deemphasize reviewer comments while keeping them around for reference.
5 Enable Simple Markup view, and if it’s still selected, click to deselect Review > Comments > Show Comments. A clickable comics-style speech bubble to indicate the conversation.
6 Click Show Comments again to display all comment threads (including the one marked Done, still greyed out). Save your work.
Comments and conversations
Word 2013 treats document review as a kind of augmented conversation (rather than real work and chatter), and a couple of new features have been added to emphasize that view: threaded comments and integrated external communications. You’ve encountered comments already; we’ll quickly review the tools to add, delete, review, and respond to comments here, as well as taking a comment thread to e-mail or instant messenger.
1 In the word0602_work.docx file, click the word Oktoberfest found in the second paragraph and then click Review > Comments > New Comment. In the comment box, type English spelling? and then press Escape to return to the document window.
2 Click the clip art next to it and add a comment with the text Classier image? Press Escape, and then mouse over the new comment.
3 Click to reply to your own Classier image? comment. Enter Fits document tone in the box and mark the first comment in the thread Done. Save your work.
Taking a comment thread to e-mail or instant messenger
For longer replies, you can respond directly to another author via e-mail, instant messenger, or phone; just mouse over their image in a comment thread to bring up their Person Card, from which you can select a contact method. To update your own contact information, click Sign in (if you are not already signed in) or your account in the upper-right corner of the Office 2013 screen, and then select Account Settings.
Access control
Sometimes you’ll want to place limits on who can edit a document, and how. The Review > Protect group offers two tools to do so.
Blocking certain edits
Scroll to the bottom of the document; the final paragraph and its footnote are marked with a little grey Don’t Touch! icon and a dotted bracket. This means that one of your colleagues has used the Protect > Block Authors tool to block others from changing that text.
No one else will be able to edit the blocked text until that author takes two steps: unblocking the text by right-clicking the icon and deselecting Block Authors, and uploading the unblocked file to SkyDrive or SharePoint for group review. If the author doesn’t have automatic uploading enabled, they have a chance to reconsider before unblocking the paragraph.
The author can also choose Block Authors > Release All of My Blocked Areas to make the entire document unrestricted (once she re-uploads, that is).
Restricting editing
You can also use the Restrict Editing tool to limit others’ input on a document. You can access this tool by choosing Review > Protect > Restrict Editing. The Restrict Editing pane offers several levels of access control, largely targeted toward colleagues sharing an intranet.

Limiting edit rights to your document with Restrict Editing.
You can place Formatting restrictions, which are useful when using a .docx file as a template (for copying into an advanced layout application such as InDesign, or generating structured XML documents) or adhering strictly to a document theme/template (e.g., when getting feedback on a newsletter). You can also place Editing restrictions: marking a document as Read-only, soliciting comments but no edits, or preventing invisible edits (requiring Track Changes to be on for all reviewers). If your document is a fillable form, you can also prevent other users from changing anything outside of the fillable text boxes.
When you’re ready to enforce access limits, you can click Yes, Start Enforcing Protection. When you do so, you’re prompted to choose either an unencrypted document password (which you’ll distribute manually to reviewers) or user authentication, which requires that you set up Information Rights Management, or IRM.
Comparing and combining documents
With the Review > Compare tool you can compare two versions of a file to see any points of difference, while flattening out any Tracked Changes in either. Combine Documents is a little different: it assumes that each file is a different revision of a common ancestor, and preserves Track Changes info for each.
Comparing documents
Here we’ll compare the document you’ve been working on, word0602_work.docx, with word0604.docx; both files branched from the same source material, word0601.docx. Word doesn’t care about the history of either file, only their current states.
1 With the word0602_work.docx file open, click Review > Compare > Compare.
2 In the left-hand text box, click Browse and select word0604.docx. In the right-hand box, click word0602_work.docx.
3 Click More >> and choose to show changes in a New document. Click OK.
4 A dialog box appears, stating that all tracked changes will be treated as accepted, asking whether to proceed. Click Yes.
Word opens a new window called Compare Result 1 containing a single new document, which essentially treats word0602_work as a set of changes to word0604.
5 Close the Review pane to make your screen less cluttered. If it’s not already selected, click Compare > Show Source Documents > Show Both.
To see how this comparison works, scroll to the Pleasure Gardens paragraph. In the first sentence of the combined document, quotation marks around the phrase pleasure gardens have been deleted; but if you look back at your original word0602_work.docx file, those quotes were never actually in the source material. They were introduced in word0604.docx. Word is treating the former as a modification of the latter, even though they only share a common ancestor.

Compare Documents lets you establish any version of a file as the baseline for future edits.
At this point you can go through the edits in the Compared Document window and accept/reject them as you normally would; this lets you combine two arbitrary files (favoring word0604 in terms of how the files are presented).
6 Leave this file open to use as reference in the next exercise.
Combining documents
Combining documents in Word 2013 is only slightly different from Comparing them: instead of flattening out each source document’s internal Track Changes data, it treats both documents as deviations from the same baseline, and throws both documents’ Tracked Changes into a new synoptic document. To see the difference, follow the same basic steps as in the previous section.
1 Click Review > Compare > Combine.
2 In the left source box select word0604.docx; on the right, select word0602_work.docx.
3 In the dialog box that appears, choose to Keep the formatting changes from the original document (word0604) and click Continue with Merge.
4 Use Alt+Tab to toggle back and forth between the Combined and Compared results windows. In each window, scroll to the Festivals and Celebrations/Seasonal Celebrations paragraph.
The Combined document’s second paragraph heading is Festivals and Celebrations, which it inherits from word0604. But the Compared document uses Seasonal Celebrations, inherited from word0602_work. Why the difference?
Combine Documents sees that both word0602_work and word0604 start with Seasonal Celebrations, and word0604 makes a Tracked Change to get to Festivals and Celebrations. Because one file deviates from the shared source document, Word includes that deviation in the Combined file.
But the output of Comparing the files comes from assuming that Festivals and Celebrations is the original text, so Seasonal Celebrations must be updated. So it preserves that heading instead.
5 Close all the open Word documents and only save the changes to the word0602_work file.
Embedding and linking objects
For the final piece of this lesson, we’ll shift gears to look briefly at how Word connects to external data sources. One such source is an Access database, which you can learn more about in the Mail Merge lesson; here we’ll see how live updates to an Excel spreadsheet can be reflected in a Word document without re-embedding the Excel data.
Linking to an Excel spreadsheet
There are two ways to drop an object into a Word file: embedding and linking. An embedded object is added to the .docx file itself, bulking it up; thereafter you’d edit the object through Word itself. A linked object is something else: a pointer to an external file, which can be updated to reflect changes to that external file (or broken, if the external file disappears). Each method is useful for different tasks. Embedding is straightforward: drag and drop or cut and paste. Linking is only slightly more complicated.
1 Navigate to the Word06lessons folder and double-click word0603.xlsx which will open in Excel 2013.
2 Click in the upper-left corner cell (A1) and either shift-click or drag down and to the right to H8 so the entire table is selected. Press Ctrl+C to copy the data. A moving dotted outline will surround the copied cells.
3 Open a blank new Word document. Right-click in the document area and under Paste Options choose Link & Keep Source Formatting.
The Excel data appears in the new Word doc in an organized way. To view a read-only copy of the source data, right-click the table and choose Linked Worksheet Object > Open Link.
4 Back in the Word document, right-click the table and select Linked Worksheet Object > Edit Link to open the spreadsheet for editing in Excel.
5 In word0603.docx, change the January Employees count to 350 and save the document.
6 Switch back to your new Word document. Right-click the inserted Excel data and select Update Link. The cell values change to reflect alterations to the original.
7 Finally, in the Word document, click the table and select a new Table Style from the Table Tools > Design tab.
The spreadsheet object formats its cell data just like the source file (or Excel file), but its table formatting and style from Word’s own table tools.
Unlinking a linked object
If you want to stop dynamically updating the data in your spreadsheet, right-click the spreadsheet object, click Linked Worksheet Object > Links, and select Break Link. There’s not much more to it; naturally, if you move or rename the source file you’ll break the link, which is the main hazard when you choose to link (vs. embed) external data. But for many work situations, with a little care and feeding of your files and folders, live data will be preferable.
Self study
1 Instead of Special Paste, you can use the Insert > Text > Object command to link or embed an object in your Word document. Experiment with copying PowerPoint, Photoshop, or other files into your project.
2 Some of this lesson’s practice files contain an enormous number of changes from their baseline states. Examine and experiment with the Accept Changes tool to find a faster option than working with individual edits.
Review
Questions
1 If you embed Chart A and link Chart B in a Word file, and then delete both source files, what happens to your Word file?
2 How can you grey out comments to signal that they’ve been dealt with?
3 Between the Combine and Compare Document tools, which maintains Track Changes information in its output?
Answers
1 If you embed Chart A and link Chart B in a Word file and then delete both source files, the charts are unchanged in the Word doc, but the link between Chart B and its source is broken.
2 You can grey out comments with the Mark Comment Done command.
3 Between the Combine and Compare Document tools, the Combine Documents tool is the one that maintains Track Changes information in its output.