
PowerPoint Lesson 6: Delivering Your Presentation
The best slide design in the world, with the slickest animations, can still fall flat when you reach the podium. This lesson introduces tools to improve the flow and pacing of your presentation, and to help you build a slide deck to support your talk, rather than the other way around.
What you’ll learn in this lesson:
- • Mastering PowerPoint’s suite of presentation tools
- • Rehearsing, recording, and automating your presentation
- • Configuring your slide deck for both live talks and kiosks
- • Laying out speaker notes and audience handouts
- • Sharing slide decks and deliver presentations online
Starting up
You will work with files from the PPT06lessons folder. Make sure that you have loaded the OfficeLessons folder onto your hard drive from www.digitalclassroombooks.com/Office2013. If you need further instructions, see “Loading lesson files” in the Starting up section of this book.
Presentations are performances
The point of your slide deck is to present it; your slides don’t work unless they work for an audience. Regularly previewing and practicing your presentation while building your slide deck will give you a clear sense of whether the slides form an effective whole, and rehearsing will make for a much smoother and more confident presentation, too.
Your workflow should build toward an outstanding talk, not perfect slides. Fortunately, PowerPoint 2013 offers a full suite of presentation tools to structure and improve the performance side of your slide show, including a totally redesigned Presenter View. In this lesson, you’ll start from a finished slide deck, rehearse your presentation (and put your slide notes to use), pin down the timing of your talk, and use PowerPoint’s pen tools and hand-drawn annotations to put audience focus right where it belongs. Then you’ll learn to assemble multiple custom presentations from a single slide deck and shape your printed notes and audience handouts to your needs.
Preparing for your presentation
Before you begin your talk, you need to configure your hardware (presenter console and display screen) and PowerPoint (the presentation app). As far as your hardware is concerned, the best advice we can give is to get to the room early and test out your projector because it rarely just works. Configuring the presentation itself is much more under your control.
Setting up the slide show
The Set Up Slide Show command offers several options to customize your slide deck and the dynamics of your presentation: looping, graphics settings, pen/pointer settings, slide controls, and monitor configuration will vary based on the type of slide show you’re preparing:
- • Presented by a speaker (full screen): the standard big-slides-behind-the-speaker view, to accompany a talk.
- • Browsed by an individual (window): the full presentation running in a window with limited interactivity (for example, click to advance doesn’t work); ideal for integrating presentations with work in other apps.
- • Browsed at a kiosk (full screen): an unattended presentation, minimally interactive, meant to transition automatically between slides and loop endlessly (for example, on a trade show floor or as advertising).
A kiosk presentation, for instance, always loops automatically, while a windowed screen slide show loops by default, but isn’t required to; windowed presentations automatically display on your primary monitor; Presenter View is (naturally) disabled for kiosk and windowed slide shows; the laser pointer is available for kiosk/windowed shows, but the pen is disabled.

Configuring your slide deck for different presentation types.
The Set Up Show dialog box offers a few additional options to customize your presentation. If you’ve recorded practice narration, or designed your slide deck for both unattended and live presentations, you can turn off the narration in the dialog box. You can also specify a subset of the deck to use in your presentation and disable automatic timings.
If you have multiple monitors connected (for instance, a laptop screen or tablet for the presenter and a projector facing the audience), you can also specify in this dialog box which screen will display which information.
Controlling your presentation from the keyboard
If you’re using a Surface or other Windows tablet while presenting, touch commands will surely be the most convenient way to interact with your slide show; on a PC, however, the keyboard is your fastest input method. Rather than printing a complete list here, we’ll mention the most common presentation commands, and refer you to the support pages at office.microsoft.com (from which this information is taken) for a full accounting:
|
Common presentation commands |
|
|
Command |
Keyboard Shortcut |
|
Next Trigger or Slide |
N, Enter, PgDown, Right Arrow, Down Arrow, Space |
|
Previous Trigger or Slide |
P, PgUp, Left Arrow, Up Arrow, Backspace |
|
Go to slide # |
Type #, press Enter |
|
Black screen |
B, period |
|
White screen |
W, comma |
|
Stop/restart |
S |
|
End |
Escape |
|
Pen |
Ctrl+P |
|
Arrow |
Ctrl+A |
|
Slide Sorter |
G |
|
Erase annotations |
E |
You can also get in and out of your slide show using only the keyboard: F5 starts your slide show from the beginning; Shift+F5 starts from the current slide; and Alt+F5 jumps right into Presenter View from the beginning.
Note that the only way to navigate directly between slides, skipping over triggered animations and effects, is by selecting a slide directly, either by typing its number or using the Slide Sorter.
Creating custom slide shows
Sometimes you’ll want to give several different presentations using only parts of a single slide deck; for instance, you might give roughly the same talk to both a team of engineers and the middle managers who supervise them, and want to leave out your raw data in the nontechnical talk. PowerPoint offers the Custom Slide Show tool for just such situation.
1 Open pp06a.pptx located in the PPT06lessons folder. Click Enable Content to enable embedded media.
 Slide shows that contain links to external media, such as YouTube videos, open in Protected mode by default. To automatically enable embedded media, make your file a Trusted Document.
2 Choose File > Save As and navigate to the PPT06lessons folder. Name the file pp06a_work and click Save.
3 Click Slide Show > Custom Slide Show > Custom Shows.
4 Click New. Enter children’s group in the Slide show name text area.
5 Select slides 1 through 3 and click Add.

Custom Slide Shows include a subset of the full slide deck.
Now a children’s group show appears in the list under Custom Slide Show, which cuts out the last three slides. You can create as many custom slide shows as you need; the slide list is simply saved in the .pptx file.
6 Click OK and then Close the Custom Shows dialog box.
Take careful note: custom slide shows renumber the individual slides. A custom show that skips slide 3 will renumber slide 4 as 3. If you’ve memorized specific slide numbers from your full deck, you may have to remember a whole new set of numbers for each custom show. When navigating a custom show, the Slide Sorter, with its slide thumbnails and section headings, becomes extremely helpful.
Presenting in slide show view
You’ve used the basic Slide Show command throughout this book’s PowerPoint lessons. As you’ve seen, Slide Show gives you the audience’s view of your presentation; it’s especially well-suited to showing the slides in action during editing. If you give the same talk multiple times, you could find it easier to present straight from Slide Show mode; the stripped-down interface will minimize distraction.
The keyboard command and onscreen tools in the Slide Show are the same as for Presenter View; the difference is the amount of information on the screen. Crucially, Slide Show mode offers neither speaker notes nor a preview of the upcoming slide.
1 Begin the Slide Show by pressing F5. Use any of the shortcut keys to advance to slide 3.
2 Press Ctrl+H to hide the pointer.
Oddly enough, Ctrl+H does not act as a toggle: pressing it again won’t make the pointer visible again. To do so, you have two options: switch to Pen mode and then back to arrow mode (press Ctrl+P twice), or right-click and select Pointer Options > Arrow Options > Visible from the context menu.
3 Press Ctrl+P to enter pen mode, circle the word house, and then press Escape to switch the pointer to an arrow.
4 Press Escape again to end the Slide Show; Discard your ink annotations.
Mission control: PowerPoint’s presenter view
PowerPoint’s standard Slide Show mode (invoked by pressing F5) shows you the presentation as the audience would see it: the current slide is displayed with no notes or additional information. Your Pen Tools are available in Slide Show mode, along with the Slide Sorter and Zoom tool, but the focus is on the slide and the audience experience.
In contrast, Presenter View is like Mission Control for presentations. It splits the screen to display slide notes, a preview of the next slide, and a handful of display options for your second (audience) screen. Your presenter tools are hidden from the audience unless you deliberately switch the Presenter and Audience screens. If you’re giving the same presentation over and over (or prefer printed Notes pages) you may not need the full Presenter View, but for your early efforts at giving a talk, it’s an essential tool.
 PowerPoint 2013 launches Presenter View in a separate window from the Slide Show view, so you can press Alt+Tab to switch between the two views.
Presenter View gives you a big picture view of your presentation.
In this section, you’ll quickly tour the Presenter View Interface.
1 Activate Presenter View by pressing Alt+F5.
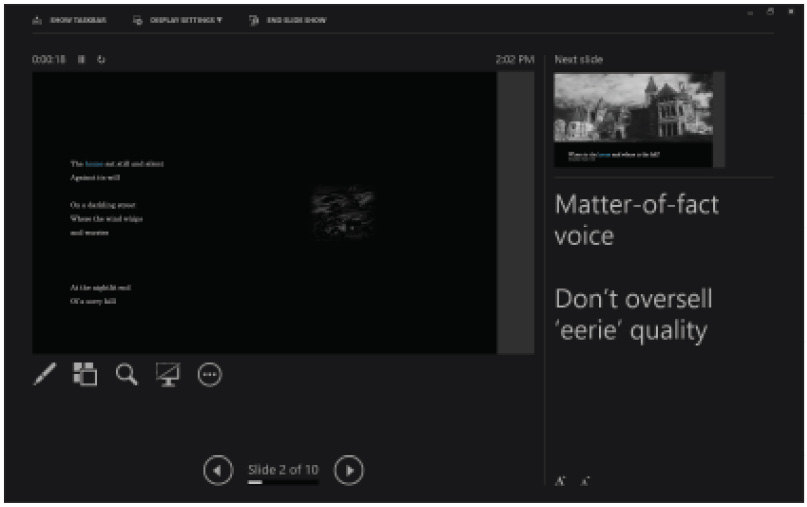
Note the large right and left arrows at the bottom of the screen. They do not let you skip from slide to slide without triggering animations. To move by the slide rather than interact with it by clicking, use the Slide Sorter. By default, Presenter View is split into three panes:
- • a large display of the current slide with timing, annotation, and zoom tools nearby;
- • a small preview of the next slide; and
- • resizable speaker notes.
2 Drag the borders between the three panes to resize the current and next slides and the slide notes.
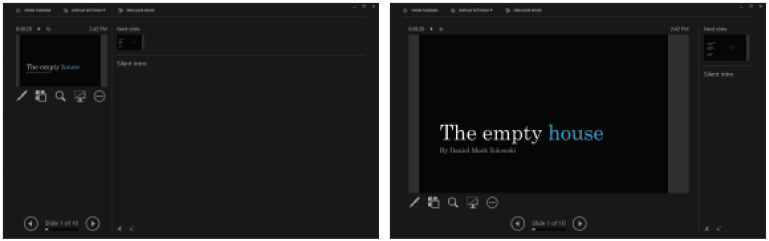
Resizing the Presenter View panes lets you focus on different aspects of your performance.
Moving the speaker notes and slide preview to the side can help you focus on tabular data or images; downsizing both slide images brings you speaker notes to the fore, which is important when you’re reading lengthy or precisely worded text pieces.
Using speaker notes
Speaker notes are easily overlooked during slide show construction. Even with animations and transitions, your slides are essentially static; slide-to-slide movement will come from you, the presenter, as you link presentation across slides and draw connections between ideas. The glue that holds your slide deck together (in other words, the logic that gets you from Slide A to Slide B) goes into your Speaker Notes.
In Presenter View, you can resize the text of your slide notes by clicking the two icons at the bottom of the Notes pane. If you don’t want to be bound to a screen during your presentation, you can print out Notes Pages instead, which present a slide thumbnail with a large formatted notes pane. You can customize the look and layout of your notes pages with the Notes Master.
How detailed should speaker notes be?
You can think of presentations as a form of theatrical performance: if you rely too heavily on your script, you could end up with a stiff performance. Obviously, you should tailor your notes to your personal taste and level of preparation, but ideally, by the time you reach the podium, your notes will be nothing more than prompts or reminders to help you move smoothly through natural, conversational spoken delivery.
For that reason, you should revise your speaker notes as you rehearse your presentation, refining scattered notes down to a telling word or phrase. If you’re comfortable improvising or even memorizing, a written-out presentation can work too; but remember, you’re writing a one-person stage performance, not a book report.
Incorporating direct quotes is another consideration. In general, long text passages fit awkwardly on slides. If you need to read verbatim text aloud, it’s often best to leave a telling excerpt on the slide and leave the full text off to your speaker notes.
The most important guideline for speaker notes is this: Focus on the talk, not the text. Write only and exactly the notes that let you give the most fluid, memorable talk you can.
Formatting and printing notes pages
The notes pane in Presenter View can’t be formatted like slide text; indeed, slide notes can only be formatted for the Notes Page view, and then only minimally (at the paragraph level). Such a limitation fits the approach suggested in this lesson: your speaker notes are notes, not a script, and great talks don’t rely on notes for their impact; if you can wean yourself off speaker notes entirely, all the better.
That said, printed speaker notes can be of great benefit during a talk, freeing you from staring at your laptop or tablet screen. You can format your speaker notes (both the text itself and the layout of the printed notes page, including header and footer areas) in the Notes Master view.
1 Select View > Notes Master.
2 Click in the Footer box at the bottom of the notes page and type Not for distribution.
3 Triple-click to select the entire first line in the notes pane (Click to edit…styles). Use the mini formatting pop-up menu (or the Home > Font group in the Ribbon) to format the line as 20pt boldfaced blue text.
4 Use the resizing handles to make the top content area (the slide image) about 2˝ square, and drag the top of the notes text box upwards to fill the added space and give the text more breathing room. Click to select the notes content area itself and apply the Colored Outline – Blue, Accent 1 style from the Drawing Tools > Format > Shape Styles gallery.
5 Click outside of the notes content area to deselect it. Finally, select Notes Master > Close Master View and save your work.
If you’ve worked through Lesson 3, “Designing a Presentation,” this process will seem familiar; designing a notes page is exactly like making changes to a slide layout in the Slide Master. You can print your formatted notes page by selecting File > Print and selecting Notes Pages under Print > Settings; use the controls at the bottom of the screen to flip through the slides in your deck. Note that Print Comments and Ink Markup is selected by default; this will insert separate pages containing only comments on each slide.
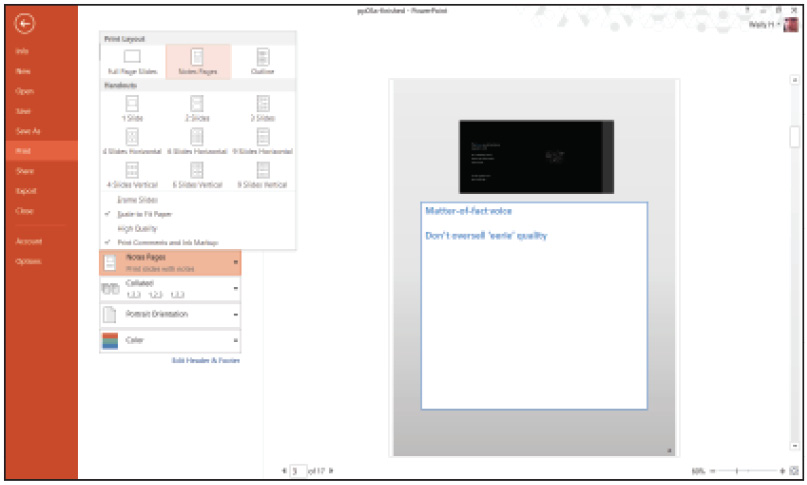
Printing speaker with additional background formatting added to the Notes Master.
Designing a printed handout
Printed handouts are useful tools for presentation audiences as material for connecting their handwritten notes to slide content. But poorly formatted handouts (for example, many slides per page on an intrusively busy background), are worse than none at all. You can use the Handout Master to design a printout of your presentation for the audience to take away. The process is largely the same as for the Notes Master and printed notes page, except that the Handout Master > Page Setup group has a Slides Per Page button to set that crucial parameter. The layout for each Slides Per Page option is fixed, so handouts are less customizable than notes pages in that sense, but a subtle background or distinctive color scheme can make a printed handout more sticky in terms of audience retention.
1 Select View > Handout Master to edit the handout’s layout.
2 Establish the layout by choosing Handout Orientation > Landscape and Slides Per Page > 4 Slides.
3 Click Background Styles > Style 4, then close the Handout Master. Save your work.
4 Click File > Print. Select 4 Slides Horizontal from the third drop-down menu, and deselect Print Comment Slides and Ink Markup from the same menu.
5 Now preview the printed handout using the controls at the bottom of the screen. When you’ve done so, press Escape to cancel the print. (The black background uses a lot of ink.)
 You can quickly generate a handout layout from the Print options screen.
Navigating with the slide sorter
The Slide Sorter works the same in Presenter View as in editing mode: it shows thumbnails of your entire slide deck organized by section and navigable with the arrow keys. To invoke the Slide Sorter from Slide Show or Presenter modes, press G or click the See all slides icon. When the right slide is highlighted, press Enter to drop back into presenting.
Note that, as is the case with Presenter View, the Slide Sorter won’t appear on the audience screen, just the presenter’s.
Going to a black or white screen
At times during a presentation, you’ll want to clear the audience screen of content. PowerPoint provides commands to black out or white out the screen, rather than quitting the presentation entirely (popping back out to the edit window). This is extremely useful for the very end of your talk as a way of signaling to the audience that you’re finished, without the awkward anticlimax of accidentally showing off your Windows desktop.
To black out the screen during a presentation, press B (or the period key); to white it out, press W or the comma. Press the same key to restore the slide content.

Black out your screen by clicking the highlighted icon beneath the slide; whiteout is only accessible from the keyboard.
Focusing audience attention with Pen tools
No matter how much time you spend on slide design, there are plenty of uses for PowerPoint’s pen tools during a presentation. A moving laser pointer can draw the audience’s eyes to a specific region in a chart or a graph, or make the contour of a scatter plot clear. Ink circles can help listeners to later recall a specific fact. Subtle yellow highlights can make crucial words or phrases pop out of a paragraph or bulleted list. And you can save or print your pen annotations, making the live performance part of the written record of your talk.
Crucially, interacting with a slide can be an effective tool for you as the presenter; among other things, it lets you focus on specific physical action rather than staring over the heads of the crowd or fidgeting with papers at the podium. In this section, you’ll mark up your presentation and save your pen annotations for later.
Using the laser pointer and highlighter
The laser pointer tool is available in both Slide Show and Presenter Views.
1 Press F5 to enter the Slide Show.
2 Click the pen icon in the lower left of the screen, and then click Laser Pointer. Move the glowing red ring around on the screen to draw attention to features of the slide.
3 Press the right-arrow key to advance to the next slide. The laser pointer remains up.
4 Now press Ctrl+P to switch to Pen mode. Click and drag to circle the word house. Then click the pen icon and select Erase All Ink on Slide. Press Ctrl+P to return to pointer mode. Advance to the next slide.
Keeping ink annotations
If you want to distribute a version of your slide show with live penstrokes included, choose to Keep ink annotations (and then save the file) when you finish marking up your slides.
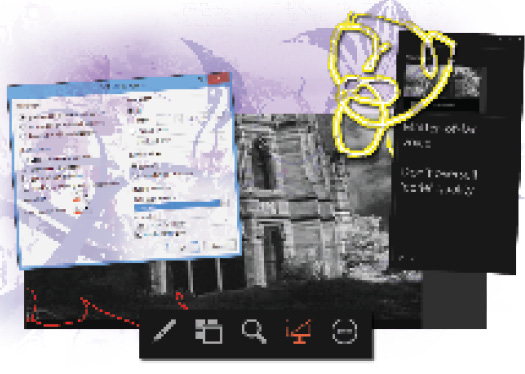
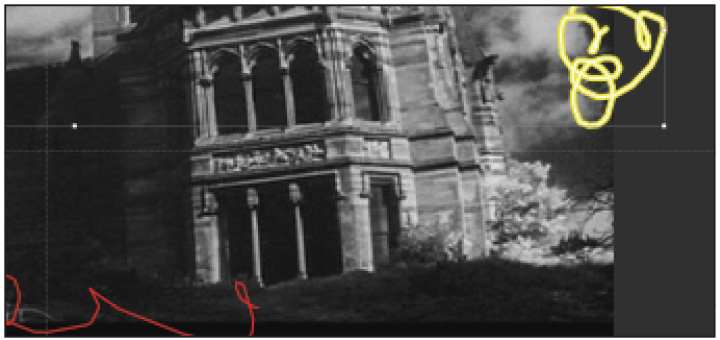
1 Click the pen icon and select Highlighter. Highlight several words on the slide. Then switch to the pen tool (Ctrl+P) and handwrite hotel over the image.
2 Press Escape to return to pointer mode, then Escape again to exit your presentation. When asked to save your annotations, click Keep. Save your work.
The ink remains on the slide. This is an image object; indeed, when you select the lines you just drew in the editing window, an Ink Tools > Pens tab appears along with Drawing Tools > Format. Note that all the strokes you make on a single slide during a given presentation are combined into a single graphic object.
The easiest way to change the color of a pen stroke after the fact is with Drawing Tools > Format > Shape Outline; you can change the stroke weight with Ink Tools > Pens > Thickness.
Once you choose to keep your ink annotations from a given talk, the only way to remove them is in the editing window; the next time you run through the presentation, PowerPoint will treat them as part of the slide (in other words, the eraser tool won’t alter pen strokes from previous run-throughs).
Saved ink annotations transform into graphic objects when you exit the Slide Show.
Rehearsing your presentation
Rehearsals are essential to the process of creating and shaping your talk and the slide deck itself. (After all, how can you know your slide show is working if you don’t experience it in its proper context?) PowerPoint provides a suite of rehearsal tools to help you iron out the timing of your presentation and pre-record narration and pointer movements.
Recording slide and presentation timings
With the tools in the Slide Show > Set Up group, you can record your timings and spoken narrations, and play back the entire presentation with prerecorded narration, or just display slide timings while you run through the deck again. In this section, you’ll start by recording timings; use the timings to run a hands-free slide show; and then record narration and laser pointer movements.
1 Click Slide Show > Set Up > Rehearse Timings to begin the slide show in practice mode. A small timer appears in the upper-left corner of the screen. Presenter View is unavailable in this mode.
2 Click through the presentation, taking five or so seconds per slide.
3 When the dialog box appears at the end of the slide show, click Yes to save your timings. Save your work.
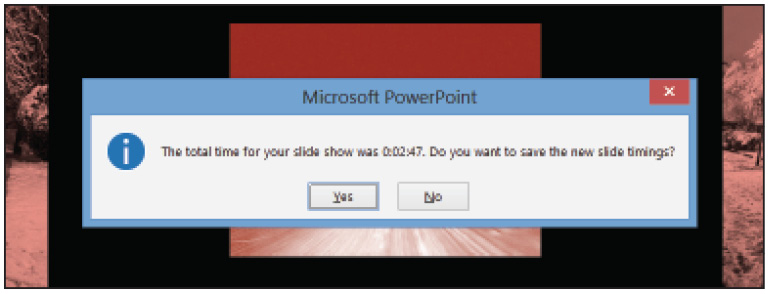
You can save one set of slide timings at a time.
After saving your timings, you can run through your presentation with the transitions playing automatically behind you. This is useful for rehearsing, but if you can give a smooth presentation without relying too much on the slides, you can also run the slide show at a fixed rate during the talk itself.
4 Now press F5 to run your slide show again. Animations and transitions will run automatically at the previously recorded tempo. Press Escape when you’re ready to move on.
Recording narration and pointer movements
Once you’ve fixed your slide timings to your satisfaction, you can record voice-over and pointer movements. This is an especially useful feature for kiosk slide shows, which can play like mini movies. But you can also use it to make recorded presentations for online distribution, or record a live presentation (for instance a team meeting) with listener feedback as a kind of audiovisual archive.
1 Click Slide Show > Record Slide Show. In the dialog box, make sure only Narrations and laser pointer is checked. Click Start Recording. Speak some of the slide text aloud as you click through the presentation.
PowerPoint is now recording audio (from your system’s default audio input; usually a built-in microphone), and will record any laser pointer movements you make.
2 Enable the laser pointer (using the button at the lower left of the screen) and move the pointer over some of the slides, holding still during others.
 If you don’t move the laser pointer at all during a slide, it won’t be visible on playback, since only movements are recorded. Don’t use the point if you don’t need it.
3 When the slide show is finished, press Escape to quit.
4 Make sure Play Narrations and Use Timings are selected in Slide Show > Set Up. Then adjust your computer’s volume to a comfortable level and press F5 to play back the presentation.
The slide show plays back using your rehearsal timings (recorded earlier) and the narration and laser pointer moves you just recorded.
5 Choose File > Save or press Ctrl+S to save your work.
Tweaking and removing timings, narration, and laser pointer movements
Your rehearsal timings are saved as automatic transitions: look under Transitions > Timing and you’ll see that each slide now has an Advance Slide After value. You can tweak these timings as you would any other transition. (If you only want to use recorded timings and don’t want to be able to break them by skipping quickly through slides, deselect the On Mouse Click timing option.)
Recording rehearsal timings overwrites any Advance Slide After timings you might have already set. The only way to remove rehearsal timings is to delete them from the slides themselves. We’ll do that now, to make the presentation timing more flexible.
1 In the Normal edit view, select all the slides by clicking in the slide pane on the left and pressing Ctrl+A.
2 In the Transitions tab, deselect Timing > Advance Slide After. Save your work.
PowerPoint saves your narrations as audio objects, one per slide. If you don’t need narration during a given presentation, you can always disable the narration in the Set Up Show dialog box; to reduce file size and speed up PowerPoint’s performance, we’ll remove the narration we’ve just recorded.
3 Click Slide Show > Record Slide Show > Clear > Clear Narrations on All Slides. Save your work.
Presenting online
At times, you might need to present to someone across town or in a different time zone. Microsoft offers a couple of channels for online presentations:
- • Lync, a paid groupware service offering integrated audio/video conferencing, instant messaging scheduling, and media sharing.
- • Office Presentation Service (OPS), a free public service for making slide shows viewable in the PowerPoint Web.
From the speaker’s standpoint, presenting online is similar to presenting in person. One key difference is that online viewers can flip back through the slide deck during the presentation without interrupting the presenter or anyone else in the audience. The potential downside to using OPS for presentations is that there’s no speech integration: the audience gets the slide deck and embedded media, but your actual talk can only go out over an external service such as Skype and there’s no built-in video presence. The Lync service provides these additional features.
You can also embed your slide show in a webpage using SkyDrive. This option gives you the least control over access or the viewer experience, but it’s the easiest way to share your slide deck; you could use it to post a multimedia photo album to a blog, for example. An OPS presentation is only viewable as long as you’re actually presenting, and though it’s theoretically open to the public, only invited viewers will be able to find it. Lync offers the most control over who can see your presentation and how.
Delivering a presentation using Office Presentation service
You can present a slide show using OPS directly from the Slide Show tab.
1 Click Slide Show > Start Slide Show > Present Online > Office Presentation Service.
2 Uncheck the option to make the slide deck downloadable (Enable remote viewers). Then click Connect.
The Enable remote viewers option does just what it says: if you leave it checked, your audience will be able to download the source file for your presentation.
The Optimize Media option appears because pp06a_work.pptx contains a link to a YouTube video, which might not display properly on older Flash-disabled computers. For our purposes, we needn’t worry about it. PowerPoint now generates the online presentation. When it’s finished, a Present Online pane appears.
3 Click Copy Link, then click Start Presentation.
4 Open a web browser, but don’t stop the presentation by pressing Escape. Paste the URL into the location bar of the browser to view your presentation.
5 Return to your slide show in PowerPoint and advance to the next slide, and then switch back to your web browser; the presentation will have advanced there as well.
6 Return to PowerPoint and stop the presentation by pressing Escape. Select Present Online > End Online Presentation, then confirm your choice in the pop-up dialog box.
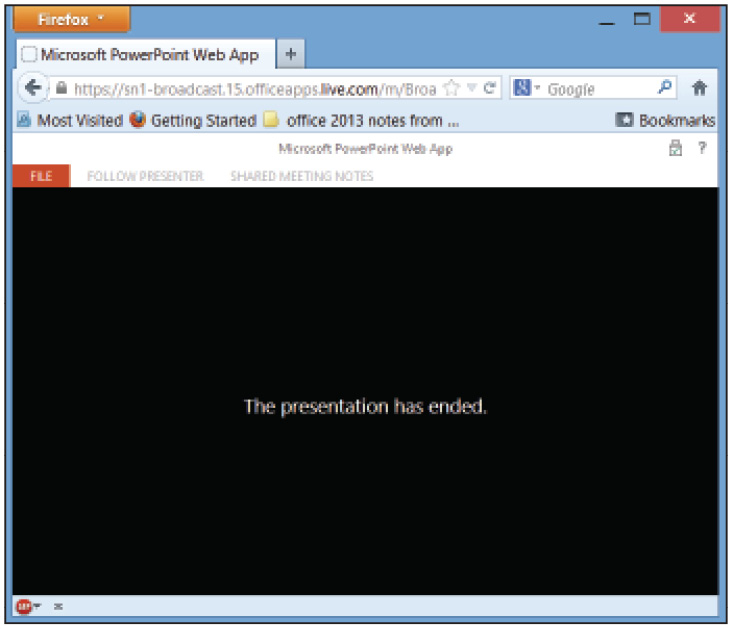
Your online presentation’s URL expires as soon as you click End Online Presentation.
Presenting in Lync
If you have a Lync account set up, the steps to present via Lync are much the same as the previous. Note that Lync sharing is not available on Windows RT devices, such as Microsoft Surface.
1 Select Slide Show > Present Online > Microsoft Lync.
2 If you have a Lync meeting set up, select it from the list of scheduled meetings; otherwise, click Start a new Lync meeting and add invitees.
3 When the meeting is underway, begin the presentation as you normally would.
 For more details on using Lync for online presentations, see the Lync documentation at onlinehelp.microsoft.com.
The important takeaway in this section is that the mechanics of presenting your slides are the same regardless of the physical or online venue.
Embedding your slide show in a webpage
If you want to publish a standalone slide deck online, or let colleagues peruse your deck as a work in progress, you can embed your slide show in a webpage by sharing it directly from SkyDrive. (If you don’t have a place to host your slideshow online, just read along, or skip to the next section.)
1 If you haven’t already done so, save the practice presentation to your SkyDrive folder by doing one of the following:
Log in to skydrive.com in your web browser, click the Upload button in the SkyDrive screen, and navigate to the file; or
Use the desktop SkyDrive or SkyDrive Pro app to upload the file to your SkyDrive.
2 Open skydrive.com in your web browser and navigate to where your presentation is stored.
3 Right-click the presentation’s icon in the browser, and select Embed.
4 SkyDrive will generate HTML to embed the presentation in a web page, along with a preview of the embedded slide show. Press Ctrl+C to copy the embed code.
5 Paste the HTML code into the blog editor of your choice; for instance, into a new Blog Post document in Word 2013. Then upload the file to your blog, and view the post in a web browser to see the embedded presentation.
If you want to share the original file via e-mail instead of embedding it on a webpage, follow steps 1 and 2 above, then choose Sharing in step 3 and e-mail a link to the original file instead. You can also open the file from your SkyDrive directory using the PowerPoint Web App, and selecting File > Sharing > Embed from the Web App to generate HTML embed code.
6 Choose File > Save and File > Close.
Giving excellent presentations
There’s no single recipe for a great PowerPoint presentation except to practice, practice, practice. Of course you need to master the basics first. Speak to the audience, not the slide. Practice stringing multiple sentences together to avoid um and uhh. Spread text out over several sparse slides, rather than one crowded one. Pick a simple font/visual scheme and stick to it.
Once you have the basics down you start getting into style, where your presentations (ideally) begin to look less like everyone else’s, because you’re finding personal solutions to technical problems.
Great talks are always unique and personal. Some speakers put a single word on a slide; some do original art for every talk; and some rely entirely on infographics and speech. Great presenters never stick to the trusty title + bullet points + clip art scheme; there’s always some twist, and the twist is what lets the talk hook into the audience’s minds in the first place, and keeps it there long after you get to the end of your presentation.
That said, here are a few principles to keep in mind as you develop your first few presentations. Our hope is that this advice will scale up to stay relevant as your skill increases.
- • Slides aren’t novels—they’re paintings. A slide crammed full of complete sentences is one of the classic PowerPoint blunders. If you’re giving a talk, think of your slides as visuals competing with your speech for audience attention; if everyone’s reading a well-crafted prose paragraph off the screen, they’re not listening to your talk.
- • It’s a visual medium—make sure the visuals are visible. Use high-contrast colors, legible fonts (and not too many at once), and uncluttered layouts. The audience shouldn’t have to figure out what you’re saying.
- • Themes help you and your audience. Every time you switch look and feel in the middle of a slide show, you impose a kind of cognitive tax on your audience as they adapt to change. Settling on a visual theme early lets you build text and images around the theme’s layout library; designing your own theme gives you even more control, matching aesthetics and informational content. A theme isn’t just a paint job; it’s a tool for information design.
- • In general, use more images and less text per slide. As text piles up, it loses immediate visual impact and gets harder to remember, but images can gain power in combination. Try splitting a slide into four quarters and filling each quarter, one by one, with images: you’re building a collage, and the images talk to one another. Do the same with blocks of text, and you’re just making a mess. If you need four blocks of text, use four slides.
- • Don’t read your slides aloud. Unless you must share a verbatim text passage, you should design your slides for visual impact and stickiness in memory and design your spoken lines for ease and fluency of speaking. Just talk to your audience; this generally involves looking at them.
- • A little flash goes a long way. Every blinking doodad or complex animation draws attention from the content of the talk to the visual flash itself. Sometimes a slide needs an animated object or two; truly rare is the slide that needs any more than that.
- • Leave time for revision. Your first idea is only special because it comes first, and you won’t see the problems with your first draft until you get into your second. You’ll often have an easier time revising a broken talk than starting from none at all, and revision takes time.
- • Leave time for rehearsal. The first time you read through your slides, you’ll notice weird juxtapositions, odd grammar, and plain old factual errors. You can do this in front of your audience if you insist, but the other way is better. Rehearsing out loud is part of the design process. The same goes for designing a kiosk presentation: if you haven’t tested the talk at an actual kiosk, you won’t know whether it’ll work.
Self study
The best way to learn what works in a presentation is to give lots of them; it’s an art, not a science. Viewing well-received talks online is a good way to see the limits of the tools; the huge online archive of TED talks, for instance, features charismatic experts giving extremely well-rehearsed talks on a range of complex topics. In the meantime, here are some exercises to expand your own skill set.
1 Take a conventional bullet points and bar graphs talk and start to boil it down: do a version with a single phrase per slide, then a single word, then (if you can) nothing but images. When you can move quickly through a large number of simple, memorable slides, push yourself further by moving to automatic slide transitions every couple of seconds.
2 Start with a PowerPoint prepared for an audience talk and convert it to a kiosk slide show, taking careful note of what works well in one form but falls flat in the other.
3 Create a slide that includes a relatively complex infographic, such as a large interconnected organization chart, using the SmartArt feature. Then experiment with different ways of emphasizing just part of that graphic, a single employee slot or branch: record laser pointer movements, make an animation of zooming in on part of the org chart, or fade out the rest of the chart. (For the last method, stack two versions of the chart, with a mostly-faded version on bottom, and animate the top chart to fade out to reveal it.)
Review
Questions
1 What are the three presentation modes available from the Set Up Slide Show command?
2 What is the Office Presentation Service?
3 How do you remove saved ink annotations from a slide show?
Answers
1 The three presentation modes available from the Set Up Slide Show command are live speaker, kiosk, and windowed viewing.
2 The Office Presentation Service is Microsoft’s free online venue hosting public live PowerPoint presentations.
3 Ink annotations are saved as graphics objects; you can delete them from the slides just as you would any other graphics.