
PowerPoint Lesson 5: Adding Graphics and Multimedia to Your Presentation
It’s hard to fit a thousand words on a single slide; luckily, an image or two is no problem. The right choice of visual elements brings a slide immediately to life. Using sound effects, background music, or a title and bulleted list on slides can have positive impact on how your slide presentation is received.
What you’ll learn in this lesson:
- • Arranging images on and off the grid
- • Styling and formatting images to fit your theme
- • Adding sound and music to your slide show
- • Embedding YouTube videos and local media
- • Turning any image or text box into a clickable trigger
Starting up
You will work with files from the PPT05lessons folder. Make sure that you have loaded the OfficeLessons folder onto your hard drive from www.digitalclassroombooks.com/Office2013. For more details, see “Loading lesson files” in the Starting up section of this book.
Beyond bulleted lists and bar graphs
Now we come to the final elements of a slide builder’s toolkit: graphics, sound, and video. PowerPoint handles images and video objects just as any other floating visual elements, with the standard Design and Format tools. Sound effects and music, much less common in presentations for a variety of reasons, work a little like animations or transitions: you can cue a sound up with a fixed time delay or start it with a mouse click.
In this lesson, you’ll also explore PowerPoint’s image-editing toolkit, which lets you make simple adjustments to images embedded in your slides. Finally, you’ll add some custom animations to your slide elements, turning a single text block into a swirl of motion.
Your final product will look something like pp05a-finished.pptx; feel free to use it as a visual guide while you work through the exercises in this lesson. Read the comments in the sample file, which walk through the design choices behind the presentation.
Recoloring and adjusting images
The Picture Tools > Format tab in PowerPoint contains a collection of tools to set the layout, framing, size, and shape of an image; the same tools can be applied to clip art, SmartArt, and text boxes. But Word provides a set of tools to alter the content of an image (the Format tab’s Adjust group), which you can use to obtain fine-grained control over the look of an image when attention to detail could have a huge impact on a slide’s effectiveness.
Crucially, these are nondestructive editing tools: no matter how many edits you make to an embedded image, you can return to the original with a single click.
We’ll use the image formatting tools available in Word to blend the image in slide 2 into the muted palette of the presentation.
1 Open the file called pp05a.pptx found in the PPT05lessons folder.
2 Choose File > Save As and navigate to the PPT05lessons folder. Name the file pp05a_work and click Save.
3 Select slide 2 in your presentation and click the blue image.
4 Click Picture Tools > Format. Recast the image in black and white by clicking Adjust > Color > Grayscale.

Choose Grayscale from the Color options.
5 Click Adjust > Corrections > Brightness –20% Contrast –20% to further mute the image.
6 Finally, click Picture Styles > Picture Effects > Soft Edges > Soft Edges Options to bring up the Format pane. Set the Soft Edges value to 17pt.
The Format pane is your main tool for tweaking individual slide and floating element parameters.
7 Save your work, and then preview this slide only by pressing Shift+F5 (then Escape when you’re done).
Cropping an image
The Format tab includes a Crop tool for paring away unwanted parts of an image to keep viewer emphasis on the most important visual content. The image on slide 5 image stands out too much from its background; instead of blending it, we’ll crop away the bright background.
1 Select slide 5 and click the image of the keys.
2 Click Format > Size > Crop > Crop to Shape > Oval (in the Basic Shapes section).
3 Right-click the cropped image and choose Format Picture.
4 In the Size & Properties tab, deselect Lock aspect ratio and enter 1.25 for both width and height. Then go to the Effects tab and apply the Paint Strokes effect from the Artistic Effects gallery.
The Paint Strokes effect makes the image a little difficult to parse at first; this is not ideal for a conventional presentation, but it fits the visual tone of our narrative slide deck.

The image of the keys with cropping and effects applied.
5 Drag the resized image to center right, a little closer to the right edge of the slide. Save your work.
Reordering images in the object stack
At times, images and text will overlap, either because a slide is crowded or because you’re using one element as background for another. You can alter the order of objects in the stack with the Format > Arrange tools, and use the Selection pane to grab an object hidden behind other slide elements.
1 Select slide 3. Click Insert > Text > Text Box and then click an empty region of the slide.
2 In the text box, type It willed as it was.
3 Click Format > Arrange > Selection pane. Click the eye icon next to Picture Placeholder 7 (to hide the image), then click to select the TextBox 1 entry, and click again to edit its name. Rename TextBox 1 to will-text.
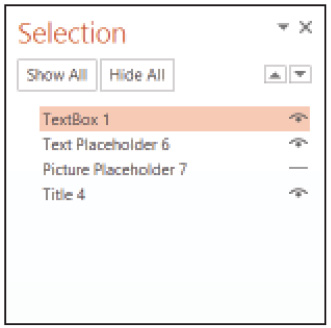
Toggling the visibility of slide elements in the Selection pane.
4 Rename Picture Placeholder 7 to house-img. Keep it invisible for the moment.
5 Position the new text box an inch below the midline of the slide, above It breathes where it will.
6 In the Selection pane, drag will-text to the bottom of the stack, then click to make house-img visible, obscuring the text box. Close the Selection pane, and then save your work.
The Selection pane works a little like a visual outline of the slide; just as is the case with outlines and text, the Selection pane lets you change the relative positions of objects without using the object’s handles or selecting objects in the slide area itself. In this case, we’re hiding the new text behind the image in order to reveal it later by fading the image out. We’ll add that effect next.
Heightening visual impact with animations
The basic commands for adding animations and transitions to a slide show were covered in Lesson 2, “Getting Started with PowerPoint 2013”; in this section, we’ll add a single exit animation to generate a novel visual effect (revealing hidden text), then fill a slide with a complex jumble of animations using custom movement paths.
Creating a crossfade effect with stacked slide elements
First we’ll finish slide 3 with a subtle animation effect.
1 Click to select the house image in slide 3.
2 Open the Animations tab and scroll down the Animation gallery to apply the Fade exit animation.
3 In the Timing group, set the animation’s duration to 3 (seconds). Save your work.
Preview the slide with Shift+F5. PowerPoint doesn’t offer a crossfade animation equivalent to the Fade transition (which fades out one slide and fades in another), but this stack/fadeout combination accomplishes the same thing.
Creating complex scenes by clustering animations
Motion Paths let you control the movement of an object around the space of the slide. Moving a single object draws attention to it; moving several objects simultaneously draws attention to the quality of the movement rather than any one moving part. The fifth slide of our storybook slide show offers an interesting opportunity to use a cluster of animations for dramatic purposes. (Important: This is a lengthy process; save your file often as you work through this section.)
1 Select slide 5. Click the title, Still it stands. Apply the Custom Path animation (under Motion Paths in the gallery) in the Animations tab.
The mouse pointer now switches to a reticle. (On a touch device there’s no pointer and the next step will be quite natural; this is another example of how touchscreens work great with PowerPoint 2013.)
2 Click and drag to draw a smooth arch shape from the current title’s location to the lower-right corner of the slide. Press Enter when the line is drawn. Preview the new animation by pressing Shift+F5.
3 Now click the main text area located underneath the title, and then click Advanced Animation > Add Animation > Custom Path. Draw a wide flat loop that circles to the right, down a bit, then back to a spot just below its start. Press Enter when the arc is drawn, and then open the Animation pane in the Advanced Animation group.
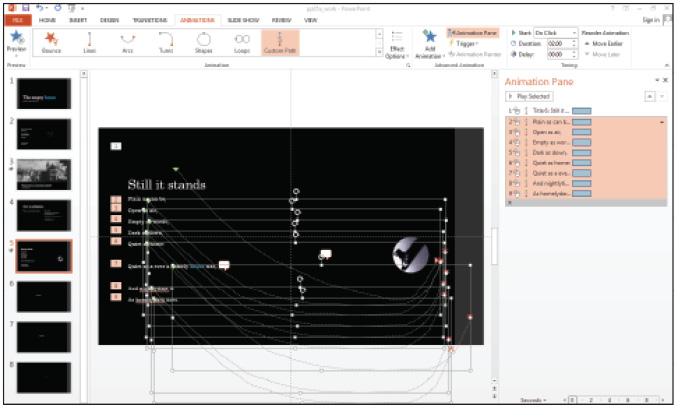
PowerPoint animates a text block line by line.
As you can see, PowerPoint applies the animation to the entire contents of the text box, but by default, it splits the animation up by line. (You can customize this behavior under Effect Options > Sequence.) Our eight-line text box is now animated in eight separate steps, one line at a time. We’re going for a different effect.
4 Click the double caret in the Animation pane to expand the animation list. The eight grouped animations are selected by default. Ctrl+click Plain as can be in the pane to deselect it, and then right-click and choose Remove to remove the remaining animations. Only two remain: the title and Plain as can be.
The rest of the work for this slide follows the same principle: animate the text block, then delete every new entry from the Animation pane except the line you want to apply the new animation to. Notice that these animations are pulling the short poem apart: for the purposes in this lesson, we’ll sacrifice readability for the sake of visual drama.
5 Repeat steps 3 and 4 for four or five more lines of the main text block, drawing a motion path for the block and then deleting all the newly-added Animation pane entries except the one you want to keep.
 Make sure to use Add Animation rather than the gallery when applying additional motion paths; otherwise, you’ll replace the existing text animation instead of adding a second animation.
6 Select every animation in the Animation pane except the first two (title and first text line), right-click the selection, and choose Start With Previous. Save your work, then press Shift+F5 to preview.
The slide animates in two parts: the title curves to bottom-right corner on your first click, and then the lines of text fly apart all at once on second click. Now we’ll change the slide further, for drama’s sake: we’ll have these two effects occur without a click, as if the text were moving on its own.
7 Click in the Animation pane to clear your selection. Then right-click entry 1 in the pane, and select Start After Previous. Set its Delay in the Timing group of the Animations tab to 2 seconds. Preview the slide with Shift+F5, and then save your work.
It takes a lot of work to generate this effect, but remember that PowerPoint isn’t really an animation program. That said, it’s a pleasantly odd visual effect that seems right for this particular slide deck.
After working on an appropriate set of visuals, we’ll work on another of our audience’s senses: hearing.
Enriching slides with sound effects
Most PowerPoint presentations support and accompany talks in front of audiences, and sound effects and music are generally a secondary concern at talks, if they’re present at all. But a well-chosen musical transition or subtle background sound can have a big effect on an attentive crowd, or grab hold of an inattentive one.
PowerPoint 2013 offers basic support for including audio files in slide shows as both clickable objects and background sounds, and some basic editing commands (though nothing on the level of its image-editing commands). You can trim, fade, and trigger your sounds, but actual audio content editing has to be done in an external app; as a result, smart sound selection and pre-editing make a big difference to the effectiveness of your presentation audio.
In this section, you’ll add both background and triggered sounds to your slide deck.
Adding background sounds to a presentation
Adding background music or sound effects to an entire presentation is as simple as embedding an audio object in slide 1 and ordering it to play automatically on a loop.
1 Select slide 1. Click Insert > Media > Audio > Audio on My PC. Navigate to your PPT05lessons folder and select pp05c.mp3. Click Insert.
2 Drag the inserted speaker icon to the lower-right corner of the slide (just for convenience while editing). In the Audio Tools > Playback tab, select Play in Background and Volume > Low.
3 Set both the Fade In and Fade Out values to 2 seconds.
Now preview the presentation from the beginning by pressing F5. As you can see, selecting an Audio Style toggles several audio settings at once: the Play Across Slides and Loop until Stopped options are now selected, for instance, to keep the sound rolling through the entire presentation.
Editing playback parameters for embedded audio.
 When choosing ambient background sounds, look for consistent volume levels; an unexpected, unwanted spike in volume can interrupt the momentum of a presentation.
Trimming and triggering sound effects
Sound effects in PowerPoint are triggered just as animations are: either cued up to begin after a delay, or set to play on a click. They can also be set to play along with animations or over slide transitions. We’ll add an eerie heartbeat sound to one of our later slides, with a long fadeout. (Remember that the background sound will be playing quietly the whole time.)
The animation on slide 5 takes six or seven seconds from slide transition to final state; we’ll trim our sound file to last just a bit longer than that, but instead of playing the sound automatically, we’ll leave it to trigger when the user clicks the key image.
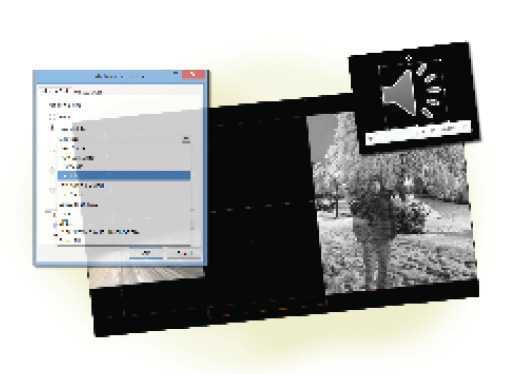
1 Select slide 5 and click Insert > Media > Audio > Audio on My PC. Select pp05d.mp3.
2 Move the audio icon to the corner of the slide as before. Select Playback > Audio Options > Hide During Show to make the icon invisible during the presentation.
3 Click Editing > Trim Audio. Set the clip’s End Time to 10 (seconds) and click OK or press Enter. Then set the Fade Out value (in Playback > Editing) to 10.
Neither of the edits in step 3 affects the original file; as with nondestructive image adjustments, you can always return to the unaltered original file. Now we’ll customize the trigger, linking the sound to a click on the key image.
4 Open the Animation pane. Right-click the sound pp05d and select Timing.
5 In the Timing dialog, select Start effect on click of Content Placeholder 9. Click OK or press Enter. Save your work, and then preview the slide with Shift+F5.
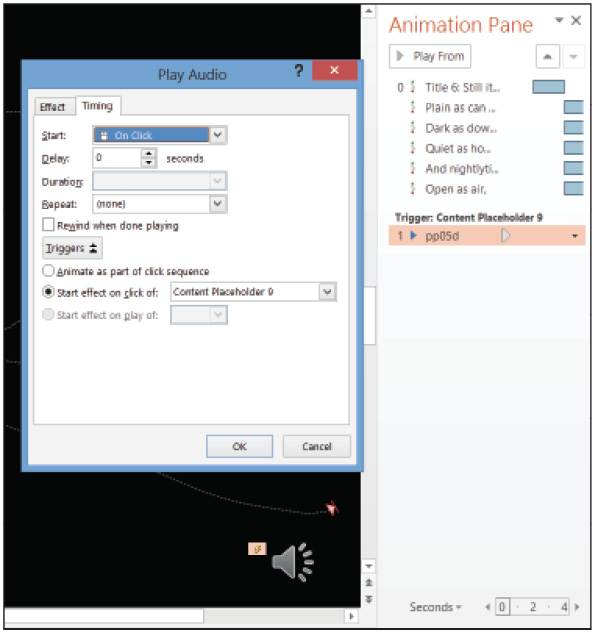
Linking audio playback to a trigger object in the Animation pane.
One nice side effect of linking the sound effect to a specific trigger object, rather than a click anywhere in the slide, is that the sound can play even while the text block animation is playing. This fits the off-kilter quality of the slide deck as a whole.
Adding custom actions to slide objects
In the previous section you linked audio playback to a click event. The process can also work in reverse: you can add an Action to a slide element, which triggers anything from a simple hyperlink to launching an external application. In this section, you’ll add hyperlinks to the first and last slides by adding two invisible Shape objects and attaching a Hyperlink Action to each.
1 Select slide 1 and click Insert > Illustrations > Shapes > Rectangle. Draw a tight rectangle over the word house.
2 Click the rectangle and select Insert > Links > Action. Select Hyperlink to Last slide. (If you accidentally deselect the new rectangle and can’t reselect it because it’s behind the text box, use the Selection pane under Home > Editing > Select.)
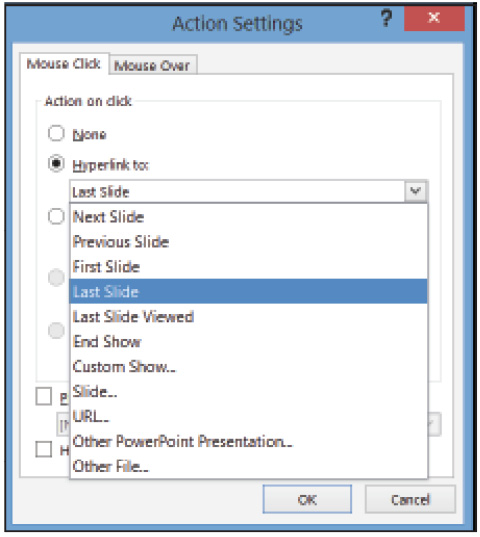
Associating a hyperlink action with a slide element.
3 Click OK. Select the new rectangle shape. In the Format tab, select Shape Fill > No Fill and Shape Outline > No Outline.
4 Repeat steps 1–3 to add a similar hyperlinked rectangle over the question mark in slide 8. Point the hyperlink toward the First Slide.
5 Save your work and test the links by previewing the slide show.
The Action Settings dialog box can also run macros (chains of actions), load external apps, or edit OLE objects (such as a linked Excel spreadsheet), either on mouse click or on mouse over. This lesson only scratches the surface of what a dedicated presentation designer could do in terms of interactivity, but the tools themselves don’t get any more complex than what you’ve already seen.
Integrating video into a presentation
Fast processors, cheap bandwidth, big hard drives, and high-quality screens mean using video in a presentation is now neither a gimmick nor a hassle. Online media files (video, audio, images, templates) are easily incorporated into Office 2013 files, and adding a YouTube video into your presentation is no more complicated than embedding a local file.
In this final section, you’ll embed, style, and trigger videos in your slide show.
Embedding and formatting video
Microsoft’s Bing video search is built into PowerPoint 2013, and YouTube can be added as an online video source. We’ll use a video from Bing and another from a local file.
1 Add an empty slide to the end of the presentation. Click Insert > Media > Video > Online Video.
2 In the Bing Video Search box, type house of leaves intro. Select the first result (the minute-long YouTube video, House of Leaves – Intro) and click Insert.
PowerPoint embeds a single frame of the video, which serves as a preview image. Clicking the preview frame during the presentation brings up the YouTube player, which streams from youtube.com. We can skip the preview frame, however:
3 Select the image. Click Video Tools > Playback > Start > Automatically. The video won’t play when the slide displays, but the preview image won’t appear.
4 Click Video Tools > Format > Video Styles > Slope Beveled Rectangle in the Subtle categoryto add a border to the image.
5 Save your work, then preview the slide.
When viewing the slide, click the embedded player to start the video, and press Escape to stop playback and clear the video frame.

PowerPoint treats video display and playback as animation events.
PowerPoint has no control over the content of videos; you can alter the preview image with the standard image-adjustment tools (Video Tools > Format), but during playback, PowerPoint only draws the border and effects such as glow, shadow, and 3-D rotation. Note that the Trim Video command is greyed out.
Considerations for embedding local video
Trimming and formatting local video works the same as for audio: select an embedded video clip, set playback options in Video Tools > Playback, adjust the frame and preview image in Video Tools > Format, and go. Unlike YouTube and other online videos, local video files can be altered to fit the needs of the presentation: Playback > Trim Video and the Fade tools become available, along with Bookmarks (which let you jump to specific spots in the Trim window) and Volume controls.
One extra consideration arises with local video: media format compatibility. PowerPoint 2013 works best with .mp4 video (H.264 codec) and .m4a (AAC) audio, but also supports the following video formats:
- • .avi, .wmv, and MPEG (.mpg/.mpeg): common local video formats
- • .swf: Flash video, intended for online streaming
- • .asf: a multimedia streaming format for Windows
PowerPoint RT, on the Microsoft Surface, is less robust; Microsoft encourages Windows RT users to use .mp4 and .m4a media. PowerPoint 2013 can also play Apple’s QuickTime video formats (.mov, .mp4, .qt) through the external QuickTime Player app.
As you can see, keeping up with video formats takes a bit of work; your best bet is to get your video file into exactly the shape you want using an external editor such as Premiere or Final Cut, then export to PowerPoint’s preferred format.
Media compression and compatibility
If disk space is at a premium (on a tablet or USB key, for instance), you could compress the audio and video in your slide show; doing so also makes for smoother playback on older machines. Since embedded media are stored within the .pptx file itself, compressing your media will directly reduce the size of your presentation.
Moreover, if you end up presenting your slide show using someone else’s computer, media compatibility may become an issue. Fortunately, PowerPoint’s File > Info tab includes tools to improve portability and performance. To see them in action, just open up the File tab:
1 If you haven’t already done so, open your presentation and click the File tab to reach the Backstage View.
2 Click Optimize Compatibility. In the Media Size and Performance text below, note that embedded media files now measures 3MB.
3 Click Compress Media > Presentation Quality to eliminate wasted space in the file without obviously affecting playback quality. This saves 0.1MB. Save your work.
The more you compress the presentation, the more image and audio quality can degrade. Because you can undo a compression step, it’s easy to e-mail a minimum-size presentation to a colleague for review, and burn the uncompressed file to disc (or upload it to the cloud) for actual presentation.
The other tools in the Info tab will come in handy in the next lesson, when you learn how to deliver your presentation.
Laying out slide elements
In earlier lessons, you learned about PowerPoint’s alignment guides and layout tools. In this final section, you’ll get a closer look at a crucial slide layout tool: PowerPoint’s hidden grid, which guides object placement as gently or forcefully as you need.

Alignment guides and the slide grid are invaluable aids for relative positioning of slide elements
Taking advantage of the grid
Slide elements occupy space in a 1/12˝ grid, which can be made magnetic with the Snap to Grid setting. When Snap to Grid is enabled, objects in a slide will automatically stick to the nearest gridline rather than sliding pixel by pixel, making alignment and layout much less fiddly and a little less flexible. In this section, you’ll vary PowerPoint’s grid settings to see the kind of flexibility that they permit.
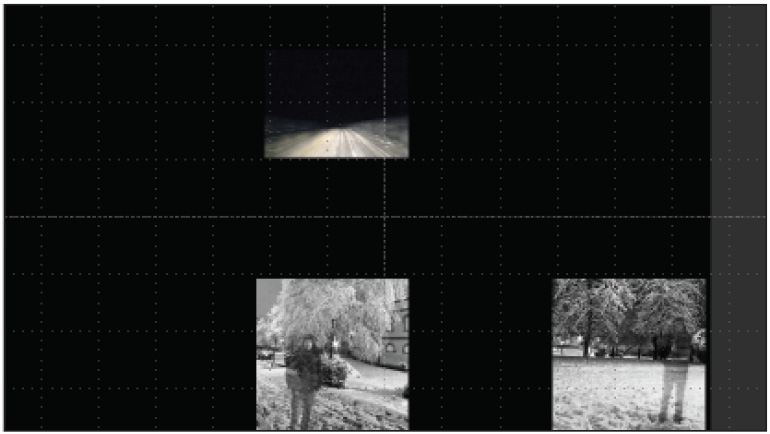
1 Add a new empty slide, slide 10. Use Insert > Images > Pictures to add three images to the new slide from your PPT05lessons folder: pp05f.jpg, pp05g.jpg, and pp05h.jpg.
2 Right-click an empty part of the slide and select Grid and Guides.
3 Select all the check boxes in the dialog box, and set the Spacing to 1/2". Click OK.
Open the View tab and notice that Show > Gridlines and Show > Guides are now enabled; they’re equivalent to the Display grid and Display drawing guides toggles in the dialog box.
Now try dragging the images around the slide. There are two features to note here. The images stick instead of moving smoothly across the slide, naturally falling into grooves that are ½˝ apart from each other; when the centers or edges of the images are aligned, red alignment guides appear.
4 Set the grid back to 1/12˝. Place the smaller image near the center of the slide, and place one of the ghost images directly below it.
5 Shift+click to select both images, then click Picture Tools > Format > Arrange > Align > Align Center to align their centers vertically. Then drag to align the centers of the two images with the dotted vertical line down the middle of the slide, and place the small image dead center in the slide. (It will snap into place.)
6 Deselect the images and click only the lower large image. Shift+drag it vertically until its top edge is aligned with the bottom grid line on the slide.

When two images’ centers are horizontally aligned, they can move freely straight up and down without breaking the alignment.
When you press and hold Shift while moving a slide element, it sticks to one cardinal direction of movement: either straight up and down or right and left. This is handy when you’ve already lined up image centers or edges, and need to vary just one positional axis.
Working with alignment guides
PowerPoint’s layout guides appear when the centers or edges of two objects are in alignment. They’re sticky, though their effect is much less dramatic than a coarse grid. To see them at work, drag one image slowly past another:
1 Place the three images in a rough L-shape with roughly an inch between them and the small image at the joint of the L, as in the image below.
For fine-grained object placement, make frequent use of the Zoom slider.
2 Align the left edges of the small image and the one below it. Then align the top edges of the small image and the one beside it, and place the side image roughly an inch away from the small image.
3 Shift+drag the lower image vertically until it’s aligned with both of the other images.
With the image edges aligned, an off-kilter grid layout emerges. Image guides are more helpful when you place the three images in a line:
4 Zoom out. Drag the bottom image to the left side of the slide, positioned so all three top edges are aligned.
5 Shift+drag the smaller image to the right; when the three images are horizontally balanced, two equidistant markers will appear in the gaps between them.
6 Finally, select the current slide in the left pane of the screen and delete it from the presentation. (It doesn’t quite fit the lonely house storybook theme.)
Self study
At this point you’ve learned about PowerPoint’s composition, editing, design, and layout tools. PowerPoint isn’t really an animation or interactive-design application; its model of a presentation is as simple as a canvas full of floating boxes. But you can take the tools you’ve seen much, much further than we have here. Advanced PowerPoint users have shared their work online, and searching online for collections of great slide show presentations will turn up a wealth of clever design. Some presenters stick to a single word per slide; others generate custom illustrations for every presentation.
Feel free to experiment at this point, not just with the tools from this lesson, but with PowerPoint’s full range of design tools.
1 Try inserting multiple short videos into a single slide, and setting up animation triggers to start them one after another. (Precise Delay timing might be necessary.)
2 Try animating a single word out of a text box, using a second text box to fake the animation (since single-world transformations aren’t properly supported by PowerPoint).
3 Experiment with layering multiple sound effects one by one throughout a presentation, building from a quiet crowd sound under the opening slide to a little background music, and finally to a roar of applause at the last slide. Add automatic slide transitions to build a music video out of your slide deck.
Review
Questions
1 What’s the default grid size for a PowerPoint slide?
2 How much control do you have over the look of an embedded local video?
3 Where are the controls to toggle the grid and alignment guide visibility?
Answers
1 The default grid size for a PowerPoint slide is 1/12” between gridlines.
2 You can trim an embedded local video, alter its frame, and style the preview image just as you would any other image; however, you can’t control the content of the video at all within PowerPoint.
3 You can control layout guide visibility from the Grid and Guides command (right-click the slide background) or the View > Show group.