
Outlook Lesson 1: Introduction to Microsoft Outlook 2013
In this lesson, you will create, send, and receive e-mail messages. You will also manage e-mail messages by creating folders, archiving old e-mail, and adding recipients to e-mail messages. Along with e-mail, you will add contacts to Microsoft Outlook, create appointments, meetings, and tasks to manage assignments and events.
What you’ll learn in this lesson:
- • About the Outlook interface
- • Creating e-mail messages, add recipients, send, and receive
- • Adding attachments and signatures to e-mail messages
- • Creating and Using folders to organize e-mail messages
- • Adding and managing contacts, appointments, meetings, and tasks
Starting up
You will work with files from the Outlook01lessons folder. Make sure you have loaded the OfficeLessons folder onto your hard drive from www.digitalclassroombooks.com/Office2013. If you need further instructions, see “Loading lesson files” in the Starting up section of this book.
What is Microsoft Outlook?
In today’s modern world, sending and receiving e-mail is an integral part of almost every business and personal life. Programs such as Outlook help you send and receive e-mail, but they also keep track of contacts, including office numbers, mobile numbers, and e-mail addresses. Outlook can also help schedule meetings and appointments. It can also create tasks for you and others, and then allow you to use e-mail to check on the status of those tasks. Many Outlook users would consider themselves lost without it, because it does a great job of keeping people organized in today’s fast-paced work environment.
Setting up Outlook
Before you start using Outlook, you need to ensure that it’s set up to receive and send e-mail. Outlook needs to know your e-mail address and e-mail password so it can retrieve and display your e-mail. If you have an IT department that has already set up Outlook for you, you can skip this section and move on to Composing E-mail. But if you are starting Outlook for the first time, you’ll need to tell the program where your e-mail is stored and how it is sent. If you use a Microsoft Exchange server, this can be as simple as entering your e-mail address and password, but other e-mail servers may require a bit more work on your part. You’ll start the configuration process of setting up a new e-mail account in the Control Panels of your computer. You can do this directly within Outlook, but there are some e-mail server configuration steps that are more efficient when you access them through the Control Panel. For this exercise, you will configure Outlook via the Mail Control Panel, which is part of the Windows operating system.
 You need to ensure that Outlook is installed on your computer and that you have opened your Outlook software, at least once, before performing these steps.
1 Make sure Outlook is closed.
2 Within the Windows operating system, click the Start menu, then choose Control Panel. Double-click to open the Mail control panel.
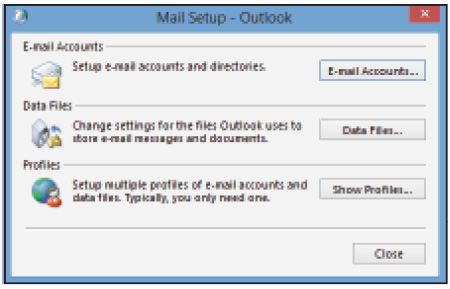
The Mail Setup control panel.
3 In the Mail Setup control panel, click the E-mail Accounts button. The Account Settings Window opens.
4 In the Account Settings window, using the E-mail tab, click the New button. Then click the E-mail account option button, and click Next to open the Add New Account window.
5 In the Add New Account window, enter your full name as you would like it to appear when sending messages. Also enter your e-mail address, such as [email protected], and enter the password provided by your IT department or Internet service provider.
Outlook will attempt to locate your e-mail server and configure your e-mail for you. If it cannot locate your e-mail server, it will ask you additional questions about the type of e-mail account you are using. If necessary, obtain the additional information from the Internet service provider that hosts your e-mail account, your IT department, or click the Help button ( ![]() ) in the main Outlook window.
) in the main Outlook window.
Using more than one e-mail account
If you have multiple e-mail accounts, you can configure Microsoft Outlook to receive mail from all your accounts. To do this, repeat the steps described above to configure Outlook to communicate with each additional e-mail server. Each e-mail account functions the same way for sending, receiving, and managing messages.
Outlook 2013 interface
Microsoft Outlook 2013 has a user interface that is very similar to the other programs in Microsoft Office 2013. The following sub-sections describe important aspects and features of the Outlook interface that are found in other office programs.
The Ribbon tabs
- • File: takes you into the Backstage view and main functions, including opening and printing items from Outlook.
- • Home: contains the most common functions for the portion of Outlook you are in, such as E-mail, Calendar, People (Contacts), or Tasks.
- • Send/Receive: for controlling how e-mail and other information is received into Outlook.
- • Folder: controls the creation of new folders.
- • View: customizes the Outlook window and the panes and tools that are visible.

Outlook 2013 Ribbons.
Minimizing Outlook Ribbons
You can minimize the Ribbons so that the buttons are not viewable and all you see are the tabbed headings. You will now minimize the Ribbon.
To minimize the Ribbon
1 Click any Ribbon tab to make it active, and then double-click the same tab to minimize the Ribbon. You will only see the tabbed headings.
2 To peak at the Ribbon without entirely opening it, click any of the Ribbon tabs. The Ribbon appears; however, it covers up the top part of the Outlook window. To open the Ribbon tabs completely, double-click the Ribbon tab.
You can turn on and off the individual tabs in the Outlook Ribbon. You can also create your own Ribbon tabs that contain the Outlook buttons you use the most. You will do this in Lesson 2, “Getting Started with Microsoft Outlook 2013.”
The Quick Access Toolbar
Outlook has a Quick Access Toolbar, just as other Microsoft Office 2013 applications do. You can add your favorite Outlook shortcuts to the Quick Access Toolbar so you can have quick and easy access to them from the main Outlook screen. The Quick Access Toolbar is located in the top-left corner of the Outlook screen, and by default, it contains four buttons: Send/Receive All Folders, Undo, Redo, and Customize Quick Access Toolbar. (The Redo button only becomes available after the Undo button has been used.)
Moving the Quick Access Toolbar
You can’t move the Quick Access Toolbar in the same way that you could move other toolbars in previous versions of Microsoft Office. However, you can change the location of the Quick Access Toolbar to sit below the Ribbon, and then you can move it back to its default position in the top-left corner of the Outlook window. To move the Quick Access Toolbar to appear below the ribbon, right-click anywhere on the Quick Access Toolbar, and from the shortcut menu that appears, choose Show Quick Access Toolbar Below the Ribbon. To move it back to its default location, right-click anywhere on the toolbar, and from the shortcut menu that appears, choose Show Quick Access Toolbar Above the Ribbon.
Customizing the Quick Access Toolbar
The fastest way to add your own shortcuts to the Quick Access Toolbar is to click the Customize Quick Access Toolbar button ( ![]() ) to expose a list of popular shortcuts that you can add to the toolbar. From this list, you can choose the options you want to add, and they will be automatically added to the toolbar.
) to expose a list of popular shortcuts that you can add to the toolbar. From this list, you can choose the options you want to add, and they will be automatically added to the toolbar.
You will now use the Customize Quick Access Toolbar button to add buttons to the toolbar.
1 Click the Customize Quick Access Toolbar button ( ![]() ).
).
2 From the list that appears, choose the Delete option. A black X is added to the toolbar as the Delete shortcut. Repeat the process to add another shortcut.
If you want to add shortcuts to the Quick Access Toolbar that aren’t available when you click the Customize Quick Access Toolbar button, you can use the More Commands option to find those shortcuts.
3 Click the Customize Quick Access Toolbar button. From the list that appears, choose More Commands (it’s the option second from the bottom of the list). The Outlook Options—Customize the Quick Access Toolbar dialog box appears.

Outlook Options—Customize the Quick Access Toolbar.
4 On the left side of the Customize the Quick Access Toolbar pane, you will see a drop-down list with the entry Popular Commands. Immediately below it, you will see a column with a list of Popular Commands. On the right side of the Customize the Quick Access Toolbar pane, you will see a column with a list of the buttons currently available in your Quick Access Toolbar. To add one of the Popular Commands to your Quick Access Toolbar, select one of the Popular Commands from the list on the left, and then click the Add button located between the two columns. The Popular Command you choose is added to the list of buttons currently available in your Quick Access Toolbar.
5 Repeat the process to add more buttons. When you are done, click OK to close the Outlook Options box. The buttons you selected now appear on the Quick Access Toolbar.
Composing e-mail, inserting attachments, adding recipients, and sending messages
Follow the steps below to create a new e-mail message.
1 From the New group located at the far left side of the Home Ribbon tab, click the New E-mail button. A new, untitled message box appears.

New Untitled Message Box Opens.
2 In the field to the right of the To button, enter the e-mail address of the recipient of the message. You can separate additional recipients with a semicolon (;).
 If the recipient of the message works at a different company or has a different domain (the part of the e-mail address after the @ symbol), you will need to enter the complete address. For example, to send an e-mail address to Jennifer Smith at work, you might enter [email protected]. If you work at the same company, you might only need to enter the first part of her e-mail address, not the entire domain address, since Outlook would try to complete it for you.
3 In the field to the right of the Subject Heading, enter a Subject for the message. We recommend entering a short, descriptive subject that summarizes the content of the message.
4 In the large white area below the Subject field, enter the Body of the e-mail message, and then click the Send button, located on the top-right portion of the message box, beneath the Ribbon.
Adding attachments to e-mail messages
Another important function of e-mail is sending attachments. Attachments are files such as a Word document, Excel spreadsheet, or even a photograph that are sent along with your e-mail message. Attachments can be opened and used as needed by the recipients of your e-mail message.
You will now create a new e-mail message and attach a file to it.
1 From the Home tab, click New E-mail to create a new e-mail. Click the text box next to To and type in an e-mail address.
2 From the Include group located on the Message tab, click Attach File. The Insert File dialog box appears.

Insert File dialog box.
3 Navigate to Outlook01lessons folder, select CompanyVolunteerSign-Up.docx, and choose Insert.
 You can also click and drag a document into the body portion of the e-mail message you are composing to attach it to the message. If you attach multiple files to your e-mail message, each file appears on the attached line separated by a semicolon (;).
4 The Insert File window closes and you are back to your e-mail message. A new line called Attached appears under the Subject line, and displays the file you have selected.
5 Click the Send button; your e-mail message is sent with the attached file included.
 When sending files as attachments, be careful not to send anything too large. Some e-mail systems are not able to accommodate e-mail messages more than a certain size. The upper limit tends to be 25 MB, although this varies by the policies set by the recipient’s e-mail administrator.
Adding signatures
You might want to add your contact information and company name to the bottom of the e-mail messages you send. You can avoid typing this information each and every time you send a message if you create an e-mail signature. When you create an e-mail signature, you can save it, and then apply it as needed at the bottom of your e-mail messages.
To create a new e-mail signature:
1 Open a new e-mail and click the Signature button in the Include group of the Message tab. A menu appears.
2 In the menu that appears, click Signatures. The Signatures and Stationery window appears.
3 In the Signatures and Stationery window, click New. Enter a name for the signature. For example, if you want to have a work e-mail signature and a personal signature, you would name your work signature work. The name is for your use only and is not visible to the people you e-mail.
4 Enter the information you want to appear at the end of your messages. For example, if your name is John Doe, you might enter
John Doe Training R US [email protected] 1-800-222-1234

Adding a new e-mail signature to the Signatures and Stationery window.
 Go to http://office.microsoft.com for different e-mail templates that you can download and use. When you access the site, type Outlook E-mail Signature Templates in the Search field. A group of different e-mail templates appears.
5 After entering the e-mail signature information, you can indicate the type of messages that should use the e-mail signature. For example, to apply the signature to new messages, select the signature name from the New messages drop-down menu. To apply the signature to your e-mail replies and to messages you forward, select the signature name from the Replies/forwards drop-down menu. If you want to apply the signature manually and not have it appear automatically when you create a new message, reply to a message, or forward a message, choose (none) from the New messages and Replies/forwards drop-down menus.
6 Click OK. In the e-mail message window, and from the Signature drop-down menu at the top of the message window, choose the signature you just created. If necessary, choose Signatures from this menu again to edit or modify the signature.
If you set your signature to apply automatically to your messages, the next time you create a new message, you will see that the signature is added automatically to the body section of your new e-mail message.
Receiving e-mail
Once you configure Outlook, it will automatically attempt to receive e-mail messages from your account at a specified interval. You can disable this option, and manually check for e-mail more regularly. If you are connected to a Microsoft Exchange e-mail server, your account will automatically update immediately upon receipt of a message.
1 To send and receive all e-mail messages outside the regular schedule, click the Send/Receive Ribbon tab, then click the Send/Receive All Folders button ( ![]() ), which is the very first button on the far left side of the Ribbon tab.
), which is the very first button on the far left side of the Ribbon tab.
2 If you have multiple e-mail accounts, you can send and receive messages only for one specific account. From the Send/Receive Groups drop-down menu (located directly to the right of the Send/Receive Folders button), choose the account you want to use.
Organizing e-mail
You can organize e-mail messages by topic or sender so it’s easier to locate and work with the messages. For example, you can put all the e-mails from a specific sender in one folder, or all e-mails regarding a certain topic in another folder. You can also have Outlook detect and remove junk e-mail (spam) for you.
Using folders
E-mail folders act just as other folders on your computer or within a filing cabinet, and it’s what you use to organize your e-mail messages.
You will now create a new folder.
1 Along the left side of your Outlook in the Folder pane, right-click the name of your e-mail account. From the context menu that appears, choose New Folder.

Creating a new folder to organize your e-mail.
2 Your new empty folder appears as a white box in the Folder pane with a blinking cursor. Type Training and then press Enter. By default, the new folder appears listed in alphabetical order with the other items in the Folder pane. Drag it up or down to relocate it to a more convenient position.
3 Click and drag an e-mail message into the new folder. Click the folder to view its contents in the middle area of your screen. Click the Inbox to view your e-mail again.
4 Repeat this process to create as many folders as you need to effectively organize your e-mail.
 You can automatically route e-mail messages to specific folders using Rules. From the File Ribbon tab, select Manage Rules and Alerts, then create a new rule. For example, you can route all the e-mail messages you receive from the professional association to which you belong to a folder that’s just for correspondence from that association. You will learn more about rules in the next lesson.
Archiving old messages
You can archive any or all your old messages if you want to save them for future reference. The contents of folders are archived at different intervals. Some folders are archived after two months, while others are archived after six months. You can change the time Outlook waits before archiving a folder, or specify that a folder is not to be archived at all. You can also have outlook delete old messages.
If you work in a company, you should check to see whether the company has a records’ retention policy before deleting messages. Some organizations require employees to retain messages for legal or compliance reasons. Note that an IT administrator can disable these settings if you are using an Exchange e-mail server. If you do not see the settings below and work in a corporate environment, the settings might have been disabled because they have already been applied for you.
To specify how often Outlook should archive your e-mail messages:
1 Choose the File Ribbon tab to go into the Backstage view of Outlook. Then click Options. The Outlook Options box appears.
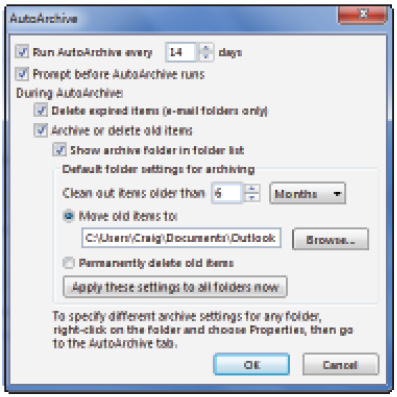
2 Click the Advanced tab on the left side of the box. In the Advanced tab, click the AutoArchive Settings button. The AutoArchive Settings dialog box appears.
3 In the AutoArchive Settings dialog box, specify the frequency with which the folder should be archived, the age of items before they are archived, and whether the items should be moved or deleted. When you’re done, click OK to close the AutoArchive settings dialog box.
AutoArchive Setting dialog box is open.
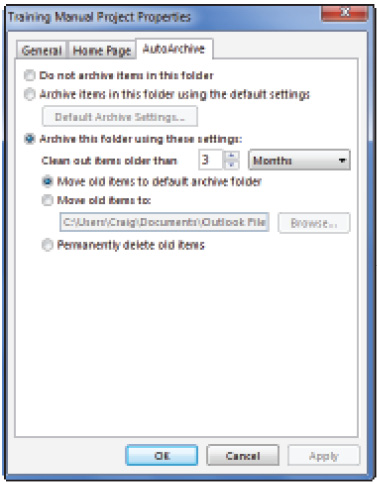
4 You can also specify different Auto Archive settings for an individual folder: from the Folder pane, right-click a folder, and then choose Properties. The Properties dialog box appears.
5 From the Properties dialog box, click the third tab over, AutoArchive. The AutoArchive tab contains the following options:
- • Do not archive items in this folder: this is the default option for every new folder; when this option is selected, none of the items in the folder will be archived at all.
- • Archive items in this folder using the default setting: this option lets you archive the items in the folder using standard settings.
- • Archive this folder using these settings: this option allows you to select your options for archiving this specific folder. You can select how old items are before they’re archived, where to move items to when archiving, or have items be permanently deleted when archived.
6 Click the second button, Archive items in this folder using default settings. Click OK to close the folder properties dialog box.
Setting Auto Archive settings for a specific folder.
Contacts and the Address Book
Microsoft Outlook contains a contact management tool called People. In older versions of Outlook, this part of the program was called Contacts. People is similar to an electronic address book in that it allows you to save information about the individuals with whom you communicate. The information you can track in the Contacts area includes names, e-mail addresses, phone numbers, addresses, and other basic contact information. If you use a Microsoft Exchange Server or work in a company that uses Outlook for e-mail and contacts management, Outlook will already contain contact information for employees of the organization. This information is usually maintained by the organization’s IT department.
Adding contacts
You can manually add contacts for individuals that Outlook has not automatically placed in your Contacts list.
 You can open a New Contact box by pressing Ctrl+N. This will also create new e-mails, tasks, and appointments when you are in those specific areas of Outlook.
1 Click the People button at the bottom-left corner of the Outlook window.
2 In the upper-left corner of the Home tab, click New Contact. Enter the contact information you want to save, including e-mail address and phone information.

New Contact Box is open.
3 Click Save and Close, located on the far left side of the Contacts tab. The new contact appears in the middle pane of your Outlook window.
Finding contacts
You can use the Search bar whenever you need to quickly find a specific person from your list of contacts. You can also use the Search bar to look for e-mails, tasks, and appointments in other areas of the program.
1 If you aren’t already in the People area of Outlook, click the People button in the lower-left corner of the Outlook window to see your contacts.
2 At the top of the Outlook window, enter part or the entire name of the person you want to locate.
3 When the correct contact’s name is displayed in the list under the search box, the right side of the Outlook screen displays the corresponding details in the Contact Information box, as well as options to Schedule a meeting or Send E-mail.
4 Under the Send E-mail heading, click the contact’s e-mail address; an untitled message box appears already addressed to the correct contact. Click the X in the top-right corner of the untitled message box to close it.

Using Search box to find a contact.
Creating groups
If you frequently send messages to the same group of people, you can create a group to simplify the process. For example, if you frequently send e-mails to five colleagues in the sales department, you can create a single group that includes all five colleagues, and then just enter the group name to e-mail all five people.
To create a group:
1 If you aren’t already in the People part of Outlook, click the People button in the lower-left corner of the window.
2 In the Home tab, click New Contact Group. An untitled contact group appears.
3 Enter Sales Department.
4 From the Member group in the Contact Group tab, click Add Members. Click From Outlook Contacts; the Select Members dialog box appears. Double-click the contacts you need to add to your new group; they will appear at the bottom of the box in the Members area, separated by semi-colons.
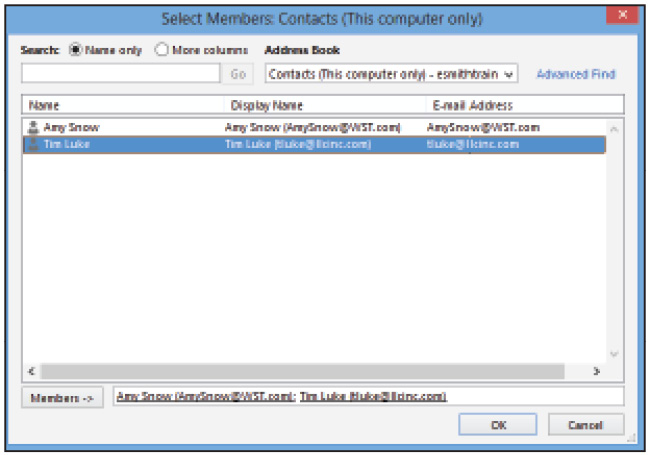
Select members to add to the new group.
5 Click OK to close the Select Members box and return to the New Group box.
6 From the Contacts Group tab, click Save & Close to save the new contact group.
Calendar
You can use Outlook to organize your schedule, set-up meetings, and keep track of anything that needs to be done by a specific date or time.
Appointments and meetings
If you need to schedule time for your own activities, Outlook considers it an Appointment. If you want others to participate, it becomes a Meeting.
Creating appointments and setting up reminders
Follow these steps to create a new appointment from the Calendar portion of Outlook.
1 Click the Calendar button in the bottom-left corner of the Outlook window. In the Home tab, click New Appointment. If you are in the Mail portion of Outlook, click the New Items button, located on the Home Ribbon tab, and then click Appointment.
2 In the Subject field, enter Dentist Appointment. This title is added to the calendar.
3 In the Location field, enter 123 Main Street, Anytown, NY.
4 Enter a start and end time for the appointment.
5 On the Appointments tab, set a Reminder. The default is 15 minutes before the appointment is due to begin. Turn the reminder off by clicking the arrow next to the 15 minutes and setting it to 0.
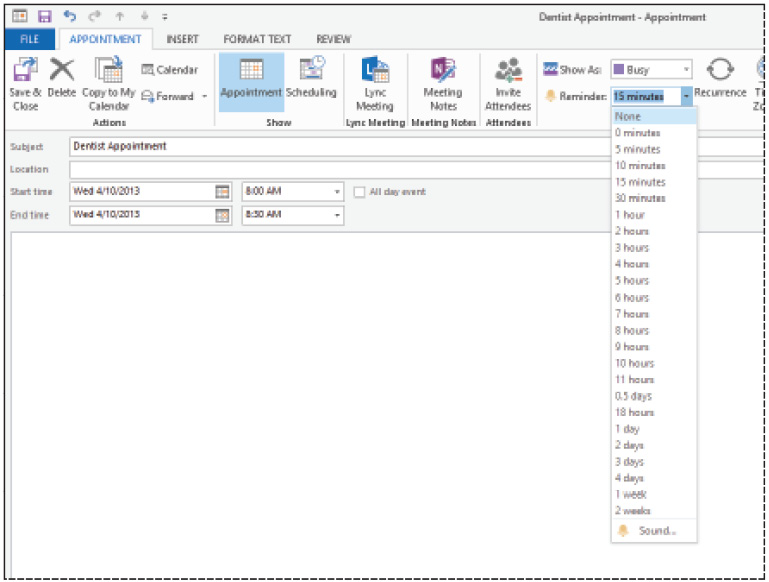
Setting a reminder in a new Appointment box.
6 Click the Save & Close button, located on the far left side of the Appointment tab.
Setting up meetings and inviting attendees
Follow these steps to create a new meeting and invite other participants to attend. The process is almost identical to creating an appointment, except you invite other participants to the meeting. The meeting invitations are then sent to the participants as an e-mail message.
1 In the Home tab, click the New Items button and click Meeting. If you are in the Calendar portion of Outlook, click the New Meeting button located on the far left side of the Home tab.

Creating a new meeting.
2 In the Subject field, enter Strategic Planning Session. This title is also added to the calendar.
3 In the Location field, enter 3rd floor conference room.
4 In the To field, enter the e-mail addresses or contact names of all participants. If your colleagues share a group calendar such as Microsoft Exchange, click the Scheduling button in the Show group of the Home Ribbon tab to see the times when the attendees are available for a meeting.
5 Enter a start and end time for the appointment.
6 In the large white area at the bottom of the message, type a note that describes the purpose of the meeting. You can also attach files, just as you would attach files to an e-mail message.
7 Click Send to e-mail the meeting invitation to your recipients.
Those you send the meeting invitation to will receive the invite in their Inbox. As those that you’ve invited respond to the meeting invitation, Outlook keeps track of who has accepted and declined the meeting request. You will see individual e-mails back in your own Inbox indicating who has accepted or declined the meeting invitation.
Using tasks
With Tasks, you can keep track of activities in much the same way you would a to-do list. (The difference between tasks and appointments is that appointments occur at a specific time and location; tasks have a start date and an due date, but no real location.) You can create tasks for yourself, and you can e-mail task assignments to others.
You will now create a task.
1 From the Home tab, click the New Items button and click Task. An Untitled Task dialog box appears. If you are in the Task portion of Outlook, click the New Task button on the far left side of the Home tab.
2 In the Subject field, enter Gather paperwork for tax planning.
3 Choose a priority of normal, high, or low for the task.
4 Enter the start date for the task and the due date.

Creating a New Task.
5 Click the Save & Close button. The task is displayed in the task list, along the left side of the Outlook Window, if you are in the Tasks portion of the program. If you are in the Mail portion, the tasks can appear on the To Do pane, which you can open on the right side of the View Ribbon tab.
Self study
1 Enter frequently contacted individuals into your Contact list.
2 Create a new e-mail message and attach a photograph or file to it and send it to someone.
3 Create a new meeting and invite participants.
Review
Questions
1 Is Outlook limited to connecting to only certain types of e-mail servers?
2 Are you limited to working with one e-mail account using Outlook?
3 What are the four main functions of Outlook?
Answers
1 No. Outlook connects to almost any e-mail server. It can connect to Exchange servers and popular online mail servers, such as Hotmail and Gmail.
2 No. Outlook can connect to multiple e-mail accounts. The different accounts are displayed independently along the left side of the Mail window.
3 Outlook is used primarily for sending, receiving, and organizing e-mail communication; scheduling and organizing meetings and appointments; organizing contacts with whom you communicate; and organizing individual task and assignments for others.