
Publisher Lesson 1: Introduction to Microsoft Publisher 2013

In this lesson, you will get a general introduction to Microsoft Publisher 2013. You will learn some of the basics of publication design, the user interface and Publisher’s essential capabilities. Finally, you will learn how to use the Help application.
What you’ll learn in this lesson:
- • About the types of documents that can be created in a Publisher document
- • About the views and interface of Microsoft Publisher 2013
- • Opening a new blank document and a document based on a Publisher template
- • Customizing the View of the Publisher window
- • Customizing the Publisher Quick Access Toolbar
Starting up
You will not need to work with any files for this lesson.
What is Publisher?
Publisher is an application that helps you create professional-looking publications quickly and easily. It is available in certain editions of Microsoft Office and can also be purchased separately.
Publisher combines the power of a word processor and the creativity of a graphics application into one flexible and easy-to-use tool for creating newsletters, brochures, letterheads, and business cards without having to study for a degree in graphic design.
Ways to use Publisher
You can use Publisher to create, design, and edit publications. You can use Publisher for tasks such as:
- • Create publications, from your own designs or included templates
- • Enter and edit text or import text from other documents such as Microsoft Word
- • Add pictures, place them precisely, and crop them to the size you want
- • Create and use Building Blocks, which are reusable pieces of content
- • Print your document to a local printer, or prepare it for e-mail distribution
Publisher basics
Publisher 2013 allows you to create a publication from a template or from scratch.
A template is a document with preset formatting and placeholder text that makes it easy to see what information to enter in the placeholder area. Publisher 2013 gives you access to 600 installed templates organized in different categories, including advertisements, greeting cards, labels, and invitations. After you select a template, you can modify the layout and select options in the right pane to help you customize the page.
If you can’t find a suitable template among those provided, you can also download additional templates from Office.com. You can also create your own publications for specific jobs such as a flyer for a special event, a fundraiser, or even creating your own personal stationery. In addition to creating publications for print, you can also create them for use on the Web or in e-mail.
 You will create a publication without a template in the Lesson 2, “Getting Started with Microsoft Publisher 2013.”
Quick tour of Publisher 2013
Understanding the components of Publisher helps you to use it more effectively. You’ll start by taking a quick tour of the Publisher interface.
1 Choose Start > Programs > Microsoft Office > Microsoft Publisher 2013.
Backstage view of Publisher 2013.
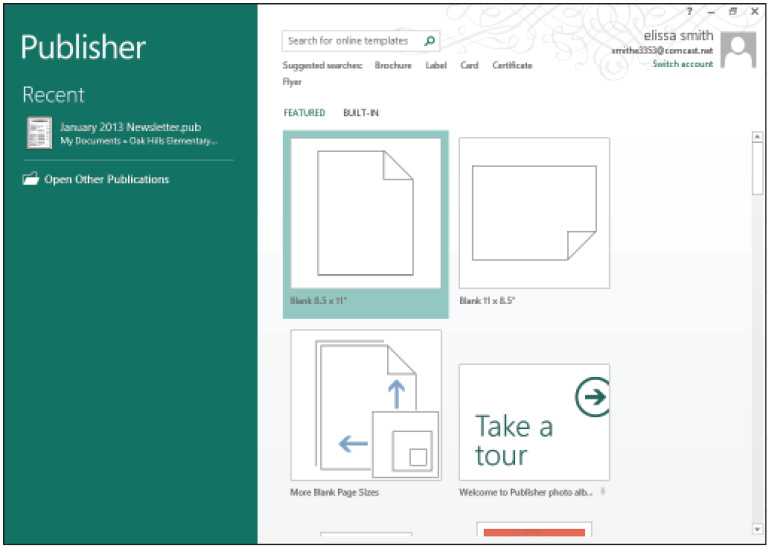
Publisher 2013 opens in Backstage view, where you can create a new publication, open an existing publication, and view featured content from Office.com. Backstage view is described in more detail in the next section.
You can always access Backstage view, even when working on a publication, by clicking the File tab.
Publisher 2013 components
To find your way around Publisher 2013, you’ll want to understand these main components of its interface:
- • The Ribbon: This bar across the top of the interface contains 7 default tabs. These tabs contain groups of commands, which are visible on all tabs except File.
- • Backstage view: This view, which appears by default when you launch Publisher 2013, displays a group of vertically placed commands on the Ribbon’s File tab.
 The File tab always has a colored background, even when it is not the active tab. You can identify the active tab by the borders on either side of it.
The Navigation pane: The area on the left side of the interface displays pages when a publication is open, or vertical command options in Backstage view.

An open publication, showing the Navigation pane on the left side.
Before you start working in Publisher, it’s important you examine its components in more detail.
The Ribbon
The Ribbon is divided into tabs, and each tab contains groups of commands. The Ribbon replaces menus that exist across the top of the screen in many other apps, as well as toolbars. The primary tabs of Publisher 2013 are File, Home, Insert, Page Design, Mailings, Review, and View.

The Publisher 2013 Ribbon is divided into tabs.
The Ribbon’s appearance changes depending on the task you are performing in your document. Some tabs, such as the Format tab, only appear in certain contexts. These are called Context Ribbon tabs. For example, when a publication is open in Publisher 2013 and a text box is drawn on the page, the Ribbon displays two new context tabs called Drawing Tools Format and Textbox Tool Format. Both these new ribbon tabs are made for formatting the text in the text box and formatting the text box itself. They will turn off as soon the text box is no longer selected.
You can hide the buttons on the Ribbon tabs and show them again by double-clicking the active command tab. This makes it easy to maximize your workspace as needed so you can see more of the document on which you are working.
To hide or show the Ribbon:
1 In Backstage view, click the Home tab.
The Ribbon changes from a simple row of tabs to a group of commands. If no documents are currently open or your document is blank, these commands will appear inactive because no publication is open.

The Ribbon in full view, showing groups of commands.
2 Hide the Ribbon by double-clicking the Home tab.

The Ribbon with its command groups hidden.
3 Show the Ribbon by clicking the Home tab again.
You have successfully toggled the Ribbon by clicking the active tab. You can also toggle the Ribbon by clicking the Minimize/Expand arrow button in the upper-right corner.
Backstage view
When you launch Publisher 2013 you are presented with the Backstage view. This contains information and commands that affect an entire publication. These commands include information about the document you have open:
- • New for opening new blank documents and templates
- • Save and Save As for saving files
- • Print for printing files and viewing them in print preview
- • Share for sharing files through e-mail
- • Export for exporting publisher files in different formats
- • Close for closing the current file open in publisher
- • Account (new to 2013) for viewing information about the office user and version of Microsoft Office
- • Options for changing defaults and settings in the software.

Publisher 2013 Backstage view.
Publisher Options in Backstage view
You can use the Publisher Options command, located on the bottom of the Backstage view, to customize and make changes to the Publisher software. The tabs are located on the left side of the box and run down vertically. When a different tab is clicked, the middle of the box changes. The tabs include the following categories: General; Proofing; Save; Language; Customize Ribbon; Quick Access Toolbar; Add-Ins; and Trust Center.
Navigation pane
You can use the Navigation pane to view pages within your publication and manage them. It is located on the left side of the Publisher 2013 interface when a publication is open.

The Navigation pane allows you to view and manage the publication’s pages, and is customizable.
Opening a publication
Now that you’re more familiar with the interface, you’ll examine a sample publication and perform some simple tasks in Publisher.
To open a sample template:
1 If you are not already in the Backstage view, click the File tab. Click New.
2 Choose Flyer from the list of Suggested searches.
3 Click Event from the Category list and then choose Event invitation flyer.

Open an existing publication using File > New
4 An informational box about the selected template will appear. Click the Create button in the bottom middle of the box.
A new publisher document based on the selected template appears in the Publisher window.
5 Click File > Close to close this file. Do not save it.
To open an existing publication:
1 In Backstage view, click Open.
2 Browse to the Pub01lessons folder and double-click NorthWindNewsletter.
Changing your view
You can view the pages in your publication in a one-page or a two-page spread, as long as the document is at least two pages in length. A two-page spread mimics the way a publication looks lying open in front of you, with two pages facing each other, such as the left and right pages in a magazine.
To view a publication in one- or two-page view:
1 Click the View tab.
2 In the Layout group, click the Two-Page Spread button or the Single Page button.
The selected view displays, and the button you clicked is now selected.

Click the Single Page or Two-Page Spread button on the status bar.
To change the view size of a page:
1 Click the View tab.
2 To select standard view sizes, in the Zoom group click any of the following buttons: 100%, Whole Page, Page Width, or Selected Objects.
Press F9 to toggle between current and 100% views.
3 To specify a custom view size, click the Zoom list arrow, and then select a view percentage.

Choose a custom view size from the Zoom list.

![]()
Click the Zoom In or Zoom Out button or drag the Zoom slider on the status bar to change the view magnification.
Saving a publication
By default, Publisher saves the files you create in a working folder. You can also specify a different location for saving files, like SkyDrive, so you can access them from any computer connected to the Internet.
1 Choose File > Save As.
2 Navigate to the Pub02lessons folder and name the file NorthWindNewsletter_work.
3 Click Save.
Customizing the Quick Access Toolbar
Use the Quick Access Toolbar for convenient, one-click access to your favorite tools. By default, the Quick Access Toolbar toolbar displays the Save, Redo, and Undo buttons, and the Customize Quick Access Toolbar button.
Now you will customize the toolbar to include the Quick Print and Spell Check buttons. If you have completed previous lessons in this book, you will already be familiar with this process.
![]()
The Quick Access Toolbar.
To customize the Quick Access Toolbar:
1 Make sure you are not in the Backstage view; you can’t see the Quick Access Toolbar from this view. Click the Customize Quick Access Toolbar button (![]() ).
).
2 In the drop-down menu, click Quick Print.
3 Click the Customize Quick Access Toolbar button, again.
4 In the drop-down menu, click Spelling.
The Quick Access Toolbar now contains the Quick Print and Print Preview buttons.
![]()
The new commands are now added to the Quick Access Toolbar.
5 To remove a button, right-click it, and click Remove from Quick Access Toolbar.
Getting help
If you run into a problem or aren’t sure how to perform a certain task, you can easily get help in Publisher by doing one of the following:
1 Press the F1 on the top of your computer’s keyboard.
2 Click the Help button, a small question mark located in the top right hand corner of the Publisher window.

Get help by pressing F1 or clicking the Help button located in the upper right hand corner of the window, next to the Minimize button.
Closing a Publisher session
When you’re finished exploring Publisher, save your file and close the program using these steps:
1 Click Save (![]() ) on the Quick Access Toolbar.
) on the Quick Access Toolbar.
2 Click the Close button located in the upper-right corner of the Publisher window.
Self study
1 Explore the selection of tabs and settings in the Ribbon, and then hide the Ribbon to give yourself more screen space to work with.
2 Practice opening templates using the New command in the Backstage view. Practice saving and closing installed templates. Try downloading different templates from Office.com and explore the additional choices available there.
3 In the Backstage view, become familiar with the Options area, which contains settings for customizing language, proofing tools, and customizing the program.
Review
Questions
1 Which tab covers up the Ribbon when you click it?
2 Where can I go to download additional templates?
3 What is the advantage of viewing a publication in a two-page spread?
4 What is the name of the new location where files can be saved to the internet through Publisher?
Answers
1 The File tab covers up the Ribbon when you click it. The Ribbon tabs contain groups of commands that are visible on all tabs except File.
2 If you can’t find a suitable template among those provided, you can easily download templates from Office.com.
3 A two-page spread mimics the way your publication would look lying open in front of you, with two pages facing each other.
4 SkyDrive is the new location where files can be saved to the internet through Publisher.