
Word Lesson 2: Getting Started with Word 2013

In this lesson, you’ll explore the user interface of Word 2013, customize it to suit your work style, and try out some of Word’s page layout options.
What you’ll learn in this lesson:
- • About new and old interface elements
- • About page layout tools
- • Customizing your workspace
Starting up
In this lesson, you’ll work with several files from the Word02lessons folder. Make sure that you have loaded the OfficeLessons folder onto your hard drive from www.digitalclassroombooks.com/Office2013. If you need further instructions, see “Loading lesson files” in the Starting up section of this book.
The Word 2013 interface
Microsoft Word is a mature product; the first version of Word for Windows, in 1983, offered many computer users their first experience with a mouse. As you’d expect, Word 2013 is an incremental update rather than a revolutionary one. If you’re familiar with Word 2007, 2010, or 2011, you won’t find many surprises in this lesson. But Windows 8 and Windows RT, the operating systems on which Word 2013 runs, have several new features; and Word 2013 inherits its main interface features from Windows itself.
Many features of the Word 2013 work environment are common to all the apps in the Office 2013 application suite; we’ll note these as we go and cover them with less detail than the unique features now available for Word.
The Start screen and template gallery
When you launch Word 2013, instead of a blank document, you’re greeted with a new start screen, similar to the Backstage view (which replaced the File menu). In the left-hand pane, a list of recent documents appears; a gallery to the right offers a collection of document templates. Note that in the Start Screen there’s no obvious distinction between documents stored on your hard drive and those stored in the cloud; in fact, many of the items in the template gallery are just links to templates hosted on Microsoft’s own servers.
In the search box at the top of the gallery pane, you can search Microsoft’s extensive online template database.
1 Type cookbook in the search box and press Enter.
As of this writing, Microsoft doesn’t actually offer a cookbook template, but this empty results screen does offer something useful: at the bottom of the screen is a new gallery, Search results from your other applications. If you have Publisher, Excel, and PowerPoint installed on your computer, you’ll see links to templates for those programs, which you can launch directly from the Start Screen in Word 2013.
In the Recent pane, you’ll see a listing of recent documents, including the hip newsletter you worked with if you completed Lesson 1. Below that list is a link to Open Other Documents, which brings up the Backstage view itself; the same as if had you clicked File > Open (or pressed Ctrl+O).
2 At the lower left of the screen, click Open Other Documents.
Opening a document
Clicking File > Open brings up a three-paned window. The left-hand pane should be familiar: it’s the old File menu, complete with New, Open, Save/Save As, Print, and a handful of other commands, most of them unavailable when you launch Word 2013, because there’s no document currently open. To the right of that pane is a list of Places: a customizable list of local and online storage locations. As you click each in turn, the right-hand pane provides a list of available documents in that location.
By clicking the Add a Place button, you can add SkyDrive and SharePoint links to the Places list.

The Open command in Backstage View.
1 Choose Computer from the list and navigate to the Word02lessons folder you saved to your hard drive. Open the the file word02a.docx.
2 Choose File > Save As and save this document as word02a_work.
The Ribbon
The main visual feature of the Word 2013 workspace is the Ribbon, which arrived in Microsoft Office in 2007 and has spread to a variety of Windows applications. The Ribbon replaced the 20-year-old system of drop-down menus (File, Edit, and so on) with clusters of graphical icons, each located on a tab (formerly a menu) within a group (submenu). The basic idea behind the Ribbon is this: the formatting options most users need most often are in the Home tab, while context-dependent actions (such as reformatting a table, changing the dimensions of a document, or styling an image) reside in other tabs.
Because of its size and prominence, the Ribbon sometimes gets in the way; for instance, when taking in an entire document, or drafting text with no formatting or layout. At those times, you can collapse the Ribbon into the tab bar, and only pin it back in place when necessary.
1 To collapse the Ribbon, click the caret (^) on the document’s far right side. Only the tab bar will remain visible at the top of the screen.

Click the caret to collapse the Ribbon.
2 To expand the Ribbon, click one of the tabs. A push pin icon appears on the far right of the Ribbon. To keep the Ribbon permanently visible (to pin it), click the push pin icon, which then changes back to a caret.
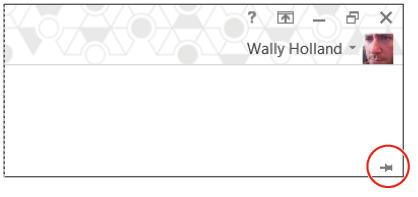
Click the push pin icon to expand the Ribbon.
3 Alternatively, press Ctrl-F1 to toggle Ribbon visibility.
Just as in old versions of Word, the Ribbon’s commands can also be invoked with keyboard shortcuts. Alt+F works the same as clicking File; Alt+R is the equivalent to clicking Review, and so forth. Pressing the Alt key displays the keyboard equivalents for each tab (pressing Alt and then M separately accomplishes the same as Alt+M) and displays the Mailings tab with keyboard shortcuts for all its icons. Learning the key equivalents for your most-used tasks will increase your productivity with Word 2013 immensely.
Customizing the Ribbon
Because it’s so central to the user experience in Word 2013, the Ribbon can be customized in several ways. You can hide, rename, and rearrange tabs, and do the same with the groups inside them; you can even create custom tabs and groups. The latter option can streamline your workflow when performing repetitive tasks. For instance, if you are working with a table-filled document, inserting footnotes and hyperlinks into a large number of cells, and changing table formatting, you might create a temporary Ribbon tab to group together the tools you need.
1 Click File > Options > Customize Ribbon (or press Alt+F+T, and then click Customize Ribbon).
2 Click New Tab, then select your New Tab (Custom) and click Rename. For the name of your custom tab, type TAAABLES.
3 Use the down-arrow button at the right of the list (Customize the Ribbon) to move your new tab, which Word has marked Custom, to a spot between the Insert and Design tabs.
4 Click New Group found underneath the TAAABLES tab, then Rename. For the name of your custom group, type GRUNT WORK.
5 Make sure your GRUNT WORK group is selected in the right-hand list. From the list of Popular Commands at left, click Hyperlink, and then the Add button. Do the same with the Insert Footnote command.
6 Now select All Tabs from the top-left drop-down menu. The list of available commands changes to include one of the ribbon icons available in Word 2013, grouped by tab. Click through to select Table Tools > Design > Borders > Borders and Shading, and then click the Add button.
7 Finally, click OK.
Your Ribbon will update to include your custom tab and group, which you can leave open for easy access while you work. Removing the tab works the same way:

Adding a custom group to the Ribbon.
8 Click File > Options > Customize Ribbon.
9 On the right-hand list, right-click your custom group and choose Remove. Click OK.
You can actually hide any of the tabs and groups in Word 2013 from the same window: simply unclick the check box next to an entry in the right-hand list to render it invisible, and then click the box again to restore the tab or group.
The Quick Access toolbar
Word 2013 also provides an always-on cluster of icons in the upper left corner of the screen called the Quick Access Toolbar. By default, this cluster of icons contains buttons to Save, Undo, and Redo, which come from the old File and Edit menus. If you click the rightmost icon in the toolbar, which resembles a tiny upside-down eject button, a drop-down menu appears with a list of available commands for the toolbar.

The Quick Access Toolbar is a customizable collection of frequently-used commands.
Choosing More Commands from this menu takes you to an options screen, equivalent to clicking File > Options > Quick Access Toolbar, which works just as the Customize Ribbon screen from the previous section.
You can stock your Quick Access Toolbar with the commands that you want available at all times: the Quick Print command, which was once prominent in Word’s toolbar, is a popular choice; the E-mail command is also a handy option.
The Status bar
At the bottom of your Word 2013 document there is a slim status bar that doubles as an always-on info readout and a collection of buttons and toggles. By default, it includes a minimal set of useful tools: the current page number, word count, a spellcheck button, zoom slider and percentage entry, and buttons to switch your document view. Clicking the page number brings up the Navigation pane; clicking the word count brings up a window with information such as character and line counts; and so forth.
![]()
The Status Bar.
You can customize the Status Bar by right-clicking anywhere along its length. The context menu lists the various options you can include on the bar. When you’re finished customizing the display, press Escape to return to your document.
The Navigation pane
The Find command has undergone some changes over the last few iterations of Microsoft word. Just as Google search, Find has gotten fuzzier over time: once upon a time its main use was to grab a specific piece of text; now it’s to move you near that text. It’s now part of a handy tool called the Navigation pane, which combines the functionality of an outline, page-thumbnail view, and the old Find command.
1 Press Ctrl+F or click the page count display in the Status Bar to bring up the Navigation pane.
The Navigation pane lets you move quickly through your document. Let’s tour the file.
2 In the Search document field, type chinatown.
3 Click Headings in the Navigation pane.

Listing Headings in the Navigation pane.
The Navigation pane shows a simplified outline of the document with each level of the outline corresponding to a Heading style in the text: Heading 1 at the top level, and the various Heading 2 sections below. The final Heading 1 entry (Chinatown Ghost Tour) should be highlighted, indicating that the text you searched for is found within that section.
4 Click Results.
The Navigation pane shows three hits for the word chinatown, all in the same section of the document. You can click each result in turn to highlight its location in the editing window.
5 Click the first result in the Navigation pane, Chinatown Ghost Tour, and press Escape or close the pane. You’ll return to the main editing window with your cursor in the right place, ready to edit.
6 Type San Francisco Chinatown, press Ctrl+F to switch focus back to the Navigation pane, and then click Headings.
The outline dynamically updates to reflect the edit you just made; clicking any heading will place the cursor at that spot in the editing window.
Different viewing modes
There are several ways to view your document in Word 2013, all available in the View tab:
Print Layout is just what it sounds like: a WYSIWYG (What You See Is What You Get) preview of the document’s final appearance on the page, with or without markup. This is the view most Word users prefer.
Web Layout is subtly different: it shows what Word will produce if you convert your document to HTML. (Switching to Web Layout mode doesn’t actually do the conversion, though; you have to Save As an HTML document for that.)
Outline View is most useful early in the writing process: you build an outline for your document, and Word 2013 automatically generates the appropriate headings, providing a skeleton that you can fill in with prose, graphics, tables, and so on.
Draft View shows a pure-text view of your document, typewriter-style: no specialized fonts, no careful layout; just words on the page. Outline and Draft views let you work directly with text without worrying about layout.

The same document in Draft, Outline, and Read modes.
The four viewing modes listed previously are holdovers from previous versions of Word. Word 2013 adds a new document view: Read Mode. Designed for tablets and touchscreens, Read Mode displays your document with no visual clutter: no Ribbon, no tool palettes, just a handful of commands. Crucially, you can’t edit the document in Read Mode; you move through the document a page at a time, as if shuffling pieces of paper.
Read Mode is useful at the reviewing, revising, and editing stages, and when sharing documents. To switch to Read Mode, click View > Views > Read Mode, or press Alt+W+F; to return to editing, press Escape or click View > Edit Document.
Laying out the page
Our info sheet uses a slightly nonstandard page layout: U.S. letter paper, as usual, but with narrow 0.5˝ margins all around. (The default for U.S. users is a 1˝ margin.) Click Page Layout > Page Setup > Margins to see the standard options. For inter-office memos and book reports, it’s not worth worrying about page layout, but if design matters to your document, you’ll start by thinking about the size and quality of the paper (or screen) where your work will appear.
Page size, margins, and marginalia
Assume that we’ve laid out our flyer haphazardly for letter paper with thin margins and no page numbers. We are then told that our flyer will be included in a book of local event listings, and we need to bring our layout in line with some new artistic visual standards. Our task is to alter everything but the content of our flyer, from page size through document theme.
1 If it’s not still open from the previous exercise, open word02a_work.docx.
2 Click Page Layout > Page Setup > Size > More Paper Sizes (Alt+P, SZ, A).
3 Set the page width to 6˝ and its height to 9˝ (the dimensions of a trade paperback book)and click OK.
Word automatically lays out the text to fit the new page size, still in portrait (tall and narrow) orientation, with the same 0.5˝ margins. Let’s change those parameters as well.
4 Select Orientation > Landscape, and then Margins > Wide (both in the Page Layout tab).
Our new layout provides tons of left and right margin space, less at the top and bottom of the page. We’ll take advantage of the roomy margins and place our page numbers at left, instead of in the usual header and footer.
5 Select Insert > Header & Footer > Page Number > Page Margins > Circle Left. Double-click the main document area to close the Header/Footer menu. The page number float fades, visually indicating that it’s a page element unaffected by normal text entry.
Headers and footers
Broadly speaking, a page in Word 2013 can be separated into a header, footer, and margins (generally the same from page to page); text blocks (the main text area, different on every page); background elements such as textures and watermarks; and floats, which jostle for space with everything else. Most documents have empty right and left margins, but headers and footers are widely used in Office documents.
Compared to applications such as InDesign and Quark Express, Word can’t handle complex page layout, but even its basic header/footer tools provide surprising flexibility for nontrivial desktop publishing projects.
The most common use for headers and footers is to print page numbers, author info, or title and date info on every page of a document. Our paranormal event listing will be included in a Coming Events guide; after setting the right Theme and Style Set, we’ll insert the guide’s title into our footer on alternate pages.
1 Select Design > Themes > Organic, and then select the Lines (Distinctive) Style Set.
2 Scroll to the first page of the document. Click Insert > Footer > Filigree. Place the cursor to the left of the filigree symbol and type Fun Francisco. Then place the cursor to the right of the filigree and type Thrillafornia.
3 Select Header Tools > Different Odd & Even Pages, and then click Navigation > Next to move to the page 2 footer.
4 Double-click the center of the page 2 footer (the cursor should change to centered text).
Word 2013 correctly assumes that text placed at the center of the footer is center-aligned.
5 Type 2013 Spooktacular. Finally, double-click the main text area to close the header/footer tools.
Windows and panes: splitting your document view
At times, you may need to have more than one section of your document open at once; for instance, when paraphrasing one passage elsewhere in the document, or avoiding doing so. The Window Group in Word 2013 offers some tools to help you visually manage different parts of a document; we’ll use the split-screen functionality to make some edits to our flyer.
1 Click View > Window > Split to divide the screen in half vertically. You can now scroll independently in each pane.
2 Click New Window to open another window on the current document.
3 Now click View Side by Side to reveal three angles on the document at once.
4 If it’s not already selected, click Synchronous Scrolling.

One image, three views: Split Window and New Window.
Now scroll to the very bottom of the document in one of the short windows; the tall window scrolls along with it. This feature is most useful when comparing different documents; we don’t need it now.
5 Close the tall window. In one of the half-height panes, scroll to the top of the document; in the other pane, scroll to the very bottom. To switch focus between panes, just click to place the cursor as normal.
To switch focus and move the cursor between the two open panes, press F6; note that this command actually switches between the open document panes, status bar, ribbon, and Navigation pane, if open. To switch between windows within Word, press Ctrl+F6.
6 Scroll down from the top of the document to gather the names of the various tour guides. At the end of the flyer, replace the placeholder text with their contact information, styled so as to draw attention (boldface, right justified):
Jim Fassbinder (253) 555-2294
San Francisco Ghost Society (617) 22-SPOOKY
Cynthia Yee (503) 555-4YEE
7 Click View > Window > Remove Split to return to a single editing window.
8 Choose File > Save.
Self study
1 Word 2013 can search for specific text strings and it can find text that sounds like the text you want; homonyms, in other words. Track down this feature (hint: you can enable it somewhere in the Navigation pane) and experiment with fuzzier search.
2 Try adding the Quick Print command to your custom tab. Use the Design > Page Color tool to add a beautiful background gradient to your entire document, and print it using the Quick Print command.
3 Perhaps you like the Filigree footer style, but prefer to use it as a header instead. Create a new header style that duplicates the Filigree footer, but includes a field for the page number. Hint: to save time, start with one big Copy/Paste.
Review
Questions
1 Which part of the Word environment can be set to display your current page, line, and column positions?
2 What sequence of commands would insert a tiny image at the top of every other page of a document?
3 Which command formats your document for a 4˝ by 4˝ flyer?
Answers
1 The part of the Word environment that can be set to display the current page, line, and column positions is the Status Bar.
2 The sequence of commands that would insert a tiny image at the top of every other page of a document are: Insert > Header > Edit Header; Insert > Illustrations > Pictures; Header Design > Different Odd & Even Pages.
3 The command that formats your document for a 4˝ by 4˝ flyer is: Page Layout > Size > More Paper Sizes.