
Outlook Lesson 2: Getting Started with Microsoft Outlook 2013

In this lesson, you will learn how to customize the Microsoft Outlook Ribbon and how to customize the Outlook window by turning panes and bars on and off. You will also learn to receive and respond to e-mail messages by forwarding and replying, and control incoming e-mail using Rules. You will create recurring appointments and meetings and use Outlook’s Junk e-mail management tools.
What you’ll learn in this lesson:
- • Customizing the Outlook window and Ribbon
- • Responding to e-mail using Forwarding and Replying
- • Controlling items in Outlook using Rules
- • Managing Junk e-mail options
- • Creating recurring appointments and meetings
Starting up
You will not need to work with any files for this lesson.
Outlook views
Microsoft Outlook is a communication, scheduling, and information management system. As you’ve already seen, Outlook contains four different main views:
- • Mail: for viewing and receiving e-mail messages.
- • People: for managing contact information.
- • Calendar: for scheduling appointments and activities.
- • Tasks: for managing personal tasks and for managing assignments for others.
Since Mail view is the default view you enter when opening Outlook, the program lets users modify the window to include different aspects of each of these four views from the Mail view.
The activities presented in this lesson focus on the Mail and Calendar views of Microsoft Outlook. Many of the activities like printing items, customizing the Outlook window, and turning on and off of different task panes can be accomplished in either the same way or very similar ways in all of Outlook’s different views.
Printing in Outlook views
There will be times when you’ll need to print items from any or all of the different views. For example, you might need to print e-mails from the Mail view, calendars from the Calendar view, and so on.
Printing in the Mail view
When you are in the Mail view, you can choose to print your e-mails in a Memo Style or a Table Style. The Memo Style prints just the e-mail item you select from the Inbox. The Table Style prints the entire Inbox list.
You will now print from the Mail view.
1 From your Inbox, select an e-mail message.
2 From the Mail view, click the File tab. Then, in the Backstage view, click Print.
The Print window opens. It is a combined view that shows the Print box on the left side and the Print Preview window on the right.
From the Print box, you can select the printer to print to, printer options, and whether to print in a Table Style or a Memo Style.
3 Select the Table Style. The entire Inbox list is printed.
4 Select the Memo Style. The e-mail item you selected in Step 1 is printed.
 To close Print without printing anything, press Esc or click the left-facing arrow at the top of the Print screen and Backstage view to return to the Mail view.

Print preview of an e-mail item.
5 To close the Print section, click Exit.
Printing in the Calendar view
Another common view to print from in Outlook is the Calendar. When printing in the Calendar view, you can print different time intervals, such as month, week, day, or even an individual appointment. Any appointments and meetings scheduled on given days will also appear on the printout.
You will print from the Calendar View.
1 From the bottom-left corner, click the Calendar button to switch to the Calendar view. Notice that the default period shown is Month.
2 Click the File tab, and click Print.
The Print box appears, and it’s very similar to the one in the Mail view: the Print box is on the left side and the Print Preview is on the right side. The Print box contains options such as the printer to print from; print options that allow you to adjust settings on your printer; and settings that allow you to pick the date interval that will print. Notice that the period that’s selected in your Calendar view is the one that’s automatically selected to print. (In this case, the period that’s selected is Month, since the Calendar view is showing a Month period.)
3 Under Settings, click Weekly Calendar Style. Notice that the Print Preview updates to display a week rather than the month. Click different settings to see what they look like in Print Preview.

Print Preview of Calendar view.
4 Press Esc to close the Print box without actually printing anything.
Adjusting views in Calendar
If you don’t want Month to be your default period in the Calendar View, you can adjust it to the period you need. This is done on the Home tab in the Arrange group, which contains the following buttons: Next 7 days, Work Week, Week, Month, and Schedule View.
You will now adjust views in the Calendar.
1 In the Calendar view, click Work Week from the Arrange group of the Home tab. The view adjusts to only show Monday through Friday in the middle screen.
The Work Week calendar view only displays Monday through Friday.
2 Click some of the other buttons in the Arrange group and notice what the views look like.
3 Click the Mail button in the bottom left area of the Outlook window to return to the Mail view.
 When you change the default period in the Calendar view and then print from this view, the Print Box automatically chooses to print the period set up in your Calendar view. You can change the settings in the Print Box to print a different period as explained in the previous exercise.
Printing in other views
Printing in Outlook’s other main views, Tasks and People (Calendar), is very similar to print in the Calendar and Mail views. Select the view you wish to print from. Select the individual item, you wish to print and then click the File Ribbon tab and select Print. Remember, you will go into Print Preview after selecting Print. You can customize the item you are printing from the left side of the Print Preview window and preview the print item on the right.
Customizing the Mail view
There are different areas in the Mail view of Outlook that you can turned on or off and also minimize. These different areas are often referred to as panes, and the buttons for controlling them are located on the View tab, in the Layout group.
About the Folder pane
The first of these panes is the Folder pane. The Folder pane is always open by default in any view of Outlook. Depending on Outlook View you have displayed on the screen, the button in the Folder pane change as follows:
- • Mail view: displays the personal folders and mail folders necessary to organize your e-mail.
- • Calendar view: displays calendars for reference.
- • People view: shows the location of different sources for contacts available on your computer.
- • Tasks view: shows locations of sources for task lists available on your computer.
Customizing the Folders pane for the Mail view
The most common view to use the Folder pane from is the Mail view, because you can use the Folder pane for organizing, reading, deleting, and moving e-mail messages into folders. As already mentioned, the Folder pane is always open by default, but you can keep it minimized or closed.
You will now minimize the Folders pane.
1 Click the View tab. In the Layout group, click the Folder pane and select Minimized from the drop-down menu that appears.
The Folder pane folds into the side of the screen, leaving only a thin bar with small links to the Inbox, Sent, Trash, and All Folders. You can click these links to open a side bar to the right of the minimized Folder pane. This side bar shows the items contained within the link you selected.

Minimize the Folder pane.
2 To restore the Folder pane, click the small arrow located on the top-right corner of the minimized Folder pane. The entire Folder pane becomes visible again.
The top section of the Folders pane contains an area called Favorites. You can select your top folders and add them to the Favorites area by dragging them up into the Favorites area from the Folder list below. You can also turn the Favorites area of the Folder pane on and off.
You will now turn off the Favorites area from the Folder pane.
3 In the View tab, click the Folder pane button. From the drop-down menu that appears, click Favorite to remove the check mark next to it. The Favorites section at the top of the Folder pane is no longer shown.

Turn off the Favorites area.
4 To turn the Favorites back on, click the Folder pane button and select Favorites from the drop-down menu to re-display the check mark. The Favorites reappears at the top of the Folder pane.
Folder pane navigation options
The area at the bottom of the Folder pane is called the Navigation Options. In here, you find the buttons that allow you to switch amongst the different Outlook views:
- • Calendar
- • People
- • Tasks
- • Notes
- • Folders
- • Shortcuts
By default, the Navigation Options area shows only four of these views, but you can get to the other view buttons by clicking the ellipses button (…) located directly to the right of the last button.
From the Layout group in the View pane, you can access the Navigation Options dialog box, which controls the number of view buttons that appear in the Navigation Options area, and the order they appear in. The Navigation Options dialog box also has an option at the top called Compact Navigation. When you select this option, the view buttons in the Navigation Options area change from listing the button names, to just showing a picture representing the button.
You will now turn on Compact Navigation in the Navigation Options dialog box.
1 In the View tab, click the Folder pane button. From the drop-down menu that appears, click Options. The Navigation Options dialog box appears.
2 At the top-left corner of the box, select the Compact Navigation check box, and then click OK to close. The area at the bottom of the Folder pane (the Navigation Options area) now displays pictures representing the views, instead of their names.

Navigation Options dialog box.
3 Go back into the Navigation Options box and click the Compact Navigation check box to clear the check mark.
4 Click OK to close the Navigation Options dialog box and commit the change.
Customizing the Reading pane
The Reading pane is the area where you can see the specifics of any of the Outlook items that you have currently selected. For example, in the Mail view, the Reading pane displays the content of the e-mail message you have clicked. In the Calendar view, it displays the current calendar.
By default, the Reading pane appears on the right side of the Outlook window. However, you can relocate it to the bottom of the window, or turn it off.
You will move the Reading pane to appear at the bottom of the screen, and then turn it off and back on again.
1 In the Layout group of the View tab, click Reading pane. From the drop-down menu that appears, click Bottom. The Reading pane changes its location to appear at the bottom of the Outlook window.

Reading pane appears at the bottom of the Outlook Window.
2 Click an e-mail message in your Inbox to see how the message’s content now appears at the bottom of the screen.
3 To turn off the Reading pane, click Reading pane in the Layout group of the View tab, and then choose Off from the drop-down menu that appears. The Reading pane turns off from the bottom of your screen.
4 To turn the Reading pane back on, click Reading pane in the Layout group of the View tab, and then choose Right from the drop-down menu that appears. The Reading pane now appears in its original position at the right side of the Outlook window.
From the Layout group in the View pane, you can access the Reading Pane Options dialog box, which contains check boxes to control how items are dealt with when they are viewed in the Reading pane. These options include:
- • Marking items as read when viewed in the Reading pane: this option is turned off by default. When you select this option, you can set the number of seconds Outlook should wait before marking the item as read.
 New items appear in a different color when they come into your Inbox. Once you open these new items and view them, Outlook marks the items as having been read and changes their color so you can visually identify the items you have already read.
- • Mark item as read when selection changes: when you move your focus to another item, Outlook marks the original item as read. This option is on by default.
- • Single key reading using the space bar: this option allows you to move down from message to message in your Inbox or other views by pressing the spacebar. As you press the spacebar and move down in the item list, your Reading pane updates to the item you have selected. This option is automatically on by default.
You will now look at the Reading Pane Options and learn how to use them when reviewing e-mail.
5 In the Layout group of the View tab, click Reading pane. From the drop-down menu that appears, click Options. The Reading Pane Options dialog box appears.
6 In the Reading Pane Options dialog box, be sure that the last two check boxes are selected (Mark item as read when selection changes and Single key reading using the space bar).
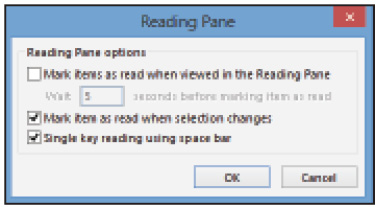
Reading Pane Options dialog box open.
7 Click OK to close the box.
Next, you will practice using the Single key reading using the space bar option.
8 Click a message at the top of your Inbox list. Press the spacebar. Watch as the selection in your Inbox list moves down the messages list as you continue to press the spacebar. Also, notice that the Reading pane updates to show the content of the selected message. You can use this method of reviewing your messages to browse through your e-mail list in a quick and convenient manner.
Customizing the To-Do bar
The To-Do bar shows the Outlook items that you currently need to perform or review. The To-Do bar appears on the far right side of the Outlook window, and it can display up to three different items, individually or together. These items are:
- • Current calendar: when you click a specific date on the calendar, Outlook will switch to the Calendar view to show that date. Also, any appointments or meetings that you have scheduled in Outlook appear directly below the calendar.
- • People: this is Search box where you can type a contact’s name to try to locate the contact (or contacts with similar names) from the People view. When you type a contact’s name in the Search box and press Enter, Outlook displays a list of possible matches. Click any of the names from search results to access the name and e-mail the contact.
- • Tasks: a list of the current tasks that you have flagged for priority completion in Outlook.
You will turn the To-Do bar and add the calendar, people search, and task list to it, and then turn it off.
1 In the Layout group of the View tab, click To-Do bar. From the drop-down menu that appears, click Calendar.
2 Repeat Step 1 to choose People and Tasks from the drop-down menu. Notice that the far right side of the Outlook window now displays a current calendar (that you can adjust to display different months), a people search box, and a task list.
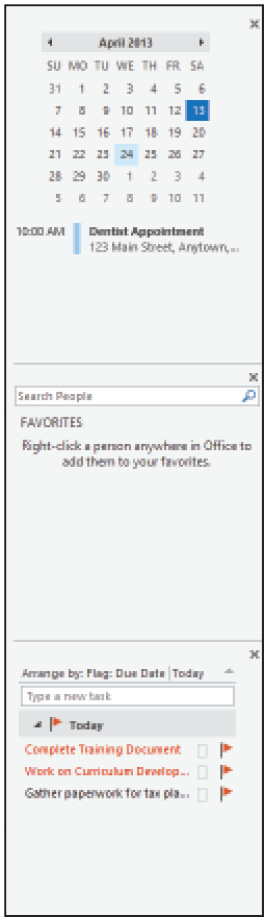
The To-Do bar open and displaying a calendar, people search tool, and task list.
3 In the Layout group of the View tab, click To-Do bar. From the drop-down menu that appears, click Off. The To-Do bar closes.
Customizing the People pane
The People pane provides you with information about the individuals who send you e-mail. It’s also called the Outlook Social Connector and it’s normally minimized when you read e-mail. You can drag it up to display more information in a normal view. If you use Outlook and SharePoint at work, you can see your work contacts in the People pane. If you maintain social media accounts on sites such as LinkedIn or Facebook, you can also use the Outlook Social Connector to show you updates from those sites without leaving Outlook.
You will now turn on the People pane, minimize it, and then turn it off.
1 From the Layout group in the View tab, click the People pane. Click Normal. The People pane appears at the bottom of your Outlook window.
2 Click the People pane, and on it, click Minimized. Drag up the thin gray bar at the top of the minimized People pane, to view it again.

People pane open in Normal view.
3 Click the People pane, and on it, click Off. The People pane turns off.
To connect your People pane to social media websites for which you have accounts, click the People pane and select Account Setting at the bottom of the box. Select the appropriate social networking sites to view their information from within Outlook and make sure the Reading pane is turned on.
Customizing the Ribbons
In Microsoft Outlook 2013, you can customize the Ribbons by turning Ribbon tabs on and off, moving Ribbon groups within the same Ribbon tab, and creating your own Ribbon tabs. You cannot delete any of the buttons or Ribbon tabs created by Microsoft.
You will customize the Outlook Ribbon tabs and create your own custom Ribbon tab with buttons that you select.
1 Click the File tab, and then click Options in the Backstage view. The Outlook Options dialog box opens.
2 In the Outlook Options box, click Customize Ribbon from the menu pane.
The Customize the Ribbon tab appears. The left side shows popular commands that you can add to a personal Ribbon tab and group. The right side shows the current Outlook Ribbon tabs with expand and collapse buttons and a check box appearing next to each tab. When you clear the checkmark from any of those check boxes, the corresponding Ribbon closes and is not visible in Outlook.
3 Select the check box next to the Send/Receive Ribbon. Click OK. Notice that the Send/Receive Ribbon tab is turned off in the Mail view of Outlook.
4 Return to the Customize Ribbon tab of the Outlook Options box. At the bottom of the box and on the right side, click New Tab. The New Tab appears in the list on the right, along with the other Ribbon tabs in Outlook. It also has a New Group listed under it. You can change the location of your new ribbon tab in the vertical list by dragging it up or down.
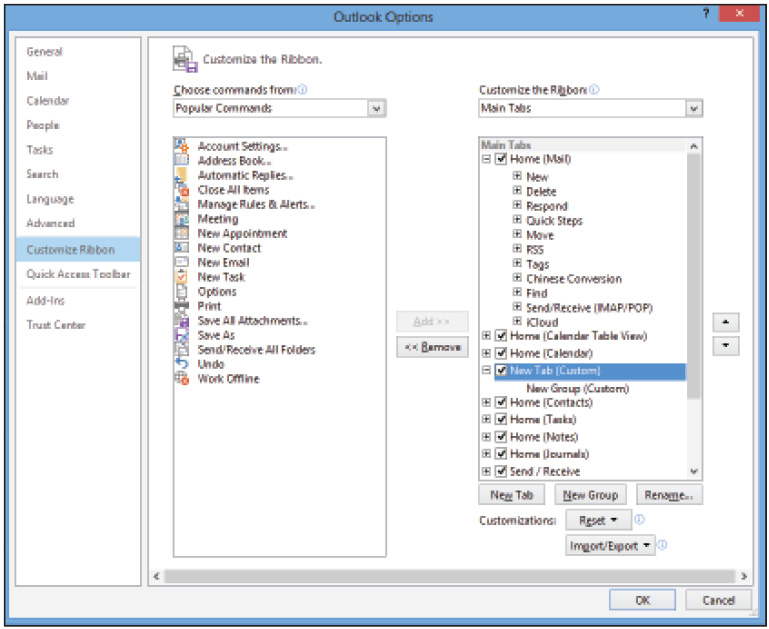
Customize the Ribbon tab, adding a new Ribbon tab.
5 To rename the Ribbon, click the New Tab in the Ribbon list to select it, and then click the Rename button at the bottom of the list. Type Training. Click OK.
6 To add buttons to your new Ribbon tab, click the plus sign button next to your new Ribbon tab. It opens to display your New Group. Use the Rename button to rename your new group.
7 Take buttons from the left side of the Customize the Ribbon box and drag them to your New Group on the right side.
You can also find other buttons by clicking the drop-down arrow next to Popular Commands at the top left side of the box, and selecting a different ribbon or category of buttons.
8 Click OK and view your new Ribbon tab at the top of the Outlook window. Click it and look at your customized group of Ribbon commands.
If you don’t need your customized Ribbon and want to delete it and return Ribbons to their original positions, you can reset them in the Customize the Ribbon tab of the Outlook Options box.
You will now reset your Ribbon tabs and delete your customized Ribbon tab.
9 Return to the Outlook Options box and the Customize the Ribbon tab. On the right side of the box, click Reset. Click Reset all customizations.
10 A Microsoft Office box opens with a question to Delete all Ribbon and Quick Access Toolbar Customizations for this program. Click Yes. The custom Ribbon tab is removed.
If you don’t want to reset your Quick Access Toolbar, you can right-click your custom Ribbon tab on the right side of the Customize the Ribbon box, and select Remove from the list. This removes the customized Ribbon, but not any other customizations, such as shortcuts.
Forwarding and replying to e-mail
After you receive e-mail, you might need to respond to it or forward the message to another person. Replying is the term used when you respond to a message you have received by sending a message back. Forwarding a message is when you send the message you received on to another recipient.
 You can forward a selected e-mail message by pressing Ctrl+F . Ctrl+R will open a reply message for a selected e-mail.
Replying to an e-mail message
You will now practice replying to a message from your Outlook Inbox.
1 Select a message from your Inbox that you can appropriately reply to. Double-click the message.
2 In the message box, click Reply in the Respond group.
 When there are multiple recipients on the e-mail message, you can click the Reply All button to simultaneously reply to everyone addressed in the e-mail.

Reply E-mail message box open.
Another e-mail box opens with the letters RE (which mean Reply) at the top of the message box. The original e-mail message box opens behind the new message box. The new message is addressed to the person who sent the original e-mail, and the original message appears at the bottom of the new message box. A cursor is blinking in the area where you can begin typing your reply.
3 Type a reply in the body section of the e-mail, and then click Send at the top left of the box.
4 To close the original message box, click the X in the top-right corner.
Forwarding an e-mail message
You will now practice forwarding an e-mail message from your Outlook Inbox.
1 Select a message from your Inbox that you can appropriately forward to someone else. Click the message in your Inbox list to select it.
2 On the Home tab in the Respond group, click Forward. You can also double-click the message in the Inbox; the message box opens, and a Forward button appears on the Respond group in the Message tab. Click the Forward button.
A new message box opens in the Reading pane. The original message appears at the bottom of the message, and the cursor blinks in the To field, ready for you to address the message.
3 In the To field, enter the e-mail address of the person to whom you’re forwarding the message.
4 Enter a message in the body section of the e-mail. Click Send.

Forward E-Mail message open in the Reading pane.
Using Rules to manage incoming items
Rules help to cut down on the physical filing of Outlook items or repetitive actions. Usually, rules are set-up to run automatically. For example, when you receive an e-mail message with a specific word in the Subject line, you can have it automatically moved into a certain folder. There is a wizard that helps you create and manage rules. Rules are assigned to two categories, organization and notification.
Creating a Rule to manage e-mail
You will create a new Rule to help manage your e-mail.
1 From the Move group in the Home tab, click Rules. Then click Create Rule.
2 Select the check box next to Subject contains. Enter Phone Lists. Whenever a message is receive with a Subject containing the text Phone Lists, the Rule will run.
3 Under Do the Following, click Move the Item to Folder. Click the Select Folder Button. A list of all your Outlook folders appears. Click Training, and then click OK.
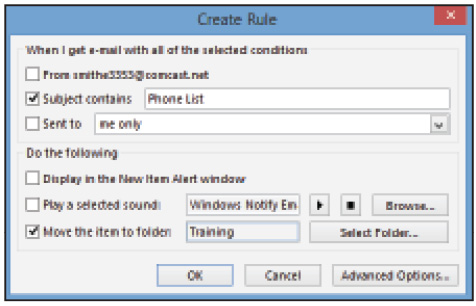
Create Rules box open.
4 A Success box opens with a message that that your Phone Lists rule has been created. The box also contains a check box asking whether to Run this rule now on messages already in the current folder. Don’t select this check box; but click OK.
5 In the Home tab, click New E-mail. In the new e-mail message box, address the e-mail to the current e-mail address you are using in Outlook on your current computer. Enter Phone Lists in the Subject line. Type a message in the body, and then click Send.
6 On the Home tab, click the Send/Receive All Folders button. This ensures that your e-mail is received quickly.
 You can also press F9 key to Send and Receive for all folders in Outlook.
7 Check the Training folder; you should see the e-mail you just sent.
Managing a Rule
Once you’ve created a rule, you can manage it, edit it, or delete it using Manage Rules & Alerts. Along with editing rules, you can also copy rules or run rules directly from the Manage Rules & Alerts Box.
You will now use the Manage Rules & Alerts Box to turn off your Rule.
1 From the Move group in the Home tab, click Rules. Click Manage Rules & Alerts. The Rules and Alerts dialog box opens.
The top of the Rules and Alerts box contains the following buttons for managing rules: New Rule, Change Rule, Copy (copying rules), Delete (delete rules), Run Rules Now (run a selected rule from the box), and Options. The middle section of the Rules and Alerts box is a list of all the current rules running or available in Outlook. The Phone List rule should appear with a check mark next to it. The bottom of the box shows a description of the currently selected rule and contains hyperlinks to sections of the rule that can you can click and edit.
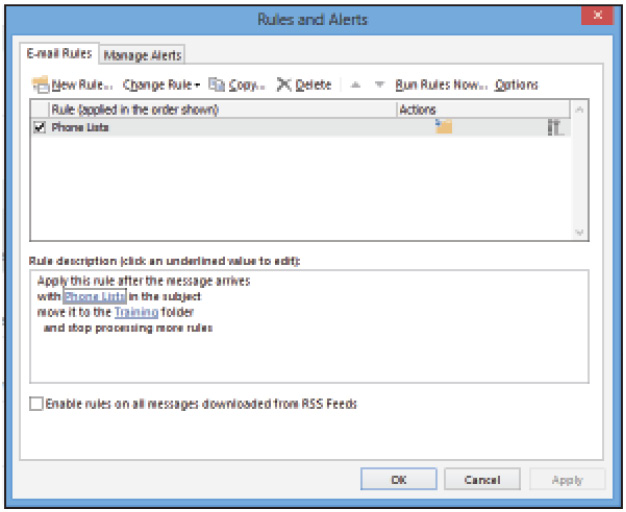
Rules and Alerts box open.
2 Click to clear the check box next to the Phone List rule to turn it off.
3 Click the Phone List rule to select it. Click Delete at the top of the Rules and Alerts to delete the rule. The Delete Rule box opens. Click OK.
Recurring appointments and meetings
It’s not uncommon for meetings and appointments set in Outlook to be recurring events. For example, a team project meeting could be a recurring meeting; a recurring appointment could be a dentist or doctor appointment, and so on. Remember, appointments are set just for you. Meetings involve multiple people and can be e-mailed to the people you want to invite to the meeting. Meetings and appointments can be created from any view in Outlook.
Creating a recurring appointment
You will create a recurring appointment.
1 From the Mail view, click New Items in the Home tab. Click Appointment; a new appointment box opens.
2 In the Subject box, enter Realtor Meeting.
3 In the Location box, enter 1234 Main St.
4 In the Options group on the Message tab, click Recurrence (the button looks like a circle with two arrows). The Appointment Recurrence dialog box opens.
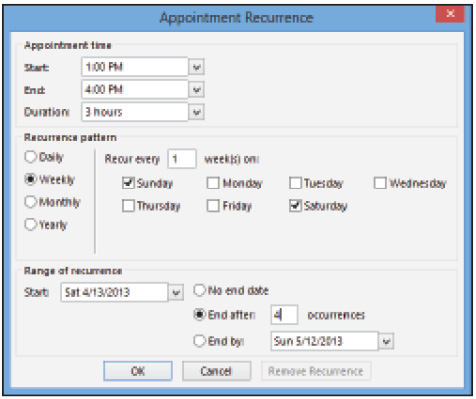
Creating a recurring appointment.
5 Select Start Time to be 1:00PM and an End Time to be 4:00PM. The Duration automatically indicates 3 hours.
6 Under the Recurrence pattern, select Weekly and Recur every 1 week on. Check off Sunday and Saturday. Under Range of recurrence, select a Start date of the following Saturday and select to End after 4 occurrences. Click OK.
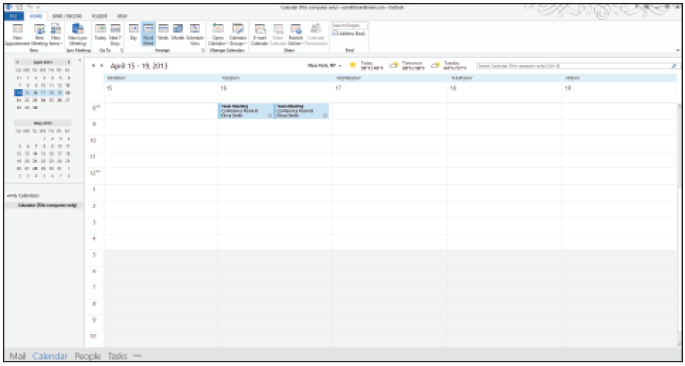
The recurring appointment is saved in your calendar. Go to the Calendar view and click the Start date you set for your appointment; you’ll see it displayed for the current week, and recurring for the following 4 weeks.
Creating a recurring meeting
A recurring meeting is similar to a recurring appointment; however, you can e-mail meetings, and they can be accepted or declined by invitees.
You will create a recurring meeting.
1 From the Mail view, click New Items and select Meeting. A new meeting box opens. Notice that it is addressed from your current e-mail address.
2 On the Meeting tab, in the Options group, Click Recurrence. The Appointment Recurrence box opens.

Creating a recurring meeting.
3 Set the Start to 8:00AM and the End to 9:00AM.
4 Set the Recurrence pattern to be Weekly and select Tuesday.
5 Set the Start to be the current end with no end date. Click OK
6 Back in the Meeting box, click the To and enter your e-mail address. In the Subject field, enter Team Meeting. In Location, enter Conference Room B.
7 Click Send. The Meeting is e-mailed to the invitee.
When meeting requests are received in the Inbox, they have a small calendar symbol next to them. This is an indicator that the message is a meeting request and not just a normal e-mail message.
Junk e-mail options
Receiving e-mail from unwanted parties is a very common occurrence today. Unwanted e-mail is often called Junk Mail or Spam. Outlook has a built-in system to help you manage the Junk mail that you might receive. The Junk mail menu allows you to block e-mail from specific senders and domains, and it allows you to unblock and receive content from senders and domains that you select as safe content. There are also junk mail options that will manage how Outlook deals with junk mail.
You will manage the junk e-mail options in Outlook.
Managing Junk e-mail
To manage Junk e-mail:
1 Select an e-mail message in your Inbox. From the Delete group in the Home tab, click Junk. The Junk menu appears with several options.

Junk E-mail Menu.
- • Block Sender: when a message is selected, this option blocks all incoming mail from that sender.
- • Never Block Sender: adds a selected message’s sender to a safe list.
- • Never Block Sender’s Domain (@example): allows any e-mail from a selected domain to always be accepted into Outlook.
- • Never block this group or Mailing list: allows all e-mail from a specific mailing group or list.
- • Not Junk: this option is grayed out because this option is only used to remove items from the Spam folder when they are placed there mistakenly.
- • Junk E-Mail Options: contains options for managing Outlook’s junk e-mail settings, such as where junk e-mail is sent, a safe senders list, a safe recipients list, a Blocked Senders list, and an International area.
2 Click Never Block Sender. A Microsoft Outlook Information box opens stating that The Sender of the Selected Message has been added to your Safe Senders List. Click OK.
To take this e-mail off your Safe Senders list, you can go into the Junk Email Options box, into the Safe Senders tab, and delete the e-mail address from that list.
Self study
1 Customize your Outlook window by going to the View tab and making adjustments to the Folder pane, Reading pane, and To-Do bar.
2 Reply and forward e-mail messages.
3 Create a recurring appointment or meeting.
4 Add e-mail addresses to your Safe Senders list using the Junk e-mail menu.
Review
Questions
1 What is the difference between a recurring appointment and recurring meeting?
2 Where does Outlook place Junk e-mail messages when they arrive in the Inbox?
3 What is another name for the People pane?
Answers
1 A recurring meeting occurs multiple times and is for multiple people. It can be e-mailed to invitees. A recurring appointment is for the creator of the appointment and can occur more than once.
2 Outlook places Junk e-mail in a folder called Spam.
3 Another name of the People pane is Outlook Social Connector. In Outlook 2013, the People pane can be connected to social networking sites such as Facebook and LinkedIn, so you can receive updates from your favorite social sites from within Outlook.