
OneNote Lesson 1: Microsoft OneNote 2013 Jumpstart
In this lesson, you will become familiar with Microsoft OneNote 2013. You will learn basic OneNote terminology, explore the program’s interface, create new notebooks, insert different types of information into OneNote notebooks, and use the search tool to locate information.
What you’ll learn in this lesson:
- • Understanding the functionalities
- • Exploring the interface
- • Performing searches
- • Customizing the OneNote user interface
- • Using the Help function
Starting up
You will not need to work with any files for this lesson.
Discovering OneNote
OneNote is one of the least known products in the Microsoft Office Suite. However, OneNote is a powerful organization tool very much like an electronic notebook or three-ring binder. OneNote is a data collection and organization tool that allows you to take a variety of data types and combine them into an electronic notebook. The different data types that can be organized from within OneNote include:
- • Text
- • Images
- • Audio
- • Video
- • Hyperlinks & web pages
- • Freehand sketches
OneNote is organized very similarly to a physical notebook, such as a three-ring binder that students use in a school setting. For example, OneNote Notebooks contain Sections, which in turn contain Pages that you can use to store your content. Just as is the case with three-ring binders, you can rearrange OneNote Notebook Sections and Pages as needed. OneNote has a user friendly design and is easy to customize to your personal needs.
OneNote can help you manage notes in situations where you would normally use a physical notebook. Here are some examples:
- • Vacation planning: maps, things to see, pictures, videos
- • Musician planner: songs, videos, pictures, gig calendar, band bios
- • Student notebook: Science, Algebra, Music, English
- • Event planning: venue locations, pictures, vendors, schedules
Exploring the OneNote environment
There are two main views in OneNote: Normal View (Notebook View) and Backstage View. The Notebook View appears when you open OneNote.
Opening OneNote
Open OneNote by doing one of the following:
- • Click Start > All Programs > Microsoft Office > Microsoft OneNote.
- • Click Start, type OneNote in the Search text box, and then click Microsoft OneNote 2013.
- • If there is a desktop shortcut for OneNote on your screen, double-click it.
OneNote opens in the Normal view, ready for you to begin creating Notebooks.
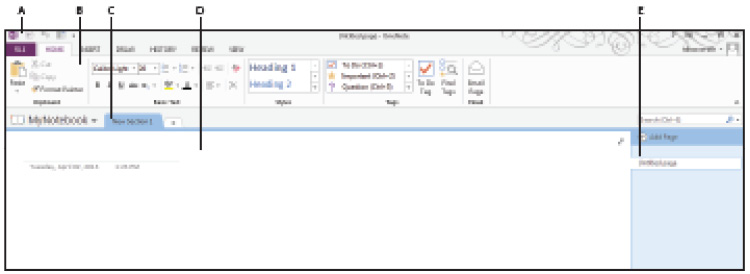
A. Quick Access Toolbar. B. Ribbon. C. Section tabs. D. Content pane. E. Pages pane.
About the Send to OneNote command
When you open OneNote 2013, a side command called Send to OneNote also opens; it appears next to the OneNote icon in the task bar at the bottom of your screen.
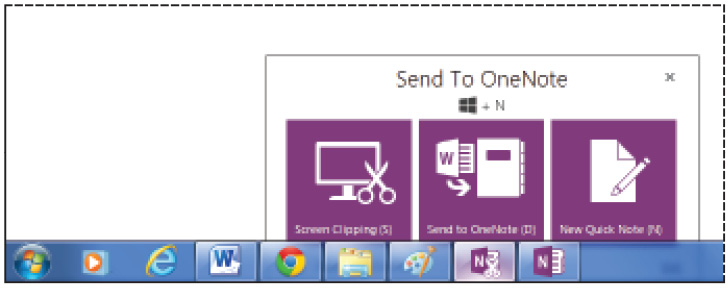
OneNote and Send to OneNote programs launched on the task pane.
The Send to OneNote command has the following three commands:
- • Screen Clipping: use it for creating a screen clipping of the current window and sending it directly to OneNote.
- • Send to OneNote: use to take the current information on your screen and insert it into OneNote.
- • New Quick Note: use it to type quick notes and add them to the QuickNotes section of OneNote.
You will use some of the functions on the Send to OneNote command in the next lesson.
Opening a new blank Notebook
Creating a new Notebook is similar to creating a database. You need to name the Notebook and save it before it can be opened, viewed, and edited.
1 From the Ribbon tabs, select File, and from the Backstage view, select New.
2 In New, select Computer and in the Notebook Name type text field type Las Vegas Trip.
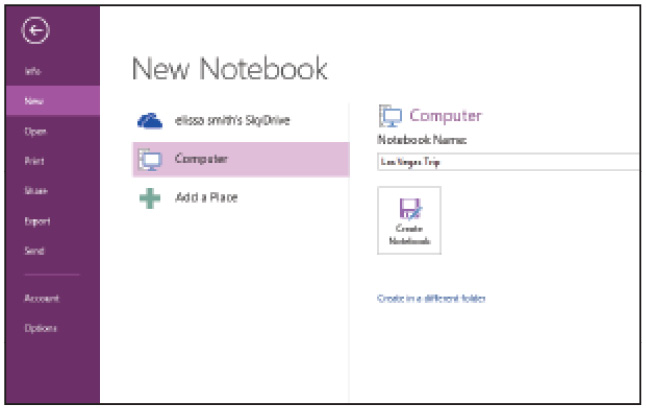
OneNote Open Notebook tab from the Backstage view. Open a new Notebook from the local computer or the network using the Browse button.
3 Click the text Create in a different folder, navigate to the OneNote01lessons folder, and click Create.
Normal (Notebook) view
Let’s take a closer look at the OneNote user interface and its components, and learn how to navigate in OneNote.
OneNote opens in the Normal view, displaying a page in a Notebook. The mouse cursor appears above a text placeholder that shows the current date and time. With the mouse cursor in this position, you can begin typing a title above the date.
The following components appear in the OneNote window:
Ribbon: if you have used other Microsoft Office 2013 programs, you will be familiar with the Ribbon tabs. Remember that you can minimize the Ribbon tabs and only see the tabbed headings. To open the Ribbon tabs again, double-click any of the tabbed headings. The Ribbon in OneNote contains the following headings:
- • Home: contains the most commonly used buttons for editing text in the Normal view.
- • Insert: for inserting other types of files and information into OneNote Notebooks, such as tables, images, audio, video, and images.
- • Draw: for creating and editing both hand and computer drawn images.
- • History: for organizing Shared Notebooks and different versions of Notebook files.
- • Review: contains the spell checker, thesaurus, and other tools for preparing a Notebook for printing, viewing, and sharing with others.
- • View: for viewing, zooming, and controlling the basic layout of the Notebook.
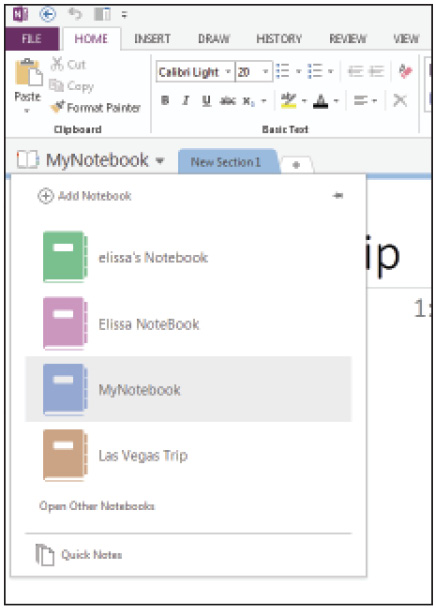
Notebook tab: located directly under the File and Home Ribbon tab commands, it is a drop-down list that shows all your open notebooks.
The Section tabs: found to the right of the Navigation bar and above the Notebook pane, these are a series of tabs that indicate the titles of the Notebook Sections. These Sections are analogous to the plastic tab dividers found in physical notebooks. For example, your high school Math notebook might have had separate sections for Lecture Notes, Problems, and Homework. You could create one OneNote Notebook for Math that has these Sections.
Content pane: most of the OneNote window is dedicated to the Content pane. This is the active page of the Notebook, in which you can add and view different types of content. The title of the active page appears at the top. For pages that you create, the date and time of the most recent update also appears.
Pages pane: located to the right of the Content pane, the Pages pane displays Pages and Subpages for the active Notebook.
 You can adjust the width of the Page pane by resting your mouse pointer on the left border. Your mouse pointer will turn into a double-headed arrow pointing left and right. You can drag it in either direction to make the Pages pane narrower or wider.
The OneNote window in Normal view with the Notebook tab open.
 The Pages pane will look different on each computer because they will have different Notebooks that were created on it.
Quick Access Toolbar: found in the upper-left corner of every Microsoft Office 2013 program interface, the Quick Access Toolbar contains buttons for selecting frequently used functions. By default, the OneNote Quick Access Toolbar contains the following buttons:
- • OneNote Logo: displays a drop-down menu with Window sizing options and the option to close OneNote.
- • Back: returns you to a previous Notebook or section.
- • Undo: it reverses the action you recently performed in OneNote.
- • Dock to Desktop: docks your current OneNote view to your computer’s Desktop.
- • Customize Quick Access Toolbar drop-down arrow: adds shortcut buttons to the toolbar.
![]()
The Quick Access Toolbar.
Working in Backstage view
While Normal (Notebook) view is where you do most of your work in OneNote, Backstage View is also important. The Backstage view is the place where you can manage a notebook by printing, saving, or even adjusting your personal Office account setting.
 The File tab, which displays Backstage view when clicked, always has a colored background, even when it is not the active tab. You can identify the active tab by the borders that appear on the left, right, and top of the active tab.
1 To display Backstage View, click the File tab.

Backstage View appears, with the Info command active.
The following list gives a brief overview of the tabs in Backstage view:
- • Info: manage and view Notebook properties; share and view synchronization status (if applicable); and open backup Notebook copies.
- • New: name and create a Notebook to be stored on the Web in your SkyDrive account or on your own computer or network.
- • Open: open a Notebook, either by browsing or selecting a recently closed Notebook.
- • Print: print from the Print dialog box and Print Preview from a separate Print Preview dialog box.
- • Share: share notebook by putting it on your SkyDrive or SharePoint location.
- • Export: save notebook as another files type, including OneNote 2007, PDF, XPS, MS Word, or as a Single webpage. You can then open these files in other applications.
- • Send: send the current Page as an e-mail, e-mail attachment, PDF, to MS Word, or to a web blog.
- • Account: manage your user account information and the Microsoft Office version you’re using.
- • Options: open the OneNote Options box to customize the OneNote software, such as the display, proofing options, the Ribbon tabs, the Quick Access Toolbar, security settings, and more.
Searching OneNote
One drawback of a physical notebook is that it can be difficult to find relevant information within it, despite the use of sections and tab dividers. Fortunately, OneNote has a powerful Search tool you can use to quickly find content.
To search the initial Notebook:
1 With your cursor blinking in your new Notebook, type Day 1 - Itinerary Bus Trip just above the current date and time. Click outside of the text box.
2 In the Search text box located in the upper-right corner, directly above the Pages pane, click the drop-down menu and select This Notebook.
 The default Search Scope is All Notebooks. To limit it to the present Notebook, click the drop-down menu and click This Notebook. Then click the drop-down menu again and click Set This Scope as Default.
3 Type bus trip in the Search text box.

Pages that contain the text bus appear as you type. The results are highlighted in the search results drop-down list.
4 Click the search result to display the page that bus trip was found on with the query text highlighted.
5 To clear the search result list, click outside the list.
Creating a new Notebook section
You can organize your data in OneNote Notebooks. One critical component of this is being able to create new Sections in your Notebooks as needed.
In this part of the lesson, you will organize the data in the Las Vegas Trip Notebook by adding a new Section. You can add a new Section by right-clicking existing Section tabs or by clicking the Create a New Section plus tab button directly to the right of the other section tabs.
You will now practice adding a new Section.
1 Right-click the section tab called New Section 1. From the shortcut menu that appears, select New Section.
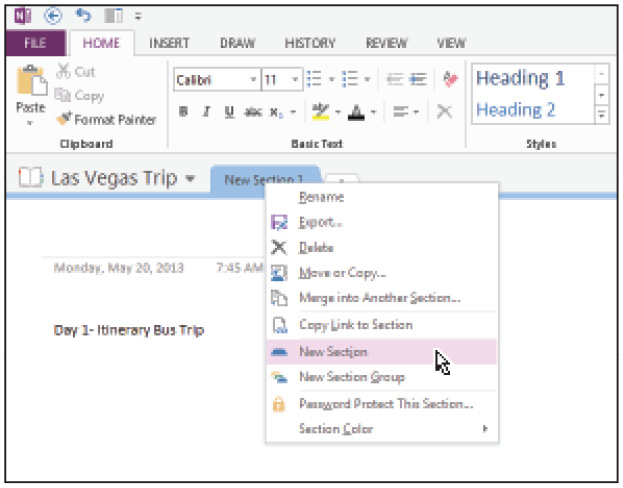
Right-click any existing Section tab to open the menu and add a new section by selecting the New Section option from the shortcut menu that appears.
A new Section tab called New Section 2 appears.
2 In the highlighted title field, type Day 2 Travel.
3 Click the Day 2 Travel Section tab. The new Section opens and the mouse cursor appears above the date heading, ready for you to type a Heading for the new Section.
4 Type Airport. The new page title, Airport, appears in the Page pane to the right of the Contents pane.
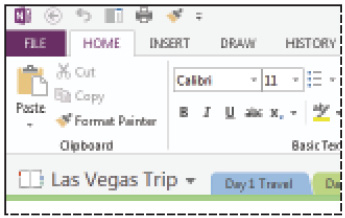
5 Double-click the New Section 1 tab and type Day 1 Travel to rename this section.
Customizing OneNote
You can customize OneNote components to suit your needs, just as you can with all Microsoft Office 2013 programs. The Quick Access Toolbar is a favorite customization area, because it allows you to place convenient one-click shortcuts to your favorite functions in OneNote.
Now you will customize the Quick Access Toolbar to include the Print and Format Painter buttons. If you have completed the Microsoft Word lessons, you will be familiar with this process.
To customize the Quick Access Toolbar:
1 Click the Customize Quick Access Toolbar button, which is the black arrow located at the far right of the toolbar.

The default appearance of the Quick Access Toolbar, showing the Customize button list open at the far right.
2 From the drop-down menu, select Print. The Print command appears in the Quick Access Toolbar.
3 Click the Customize Quick Access Toolbar button.
4 From the drop-down menu, select More Commands. The OneNote Options Quick Access Toolbar window opens and shows a lengthy list of popular commands.
5 Scroll down the list that’s located on the left side of the box under the Choose Popular Commands From until you find the command Format Painter, and then select it.
6 Click the Add button located in the middle of the box. The Format Painter now appears on the right side of the list of Quick Access Toolbar commands, below the newly added Print command.

The OneNote Options, Customize the Quick Access Toolbar box open and showing the two newly added buttons on the right side, under Customize Quick Access Toolbar List.
7 Click OK and notice the newly added commands on the Quick Access Toolbar.
The Quick Access Toolbar now displays both new commands.
Getting help
You can easily access the OneNote Help system when you need answers to a question or need help performing a task.
To access the Help system, press the F1 key or click the Help button. (The Help button is located in the top-right corner of the OneNote screen, directly to the left of the Ribbon Display Options button.)
Ending a OneNote session
To end a session, you can do one of the following:
1 Click the OneNote logo button located in the top-left corner of the program.

Close the program using the OneNote logo button located in the top-left corner.
2 Click the Close button located in the upper-right corner of the program interface.
 OneNote automatically saves the Notebook you are working in every time you edit content or design so you don’t have to.
Self study
1 Add more new buttons to the Quick Access Toolbar. Explore the More Commands option to discover the different shortcut options available to you.
2 Customize the Ribbon by right-clicking it and selecting Customize the Ribbon. Make some changes to its functionality and appearance.
3 Use the Search tool located above the Page pane to locate the text Airport in the Las Vegas Trip Notebook. Click the search results and jump to that section in the Notebook.
Review
Questions
1 True or False? The Ribbon can be minimized.
2 How do you widen the Pages pane?
3 True or False? The OneNote Search feature is only capable of searching the current Notebook.
Answers
1 True. One way the Ribbon can be minimized is by double-clicking the active tab.
2 You can widen the Page pane by resting your mouse pointer on its left border and dragging it to the left.
3 False. It can search This Section, This Section Group, This Notebook, or All Notebooks.