Reports in ArcGIS provide you with a way of presenting information about your data or analysis. Information in a report is displayed by using information pulled directly from an attribute table in a feature class or a standalone table. Reports can contain attribute information, maps, pictures, graphics, and other supporting information. ArcMap includes a Report Wizard and Report Designer that you can use to create and modify reports. You can also save the format of a report to a template file. This template file can be used repeatedly to generate new reports based on any changes in your data. Using a combination of a report template along with arcpy.mapping, you can automate the production of reports.
The Report Wizard in ArcGIS can be used to create reports. There are two native data formats for ArcGIS reports: Report Document File (RDF) and Report Layout File (RLF). RDF reports provide a static report of your data. A one-time snapshot, if you will. A RLF is a template file and is created using Report Designer. The report template file can be used repeatedly and includes all the fields in the report along with how they are grouped, sorted, and formatted. It also includes any layout elements, such as graphics or maps. When the report is rerun, the report regenerates based on the source data that is connected to the template. The arcpy.mapping ExportReport() function can be used to connect a data source to a template file to automate the creation of a report. In this recipe, you will learn how to use the ExportReport() function with the PDFDocument class to create a report that contains crime information for school districts. The report will include attribute information and a map of the boundaries of the school district.
To save some time on this recipe, I have precreated a report template (RLF) file for you to use. This file, called CrimeReport.rlf, is located in the c:ArcpyBookCh4 folder and contains attribute columns for the name of the school district, number of crimes, crime density, and test performance scores. In addition to this, a placeholder for a map containing the boundaries of the school district has also been added to the template.
Follow these steps to learn how to automate the production of reports using the arcpy.mapping ExportReport() function and the PDFDocument class:
- Create a new script file in IDLE or your favorite Python editor and save it as
c:ArcpyBookCh4CreateReport.py. - Import the
arcpyandosmodules and get the current working directory:import arcpy import os path = os.getcwd()
- Create the output PDF file:
#Create PDF and remove if it already exists
pdfPath = path + r"CrimeReport.pdf"
if os.path.exists(pdfPath):
  os.remove(pdfPath)
pdfDoc = arcpy.mapping.PDFDocumentCreate(pdfPath)
- Create a list of school districts. We'll loop through this list to create reports for each district:
districtList = ["Harlandale", "East Central", "Edgewood", "Alamo Heights", "South San Antonio", "Southside", "Ft Sam Houston", "North East", "Northside", "Lackland", "Southwest", "Judson", "San Antonio"]
- Get references to the map document, data frame, and layer:
mxd = arcpy.mapping.MapDocument(path + r"Crime_Ch4.mxd")
df = arcpy.mapping.ListDataFrames(mxd)[0]
lyr = arcpy.mapping.ListLayers(mxd, "Crime Density by School District")[0]
- Start a loop through the school districts and apply a
whereclause that acts as the definition query so that only the individual school district will be displayed:pageCount = 1 for district in districtList: #Generate image for each district whereClause = ""NAME" = '" + district + " ISD'" lyr.definitionQuery = whereClause
- Select the individual school district, set the data frame extent to the extent of the school district, and clear the selection set:
arcpy.SelectLayerByAttribute_management(lyr, "NEW_SELECTION", whereClause)
df.extent = lyr.getSelectedExtent()
arcpy.SelectLayerByAttribute_management(lyr, "CLEAR_SELECTION")
- Export the data frame to a bitmap (
.bmp) file:arcpy.mapping.ExportToBMP(mxd, path + "DistrictPicture.bmp", df) #single file
- Call the
ExportReport()function to create the report:#Generate report print("Generating report for: " + district + " ISD") arcpy.mapping.ExportReport(report_source=lyr, report_layout_file=path + r"CrimeLayout.rlf",output_file=path + r" emp" + str(pageCount) + ".pdf", starting_page_number=pageCount) - Append the report to the PDF file:
#Append pages into final output print("Appending page: " + str(pageCount)) pdfDoc.appendPages(path + r" emp" + str(pageCount) + ".pdf") - Remove the temporary PDF report:
os.remove(path + r"	emp" + str(pageCount) + ".pdf")
pageCount = pageCount + 1
- Save the PDF document:
pdfDoc.saveAndClose()
- The entire script should appear as follows:

- You can check your work by examining the
c:ArcpyBookcodeCh4CreateReport.pysolution file. - Save and run your script. This will create a file called
CrimeReport.pdfin yourc:ArcpyBookch4folder. The contents will contain one report page for each school district, as seen in this screenshot: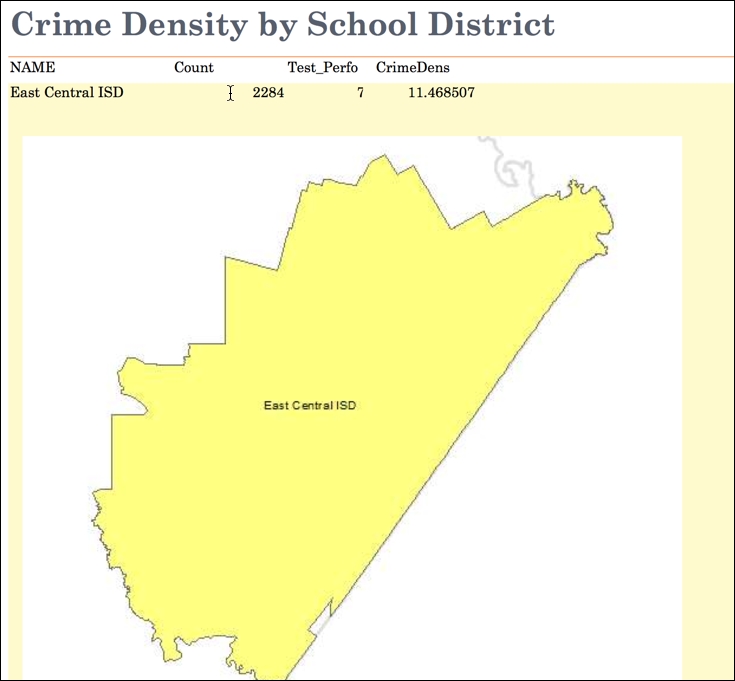
In this recipe, we used several functions and classes that are part of the arcpy.mapping module, including PDFDocument, ExportToReport() and ExportToBMP(). Initially, we used the PDFDocumentCreate() function to create an instance of PDFDocument, which holds a pointer to the CrimeReport.pdf file that we'll create. Next, we created a list of school districts and began a loop through each of them. Inside the loop, for each district, we set a definition query on the layer, selected the district, and returned the extent of the district that was used to set the extent of the data frame. A bitmap file was then created using the ExportToBMP() function and the report was generated with the ExportReport() function. Finally, each page was appended to the CrimeReport.pdf file and the document was saved.