Feature layers and table views serve as intermediate datasets held in memory specifically for use with tools, such as Select by Location and Select Attributes. Although these temporary datasets can be saved, they are not needed in most cases.
Feature classes are physical representations of geographic data and are stored as files (shapefiles, personal geodatabases, and file geodatabases) or within a geodatabase. Environmental Systems Research Institute (Esri) defines a feature class as "a collection of features that shares a common geometry (point, line, or polygon), attribute table, and spatial reference."
Feature classes can contain default and user-defined fields. Default fields include the SHAPE and OBJECTID fields. These fields are maintained and updated automatically by ArcGIS. The SHAPE field holds the geometric representation of a geographic feature, while the OBJECTID field holds a unique identifier for each feature. Additional default fields will also exist depending on the type of feature class. A line feature class will have a SHAPE_LENGTH field. A polygon feature class will have both, a SHAPE_LENGTH and a SHAPE_AREA field.
Optional fields are created by end users of ArcGIS and are not automatically updated by GIS. These contain attribute information about the features. These fields can also be updated by your scripts.
Tables are physically represented as standalone DBF (also known as dBase File Format) tables or within a geodatabase. Both, tables and feature classes, contain attribute information. However, a table contains only attribute information. There isn't a SHAPE field associated with a table, and they may or may not contain an OBJECTID field.
Standalone Python scripts that use the Select by Attributes or Select by Location tool require that you create an intermediate dataset rather than using feature classes or tables. These intermediate datasets are temporary in nature and are called feature layers or table views. Unlike feature classes and tables, these temporary datasets do not represent actual files on disk or within a geodatabase. Instead, they are an in-memory representation of feature classes and tables. These datasets are active only while a Python script is running. They are removed from memory after the tool has been executed. However, if the script is run from within ArcGIS as a script tool, then the temporary layer can be saved either by right-clicking on the layer in the table of contents and selecting Save As Layer File or simply by saving the map document file.
Feature layers and table views must be created as a separate step in your Python scripts before you can call the Select by Attributes or Select by Location tools. The Make Feature Layer tool generates the in-memory representation of a feature class, which can then be used to create queries and selection sets as well as join tables. After this step has been completed, you can use the Select by Attributes or Select by Location tool. Similarly, the Make Table View tool is used to create an in-memory representation of a table. The function of this tool is the same as Make Feature Layer. Both the Make Feature Layer and Make Table View tools require an input dataset, an output layer name, and an optional query expression, which can be used to limit the features or rows that are a part of the output layer. In addition to this, both tools can be found in the Data Management Tools toolbox.
The syntax to use the Make Feature Layer tool is as follows:
arcpy.MakeFeatureLayer_management(<input feature layer>, <output layer name>,{where clause})The syntax to use the Make Table View tool is as follows:
Arcpy.MakeTableView_management(<input table>, <output table name>, {where clause})In this recipe, you will learn how to use the Make Feature Layer and Make Table View tools. These tasks will be done inside ArcGIS, so that you can see the in-memory copy of the layer that is created.
Follow these steps to learn how to use the Make Feature Layer and Make Table View tools:
- Open
c:ArcpyBookCh7Crime_Ch7.mxdin ArcMap. - Open the Python window.
- Import the
arcpymodule:import arcpy
- Set the workspace:
arcpy.env.workspace = "c:/ArcpyBook/data/CityOfSanAntonio.gdb"
- Start a
tryblock:try:
- Make an in-memory copy of the Burglary feature class using the Make Feature Layer tool. Make sure you indent this line of code:
flayer = arcpy.MakeFeatureLayer_management("Burglary","Burglary_Layer") - Add an
exceptblock and a line of code to print an error message in the event of a problem:except Exception as e: print(e.message)
- The entire script should appear as follows:
import arcpy arcpy.env.workspace = "c:/ArcpyBook/data/CityOfSanAntonio.gdb" try: flayer = arcpy.MakeFeatureLayer_management("Burglary","Burglary_Layer") except Exception as e: print(e.message) - Save the script to
C:ArcpyBookCh7CreateFeatureLayer.py. - You can check your work by examining the
c:ArcpyBookcodeCh7CreateFeatureLayer.pysolution file. - Run the script. The new
Burglary_Layerfile will be added to the ArcMap table of contents: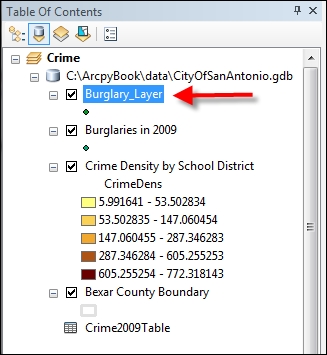
- The functionality of the Make Table View tool is equivalent to the Make Feature Layer tool. The difference is that it works against standalone tables instead of feature classes.
- Remove the following line of code:
flayer = arcpy.MakeFeatureLayer_management("Burglary","Burglary_Layer") - Add the following line of code in its place:
tView = arcpy.MakeTableView_management("Crime2009Table","Crime2009TView") - You can check your work by examining the
c:ArcpyBookcodeCh7CreateTableView.pysolution file. - Run the script to see the table view added to the ArcMap table of contents.
The Make Feature Layer and Make Table View tools create in-memory representations of feature classes and tables, respectively. Both, the Select by Attributes and Select by Location tools, require that these temporary, in-memory structures be passed as parameters when called from a Python script. Both tools also require that you pass a name for the temporary structures.
You can also apply a query to either the Make Feature Layer or the Make Table View tools to restrict the records returned in the feature layer or table view. This is done through the addition of a
where clause when calling either of the tools from your script. This query is similar to a situation where you set a definition query on the layer by navigating to Layer Properties | Definition Query.
The syntax to add a query is as follows:
MakeFeatureLayer(in_features, out_layer, where_clause)
MakeTableView(in_table, out_view, where_clause)