
Using the arcpy.mapping module, it is possible to publish your map document files to ArcGIS Server
as map services. ArcGIS Server is a platform to distribute maps and data on the Web. Using the ArcGIS JavaScript API, web and mobile applications can be created from services created in ArcGIS Server. For more information about ArcGIS Server, please visit the esri ArcGIS Server site at http://www.esri.com/software/arcgis/arcgisserver. There are several steps involved in creating a map service from a map document file. The map document file must first be analyzed for suitability and performance issues and any resulting errors must be fixed before final publication to ArcGIS Server. This process involves several steps including a call to an arcpy.mapping function along with the use of a couple of tools in ArcToolbox that can be called from your script. After errors have been fixed, you can then upload the resulting Service Definition Draft file to ArcGIS Server as a service.
The publication of a map document to ArcGIS Server with Python is a three-step process. The first step is to call the CreateMapSDDraft() arcpy.mapping function. This will convert a map document file to a Service Definition Draft file. This file contains a combination of a map document, information about the server, and a set of service properties. Information about the server includes the server connection or server type being published to, the type of service being published, metadata for the service, and data references. The draft service definition file does not contain data. CreateMapSDDraft() also generates a Python dictionary containing errors and warnings that could cause problems with the publication of the service.
The second step is to call the StageService Tool(.sd). Staging compiles the information needed to successfully publish the GIS resources. If your data is not registered with the server, it will be added when Service Definition Draft is staged. Finally, the Service Definition Draft file can be uploaded and published as a GIS service to a specified GIS server by using the UploadServiceDefinition Tool. This step takes the Service Definition file, copies it onto the server, extracts the required information, and publishes the GIS resource. Here is an illustration of this process:

Note that you will need to have access to an ArcGIS Server instance and also have the necessary privileges to publish a service to complete this exercise. In this recipe, you will learn how to publish a map document file to an ArcGIS Server map service.
Follow these steps to analyze a map document for suitability for publication to ArcGIS Server and then publish it as a map service:
- Create a new IDLE script and save it as
c:ArcpyBookCh4PublishMapService.py. - Import the
arcpy.mappingmodule:import arcpy.mapping as mapping
- Set the current workspace:
wrkspc = r'c:ArcpyBookCh4'
- Get a reference to the map document:
mxd = mapping.MapDocument(wrkspc + r"Crime.mxd")
- Define variables for the service name and Service Draft Definition file:
service = 'Crime'
sddraft = wrkspc + service + '.sddraft'
- Create the Service Definition Draft file:
mapping.CreateMapSDDraft(mxd, sddraft, service)
- Analyze the draft file:
analysis = mapping.AnalyzeForSD(wrkspc + "Crime.sddraft")
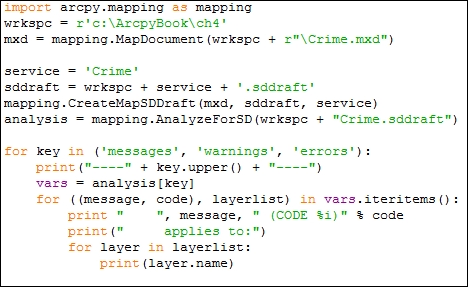
- Create a looping structure that will loop through all the potential messages, warnings, and errors, and print out the information:
for key in ('messages', 'warnings', 'errors'): print("----" + key.upper() + "----") vars = analysis[key] for ((message, code), layerlist) in vars.iteritems(): print " ", message, " (CODE %i)" % code print(" applies to:",) for layer in layerlist: print(layer.name) - The entire script should appear as follows:
- You can check your work by examining the
c:ArcpyBookcodeCh4PublishMapService.pysolution file. - Save and run your code to see this output:
----MESSAGES----
     Layer draws at all scale ranges  (CODE 30003)
     applies to: District_Crime_Join
Bexar_County_Boundary
District_Crime_Join
Bexar_County_Boundary
Bexar_County_Boundary
Texas_Counties_LowRes
School_Districts
Crime_surf
Bexar_County_Boundary
----WARNINGS----
     Layer's data source has a different projection [GCS_WGS_1984] than the data frame's projection  (CODE 10001)
     applies to: District_Crime_Join
Bexar_County_Boundary
District_Crime_Join
Bexar_County_Boundary
Bexar_County_Boundary
Texas_Counties_LowRes
School_Districts
Crime_surf
Bexar_County_Boundary
     Missing Tags in Item Description  (CODE 24059)
     applies to:      Missing Summary in Item Description (CODE 24058)
     applies to: ----ERRORS----
     Data frame uses a background symbol that is not a solid fill  (CODE 18)
Tip
You'll want to pay particular attention to the Errors section. Errors must be fixed before the service can be created. Warnings can indicate problems related to the performance of the service but they won't stop a service from being published. In this case, the error indicates that the data frame uses a background symbol that is not a solid fill. This will need to be corrected in ArcGIS before we can proceed.
- In ArcMap, open
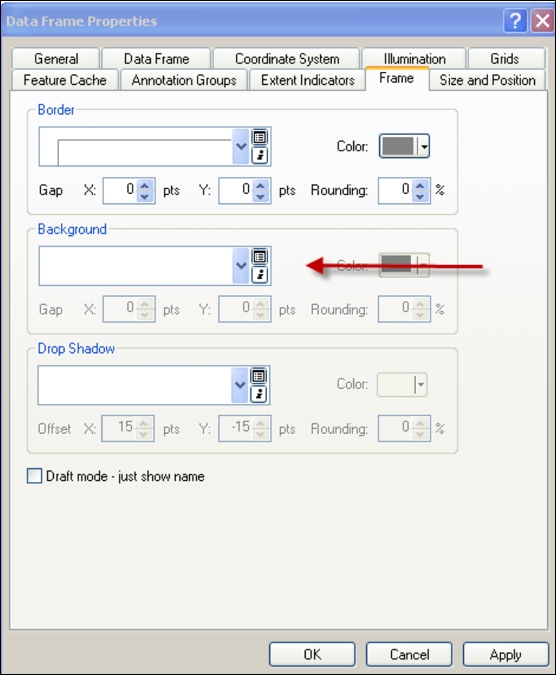
crime.mxdin thec:ArcpyBookch4folder and right-click on the Crime data frame and select Properties. - Select the Frame tab, as seen in this screenshot:

- Change the Background from the current symbol to none and click on OK:
- Repeat this process for each of the data frames in the map document.
- Rerun the script you just wrote. This time, you shouldn't see any errors. You do still have a warning that should probably be fixed as well, but warnings won't stop your map document from being published as a service.
- With all our errors fixed, we'll now convert the
Crime.mxdfile into aCrime.sdfile. Delete the looping structure that you added in step 6. - Add the following
if/elseblock of code. Note that I have commented on the line of code that calls theUploadServiceDefinitiontool. If you have access to an ArcGIS Server instance and have the appropriate privileges and connection information, you can uncomment this line to have it upload the file as a map service. You would also need to add the connection parameters for the instance in theconvariable, which is passed as the second parameter for this tool. Save and execute the script to see the results:if analysis['errors'] == {}: #execute StageService arcpy.StageService_server(sddraft,sd) #execute UploadServiceDefinition #arcpy.UploadServiceDefinition_server(sd, con) else: #if the sddraft analysis contained errors, display them print(analysis['errors']) - Your entire script should appear as follows:

- You can check your work by examining the
c:ArcpyBookcodeCh4PublishMapService2.pysolution file. - If you have access to an ArcGIS Server instance and have the necessary privileges, you can uncomment the
UploadServiceDefinitiontool and execute the script.
The CreateMapSDDraft() function creates a Service Definition Draft file from a map document file. Next, we call the AnalyzeForSD() function and examine the results that are returned for any messages, warnings, or errors. Any errors that are identified must then be fixed before the map service can be created. Finally, if no errors are present, we call the StageService tool that creates a Service Definition Draft file that can then be passed into the UploadServiceDefinition tool for publication to ArcGIS Server.