Tool add-ins are similar to buttons with the exception that tools require some type of interaction with the map. The zoom-in tool, for example, is a type of tool. Tools should be placed inside a toolbar or tool palette. The properties similar to those of a button. You'll also need to edit the Python script.
The Tool class has a number of properties, including cursor, enabled, and shape. The cursor property sets the cursor for the tool when it is clicked on, and is defined as an integer value corresponding to the cursor types, as follows:

By default, tools are enabled. This can be changed, though, by setting the enabled property to false. Finally, the shape property specifies the type of shape to be drawn and it can be a line, rectangle, or circle. These properties are typically set inside the constructor of the tool, which is defined by the __init__ method, as shown in the following code example. The self object refers to the current object (a tool in this case) and is a variable that refers to this current object:
def __init__(self):
  self.enabled = True
  self.cursor = 3
  self.shape = 'Rectangle'
There are a number of functions associated with the Tool class. All classes will have a constructor, which is used to define the properties for the class. You saw an example of this __init__ function earlier. Other important functions of the tool class include onRectangle(), onCircle(), and onLine(). These functions correspond to the shape that will be drawn on the map with the tool. The geometry of the drawn shape is passed into the function. There are also a number of mouse and key functions that can be used. Finally, the deactivate() function can be called when you want to deactivate the tool.
We've already seen the constructor for the Tool class in action. This function, called __init__, is used to set various properties for the tool when it is created. Here, we've also shown the onRectangle() function for the Tool class. This function is called when a rectangle is drawn on the map. The geometry of the rectangle is passed into the function along with a reference to the tool itself:
def onRectangle(self, rectangle_geometry):
In this recipe, you will learn how to create a tool add-in that responds to the user dragging a rectangle on the map. The tool will use the Generate Random Points tool to generate points within the rectangle.
Follow these steps to create a tool add-in with the ArcGIS Python Add-In Wizard:
- Open the ArcGIS Python Add-In Wizard by double-clicking on the
addin_assistant.exefile that is located in thebinfolder, where you extracted the wizard. - Create a new project folder called
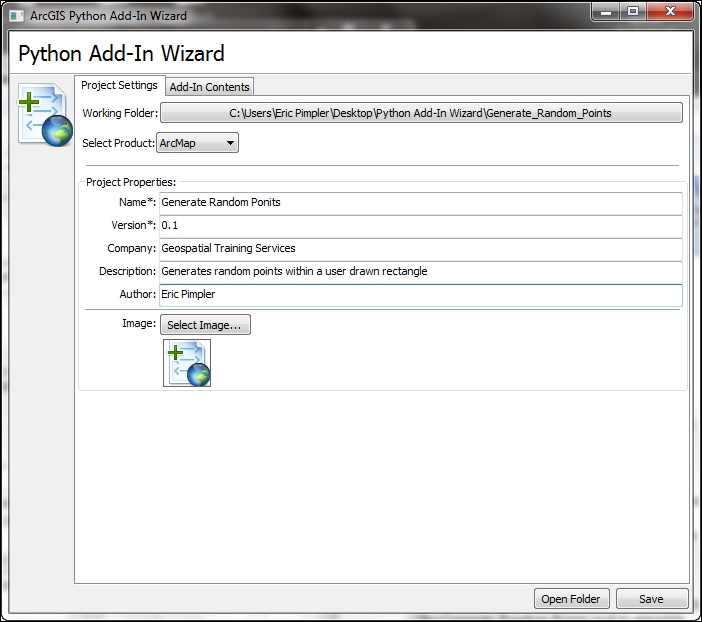
Generate_Random_Pointsand select OK. - Enter properties, including Name:, Version:, Company:, Description:, and Author:, in the Project Settings tab:
- Click on the Add-In Contents tab.
- Right-click on TOOLBARS and select New Toolbar.
- Set the caption for the toolbar to
Random Points Toolbar. - Right-click on the newly created
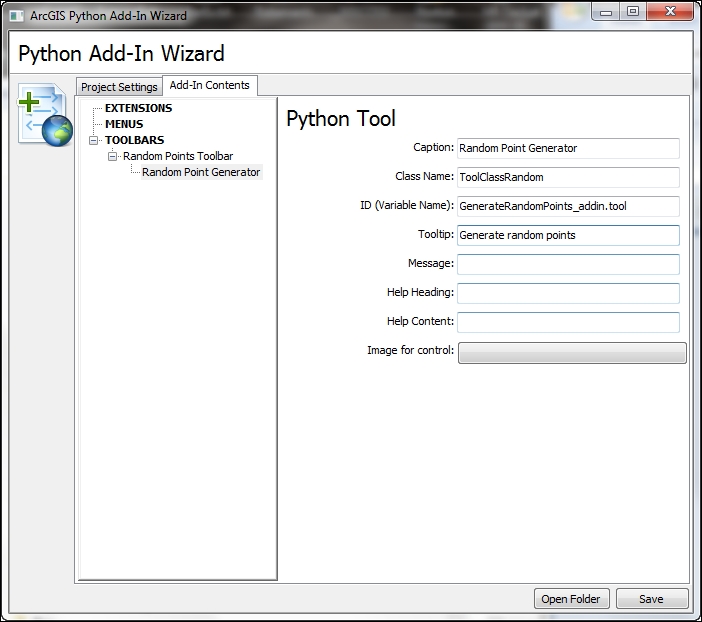
Random Points Toolbarand select New Tool. - Enter items for the tool as shown in the following screenshot:
- Click on Save. This will generate the folder and file structure for the add-in.
- Go to the
Installfolder for the new add-in and openGenerateRandomPoints_addin.pyin IDLE. - Add the following code to the
__init__function, which is the constructor for the tool:def __init__(self): self.enabled = True self.cursor = 3 self.shape = 'Rectangle'
- In the
onRectangle()function, write a code to generate a set of random points within the rectangle drawn on the screen:import arcpy import pythonaddins def __init__(self): self.enabled = True self.cursor = 3 self.shape = 'Rectangle' def onRectangle(self, rectangle_geometry): extent = rectangle_geometry arcpy.env.workspace = r'c:ArcpyBookCh10' if arcpy.Exists('randompts.shp'): arcpy.Delete_management('randompts.shp') randompts = arcpy.CreateRandomPoints_management(arcpy.env.workspace,'randompts.shp',"",rectangle_geometry) arcpy.RefreshActiveView() return randompts - Save the file.
- You can check your work by examining the
C:ArcpyBookcodeCh10GenerateRandomPoints_addin.pysolution file. - Generate the
.esriaddinfile by double-clicking on themakeaddin.pyfile in themainfolder for the add-in. - Install the add-in by double-clicking on
GenerateRandom_Points.esriaddin. - Open ArcMap and add the
Generate Random Pointstoolbar, if necessary. - Add the
BexarCountyBoundariesfeature class fromC:ArcpyBookdataCityOfSanAntonio.gdb. - Test the add-in by dragging a rectangle on the map. The output should appear similar to the following screenshot. Your map will vary because the points are generated randomly:

Tool add-ins are very similar to button add-ins with the difference being that tool add-ins require some sort of interaction with the map before the functionality is triggered. An interaction with the map can include a number of things, such as clicking on the map, drawing a polygon or rectangle, or performing various mouse or key events. Python code is written to respond to one or more of these events. In this recipe, you learned how to write a code that responds to the onRectangle() event. You also set various properties inside the constructor for the add-in, including cursor and shape, which will be drawn on the map.
There are a number of additional add-ins that you can create. The ComboBox add-in provides a drop-down list of values that the user can select from, or alternatively type a new value into an editable field. As with the other add-ins, you'll first want to create a new project with the Python Add-In Wizard, add a new toolbar, and then create a combo box to add to the toolbar.
The Tool Palette provides a way of grouping related tools. It does need to be added to an existing toolbar. By default, tools will be added to the palette in a grid-like pattern.
The Menu add-in acts as a container for buttons and other menus. Menus, in addition to being displayed by the ArcGIS for Desktop Add-in Manager, will also be displayed in the Customize dialog box for ArcGIS for Desktop.
Application extensions are used to add specific sets of related functionality to ArcGIS for Desktop. Several examples include Spatial Analyst, 3D Analyst, and Business Analyst. Typically, application extensions are responsible for listening for events and handling them. For example, you could create an application extension that saves the map document file each time a user adds a layer to the map. Application extensions also coordinate activities between components.