Along with being able to execute any of the available tools in your scripts, you can also create your own custom tools, which can also be called from a script. Custom tools are frequently created to handle geoprocessing tasks that are specific to an organization. These tools can be easily shared as well.
In this recipe, you will learn how to create custom geoprocessing script tools by attaching a Python script to a custom toolbox in ArcToolbox. There are a number of advantages of creating a custom script tool. When you take this approach, the script becomes a part of the geoprocessing framework, which means that it can be run from a model, command line, or another script. Also, the script has access to the environment settings and help documentation of ArcMap. Other advantages include a nice, easy-to-use user interface and error prevention capabilities. Error prevention capabilities that are provided include a dialog box that informs the user of certain errors.
These custom developed script tools must be added to a custom toolbox that you create, because the system toolboxes provided with ArcToolbox are read-only toolboxes, and thus can't accept new tools.
In this recipe, you are going to be provided with a prewritten Python script that reads wildfire data from a comma-delimited text file, and writes this information to a point feature class called FireIncidents. References to these datasets have been hardcoded, so you are going to have to alter the script to accept dynamic variable inputs. You'll then attach the script to a custom tool in ArcToolbox to give your end users a visual interface to use the script.
The custom Python geoprocessing scripts that you write can be added to ArcToolbox inside custom toolboxes. You are not allowed to add your scripts to any of the system toolboxes, such as Analysis or Data Management. However, by creating a new custom toolbox, you can add scripts in this way:
- Open ArcMap with an empty map document file and open the ArcToolbox window.
- Right-click anywhere in the white space area of ArcToolbox and select Add Toolbox.
- Navigate to the
C:ArcpyBookCh6folder. - In the Add Toolbox dialog box, click on the new toolbox button. This will create a new toolbox with a default name of
Toolbox.tbx; you will rename the toolbox in the next step:
- Name the toolbox
WildfireTools.tbx:
- Open the toolbox by selecting
WildfireTools.tbxand clicking on the Open button. The toolbox should now be displayed in ArcToolbox, as shown in the following screenshot:
- Each toolbox should be given a name and an alias. The alias will be used to uniquely define your custom tool. Alias names should be kept short and should not include any special characters. Right-click on the new toolbox and select Properties. Add an alias of
wildfire, as shown in the following screenshot: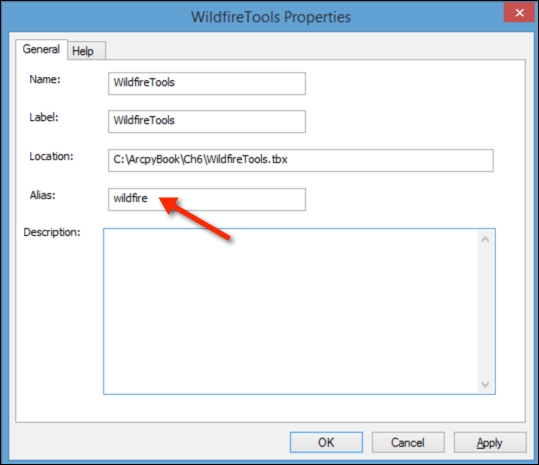
Note
You can optionally create a new toolset inside this toolbox by right-clicking on the toolbox and navigating to New | Toolset. Toolsets allow you to functionally group your scripts. In this example, it won't be necessary to do this, but if you need to group your scripts in the future, then this is how you can accomplish it.
- In this next step, we will alter an existing Python script called
InsertWildfires.pyto accept dynamic inputs that will be provided by the user of the tool through the ArcToolbox interface. Openc:ArcpyBookCh6InsertWildfires.pyin IDLE.Notice that we have hardcoded the path to our workspace as well as the comma-delimited text file containing the wildland fire incidents:
arcpy.env.workspace = "C:/ArcpyBook/data/Wildfires/WildlandFires.mdb" f = open("C:/ArcpyBook/data/Wildfires/NorthAmericaWildfires_2007275.txt","r") - Delete the preceding two lines of code.
In addition to this, we have also hardcoded the name of the output feature class:
cur = arcpy.InsertCursor("FireIncidents")This hardcoding limits the usefulness of our script. If the datasets move or are deleted, the script will no longer run. Additionally, the script lacks the flexibility to specify different input and output datasets. In the next step, we will remove this hardcoding and replace it with the ability to accept dynamic input.
- We will use the
GetParameterAsText()function found inarcpyto accept dynamic input from the user. Add the following lines of code to the try block, so that your code appears as follows:try: #the output feature class name outputFC = arcpy.GetParameterAsText(0) # template featureclass that defines the attribute schema fClassTemplate = arcpy.GetParameterAsText(1) # open the file to read f = open(arcpy.GetParameterAsText(2),'r') arcpy.CreateFeatureclass_management (os.path.split(outputFC)[0], os.path.split(outputFC)[1], "point", fClassTemplate)Notice that we call the
CreateFeatureClasstool, found in the Data Management Tools toolbox, passing theoutputFCvariable along with the template feature class (fClassTemplate). This tool will create the empty feature class containing the output feature class defined by the user. - You will also need to alter the line of code that creates an
InsertCursorobject. Change the line as follows:with arcpy.da.InsertCursor(outputFC) as cur:
- The entire script should appear as follows:
#Script to Import data to a feature class within a geodatabase import arcpy, os try: outputFC = arcpy.GetParameterAsText(0) fClassTemplate = arcpy.GetParameterAsText(1) f = open(arcpy.GetParameterAsText(2),'r') arcpy.CreateFeatureclass_management(os.path.split(outputFC)[0], os.path.split(outputFC)[1],"point",fClassTemplate) lstFires = f.readlines() with arcpy.da.InsertCursor(outputFC) as cur: cntr = 1 for fire in lstFires: if 'Latitude' in fire: continue vals = fire.split(",") latitude = float(vals[0]) longitude = float(vals[1]) confid = int(vals[2]) pnt = arcpy.Point(longitude, latitude) feat = cur.newRow() feat.shape = pnt feat.setValue("CONFIDENCEVALUE", confid) cur.insertRow(feat) arcpy.AddMessage("Record number" + str(cntr) + "written to feature class") cntr = cntr + 1 except: print arcpy.GetMessages() finally: f.close() - You can check your work by examining the
c:ArcpyBookcodeCh6InsertWildfires.pysolution file. - In the next step, we will add the script that we just created to the Wildfire Tools toolbox as a script tool.
- In ArcToolbox, right-click on the Wildfire Tools custom toolbox that you created earlier and navigate to Add | Script. This will display the Add Script dialog, as shown in the following screenshot. Give your script a name, label, and description. The Name: field can not contain any spaces or special characters. The Label: field is the name that shows up next to the script. For this example, give it a label of
Load Wildfires From Text. Finally, add some descriptive information that details the operations that the script will perform. - The details relating to Name:, Label:, and Description: are shown in the following screenshot:

- Click on Next to display the next input dialog box for Add Script.
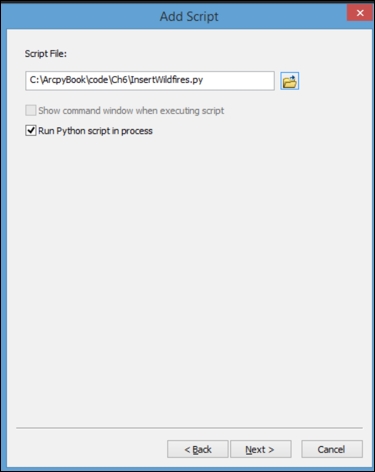
- In this dialog box, you will specify the script that will be attached to the tool. Navigate to
c:ArcpyBookCh6InsertWildfires.pyand addInsertWildfires.pyas the script. - You will also want to make sure that the Run Python script in process checkbox is selected, as shown in the following screenshot. Running a Python script in process. increases the performance of your script.
Note
Running a script out of process requires ArcGIS to create a separate process to execute the script. The time it takes to start this process and execute the script leads to performance problems. Always run your scripts in process. Running a script in process means that ArcGIS does not have to spawn a second process to run the script. It runs in the same process space as ArcGIS.
- Click on Next to display the parameter window, as shown in the following screenshot:
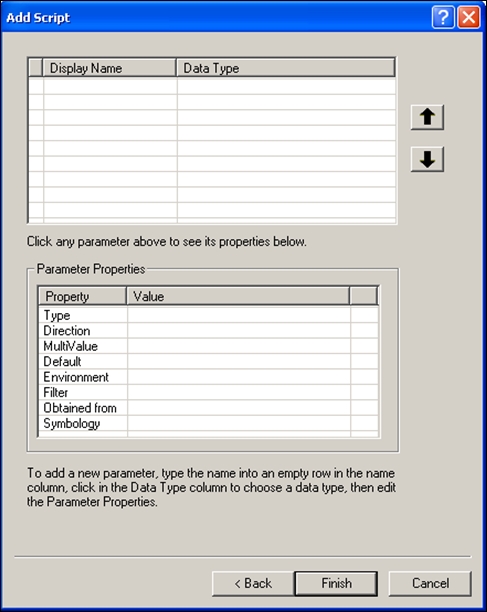
Each parameter that you enter in this dialog box corresponds to a single call to
GetParameterAsText(). Earlier, you altered your script to accept dynamic parameters through theGetParameterAsText()method. The parameters should be entered in this dialog box in the same order that your script expects to receive them. For instance, you inserted the following line of code in your code:outputFC = arcpy.GetParameterAsText(0)
The first parameter that you add to the dialog box will need to correspond to this line. In our code, this parameter represents the feature class that will be created as a result of this script. You add parameters by clicking on the first available row under Display Name. You can enter any text in this row. This text will be displayed to the user. You will also need to select a corresponding data type for the parameter. In this case, Data Type should be set to Feature Class, since this is the expected data that will be gathered from the user. Each parameter also has a number of properties that can be set. Some of the more important properties include Type, Direction, and Default.
- Enter the information, as shown in the following screenshot, into your dialog box, for the output feature class. Make sure that you set Direction to
Output:
- Next, we need to add a parameter that defines the feature class that will be used as the attribute template for our new feature class. Enter the following information in your dialog box:

- Finally, we need to add a parameter that will be used to specify the comma-delimited text file that will be used as an input in the creation of our new feature class. Enter the following information into your dialog box:

- Click on Finish. The new script tool will be added to your Wildfire Tools toolbox, as shown in the following screenshot:

- Now, we'll test the tool to make sure it works. Double-click on the script tool to display the dialog box, as shown in the following screenshot:

- Define a new output feature class, which should be loaded inside the existing
WildlandFires.mdbpersonal geodatabase, as shown in the next screenshot. Click on the open folder icon and navigate to theWildlandFires.mdbpersonal geodatabase, which should be located inc:ArcpyBookdataWildfires. - You will also need to give your new feature class a name. In this case, we'll name the feature class
TodaysWildfires, but the name can be whatever you'd like. In the following screenshot, you can see an example of how this should be done. Click on the Save button: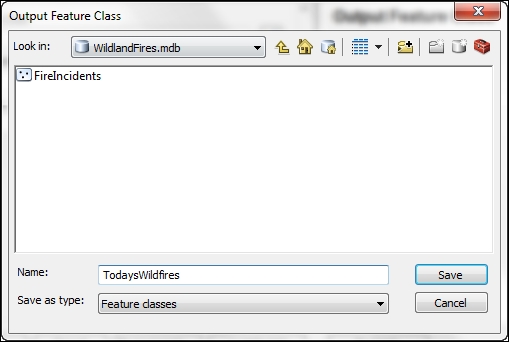
- For the attribute template, you will want to point to the
FireIncidentsfeature class that has already been created for you. This feature class contains a field calledCONFIDENCEVAL. This field will be created in our new feature class. Click on the Browse button, navigate toc:ArcpyBookdataWildfiresWildlandFires.mdb, and you should see theFireIncidentsfeature class. Select it and click on Add. - Finally, the last parameter needs to point to our comma-delimited text file containing wildland fires. This file can be found at
c:ArcpyBookdataWildfiresNorthAmericaWildfires_2007275.txt. Click on the Browse button and navigate toc:ArcpyBookdataWildfires. Click onNorthAmericaWildfires_2007275.txtand click on the Add button. Your tool should appear as follows: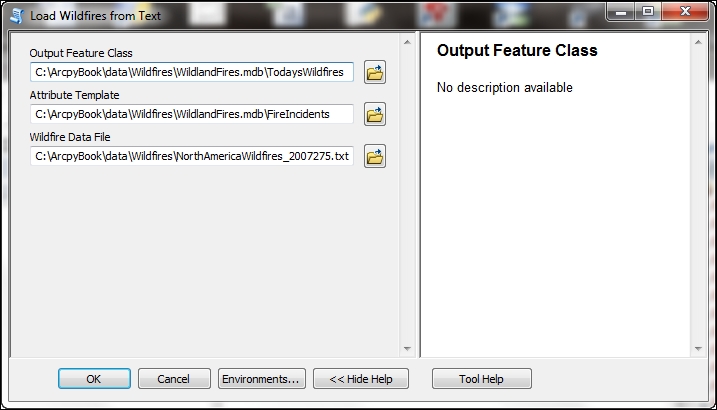
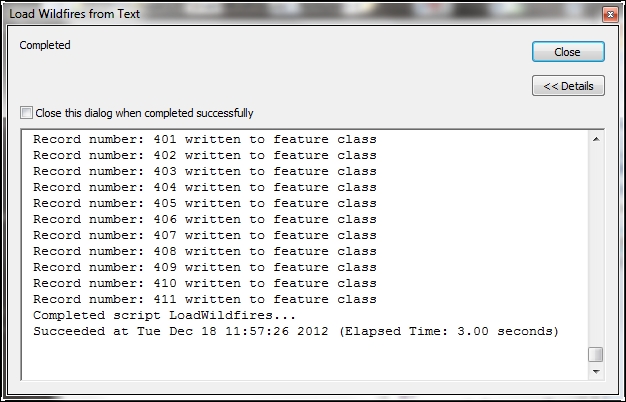
- Click on OK to execute the tool. Any messages will be written to the dialog box shown in the following screenshot. This is a standard dialog box for any geoprocessing tool.
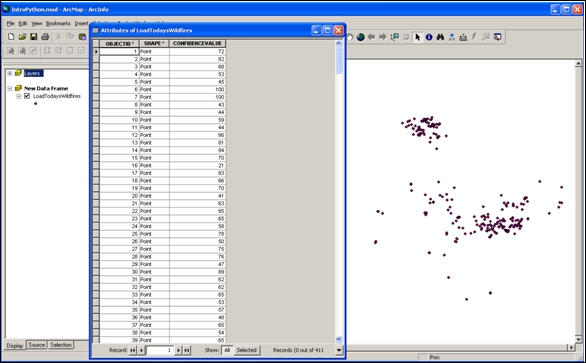
- If everything is set up correctly, you should see the following screenshot, which shows that a new feature class will be added to the ArcMap display:
- In ArcMap, select add basemap and then choose the Topographic
basemap. Click on the Add button to add thebasemaplayer.
This will provide a reference for the data that you have just imported, as seen in the preceding screenshot.
Almost all script tools have parameters, and the values are set for the tool dialog box. When the tool is executed, the parameter values are sent to your script. Your script reads these values and then proceeds with its work. Python scripts can accept parameters as input. Parameters, also known as arguments, allow your scripts to become dynamic. Up to this point, all of our scripts have used hardcoded values. By specifying input parameters for a script, you are able to supply the name of the feature class at runtime. This capability makes your scripts more versatile.
The GetParameterAsText() method, which is used to capture parameter input, is zero-based with the first parameter entered occupying a 0 index and each successive parameter is incremented by 1. The output feature class that will be created by reading the comma-delimited text file is specified in the outputFC variable, which is retrieved by GetParameterAsText(0). With GetParameterAsText(1), we capture a feature class that will act as a template for the output feature class attribute schema. The attribute fields in the template feature class are used to define the fields that will populate our output feature class. Finally, GetParameterAsText(2) is used to create a variable called f, which will hold the comma-delimited text file that will be read.
The arcpy.GetParameterAsText() method is not the only way to capture information passed into your script. When you call a Python script from the command line, you can pass in a set of arguments. When passing arguments to a script, each word must be separated by a space. These words are stored in a zero-based list object called sys.argv. With sys.argv, the first item in the list, referenced by the 0 index, stores the name of the script. Each successive word is referenced by the next integer. Therefore, the first parameter will be stored in sys.argv[1], the second in sys.argv[2], and so on. These arguments can then be accessed from within your script.
It is recommended that you use the GetParameterAsText() function rather than sys.argv, because GetParameterAsText() does not have a character limit, whereas sys.argv has a limit of 1,024 characters per parameter. In either case, once the parameters have been read into the script, your script can continue execution using the input values.