A Button add-in is the simplest type of add-in and is also the most commonly used. With button add-ins, the functionality that you code in your script is executed each time the button is clicked on.
Creating an add-in project is the first step in the creation of a new add-in. To create a project using the Python Add-In Wizard, you select a working directory, enter various project settings, and click on the Save button. Creation of the add-in then follows a well-defined process, as illustrated in the following screenshot:
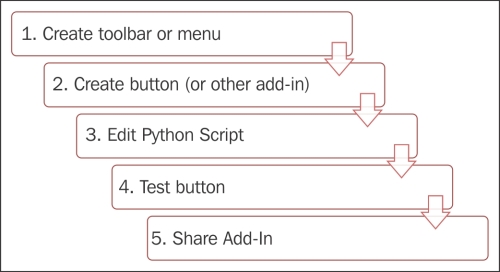
You must first create a container for the add-in and this can either be in the form of a toolbar or menu. Next, create the button, tool, or any other add-in that you want to add to the container. In this recipe, we'll create a button. Next, you need to edit the Python script that is associated with the button. You'll also want to test the button to make sure it works as expected. Finally, you can share the add-in with others. In this recipe, you'll learn how to use the Add-In Wizard to create a button add-in for ArcGIS for Desktop. The button add-in will execute code that uses the pythonaddins module to display a dialog that allows the user to add feature classes that have already been created for a data frame.
Follow these steps to learn how to create a button add-in:
- Open the ArcGIS Python Add-In Wizard by double-clicking on the
addin_assistant.exefile located in thebinfolder, where you extracted the wizard. - Create a new project folder called
Wildfire_Addinand select OK:
- The Project Settings tab should be active initially and display the working directory that you just created. By default, ArcMap should be the selected product, but you should verify that this is the case:

- Give your project a name. We'll call it
Load Wildfire Data Addin:
- By default, the Version: is 0.1. You can change this if you like. Version numbers should change as you update or make additions to your tool. This helps with the tracking and sharing of your add-ins:

- The Name: and Version: properties are the only two required properties. It's a good practice to go ahead and add the company, description, and author information, as shown in the following screenshot. Add your own information:

- You may also wish to add an image for the add-in. A file called
wildfire.pnghas been provided for this purpose in theC:ArcpyBookCh10folder: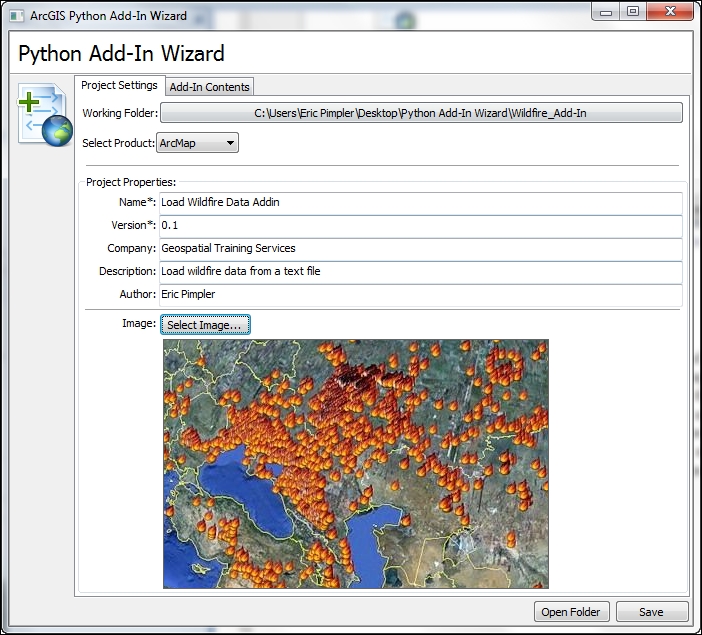
- The Add-In Contents tab is used to define the various add-ins that can be created. In this step, we're going to create a toolbar to hold a single button add-in that runs a wildfire script, which imports
firesfrom a text file to a feature class. Click on the Add-In Contents tab: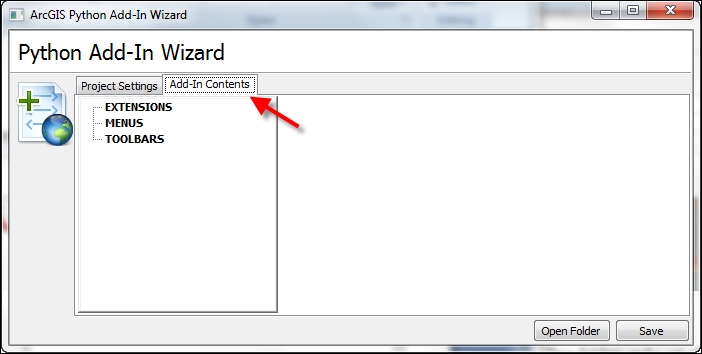
- In the Add-In Contents tab, right-click on TOOLBARS and select New Toolbar. Give the toolbar a Caption:, accept the default name, and make sure the Show Initially checkbox is selected:
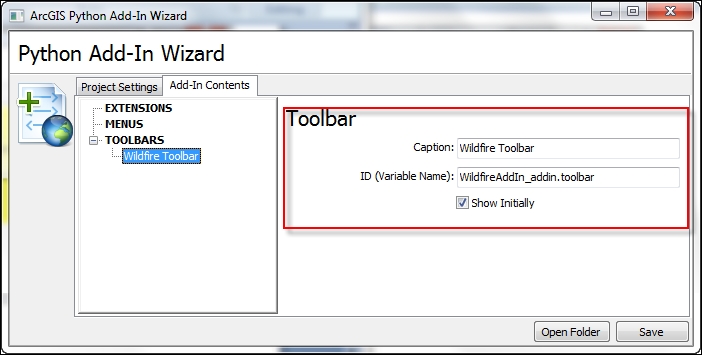
While it doesn't do a whole lot functionally, the Toolbar add-in is very important because it acts as a container for other add-ins, such as buttons, tools, combo boxes, tool palettes, and menus. Toolbars can be floating or docked. Creating a toolbar add-in is easy using the
Python Add-In Wizard. - Click on the Save button.
- Now, we'll add a button by right-clicking on the new Wildfire Toolbar option and selecting New Button.
- Fill in the Button details, including a Caption:, Class Name:, ID (Variable Name):, Tooltip:, and so on. You can also include an Image for control:. I haven't done so in this case, but you may choose to do this. This information is saved to the configuration file for the add-in:
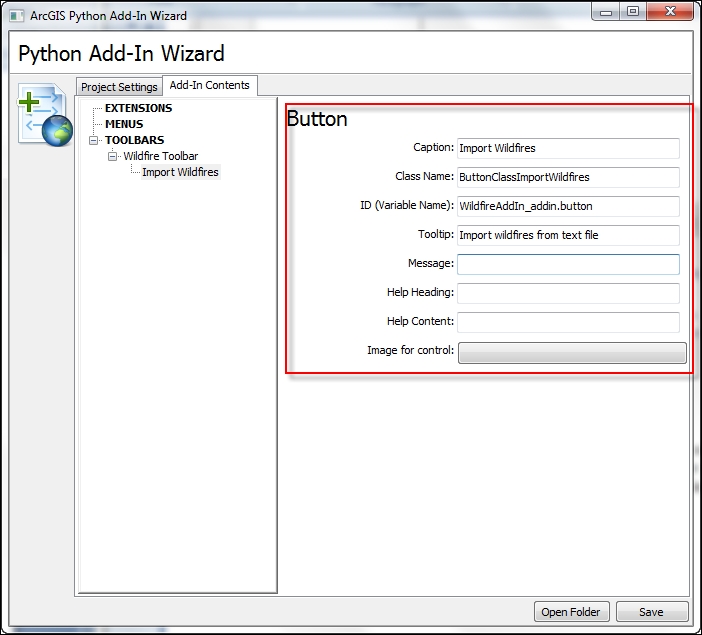
- Click on the Save button. Add-ins have a Python script that they are attached to. This file, by default, will be named
AddIns_addin.pyand can be found in theinstalldirectory of your working project folder. - We've already created a custom
ArcToolboxPython script tool that loads a comma-delimited text file from a disk containing wildfire data to a feature class. We will be using the results of this script in our add-in. In Windows Explorer, go to theaddindirectory that you created earlier. It should be calledWildfire_Addin. Go to theInstallfolder and you should find a file calledWildfireAddin_addin.py. Load this file into your Python editor. - In this next step, we'll write code that uses the
pythonaddinsmodule to open a dialog that allows you to add one or more layers to a selected data frame. TheOpenDialog()andGetSelectedTOCLayerorDataFrame()functions inpythonaddinsare used to accomplish this task. Find theonClick(self)method, which is shown in the following code snippet. This method is triggered when the button is clicked. Remove thepassstatement from theonClickevent and add this code:import arcpy import pythonaddins class ButtonClassImportWildfires(object): """Implementation for Wildfire_addin.button (Button)""" def __init__(self): self.enabled = True self.checked = False def onClick(self): layer_files = pythonaddins.OpenDialog('Select Layers to Add', True, r'C:ArcpyBookdataWildfires', 'Add') mxd = arcpy.mapping.MapDocument('current') df = pythonaddins.GetSelectedTOCLayerOrDataFrame() if not isinstance(df, arcpy.mapping.Layer): for layer_file in layer_files: layer = arcpy.mapping.Layer(layer_file) arcpy.mapping.AddLayer(df, layer) else: pythonaddins.MessageBox('Select a data frame', 'INFO', 0) - Save the file.
- You can check your work by examining the
C:ArcpyBookcodeCh10WildfireAddIn.pysolution file.
In the next recipe, you will learn how to install your new add-in.
As you've seen in this recipe, the Python Add-In Wizard handles the creation of the add-in through a visual interface. However, behind the scenes, the wizard creates a set of folders and files for the add-in. The add-in file structure is really quite simple. Two folders and a set of files comprise the add-in structure. You can see this structure in the following screenshot:

The Images folder contains any icons or other image files used by your add-in. In this recipe, we used the wildfire.png image. So, this file should now be in the Images folder. The Install folder contains the Python script that handles the business logic of the add-in. This is the file you will work with extensively to code the add-in. It performs whatever business logic needs to be performed by the buttons, tools, menu items, and so on. The config.xml file in the main folder of the add-in defines the user interface and static properties, such as the name, author, version, and so on. The makeaddin.py file can be double-clicked on to create the .esriaddin file, which wraps everything into a compressed file with an .esriaddin extension. This .esriaddin file is what will be distributed to end users, so that the add-in can be installed.