
In this recipe, you will learn how to time-enable a layer and data frame. You will then write a script that cycles through the time range for the layer and exports a PDF map showing crimes through time in seven-day intervals.
The DataFrameTime object provides access to time management operations for time-enabled layers in a data frame. This object is returned when you reference the DataFrame.time property, and includes properties for retrieving the current time, end time, start time, time step interval, and others that are established by using the Time Slider Options dialog box and then saved with the map document. One or more layers in a data frame must be time-enabled for this functionality to be operational.
Follow these steps to learn how to work with time-enabled layers:
- Open
c:ArcpyBookCh2Crime_Ch2.mxdwith ArcMap. - In the ArcMap Table Of Contents make sure
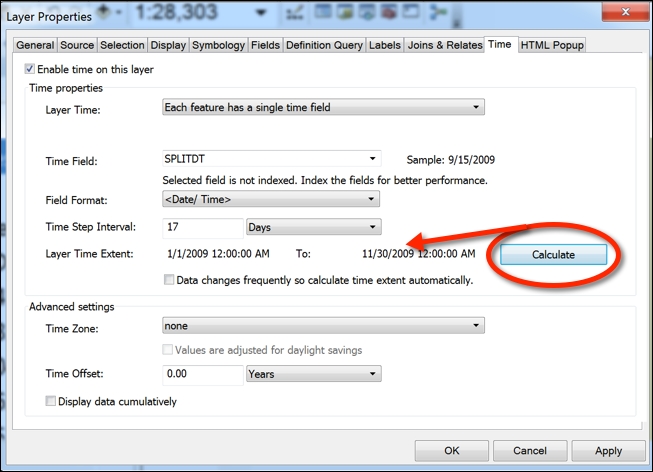
Crimeis the active data frame. - Open the Layer Properties dialog box for Burglaries in 2009 by right-clicking on the layer and selecting Properties. Select the Time tab, as shown in the following screenshot:

Enable time for the layer by clicking on the Enable time on this layer checkbox.
- Under Time properties, select Each feature has a single time field for Layer Time:. Select the SPLITDT field for the Time Field:. Define a Time Step Interval: of 7.00 Days, as shown in the following screenshot:

Define the Layer Time Extent: by clicking the Calculate button, circled in the following screenshot:
- Check the Time Step Interval: field. You may need to reset that to 7 Days.
- Click on Apply and then OK.
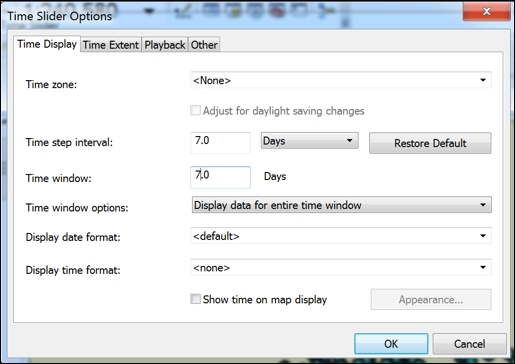
- In the ArcMap Tools toolbar, select the time slider options button to display the Time Slider Options dialog as shown in the following screenshot:

- On the Time Display tab of the Time Slider Options dialog, make sure Time step interval: is set to 7.0 days. If not, set it to 7.0 days. Do the same for the Time window: option.
- Click on OK.
- Save your map document. It's very important that you save the time-enabled data with your map document. The code you write next won't work unless you do so.
- Open the Python Window.
- Import the
arcpy.mappingmodule:import arcpy.mapping as mapping
- Reference the currently active document (
Crime_Ch2.mxd), and assign the reference to a variable:mxd = mapping.MapDocument("CURRENT") - Retrieve the
Crimedata frame:df = mapping.ListDataFrames(mxd, "Crime")[0]
- Generate the
DataFrameTimeobject:dft = df.time
- Set the
DataFrameTime.currentTimeproperty to theDataFrameTime.startTimeproperty:dft.currentTime = dft.startTime
- Start a
whileloop that will loop through the time while thecurrentTimeis less than or equal to theendTime:while dft.currentTime <= dft.endTime:
- Inside the while loop, create a file for each PDF that will be created, export the PDF, and reset the
currentTimeproperty. The entirewhileloop should appear as follows:while dft.currentTime <= dft.endTime: fileName = str(dft.currentTime).split(" ")[0] + ".pdf" mapping.ExportToPDF(mxd,os.path.join(r"C:ArcpyBookCh2", fileName), df) print("Exported " + fileName) dft.currentTime = dft.currentTime + dft.timeStepInterval - The entire script should appear as follows. You can consult the solution file at
c:ArcpyBookcodeCh2TimeEnabledLayers.pyto verify the accuracy of your code: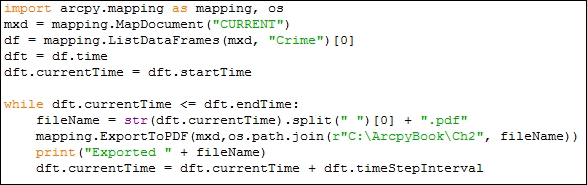
The
DataFrameTime object provides access to time management operations in a data frame. Several properties of DataFrameTime, including currentTime, startTime, endTime, and timeStepInterval, are used in this recipe. Initially, we set the currentTime property equal to the startTime property. The initial startTime was calculated when you set the Time Step Interval: properties in ArcMap. The while loop was set up to loop as long as the currentTime property is greater than the endTime property. Inside the loop, we created a fileName variable that is set to the currentTime property, plus an extension of .pdf. We then called the ExportToPDF() function, passing in a path and the filename. This should ideally export the page layout view to the PDF file. Finally, we updated the currentTime property by the timeStepInterval property that was set to 7.0 days in in the Time Step Interval: properties dialog.