Before using a tool in your geoprocessing script, you will need to make sure that you have access to this tool, based on the current license level of ArcGIS for Desktop that you are running or that your end users will run. In addition to this, any extensions you have licensed and enabled must be taken into consideration as well. This information is contained within the ArcGIS for Desktop help system.
The availability of geoprocessing tools for your script is dependent on the level of the ArcGIS license you are using. In version 10.3 of ArcGIS for Desktop, there are three license levels, namely basic, standard, and advanced. These were formerly known as ArcView, ArcEditor, and ArcInfo, respectively. It is important for you to understand the license level required for the tool that you want to use in your script. In addition to this, the use of extensions in ArcGIS for Desktop can result in the availability of additional tools for your script. There are two primary ways to find tools in ArcGIS for Desktop. The first is to use the search window and the second is to simply browse the contents of ArcToolbox. In this recipe, you will learn how to use the search window to find available geoprocessing tools that can be used in your scripts.
- Open
C:ArcpyBookCh5Crime_Ch5.mxdin ArcMap. - From the Geoprocessing menu item, select Search For Tools. This will display the Search window, as shown in the following screenshot. By default, you will be searching for Tools:

- Type the
Clipterm into the search textbox. As you begin typing this word, the search textbox will automatically filter the results based on the first few letters you type. You'll notice that forClip, there are three possible tools:clip(analysis), clip(coverage), andclip(data_management). There are a number of cases where there are several geoprocessing tools with the same name. To uniquely define a tool, the toolbox alias is attached to the tool name. We'll examine toolbox aliases in greater detail in the next recipe. - For now, click on the search button to generate a list of matching tools. The search should generate a list similar to what you see in the following screenshot. Tools are indicated by a hammer icon in the search results. You'll also see a couple of other icons in the search results. The scroll icon indicates a Python script, and an icon containing multicolored squares indicates a model:

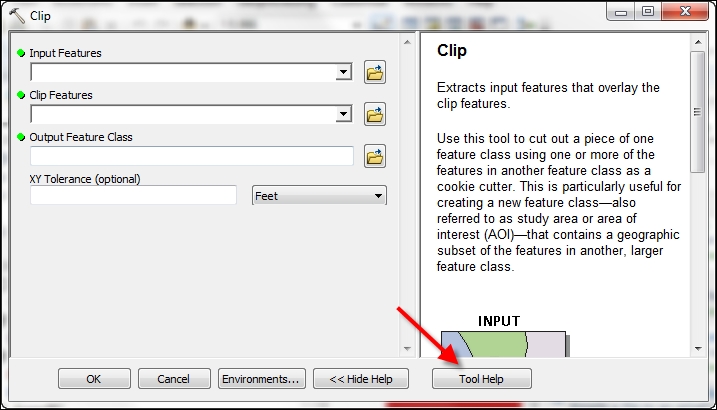
- Select the Clip (Analysis) tool. This will open the dialog box for the Clip (Analysis) tool. This isn't all that useful to you as a script programmer. You will probably be more interested in the help provided by ArcGIS for Desktop for a particular tool.
- Click on the Tool Help button at the bottom of the tool dialog box to display detailed information about this particular tool:
- Scroll down to the bottom of the help page for the Clip tool to examine the syntax for this particular tool.
The help system contains a summary, illustration, usage, syntax, code samples, available environment variables, related topics, and licensing information for each tool. As a geoprocessing script programmer, you will primarily be interested in the syntax, code samples, and licensing information sections near the bottom.
The syntax section contains information about how this tool should be called from your Python script, including the name of the tool and the required and optional input parameters. All the parameters will be enclosed within parentheses. The required parameters for the Clip tool are in_features, clip_features, and out_feature_class. When you call this tool from your script, you will be required to provide these parameters to the tool for it to execute correctly. The fourth parameter is an optional parameter called cluster_tolerance. Parameters marked as optional in the syntax are surrounded by curly braces. The following screenshot provides an example of an optional parameter surrounded by curly braces. This doesn't mean that you enclose the parameter in curly braces when you call the tool. It is in the help section simply to indicate that this parameter is optional when being called from your geoprocessing script:
