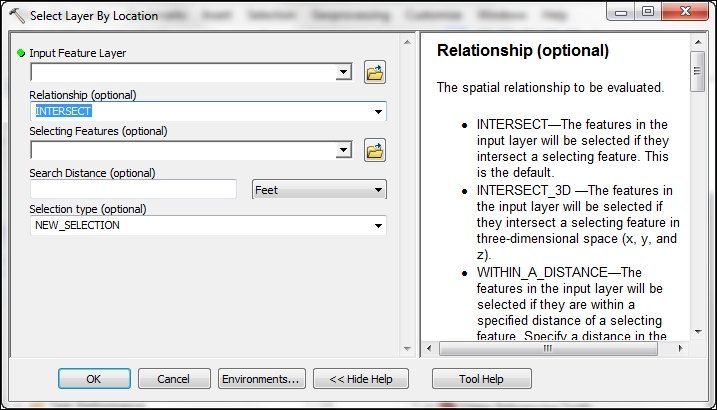
The Select Layer by Location tool, as shown in the next screenshot, can be used to select features based on some type of spatial relationship. Since it deals with spatial relationships, this tool only applies to feature classes and their corresponding in-memory feature layers.
There are many different types of spatial relationships that you can apply while selecting features using the Select by Location tool, including intersect, contains, within, boundary touches, is identical, and many others. If it's not specified, the default intersect spatial relationship will be applied. The input feature layer is the only required parameter, but there are a number of optional parameters, including the spatial relationship, search distance, a feature layer, or feature class to test against the input layer, and a selection type. In this recipe, you will learn how to use the Select by Location tool in a Python script to select features based on a spatial relationship. You'll use the tool to select burglaries that are within the boundaries of the Edgewood school district.
Follow these steps to learn how to perform a spatial query using the Select by Location tool:
- Open IDLE and create a new script window.
- Save the script to
c:ArcpyBookCh7SelectByLocation.py. - Import the
arcpymodule:import arcpy
- Set the workspace to the City of San Antonio geodatabase:
arcpy.env.workspace = "c:/ArcpyBook/data/CityOfSanAntonio.gdb"
- Start a
tryblock:try:
- Make an in-memory copy of the
Burglaryfeature class:flayer = arcpy.MakeFeatureLayer_management("Burglary","Burglary_Layer") - Call the Select Layer by Location tool passing in a reference to the feature layer we just created. The spatial relationship test will be
COMPLETELY_WITHIN, meaning that we want to find all burglaries that are completely within the boundaries of the comparison layer. DefineEdgewoodSD.shpas the comparison layer:arcpy.SelectLayerByLocation_management (flayer, "COMPLETELY_WITHIN", "c:/ArcpyBook/Ch7/EdgewoodSD.shp")
- Print the number of selected records in the layer using the Get Count tool:
cnt = arcpy.GetCount_management(flayer) print("The number of selected records is: " + str(cnt)) - Add an
exceptblock and a line of code to print an error message in the event of a problem:except Exception as e: print e.message
- The entire script should appear as shown in the following code snippet. Remember to include indentation with the
tryandexceptblocks:import arcpy arcpy.env.workspace = "c:/ArcpyBook/data/CityOfSanAntonio.gdb" try: flayer = arcpy.MakeFeatureLayer_management("Burglary","Burglary_Layer") arcpy.SelectLayerByLocation_management (flayer, "COMPLETELY_WITHIN", "c:/ArcpyBook/Ch7/EdgewoodSD.shp") cnt = arcpy.GetCount_management(flayer) print("The number of selected records is: " + str(cnt)) except Exception as e: print("An error occurred during selection") - Save the script.
- You can check your work by examining the
c:ArcpyBookcodeCh7SelectByLocation_Step1.pysolution file. - Run the script. If everything was done correctly, you should see a message indicating that
1470records have been selected:The total number of selected records is: 1470In this case, we did not define the optional search distance and selection type parameters. By default, a new selection will be applied as the selection type. We didn't apply a distance parameter in this case, but we'll do this now to illustrate how it works.
- Update the line of code that calls the Select Layer by Location tool:
arcpy.SelectLayerByLocation_management (flayer, "WITHIN_A_DISTANCE", "c:/ArcpyBook/Ch7/EdgewoodSD.shp","1 MILES")
- Save the script.
- You can check your work by examining the
c:ArcpyBookcodeCh7SelectByLocation_Step2.pysolution file. - Run the script. If everything was done correctly, you should see a message indicating that
2976records have been selected. This will select all burglaries within the boundaries of the Edgewood school district along with any burglaries within one mile of the boundary:The total number of selected records is: 2976
The final thing you'll do in this section is use the Copy Features tool to write the temporary layer to a new feature class.
- Comment out the two lines of code that get a count of the number of features and print them to the screen:
## cnt = arcpy.GetCount_management(flayer) ## print("The number of selected records is: " + str(cnt)) - Add a line of code that calls the Copy Features tool. This line should be placed just below the line of code that calls the Select Layer by Location tool. The Copy Features tool accepts a feature layer as the first input parameter and an output feature class, which in this case will be a shapefile called
EdgewoodBurglaries.shp:arcpy.CopyFeatures_management(flayer, 'c:/ArcpyBook/Ch7/EdgewoodBurglaries.shp')
- The entire script should now appear as shown in the following code snippet. Remember to include indentation with the
tryandexceptblocks:import arcpy arcpy.env.workspace = "c:/ArcpyBook/data/CityOfSanAntonio.gdb" try: flayer = arcpy.MakeFeatureLayer_management("Burglary","Burglary_Layer") arcpy.SelectLayerByLocation_management (flayer, "WITHIN_A_DISTANCE", "c:/ArcpyBook/Ch7/EdgewoodSD.shp","1 MILES") arcpy.CopyFeatures_management(flayer, 'c:/ArcpyBook/Ch7/EdgewoodBurglaries.shp') #cnt = arcpy.GetCount_management(flayer) #print("The total number of selected records is: " + str(cnt)) except Exception as e: print(e.message) - Save the script.
- You can check your work by examining the
c:ArcpyBookcodeCh7SelectByLocation_Step3.pysolution file. - Run the script.
- Examine your
c:ArcpyBookCh7folder to see the output shapefile.
The Select by Location tool requires that a feature layer be passed as the first parameter. In this recipe, we pass a feature layer that was created by the Make Feature Layer tool in the preceding line. We used Make Feature Layer to create a feature layer from the Burglary feature class. This feature layer was assigned to the flayer variable, which is then passed into the Select by Location tool as the first parameter. In this script, we've also passed a parameter that indicates the spatial relationship that we'd like to apply. Finally, we've also defined a source layer to use for the comparison of the spatial relationship. Other optional parameters that can be applied include a search distance and a selection type.