
As you know now, a Cognos Report is an XML definition. When you create or update a report in Report Studio, the corresponding XML tags are added to or modified in the report specification. However, it is possible to directly add or modify XML tags that are not visible from the studio as an object or property.
In this recipe, we will see how to define crosstab row level formatting in the XML to save the development and maintenance time.
There is a crosstab report with many measures on columns. The business wants to highlight the rows which belong to costly products (>25 units). Instead of defining conditional formatting for every column, we will modify the XML here to directly define row level formatting.
Create a report with product name on rows and various measures on columns, shown as follows:
- Define a conditional variable of Boolean type to identify costly products (which are to be highlighted in the report).

Call this variable as
Is_Costly. - Now select the first column Quantity. Attach the conditional variable
Is_Costlyto it as Style variable. Define the appropriate formatting for this column for both the conditions (Yes and No). We have already talked about defining conditional styles in prior chapters. - Now copy the report to clipboard and paste in a new file in an XML editor. I have used Visual Studio for this purpose.
- Run a search for
<conditionalStyles>tag. You will find this element under Quantity data item. - Copy the whole element, that is from
<conditionalStyles>to</conditionalStyles>.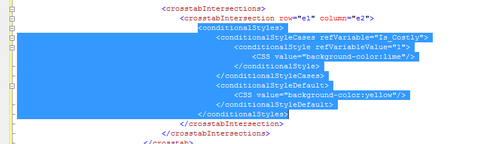
- Now locate the
<crosstabRows>element. You will see that it has a<crosstabNodeMember>defined for product name.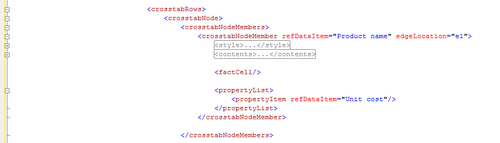
- Replace the empty
<factCell/>with the following code:<factCell></factCell> - Now paste the
<conditionalStyles>tag copied in step 5 within the<factCell>element. The code will now look like this.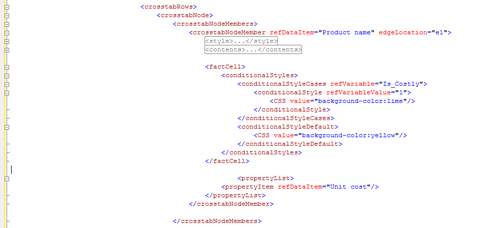
- Copy the whole XML back on clipboard and open in Report Studio.
- Run the report to test it.

As you can see, the whole row is formatted based on the condition.
In Report Studio, there is no option to select and modify whole row in crosstab. Hence, if we want to do any row level formatting, we need to do it for each column.
However, if you examine the report XML, you will notice that it has an element for fact cells under crosstab rows. Here we are overriding this element and defining our own style to be applied for every fact cell within that row.
Instead of manually writing the whole conditional style code, we have first applied Conditional style on one column (quantity) and then copied the same under "Crosstab rows" so that it is applied on all the columns.
This recipe will save your development time as you don't have to define the conditional styling for every column. Also, in future if styling needs to be changed, it can be changed from just one place than doing so for every column. Hence, it will save maintenance time as well.
You can also experiment with the <crosstabColumns> tag to style whole column, when there are multiple members on rows.
For conditional formatting basics, please refer to Chapter 1, Report Authoring Basic Concepts.