We often want to record the exact time taken by a report to execute. This recipe will show you a technique that is tried and tested and can be used repeatedly to examine the performance of a report at different loads and volumes on the data source.
Take any report whose execution time is to be recorded. The steps for this recipe are to be carried out in Cognos Connection portal, not Cognos Report Studio.
- Go to Connection Portal and locate the report.
-
Click on the Create Report View button
 and create a report view of this report in the desired location.
-
Open the Properties of the report view by clicking Set Properties button.

- Go to the Report View tab. Uncheck the Prompt for values option.
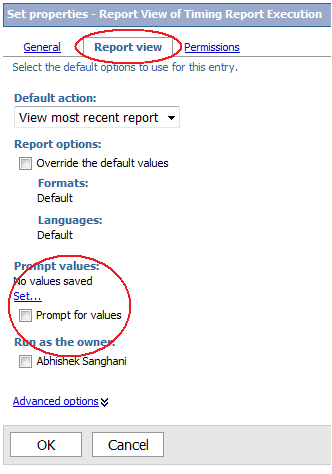
- Click on the Set link for Prompt values. This will bring the prompt page up.
- Select the prompt values and save them. Click the OK button to come back to the list of reports and report views.
-
Now click on the Run with options button
 and choose following options:
- Format: PDF
- Delivery: Save the report
- Uncheck the option of prompt for values
Click the Run button.
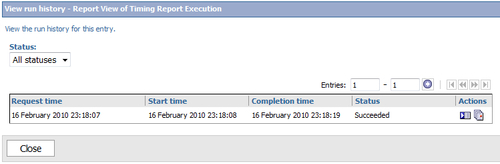
- Now open the Schedule Management or Past Activities view. Once the report is executed, record the Start time and Completion time.
Here we are creating a report view so that prompt values can be saved and then we run it in the background so that timing can be noted from schedule management.
Report view sits on top of the report. You can set different properties for it (delivery method, output format, and so on) as well as the prompt values; without affecting the actual report. If the main report is updated, the changes are automatically reflected in the view.
When we choose the delivery method as 'Save Report Output', the report execution happens in the background using the batch processing service. Using the schedule management view (or Past Activities view in version 8.4), we can see when exactly the report execution started and when it ended. This gives us the exact time taken by the report to execute.
When users use the report interactively, they tend to prefer output in HTML format. This retrieves only a pageful of data at a time, and hence the time taken to produce the first page does not accurately reflect the time that will be required to generate the whole report. Also, checking the time manually can be error prone. Hence it is advisable to use the scheduler as shown in the recipe, and do several runs with different prompt selections, to record the execution timings.
You can create multiple report views of the same report to choose different prompt values and output formats.
Also, whenever you want to run performance tests on a particular data source, you can create a job to run all the report views against that data source. This will allow you to record the timings for all and compare them with prior runs.