
Workflow is what JIRA uses to model business processes. It is a flow of states (steps ) that issues go through one by one with paths between them (transitions). All issues in JIRA are based on their issue type and the project they are in, and they have a workflow applied. Issues move through workflows from one step (for example, Open) to another (for example, Closed). For this reason, it is sometimes referred to as the life cycle of issues. This life cycle is shown in the following diagram:

The preceding diagram shows a very simple workflow in JIRA. The rectangles represent the steps and the arrows represent transitions that link steps together. As you can see, this looks a lot like a normal flow chart depicting the flow of a process.
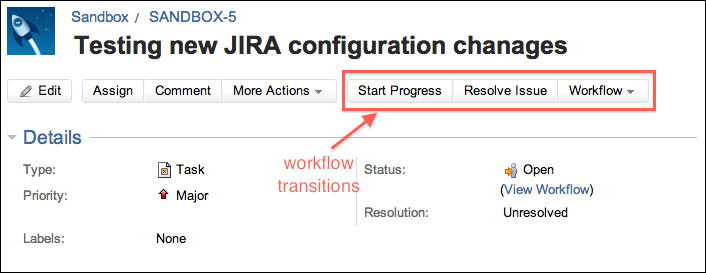
Issues in JIRA, starting from when they are created, go through a series of steps identified as issue statuses , such as In Progress and Closed. These movements are often triggered by user interactions. For example, when a user clicks on the Start Progress link, the issue is transitioned to the In Progress step as shown in the following screenshot:
There is a definitive start of a workflow, which is when the issue is first created, but the end of a workflow can sometimes be ambiguous. For example, in the default workflow, issues can go from Open to Closed, and to Reopened and back to Closed again. By convention, when people talk about the end of a workflow, it usually refers to a step named Closed or the step where issues are given a resolution.
Workflows are controlled and managed centrally from the JIRA Administration console, so you need to be an administrator to create and configure workflows. To manage workflows you need to perform the following steps:
- Log in to JIRA as a JIRA Administrator.
- Click on Administration from the top menu bar.
- Select Workflows under the Workflows section to bring up the View Workflows page.
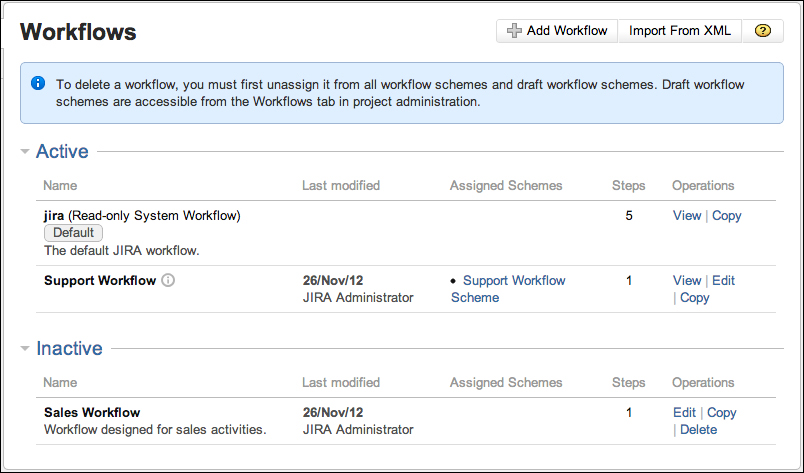
From the View Workflows page, you will be able to see a list of all the available workflows. You can also create new workflows, and manage existing workflows.
Workflows can have the following three statuses:
- Active – this status means the workflow is currently being used by one or more projects. You cannot make changes directly to an active workflow.
- Inactive – this status means the workflow is not being used by any project. You can update inactive workflows.
- Draft – this status means the workflow is an inactive copy linked to the active workflow. You can think of this as an offline duplicate of an active workflow, which can be edited and published.
In JIRA 5, workflows will no longer be marked as Draft, and you cannot create multiple drafts for an active workflow. Instead, a workflow that has an unpublished draft will have an exclamation icon next to its name. For example, in the previous screenshot, Support Workflow has an unpublished draft.
Workflows can also be associated with one or more workflow schemes (discussed in later sections). When a workflow belongs to a workflow scheme, it cannot be deleted even if it is inactive.
JIRA comes with a default read-only workflow called jira . This workflow is applied to projects that do not have any specific workflow applied. For this reason, you cannot edit or delete this workflow.
JIRA 5 has made several key changes in the Workflows page to make it more intuitive. Firstly, all workflows are grouped into either the Active or Inactive section. By default, the Inactive section is collapsed to display only the active workflows. This may not seem like an important change at first, but when you have many workflows, this can save you a lot of time.
It is simple to create a new workflow in JIRA. All you need is a name and a description:
- Browse to the View Workflows page.
- Click on the Add Workflow button.
- Provide a meaningful name for the new workflow in the Add New Workflow dialog.
- Provide an optional short description for the workflow.
- Click the Add button to create the workflow.
The newly created workflow will only contain the default create and open steps, and you will need to configure it by adding new steps and transitions to make it useful. One good practice to keep in mind is that it is often a good idea to not have a "dead end" state in your workflow, for example, allowing closed issues to be re-opened. This will prevent users from accidentally closing an issue and not being able to correct the mistake.
JIRA 5 has introduced a number of changes when it comes to editing workflows to make the workflow authoring experience as simple as possible.
The first change is that there is only one Edit link now, which will allow you to both edit the workflow's metadata such as its name, and also configure its steps and transitions at the same time.
The second change is that you will no longer need to manually create drafts for editing active workflows. If you want to edit a workflow, all you have to do is click on the Edit link and JIRA will automatically create a draft for you.
The third change is that JIRA now offers two modes for authoring workflows, namely the Diagram mode and the Text mode. The Text mode is the traditional workflow-authoring mode, where you use hyperlinks on the web page to make changes. The new Diagram mode provides a drag-and-drop interface where you can visually design your workflow. Both modes, when making changes to a draft workflow, will observe the same set of restrictions compared to editing an inactive workflow:
- Existing workflow steps cannot be deleted
- The associated status for an existing step cannot be edited
- If an existing step has no outgoing transitions, it cannot have any new outgoing transitions added
- Step IDs for the existing steps cannot be changed
If you need to make these changes, you will need to either deactivate the workflow by removing the associations of the workflow with all projects or create a copy of the workflow.
You can configure a workflow's content by performing the following steps:
- Browse to the View Workflows page.
- Click on the Edit link for the workflow you wish to configure. This will take you to the Edit Workflow page.

From this page, you get a one-page table view of all the steps and transitions in the current workflow. You can also add new steps and transitions, manage their properties and configurations. As stated earlier, the default jira workflow cannot be changed.
As we have mentioned, to edit an active workflow JIRA will automatically create a draft for you. However, you still have to publish the draft workflow yourself once you have completed making your changes. In fact, when you first edit an active workflow, JIRA will remind you with a message so that you do not forget, as shown in the preceding screenshot.
Publishing a draft is a very simple process, all you have to do is the following:
- Click on the Publish Draft button. You will be prompted if you would like to first create a backup of the original workflow. It is recommended that you create a backup in case you need to undo your changes.
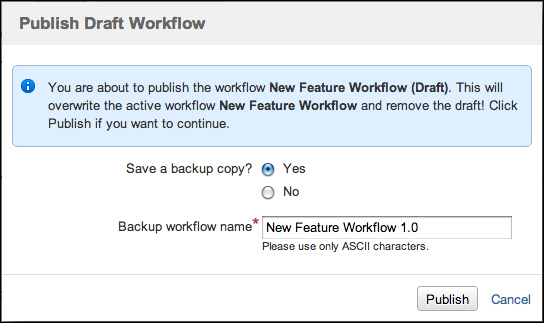
- Select either Yes or No to create a backup of the current workflow before applying the changes. This is a handy way to quickly create a backup if you have not made a copy already. If you do choose to create a backup, it is a good idea to name your workflow with a consistent convention (for example, based on a version such as Sales Workflow 1.0) to keep track.
- Click on the Publish button to publish the draft workflow and apply changes as shown in the following screenshot:
In a JIRA workflow, a step represents a state in the workflow for an issue. It describes the current status of the issue. If we look at a flow chart, the steps will be the rectangles and in the diagram they indicate the current status of the issue along the process. Just as a task can only be in one stage of a business process, an issue can be in only one step at any given time, for example, an issue cannot be both open and closed at the same time.
Status is what JIRA uses to show users where along the workflow an issue is. So, there is a one-to-one relationship between workflow steps and issue statuses. Each step is associated with an issue status, also known as linked status. In a JIRA workflow, when an issue has been transitioned into a specific step, JIRA updates the issue's status field.
Because you link a step to an issue status, when you view issues, JIRA will display the issue status rather than the step. When you search issues, you will not search by the workflow step the issue is in, but rather, you search by the status that is linked to the step.
Each step is unique in a workflow. You can have two steps with exactly the same name in the same workflow, and JIRA will consider them to be different entities.
Steps and issue statuses have a one-to-one relationship. This means you can only have as many steps in a workflow as your issue statuses. In fact, if all your issue statuses are mapped in a given workflow, JIRA will kindly tell you this with a message at the bottom of the page:
- Browse to the Edit Workflow page.
- Provide a meaningful name for the new step in the Add new Step section. It is often a good idea to name the step after the issue status.
- Select a linked status.
- Click on the Add button to create the step.
Once the step is created, it will be added to the bottom of the table, and you will be able to use transitions to link existing steps to the new step.
You can edit a step to update its name and its associated linked status. However, as mentioned earlier, if you are configuring a draft workflow, you will not be able to change the step's linked status. Also, if all of your statuses are mapped, you will not be able to change the linked status, as the list will only contain free statuses. You will need to create a new status to act as an intermediate buffer. The following steps will help you do that:
You can also delete redundant workflow steps if the workflow is not a draft. For you to delete a step, you have to first make sure that there are no incoming transitions. If there are transitions with a destination to the step you want to delete, JIRA will not display the delete option. To delete a step:
- Browse to the Edit Workflow page.
- Click on the Delete Step link for the step you wish to remove. This will take you to the Delete Workflow Step page.
- Click on the Delete button to remove the step.
Steps represent stages in a workflow, the path that takes an issue from one step to the next is known as a transition. A transition links two and only two steps together. A transition cannot exist on its own, meaning it must have a start and finish step, and can only have one of each. This means a transition cannot conditionally split off to different destination steps. Transitions are also one way only. This means if a transition takes an issue from step A to step B, you must create a new transition if you want to go back from step B to step A.
As we have seen, transitions provide the path between two steps. You can create any number of transitions for a step. You can even create multiple transitions between the same set of steps, although doing so is not encouraged.
When you create a new transition, you start with the originating step. This will be the step where you can execute your transition.
You then need to provide a name for your transition. This name will be what your users will see when they are presented with all available transitions. It is often a good idea to have your transitions' names start with a command. For example, "Submit Ticket" or "Provide Information", this way users will know that they are performing an action.
The next step is to determine the destination step. This is your issue's target state once the transition has been successfully executed. While transitions would have different originating and target steps, it is perfectly fine to have the same step for both. Although doing so is not common in a process flow scenario, it can be useful in some situations. For example, you have fields you do not want all users to be able to update via the edit issue operation. You can create a transition with an intermediate screen with those fields and restrict the users that can execute the transition.
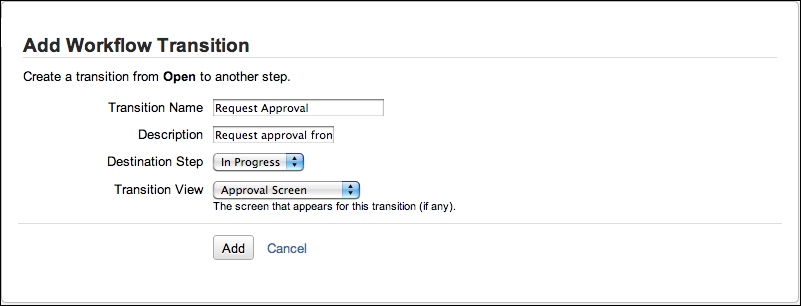
The last piece to set is if the transition will have an intermediate screen. If you select a screen for Transition View, when the user clicks on the transition to execute it, the screen will be displayed before it is executed. This allows you to capture additional information that might be relevant for this transition. If you do not select a screen, the transition will be executed as soon as the user clicks on the transition:
- Browse to the Edit Workflow page.
- Click on the Add Transition link for the step that will be the start of the transition.
- Provide a meaningful name for the new transition. It is often a good idea to have the name start with a verb.
- Provide an optional description.
- Select the destination step for the transition.
- Select a screen if the transition will have an intermediate screen when being executed.
- Click on the Add button to create the transition.
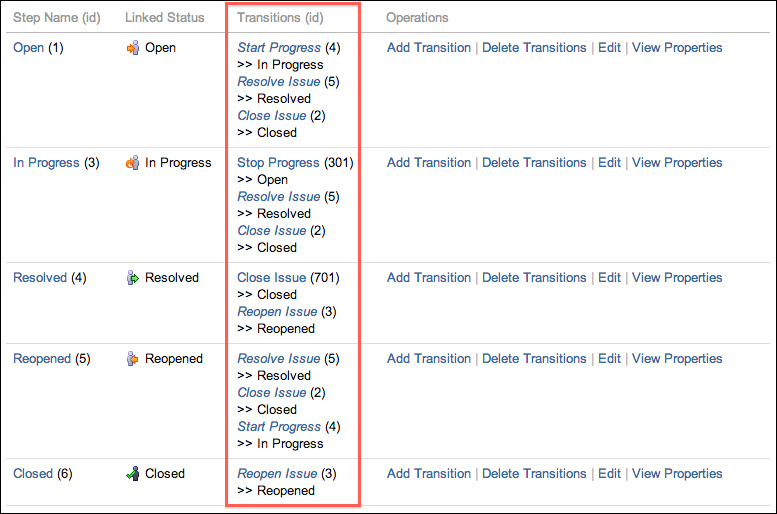
This screenshot provides you with a view of what you will be looking at:
Once you have created the transition, it will be listed under the Transitions column for the step it is created under. You will also see next to its name, there is a number in bracket. That is the unique ID for the transition in the workflow. This can be very useful when you have multiple transitions with the same name (for example, a Go Back transition).
After a transition has been created, you can update its details at any time. Most commonly, you will need to change its destination step and transition screen:
- Browse to the Edit Workflow page.
- Click on the transition you wish to edit. This will take you to the Transition page.
- Click on the Edit link. This will take you to the Update Workflow Transition page.
- Provide new values for the name and description for the transition.
- Select a new Destination Step.
- Select a new Transition View.
- Click on the Update button to apply the changes.
You can also delete transitions from a workflow step. When a transition is deleted, users will no longer see the transition link when viewing issues.
There are two ways of deleting transitions. You can delete a specific transition by going to the Transition page and perform the following steps:
You can also delete multiple transitions that belong to a step:
- Browse to the View Workflow Steps page.
- Click on the Delete Transitions link for the step you wish to delete transitions from. This will bring you to the Delete Workflow Transitions page, listing all the transitions belonging to the step.
- Select the transitions you wish to remove.
- Click on the Delete button to remove all the selected transitions.
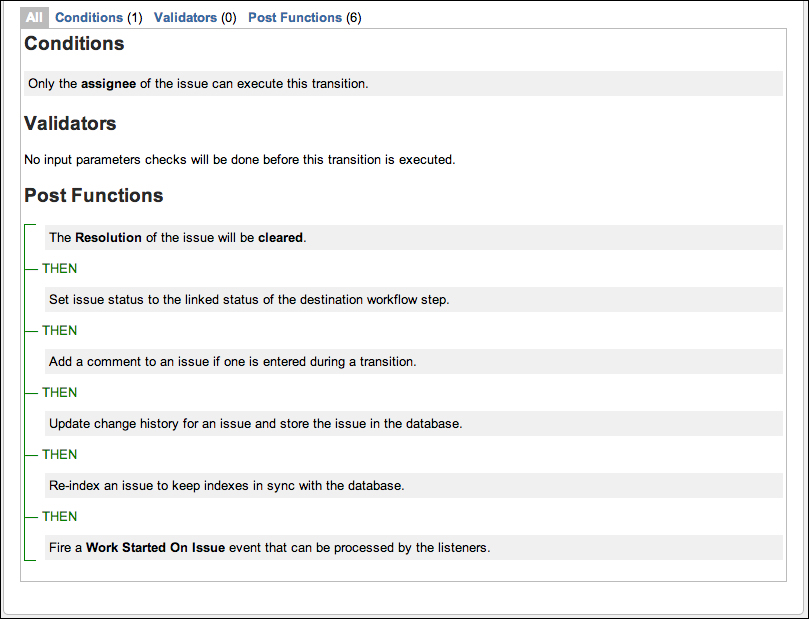
Transitions are actions in a workflow, so they are more complex than steps. With transitions, you can add three additional components—Conditions, Validators, and Post Functions.
Each of the three components defines the behavior of the transitions, allowing you to perform pre and post validations on the transition execution, and also perform post execution processing. We will discuss these three components in depth in the next sections.
A screenshot illustrating the components is shown as follows:
Sometimes you might want to have control over who can execute a transition or when a transition can be executed. For example, an authorization transition can only be executed by users in the managers group so normal employees will not be able to authorize their own requests. This is where conditions come in.
Conditions are criteria that must be fulfilled before the user is allowed to execute the transition. If the conditions on transitions are not met, the transition will not be available to the user when viewing the issue. The following table shows a list of conditions that are shipped with JIRA:
|
Condition |
Description |
|---|---|
|
Code Committed Condition |
Allows transition to execute only if code has/have not (depending on configuration) been committed against this issue |
|
No Open Reviews Condition |
Allows transition to execute only if there are no related open Crucible reviews |
|
Code Committed Condition |
Allows transition to execute only if code has/have not (depending on configuration) been committed against this issue |
|
Only Assignee Condition |
Only allows the issue's current assignee to execute the transition |
|
Only Reporter Condition |
Only allows the issue's reporter to execute the transition |
|
Permission Condition |
Only allows users with the given permission to execute the transition |
|
Sub-Task Blocking Condition |
Blocks the parent issue transition depending on all its sub-tasks' statuses |
|
Unreviewed Code Condition |
Allows transition to execute only if there are no unreviewed change sets related to this issue |
|
User Is In Group |
Only allows users in a given group to execute the transition |
|
User Is In Group Custom Field |
Only allows users in a given group custom field to execute a transition |
|
User Is In Project Role |
Only allows users in a given project role to execute a transition |
New transitions do not have any conditions by default. This means anyone that has access to the issue will be able to execute the transition. JIRA allows you to add any number of conditions to the transition:
- Browse to the Manage Transition page for the transition you wish to add a condition for.
- Click on the Conditions tab.
- Click on the Add link. This will bring you to the Add Condition To Transition page, which lists all the available conditions you can add.
- Select the condition you wish to add.
- Click on the Add button to add the condition.
- Depending on the condition, you may be presented with the Add Parameters To Condition page where you can specify configuration options for the condition:

Newly added conditions are appended to the end of the existing list of conditions, creating a condition group
. By default, when there is more than one condition, logical AND is used to group the conditions. This means that all conditions must pass for the entire condition group to pass. If one condition fails, the entire group fails, and the user will not be able to execute the transition. You can switch to use logical OR, which means only one of the conditions in the
group needs to pass for the entire group to pass. This is a very useful feature as it allows you to combine multiple conditions to form a more complex logical unit.
For example, the User Is In Group condition lets you specify a single group, but with the AND operator, you can add multiple User Is In Group conditions to ensure the user must exist in all the specific groups to be able to execute the transition. If you use the OR operator, then the user will only need to belong to one of the listed groups. There is one restriction to this however; you cannot use both operators for the same condition group.
Validators are similar to conditions in nature. Conditions check for criteria before a transition is performed; validators check criteria after a user has executed a transition. If one of the validators fails, the transition fails and will be rolled back to its original state. The following table shows a list of validators that come shipped with JIRA:
|
Validator |
Description |
|---|---|
|
Validates that the user has permission. This is useful when checking the person who has executed the transition has the required permissions. | |
|
Validates that the user has permission, where the |
Like conditions, transitions by default do not have any validators associated. This means transitions are completed as soon as they are executed. You can add validators to transitions to make sure executions are only allowed to complete when certain criteria are met. Use the following steps to add a validator to a transition:
- Browse to the Manage Transition page for the transition you wish to add a condition for.
- Click on the Validators tab.
- Click on the Add link. This will bring you to the Add Validator To Transition page, which lists all the available validators you can add.
- Select the validator you wish to add.
- Click on the Add button to add the validator.
- Depending on the validator, you may be presented with the Add Parameters To Validator page where you can specify configuration options for the validator.
Similar to conditions, when there are multiple validators added to a transition, they form a validator group. But unlike conditions, you can only use logical AND for the group. This means in order for a transition to complete, every validator added to the transition must pass its validation criteria. Transitions cannot selectively pass validations by using logical OR.
As the name suggests, post functions are functions that occur after (post) a transition has been executed. This allows you to perform additional processes once you have executed a transition. JIRA heavily uses post functions internally to perform a lot of its functions. For example, when you transition an issue, JIRA uses post functions to update its search indexes so your search results will reflect the change in issue status.
If a transition has failed to execute (for example, failing validation from validators), post functions attached to the transition will not be triggered. The following table shows a list of post functions that come shipped with JIRA:
|
Post function |
Description |
|---|---|
|
Assigns the issue to the current user if the current user has the "Assignable User" permission | |
|
Assigns the issue to the project/component lead developer | |
|
Assigns the issue to the reporter | |
|
Creates a Perforce Job (if required) after completing the workflow transition | |
|
Sends a notification to one or more HipChat rooms | |
|
If this post function is executed, JIRA will post the issue content in JSON format to the URL specified | |
|
Updates a simple issue field to a given value |
Transitions by default are created with several post functions. These post functions provide key services to JIRA's internal operations, so they cannot be deleted from the transition. These post functions perform the following:
- Set issue status to the linked status of the destination workflow step
- Add a comment to an issue if one has entered during a transition
- Update change history for an issue and store the issue in the database
- Re-index an issue to keep indexes in sync with the database
- Fire an event that can be processed by the listeners
As you can see, these post functions provide some of the basic functions such as updating a search index and setting an issue's status after transition execution, which are essential in JIRA. So instead of letting users having to manually add them in and risk the possibility of leaving one or more out, JIRA adds them for you automatically when you create a new transition:
- Browse to the Manage Transition page for the transition you wish to add a post function for.
- Click on the Post Functions tab.
- Click on the Add link. This will bring you to the Add Post Function To Transition page, which lists all the available post functions you can add.
- Select the post function you wish to add.
- Click on the Add button to add the post function.
- Depending on the post function, you may be presented with the Add Parameters To Function page where you can specify configuration options for the post function.
Just like conditions and validators, multiple post functions form a post function group in a transition. After a transition is executed, each post function in the group is executed sequentially as it appears in the list, from top to bottom. If any post function in the group encounters an error during processing, you will receive an error.
Because post functions are executed sequentially and some of them have the abilities to modify values and perform other tasks, often, their sequence of execution becomes very important. For example, if you have a post function that changes the issue's assignee to the current user and another post function that updates an issue field's value with the issue's assignee, obviously the update assignee post function needs to occur first, so you need to make sure it is above the other post function.
You can move the positions of post functions up and down along the list, by clicking on the Move Up and Move Down links. Note that not all post functions can be repositioned.
We have seen how to configure workflows the old-fashioned way via the traditional text mode; it is time to take a look at the alternative. In JIRA 5, there is a new a drag-and-drop tool called the workflow designer, to help you create and configure workflows. If you are familiar with diagramming tools such as Microsoft Visio, you will feel right at home.
You have probably already seen this since in JIRA 5, it is the default workflow-authoring tool. When you are on the Edit Workflow page, you can toggle between the Diagram and Text options to choose how you would like to configure your workflow:
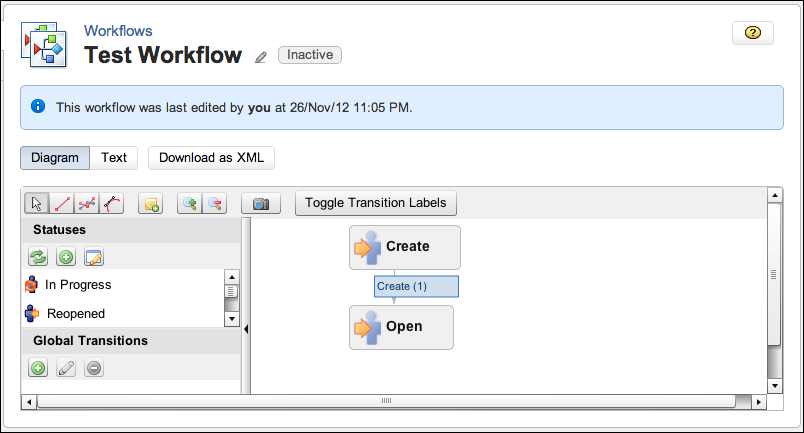
The workflow designer panel is divided into three sections. On the right-hand side, you have your main section, where you can get a visual representation of your workflow. From there, you can move the steps within the workflow around so they will appear more logically, and create new transitions between them. You can click on the existing steps and transitions to edit their properties, and for transitions, you can also add conditions, validators, and post functions.
On the left-hand side, you have your statuses and transitions, which you can simply drag over to the right and drop them where you want them to be. You can create new statuses and drag them in to be part of your workflow.
One of the big advantages of using the designer is that you can do everything right in this one place, without having to move back and forth between different parts of the JIRA administration.
One thing to note is that the workflow designer is a Flash-based tool, so you will need to have Flash installed and enabled for your browser.
It is usually a good practice to review unused workflows and delete them from JIRA, especially when your JIRA starts to grow with old, redundant workflows building up. One thing you will notice is that only workflows under the Inactive heading will have the delete option, this is because you cannot delete active workflows:
Workflows are often very complex and creating a new workflow can sometimes be time consuming and may not always be the most efficient option, especially if you already have one that is very similar to your requirements. JIRA allows you to copy existing workflows. Once a workflow has been copied, both workflows will exist as separate entities and you can edit them without affecting the other as shown in the following steps:
- Browse to the View Workflows page.
- Click on the Copy link for the workflow you wish to copy.
- Provide a new name and description for the workflow.
- Click on the Copy button to copy the workflow.
As with creating a new workflow, the newly copied workflow is inactive until it has been associated.
JIRA allows you to export existing workflows into an XML file, which can be imported into a different JIRA. This is a useful feature as it allows you to quickly replicate complex workflows across different instances of JIRA. This is often an ideal solution when workflows developed in a test environment need to be deployed onto a production environment where a full system restore will be inappropriate. There are however, caveats that one will need to look out for while performing workflow imports, which we will discuss later. But first, let's take a look at how to export workflows in JIRA.
To export a workflow, perform the following steps:
- Browse to the View Workflows page.
- Click on the Edit link for the workflow you wish to export.
- Click on the Download as XML button to export. Depending on your browser setup, you may or may not get a save file dialog prompt.
- Select the location where you would like to save the exported workflow XML file if you are prompted with the save file dialog.
You can open the exported XML file and edit the workflow directly. A detailed explanation on the contents of the workflow XML file is beyond the scope of this book. JIRA uses the OSWorkflow engine from OpenSymphony. You will be able to find more information online about how you can tweak the XML content at https://confluence.atlassian.com/x/9UkC. However, this is only recommended for advanced users.
As we can see, exporting a workflow is quite simple and straightforward. Importing, however, takes a bit of planning. When you export a workflow, what you are exporting is not only the workflow entities such as steps and transitions, but also references to other related entities such as statuses linked to the steps, and fields used by post functions and validators. These entities are not exported along with the workflow; if they do not exist in the target system, the import will not work. References that are most likely to be different between systems include:
- Steps and their linked statuses, as it is important to note that the statuses need to have the same ID across both systems, not just the names
- Custom screens referenced by workflow transitions
- Custom fields referenced by post functions, validators, and conditions
- Field values such as
Prioritybeing referenced
For this reason, it is only recommended to import workflows into a system with an identical setup (such as production and staging). However, often you will need to copy workflows between two JIRAs that have different setups. For example, when you need to promote a new workflow from the test environment into the production environment, or between two JIRAs used by different departments.
In cases like these, where the causes of differences between systems are due to the introduction of new custom fields or statuses as part of a new workflow, it is recommended to follow these steps:
- Create the new entities (custom fields, statuses, and so on) in the target JIRA system.
- Export the workflow from the base system.
- Edit the exported XML file and update the referenced IDs with the actual IDs in the target system.
- Import the workflow into the target system.
Once you have made sure that all the external entities have been created in the target system, you can start importing the workflow using the following steps:
- Browse to the View Workflows page.
- Click on the Import From XML button. This will take you to the Import Workflow dialog.
- Provide a name for the workflow to be imported. The name must be unique so it cannot be the same as an existing workflow.
- Provide an optional description for the workflow.
- Select the Workflow Definition option to either import from an existing XML file or paste in the file content directly.
- Click on the Import button to import the workflow.
These steps are illustrated in the following screenshot:

As we have seen, JIRA's built-in workflow import/export tool has many limitations. Administrators often find it challenging to keep multiple JIRA instances in-sync in order to take advantage of this feature. Some of the challenges faced by administrators include the following:
- Making sure all third-party plugins that are used as part of the workflow will be available in the target JIRA
- Making sure the target JIRA has the necessary custom fields and screens configured
Recognizing this, Atlassian has released a more advanced tool called the JIRA Workflow Sharing Plugin to provide a solution for the aforementioned problems. Currently, this is a separate add-on that can be installed free of charge. In the future, Atlassian may bundle this along with JIRA, but for now, you will have to manually get it from the Atlassian Marketplace, using the following link:
https://marketplace.atlassian.com/plugins/com.atlassian.jira.plugins.jira-workflow-sharing-plugin
With the JIRA Workflow Sharing Plugin, a new concept called the workflow bundle is introduced. A workflow bundle is a ZIP file (the bundle) that contains everything about a workflow, including the XML file representation of the workflow, any custom fields and screens, and all the plugins that are being used.
The JIRA Workflow Sharing Plugin adds a new Export option to all workflows except the default jira workflow. This allows you to export your workflow as a workflow bundle, which can be imported later via the plugin's import tool.
The workflow bundle export tool has a wizard-driven interface to help guide you along the process. The first step is to identify all the third-party plugins that are part of the workflow. The export tool is smart enough to automatically detect this and provide you with a summary list for review as shown in the following screenshot:
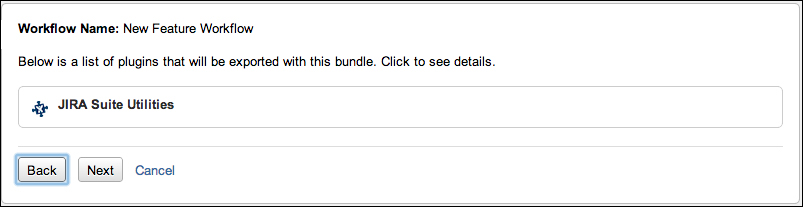
After you have reviewed the list of plugins, you can move onto the second step, which allows you to provide any additional notes on how to import the workflow bundle.
Once you have documented all the necessary information, you then move onto the last step of the process, where a .jwb file (JIRA Workflow Bundle) will be generated and you can download it directly.
To import a workflow bundle, the JIRA Workflow Sharing Plugin provides an import wizard that will guide you through the import process. The import wizard will walk through the following steps:
- Select the workflow bundle to import.
- Specify the new workflow's name.
- Map statuses from the workflow bundle to existing statuses in JIRA, or create new statuses.
- List all required plugins and their compatibility. If a plugin cannot be installed due to an error, all references to the plugin in the workflow will be removed. You can also choose to not install certain plugins on the list. This step may be skipped if the workflow bundle contains no plugins.
- You are presented with the import summary before the actual import.
- Run the import process.
- The screen presents you with the final report on the import process.
These steps are illustrated in the following screenshot:

Note that while the JIRA Workflow Sharing Plugin is a very useful tool, it is still in its early development stage, so there might be small glitches with some of its functions. Atlassian has built a feature into the plugin to collect some anonymous information on its usage to help them make it better. You can choose to disable this, but it will be helpful if you leave this on to assist Atlassian to continue improving this plugin.
Other than the JIRA Workflow Sharing Plugin, there are a number of other very useful plugins, which will provide additional components such as conditions, validators, and post functions. The following list presents some of the most popular workflow-related plugins. In Chapter 10, General Administration, we will talk about plugins in more details and also how you can look for plugins yourself.
https://marketplace.atlassian.com/plugins/com.googlecode.jira-suite-utilities
This contains a number of very useful conditions, validators, and post functions. For example, the Update Issue Field post function that ships with JIRA allows you to update any issue fields such as priority and assignee when a workflow transition completes. The JIRA Suite Utilities plugin complements this by providing a very similar Update Issue Custom Field post function, which handles custom fields. There are many other useful components such as the Copy Value From Other Field post function, which will allow you to implement some amazing logics with your workflow. A true must-have for any JIRA.
https://marketplace.atlassian.com/plugins/com.fca.jira.plugins.workflowToolbox.workflow-toolbox
As the name suggests, a workflow toolbox with a rich set of workflow conditions, validators, and post functions intended to fill many gaps when developing complex workflows. For example, it provides a condition and validator that allows you to specify the checking rules with regular expressions.
https://marketplace.atlassian.com/plugins/com.innovalog.jmwe.jira-misc-workflow-extensions
This is another plugin with an assortment of conditions, validators, and post functions. Normal post functions let you alter the current issue's field values. This plugin provides post functions that will allow you to set a parent issue's field values from subtasks, along with many other features.
https://marketplace.atlassian.com/plugins/com.tng.jira.plugins.workflowenhancer
This contains a variety of validators and conditions around comparisons of the value of a field with another field, and lets you set up validation logic to comparing dates, numeric, and Boolean value.