C H A P T E R 4
Connection Managers
Eventually everything connects—people, ideas, objects.
The quality of the connections is the key to quality per se.-American designer Charles Eames
SSIS uses connection managers to encapsulate, manage, and abstract away physical data stores. Connection managers allow you to read from, and write to, nearly any data store for which you have drivers and access. You can use connection managers to pull data from flat files, databases, or Excel spreadsheets and push data to databases, custom file formats, or web sites, for instance. In this chapter, you’ll start by looking at some of the most commonly used connection managers and move on to the more advanced, and less commonly used, connection managers SSIS supports. Some of the infrequently used connection managers can be used to connect to web servers, FTP servers, and even Windows events, to name a few examples.
Commonly Used Connection Managers
SSIS first introduced the concept of connection managers as a means of encapsulating and managing connection information for nearly any type of data store, provided of course that you have adequate drivers for your data store. You can create connection managers that define connections to fixed-width and delimited flat files, binary files, Excel spreadsheets, web sites, and SQL Server Analysis Services cubes, among others. You can also connect to a wide variety of database servers including SQL Server, Oracle, Teradata, DB2, MySQL, and any other database management system (DBMS) for which you can find Open Database Connectivity, ODBC, or OLE DB drivers. Each connection manager can be used by multiple tasks as well as data sources and destinations. After you create a connection manager, regardless of the creation method, they are all centrally located at the bottom of the Control Flow and Data Flow designer windows in the Connection Managers pane. This section introduces some of the most commonly used connection managers.
![]() NOTE: For some DBMSs, such as Oracle, Teradata, and MySQL, you’ll need to download and install appropriate ODBC or OLE DB drivers from the DBMS vendor or a third-party vendor on your development machines and servers.
NOTE: For some DBMSs, such as Oracle, Teradata, and MySQL, you’ll need to download and install appropriate ODBC or OLE DB drivers from the DBMS vendor or a third-party vendor on your development machines and servers.
The Connection Managers section of the BIDS designer is always at the bottom of the Control Flow and Data Flow designer windows. In this section, you can see all of the connection managers that are available to your SSIS package. You can also create new connection managers by right-clicking in this section, as shown in Figure 4-1.

Figure 4-1. Connection Managers section of the BIDS designer window, with pop-up context menu
The pop-up context menu of the Connection Managers section is accessed by right-clicking in the area. The context menu has options for creating commonly used connection managers, including OLE DB connections to databases, flat file connections to delimited and fixed-width files, ADO.NET managed database connections, and others. Selecting the New Connection option shows the complete list of connection managers supported by SSIS, as shown in Figure 4-2.
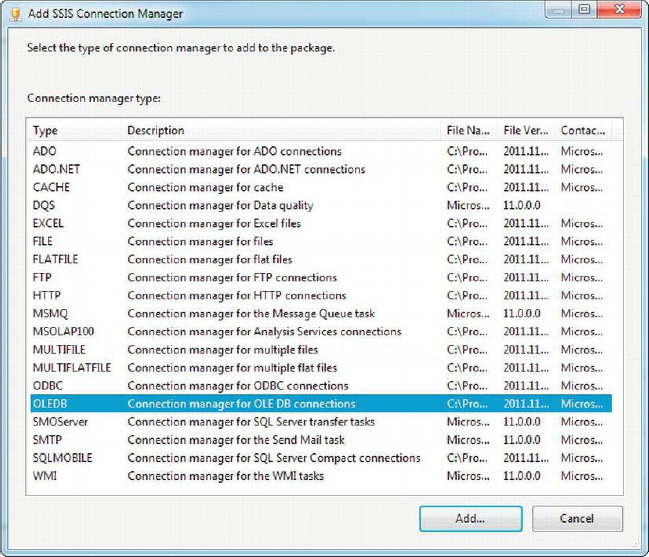
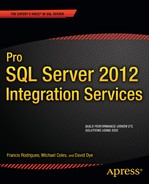
Figure 4-2. Add SSIS Connection Manager dialog box listing all available connection managers
The following sections describe the connection managers and the connectivity functionality they provide. The Type of the connection manager may not clearly describe the connectivity capabilities. To get a much clearer description, refer to the Description column of the Add SSIS Connection Manager. In the following sections, the connection managers are categorized by type because that is how they will be referred to by Visual Studio and the debugger.
OLE DB Connection Managers
OLE DB stands for Object Linking and Embedding, Database. It is essentially an API based on the Component Object Model (COM), providing support for a wide variety of data sources. OLE DB was designed as a successor to the older Open Database Connectivity (ODBC). OLEDB is a component-based specification that supports connections to relational and nonrelational data sources. Using OLE DB, you can connect to databases such as SQL Server and Oracle, Microsoft Access databases, e-mail servers, file systems, hierarchical databases, and more.
Generally speaking, OLE DB providers for relational databases come in two flavors: native and OLE DB for ODBC versions. The native OLE DB providers are faster than the OLE DB for ODBC versions, because they communicate with the low-level database APIs directly for maximum performance. The OLEDB for ODBC providers are OLE DB providers that sit on top of ODBC, so there’s another layer of abstraction between OLE DB and the database. The performance with these types of providers is usually not quite as good as with native OLE DB providers.
![]() NOTE: Some people spell OLE DB as OLEDB, and still others use OLE-DB. As you can tell by looking at the images in this section, Microsoft chooses to use multiple spellings. Any of these are considered correct. We’ll stick with OLE DB throughout this book..
NOTE: Some people spell OLE DB as OLEDB, and still others use OLE-DB. As you can tell by looking at the images in this section, Microsoft chooses to use multiple spellings. Any of these are considered correct. We’ll stick with OLE DB throughout this book..
When you create a new OLE DB Connection Manager, you will choose an OLE DB provider from the list at the top of the dialog box shown in Figure 4-3.
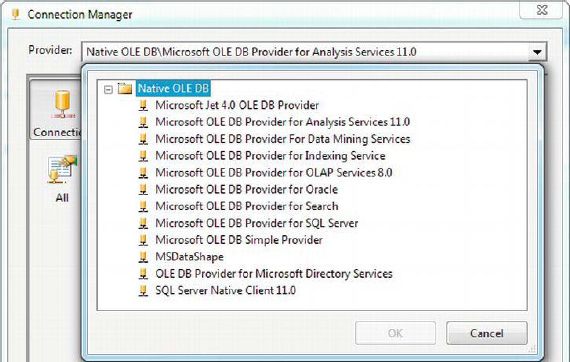
Figure 4-3. Selecting a provider in the OLE DB Connection Manager dialog box
Like us, you may find yourself choosing the Microsoft OLE DB Provider for SQL Server more often than any of the other providers, but when you need to connect to an Access database (Jet OLE DB provider), an Oracle RDBMS server, or even Microsoft Directory Services, SSIS can do that too.
File Connection Managers
Files of various formats are often used to feed ETL processes. Whether you’re pulling data from delimited or fixed-width flat files, binary files, Excel spreadsheet files, or combinations of files, SSIS has got you covered. Here’s a quick breakdown of the types of files that SSIS supports natively:
FLATFILE: Flat files are text files structured as delimited files, fixed-width files, or ragged-right files. Flat files can be delimited by using commas (
.csv), Tab or pipe (|) characters (.txt), or any other delimiter you decide to use.FILE: The File Connection Manager lets you choose any file as input or output, including text files, binary files, XML files, or any other format you prefer. Note that if you choose a structured file for input, such as a delimited text file or XML file, you are responsible for recognizing and managing the structured data in your data flow.
EXCEL: The Excel File Connection Manager connects your data flow to an Excel workbook.
MULTIFILE: The Multifile Connection Manager is useful if you have several files that are of the same format. It’s a little trickier, requiring some data flow gymnastics, if you want to use it with several files of differing formats.
MULTIFLATFILE: The Multiflat File Connection Manager can connect to several flat files of the same format. If your files are of differing formats, your data flow can easily be consumed with trying to process the files by using different business logic.
With this variety of File Connection Managers, you can retrieve data from literally any file in any format. For file formats whose structure is not natively supported by the SSIS data flow, such as binary files, you will have to write custom code to handle the file format. The General page of the Flat File Connection Manager Editor, shown in Figure 4-4, allows you to choose the name, format, and code page for the source file. You can also choose the locale for the source data, whether or not the source data is Unicode, and other options including the number of header rows to skip (if any).
Figure 4-4. Setting properties for a Flat File Connection Manager in the editor
The Flat File Connection Manager Editor allows you to see the columns in the source file, with options to choose the end-of-row delimiter and the column delimiter. As you can see in Figure 4-5, the editor also shows a preview of the data in your source file.

Figure 4-5. Columns pageof the Flat File Connection Manager Editor, with data preview
The Advanced page of the Flat File Connection Manager Editor gives you an opportunity to change column-level properties, such as the data type and size of the column. Figure 4-6 shows the column properties on the Advanced page.

Figure 4-6. Advanced page of the Flat File Connection Manager Editor, with column property configurations
ADO.NET Connection Manager
The ADO.NET Connection Manager uses a managed .NET provider to give you access to your data. One of the biggest benefits of the managed connection managers is that you can easily access this type of connection manager from within managed code, such as in a Script task in the control flow or script component in the data flow. One of the most commonly used .NET providers is the SqlClient data provider, which is specific to SQL Server. Other managed provider options include the OracleClient, Odbc, and SQL Server Compact Edition.
The .NET Providers for OleDb options give you the choice to access several OLE DB providers via managed code. When using these providers, SSIS uses .NET COM interop to create a managed wrapper around your OLE DB provider. This makes these connection managers easier to access in .NET code, but can affect performance because there’s an extra layer of communication between the managed wrapper and the unmanaged OLE DB provider. Figure 4-7 shows the providers available to the ADO.NET Connection Manager.

Figure 4-7. Choosing a .NET Provider in the ADO.NET Connection Manager Editor
The ADO.NET Connection Manager Editor enables you to edit the properties of the connection. For the commonly used SqlClient provider, the options are simple: a server name, a database to connect to, and authentication credentials. On the All page, you can set advanced features including encryption and replication support. Figure 4-8 shows the connection editor properties for the SqlClient provider.

Figure 4-8. ADO.NET SqlClient Connection Manager Editor
Cache Connection Manager
The Cache Connection Manager was introduced in SQL Server 2008. This type of connection manager allows you to cache lookup data in memory in advance. Consider a scenario like this: you have two lookup components, and both are reading the same large number of rows from the same table. You can use a Cache Connection Manager to cache the lookup data in advance and connect both lookup components to use the same Cache Connection Manager. This means you have to read the data in only once, and it will consume less memory than two separate lookups caching the same data.
The Cache Connection Manager can be populated with a cache file (.caw) or by a Cache transformation, which we cover later in this chapter. Figure 4-9 shows the Cache Connection Manager Editor’s General tab. This tab lets you set the name of the connection manager and select a cache file as the source for the connection manager if you choose.
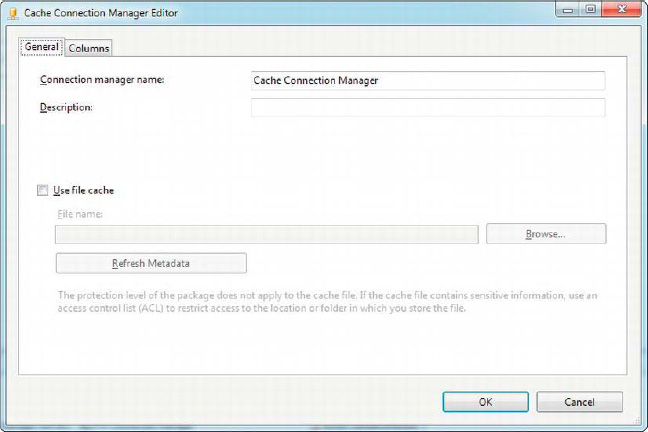
Figure 4-9. Cache Connection Manager Editor General tab options
The Columns tab of the Cache Connection Manager Editor lets you set properties of the individual columns of the Cache Connection Manager. You can set each column’s data type, length, precision/scale, or code page, for instance. Figure 4-10 shows the Columns tab properties.
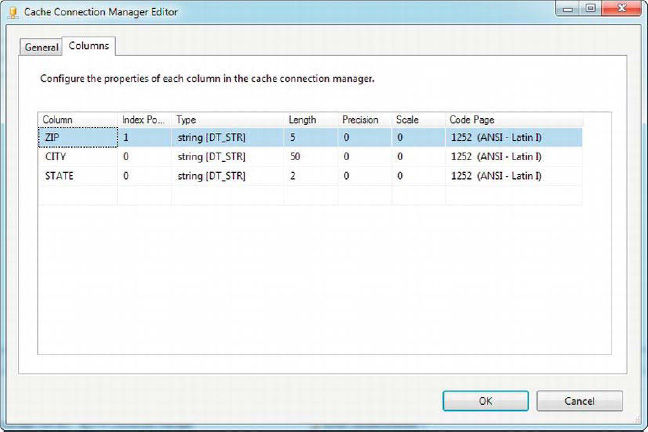
Figure 4-10. Cache Connection Manager Editor Columns tab properties
Other Connection Managers
In the previous section, you looked at some of the most commonly used connection managers. SSIS supplies several others (for example, the FTP and HTTP Connection Managers, Analysis Services Connection Manager, and Data Quality Services Connection Manager) in order to access systems that do not necessarily lend themselves to direct data access. For example, FTP servers usually don’t contain raw data, but they may store files that in turn may have the required data. These connection managers allow you to access these different storage systems so that you can retrieve data.
FTP Connection Manager
The FTP Connection Manager allows you to connect to File Transfer Protocol (FTP) servers. The connection editor allows you to define time-outs, ports, and several other properties, as shown in Figure 4-11.

Figure 4-11. FTP Connection Manager Editor
The Server Name and the Server Port fields allow you to define the FTP server that the connection should be made to and the port that the server will be listening to. The Credentials section stores the authentication information. By default, the value is Anonymous. The Time-Out field defines, in seconds, the period of time that a task may take before timing out. The value 0 signifies that the connection will not time out. The check box that enables passive mode indicates that the package will start the connection. By default, active mode has the server initiate the connection. The Retries field sets the number of retries; 0 indicates unlimited retries. The Chunk Size denotes the size for chunks when transmitting data. The Test Connection button allows you to test the connection parameters.
![]() NOTE: The FTP Connection Manager supports only anonymous and simple authentication. Windows authentication is not supported.
NOTE: The FTP Connection Manager supports only anonymous and simple authentication. Windows authentication is not supported.
HTTP Connection Manager
Just as FTP can be used to store files, Hypertext Transfer Protocol (HTTP) can be used to store data. The HTTP connection allows you to connect to a web server to perform tasks. This connection enables you to upload and download files to and from a web server. This connection manager works in conjunction with a Web Service task. Figure 4-12 shows the options that are used to configure this connection manager.

Figure 4-12. HTTP Connection Manager Editor—Server page
The Server URL stores the URL to the desired web server. If you intend to use Web Services Description Language (WSDL) on the Web Services task, the URL should end with ?wsdl. The Use Credentials option allows you to specify the login information necessary to connect to the web server. The User Name, Password, and Domain are the key elements for the credentials to be recognized by the server. The Use Client Certificate option allows you to specify a certificate to authenticate the connection. Once enabled, the Certificate button allows you to select a certificate to use. The Time-Out setting allows you to define the time allotted to connect to a web server. The Chunk Size option determines the size of data to be written. The Test Connection button allows you to test your current configuration of the connection manager as illustrated in Figure 4-13.

Figure 4-13. HTTP Connection Manager Editor—Proxy page
The Proxy page allows you to use a proxy server to connect to the defined URL. The Proxy URL requires the URL for the proxy server being used. The Bypass Proxy on Local option allows you to bypass using the proxy server for local addresses. The Use Credentials check box allows you to provide the authentication information that might be needed to connect to the proxy server. The User Name, Password, and Domain are the key components necessary for access to the proxy server. The Add and Remove buttons allow you to modify a list of addresses defined to bypass the proxy server.
MSOLAP100 Connection Manager
The Analysis Services Connection Manager, MSOLAP100, allows you to connect to an Analysis Services engine and during design time connect to an Analysis Services project. At runtime, the connection will connect to only the server and the database with the deployed Analysis Services project. Figure 4-14 shows how to add an Analysis Services Connection Manager.

Figure 4-14. Add Analysis Services Connection Manager
Creating a connection to an Analysis Services instance is as simple as providing the server name. By default, the provider for this connection manager is set to Microsoft Online Analytical Processing (MSOLAP), defining the OLAP engine as the Analysis Services engine. The Impersonation Level allows you to define the authentication to use. The different Impersonation Levels are defined in the following list. The Analysis Services Execute DDL task and Analysis Services Processing task utilize this connection to access the Analysis Services database. The Data Mining Model Training destination component can utilize this connection to apply models to the data. The option to create the connection to an Analysis Services project in this solution utilizes the project only for metadata. At runtime, the tasks will need to utilize this connection to connect to an existing database.
Anonymous: The server does not see any information about the client during access.
Identify: The server knows the client’s identity and can use the client’s access control list.
Impersonate: The server can impersonate the client with dependencies on the location of the server and the client. If the server and the client are on the same machine, the server can access the network resources of the client. If they reside on different machines, the server has access to only the resources available on its own machine.
Delegate: The server can impersonate the client regardless of the machine.
DQS Connection Manager
The Data Quality Services (DQS) Connection Manager allows you to connect to a Data Quality Services server and database. The Data Correction transformation task utilizes this connection to access a set of data correction rules before applying them to the pipeline.
MSMQ Connection Manager
The Microsoft Message Queuing, MSMQ, Connection Manager allows you to connect to a message queue that utilizes message queuing. The connection manager will connect a Message Queue task to the specified queue in order to trigger the message service. Figure 4-15 demonstrates how to set up the manager.
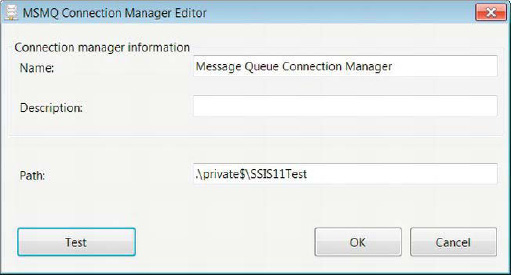
Figure 4-15. MSMQ Connection Manager Editor
There are two ways to define the path, depending on the type of message queue. For private queues, the format is <computername>Private$<queuename>. A period can also be used to represent the local machine, as shown in Figure 4-15. For public queues, the format simply eliminates the private path:
<computername><queuename>.
![]() NOTE: By default, message queuing is turned off on Windows installations. You will have to enable the service and create your own queue so that SSIS can utilize it.
NOTE: By default, message queuing is turned off on Windows installations. You will have to enable the service and create your own queue so that SSIS can utilize it.
SMO Connection Manager
SQL Server Management Object (SMO) Connection Manager enables the package to establish a connection with a SQL Management Object server. This connection manager is utilized by the transfer tasks that are present by default in SSIS 11. Figure 4-16 shows you the editor for this connection manager.

Figure 4-16. SMO Connection Manager Editor
The SMO Connection Manager Editor requires only the server name and the authentication mode to access the server. The Refresh button reloads the list of available servers. The Test Connection button will check the current configuration provided in the editor. The different transfer executables allow you to perform Data Access Language (DAL), moving and copying databases, and other functions. Depending on the task you use, you will have to define the database, but transfer tasks will all utilize this connection to connect to a server.
SMTP Connection Manager
The SMTP Connection Manager allows you to connect to a Simple Mail Transfer Protocol (SMTP) server. The Send Mail task utilizes this connection manager to send e-mails when certain conditions are met in the execution of the package. Figure 4-17 demonstrates the options available in the connection manager’s editor.

Figure 4-17. SMTP Connection Manager Editor
The Name uniquely identifies the connection. The Description should be filled in to help fellow developers understand the role of this connection. The SMTP Server field is used to indicate the server name. By default, the connection manager utilizes Anonymous authentication but it does allow you to choose Windows Authentication via a check box. Selecting the Enable Secure Sockets Layer (SSL) option allows you to encrypt the data when you are sending e-mails. The Timeout field defines in milliseconds the amount of time you have to connect to the server.
![]() CAUTION: When connecting to Microsoft Exchange, use Windows Authentication, because the exchange servers can deny unathenticated SMTP connections.
CAUTION: When connecting to Microsoft Exchange, use Windows Authentication, because the exchange servers can deny unathenticated SMTP connections.
SQLMOBILE Connection Manager
The SQLMOBILE Connection Manager allows you to connect to a SQL Server Compact database. The SQL Server Compact destination uses this connection manager to load data into the SQL Server Compact database. Figures 4-18 and 4-19 demonstrate the configuration of the connection manager.
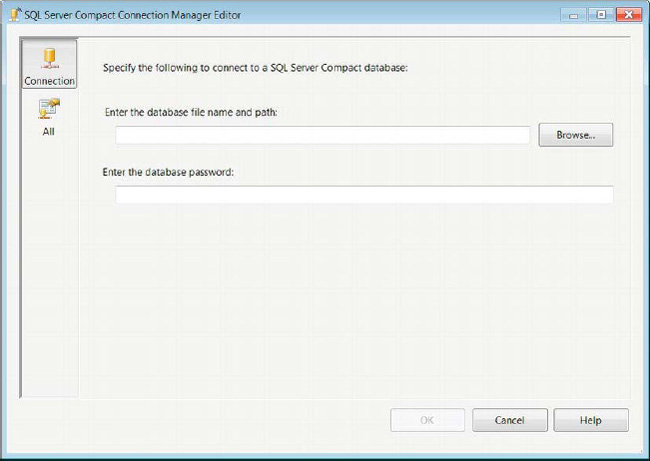
Figure 4-18. SQL Server Compact Connection Manager Editor—Connection page
![]() NOTE: The provider that enables you to connect to a SQL Server Compact database is available in only 32-bit mode. If you are developing or executing on a 64-bit machine, you will have to use 32-bit mode.
NOTE: The provider that enables you to connect to a SQL Server Compact database is available in only 32-bit mode. If you are developing or executing on a 64-bit machine, you will have to use 32-bit mode.
The database file name and path indicates the location of the SQL Server Compact database. The Browse button opens Windows Explorer to help look for the file location. The password to the database can be stored in the Enter the Database Password field. The All page in Figure 4-19 shows all the options available when using this connection manager.

Figure 4-19. SQL Server Compact Connection Manager Editor—All page
The properties exposed by the All page allow you to configure the minute details of the connection manager. Some of these properties include the growth size and time-out settings. All of the properties are as follows:
AutoShrink Threshold: The percent of free space allowed before autoshrink is allowed to execute.
Default Lock Escalation: The number of locks SQL Server Compact is allowed before it escalates the locks.
Default Lock Timeout: The interval during which a transaction will wait for a lock. This is measured in milliseconds.
Flush Interval: The interval during which committed transactions are flushed to disk. This is measured in seconds.
Locale Identifier: Specifies the Locale ID of the SQL Server Compact database.
Max Buffer Size: Specifies the amount of memory SQL Server Compact uses before flushing data to disk. This is measured in kilobytes (KB).
Max Database Size: Defines the maximum size of the SQL Server Compact database. This is measured in megabytes (MB).
Mode: Specifies the access mode for the SQL Server Compact database. By default, it is set to Read Write. Read Write gives you permission to both read from and write to the database. Read Only specifies that you can only read from the database. Exclusive provides exclusive access to the database. Shared Read allows multiple users to read from the database simultaneously.
Persist Security Info: Allows the connection information to be stored as part of the connection’s string.
Temp File Directory: Specifies the location of the temporary database file for the SQL Server Compact database.
Datasource: Specifies the name of the SQL Server Compact database to access.
Password: Specifies the password of the SQL Server Compact.
WMI Connection Manager
The WMI Connection Manager enables access to Windows Management Instrumentation. The Web Services task utilizes this connection manager. Figure 4-20 displays the configuration of the WMI Connection Manager Editor.
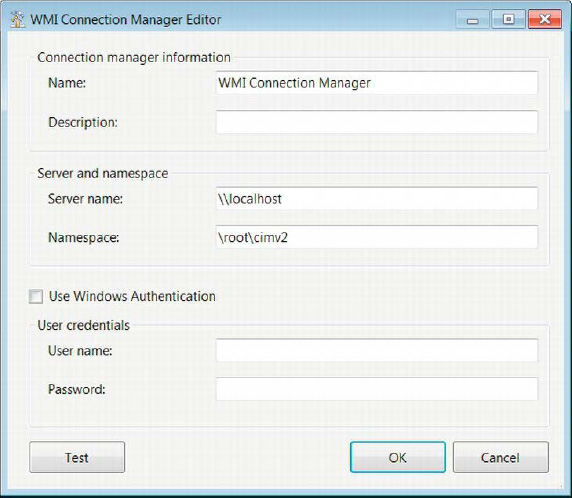
Figure 4-20. WMI Connection Manager Editor
The Name field uniquely defines the connection manager. The Description should be used so that other developers will know the exact purpose of the connection manager. The Server Name denotes the location of the management instrument. The Namespace defines the WMI namespace to use. The check box will enable the usage of Windows Authentication. If you use this option, you do not need to provide the user name and password. The Test button will test the current configurations set in the editor.
Summary
The connection managers that SSIS can access are the backbone of the ETL process that the packages carry out. They allow both the extraction of data as well as its insertion. Certain connection managers have a rather simple configuration, while others have a much more complex set of properties. In this chapter, you looked in great detail at the most frequently used connections. You also were introduced to some of the more sparingly used connection managers. The next chapter will guide you through the basic executables, containers, and precedence constraints available for the control flow.