C H A P T E R 19
Deployment Model
Program testing can be used to show the presence of bugs, but never to show their absence!
—Computer scientist Edsger Dijkstra
Version 2012 of SQL Server Integration Services introduces an entirely new way to deploy ETL processes. In prior versions, the individual package was the deployed object. With the new deployment model, the entire project becomes the deployed object. As noted in previous chapters, the inclusion of parameters and project-level connection managers facilitate this new deployment model. One of the advantages of this new model is that it enables you to create environments within SQL Server with specific values to be used for parameters. Just as Edsger Dijkstra suggests that program testing is not meant to show the absence of bugs, the ability to emulate environments with this new deployment model should greatly expedite detecting potentital bugs.
This chapter guides you through deploying a project. In addition, it shows you how to upgrade your legacy SSIS projects to the new deployment model. For the execution of the ETL process, we will demonstrate how to use environments.
The Build Process
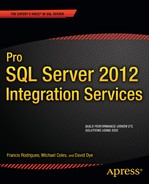
The build process prepares your project for deployment. It creates a deployment utility that will automate the process. The build process copies packages and objects to specified locations so that the deployment utility can identify them during the deployment process. The properties window of the project file in Visual Studio, shown in Figure 19-1, allows you to define the path for the objects to be copied. The active configuration allows you to control which output receives the build files. Each configuration creates its own folder structure within the output path.
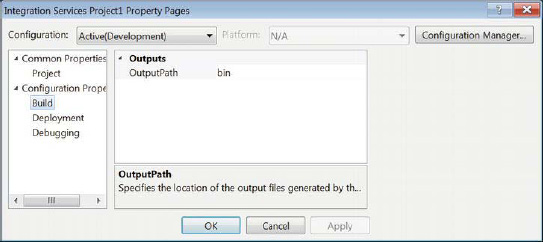
Figure 19-1. Project Property Pages—Build properties
The Configuration Manager button opens the Configuration Manager shown in Figure 19-2. This manager allows you to create multiple configurations to use for your build processes. Of the multiple configurations you can create, you must assign one as the default configuration for your solution. The manager also allows you to define the solution platform. In this particular example, the Development configuration is our active configuration for the solution. We base our builds on this configuration by selecting the check box in the Build column.

Figure 19-2. Project Configuration Manager
After the development is complete on all the packages, you need to use the Build utility within Visual Studio to build the project and its files. The Build utility works behind the scenes of Visual Studio and can be accessed by either right-clicking the project file in the Visual Studio Solution Explorer and selecting Build or by going to the Build menu and selecting Build project name. When you build a project for the first time, the directory specified as your output path will be created if it does not exist already. Inside this folder path, you will find a folder designated for the active solution configuration. This folder will contain a project name .ispac file, or Integration Services Project Deployment file. This file contains the deployment utility and can deploy the project to an Integration Services catalog.
In addition to the OutputPath being generated, the folder with the project file itself will create a folder path to store all the built objects. This folder, named obj, contains a subfolder for the active solution configuration. Within this folder, you will see a file for each of the packages and project parameters, the project connection managers, the project file, and the output log file.
The Deployment Process
After the project has been built, you will have the option to deploy to an Integration Services catalog on a SQL Server instance. Double-clicking the .ispac file in your active solution configuration’s folder will ensure that you deploy the latest build of your objects. The other approach to deploying your project is to right-click the project file in the Visual Studio Solution Explorer and select Deploy.
Prior to deploying a project to an Integration Services catalog, you need to enable Common Language Runtime (CLR) integration on the SQL Server instance. Running the code shown in Listing 19-1 will enable CLR integration. If you do not know whether CLR is enabled, you can simply run sp_configure to see the available options.
Listing 19-1. Enabling CLR Integration
sp_configure 'clr enabled', 1;

GO

RECONFIGURE;

GO
After CLR integration is enabled, you can create the Integration Services catalog by right-clicking the Integration Services folder on the SQL Server instance and selecting Create Catalog. A wizard, shown in Figure 19-3, guides you through the process of creating the catalog. The default name of the database is SSISDB and cannot be renamed. If you did not run the script in Listing 19-1 enabling CLR integration, the wizard can be used to enable this feature. The catalog is created in the databases folder of the SQL Server instance.
![]() CAUTION: In order to create the Integration Services catalog, you must provide a password. Make sure to save the password and have some process for backing up the encryption key frequently. This password is used to encrypt sensitive data that packages may contain, depending on the protection level that you choose.
CAUTION: In order to create the Integration Services catalog, you must provide a password. Make sure to save the password and have some process for backing up the encryption key frequently. This password is used to encrypt sensitive data that packages may contain, depending on the protection level that you choose.

Figure 19-3. The Create Catalog Wizard
With the catalog in place, you will have to create folders within it to store the deployed projects. You can create these folders by expanding the Integration Services tree to the catalog level. On the catalog, you can right-click and select Create Folder. The Create Folder Wizard, shown in Figure 19-4, will assist you in creating each folder.

Figure 19-4. The Create Folder Wizard
After you have the folders that you need in place, your Object Explorer should look similar to Figure 19-5. The Projects and Environments subfolders are automatically created within the specified folder. All the projects that are deployed to the SSIS11 folder will be listed in the Projects subfolder. We discuss the environments later in this chapter.
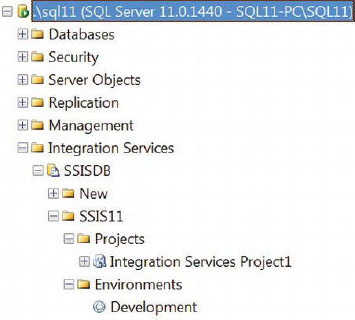
Figure 19-5. Object Explorer’s Integration Services tree
After the folder structure is in place, the Integration Services Deployment Wizard will guide you through the entire deployment process. Figure 19-6 shows the Select Source page of the wizard. This page allows you to specify the location of the project you want to deploy. The project itself is defined within either a project deployment file or Integration Services catalog. This page allows you to deploy a different project than the active project in the Solution Explorer or the selected .ispac file.

Figure 19-6. The Select Source page of the Integration Services Deployment Wizard
The Integration Services Catalog option allows you to deploy a project directly from one instance of SQL Server to another instance. The Project Deployment File option is the only option to move project objects from a file system to an Integration Services catalog. After you specify the project you want to deploy, you have to determine the destination of that project on the Select Destination page, shown in Figure 19-7.
Figure 19-7. The Select Destination page of the Integration Services Deployment Wizard
Unlike prior versions of Integration Services, there is no option to deploy to the file system. You need to specify a SQL Server instance with an Integration Services catalog as the destination of the project deployment. The Browse for Folder or Project dialog box allows you to navigate to the project file in the catalog that you want to associate with this deployment. The deployment wizard will give a warning if you are about to overwrite an existing project. After you have specified the destination server and folder path for the destination, you get a chance to review your configuration by using the Review page, as shown in Figure 19-8.

Figure 19-8. The Review page of the Integration Services Deployment Wizard
The Review page provides the details of the source and destination of the project deployment. Clicking the Deploy button initiates the process that installs the project to the destination. The Results page, shown in Figure 19-9, provides feedback along each step of the deployment process.

Figure 19-9. The Results page of the Integration Services Deployment Wizard
The Changing Protection Level step modifies the project protection level to use the encryption setting on the destination server. The key is created with the password you provided when creating the catalog. In order to find all the encryption keys that you have for your projects, you can query the internal.catalog_encryption_keys table on SSISDB.
Environments
Having deployed your project, you may want to emulate different scenarios that will execute the ETL processes. Environments allow you to provide values to all parameters within projects through their variables. These environment variables can also be used to configure connection managers so that data can be sourced and loaded according to the simulation you need to run.
![]() NOTE: Environment variable is a misleading term that may be confused with the operating system’s environment variables. The term simply applies to variables within environments the Integration Services catalog can be bound to deployed projects that exist on the catalog for execution purposes. Mappings can be created between these variables, and the different parameters can be configured for various projects.
NOTE: Environment variable is a misleading term that may be confused with the operating system’s environment variables. The term simply applies to variables within environments the Integration Services catalog can be bound to deployed projects that exist on the catalog for execution purposes. Mappings can be created between these variables, and the different parameters can be configured for various projects.
To create an environment, navigate to the Environments subfolder where you deployed your project. Right-click the subfolder and select Create Environment. This opens a window that will allow you to create the environment. Figure 19-10 shows the Create Environment Window. This window asks for basic information such as the new environment’s name and description.

Figure 19-10. The Create Environment Wizard
The Script button above the text fields enables you to generate a T-SQL script that will create the environment. Listing 19-2 shows the stored procedure and its parameters that will create the Development environment.
Listing 19-2. Creating an Environment
EXECUTE SSISDB.catalog.create_environment

        @environment_name=N'Development',

        @environment_description=N'',

        @folder_name=N'SSIS11'

;

GO
After creating the environment, you can add variables to it. Just as with creating an environment, you can use the window shown in Figure 19-11 or the code shown in Listing 19-3 to create environment variables. To open the window, you need to right-click the environment and select Properties. The advantage of using the window is that it will allow you to define multiple environment variables.

Figure 19-11. Environment properties
The T-SQL stored procedure for creating environment variables, catalog.create_environment_variable, uses all the columns shown in the window as parameters. The two parameters, @folder_name and @environment_name, help identify the environment where the variable will belong.
Listing 19-3. Creating an Environment Variable
EXECUTE SSISDB.catalog.create_environment_variable

        @folder_name = 'SSIS11',

        @environment_name = 'Development',

        @variable_name = 'TestingVariableMapping',

        @data_type = 'Int32',

        @sensitive = FALSE,

        @value = 0,

        @description = ''

;

GO
With the project, environment, and environment variables ready to go, you can configure the project to associate with the environment and its variables for specific execution simulations. The environment variables can be mapped to the different project and package parameters that are defined. You can set up these dependencies by navigating to the project in the Integration Services catalog, right-clicking it, and selecting Configure. Figure 19-12 shows the References page of the project’s configuration window. This page allows you to define the different environments that can pass values to the project during execution.

Figure 19-12. The References page of the Configure project window
![]() NOTE: Environments can be referenced from locations other than the project’s immediate folder structure. The environments do, however, need to be on the same SQL Server instance.
NOTE: Environments can be referenced from locations other than the project’s immediate folder structure. The environments do, however, need to be on the same SQL Server instance.
After the environment reference is set up, you can map project objects to variables within the environment. Figure 19-13 shows the Parameters page’s Parameters tab of the Configure projects window. This tab allows you to map values of all the parameters contained within the project to the environment variables’ values. The Scope drop-down allows you to find the parameters more easily. It can limit the parameters list to a specific package or parameter function. The tab also shows the default value defined for the parameter.

Figure 19-13. The Parameters page and Parameters tab of the Configure project window
The actual mapping for the parameter is generated by clicking the ellipsis button to the right of the Value field for the parameter. Clicking the button opens the window shown in Figure 19-14. The Edit Value option allows you to define a new static value for the execution regardless of the specified environment. The Use Environment Variable option will search the environments for the specified variable and map its value to the parameter. The environment variables available in the drop-down list will be those whose data types are compatible with the parameter’s data type.
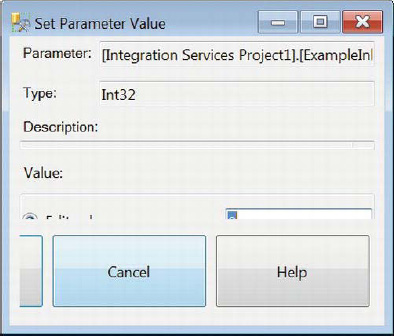
Figure 19-14. The Set Parameter Value window
![]() NOTE: When you define multiple environment references for the projects, we recommend that you define variables with the same names and types in all the environments. The drop-down list in the Set Parameter Value window allows you to specify the variable to map to the parameter.
NOTE: When you define multiple environment references for the projects, we recommend that you define variables with the same names and types in all the environments. The drop-down list in the Set Parameter Value window allows you to specify the variable to map to the parameter.
In addition to the parameters, the connection managers defined within the project can be mapped to environment variable values. The Connection Manager tab of the Configure project window’s Parameter page, shown in Figure 19-15, allows you to create these mappings. The Scope drop-down list is similar to the list in the Parameters tab in that it will filter the connection managers defined within the project so that you can map the values easily.
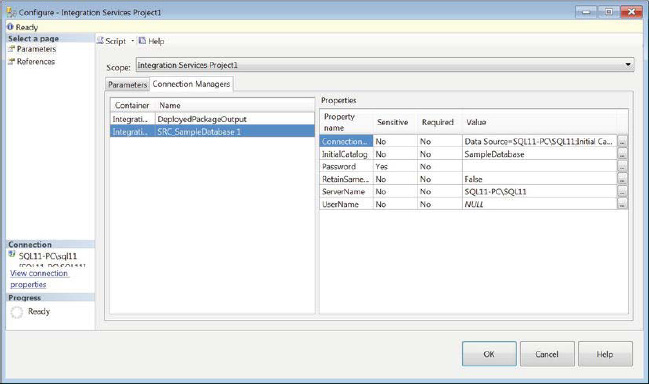
Figure 19-15. The Parameters page and Connection Managers tab of the Configure project window
The Set Parameter Value window allows you to map the property values of the connection managers to environment variables as well. The window, which is accessed by clicking the ellipsis button next to the Value field of the property that needs to be mapped, works the same way as the window that maps environment variables to parameters.
Execution
With the project deployed to the Integration Services catalog and configured, we can finally execute the ETL process on the server. This example demonstrates the dynamic parent-child design pattern. The versatility of this design pattern works seamlessly with the new deployment model. For more information about the parent-child design pattern, refer to Chapter 16.
In order to trace the execution of the individual packages, the packages contain a Script task that writes to a file on the file system. The file location is defined by the connection manager defined in the packages. Listing 19-4 shows the C# code that allows access to the file. The main() method calls the method appendToFile(string) in order to append the string parameter to the file. The file mode that is defined for the file stream object is Append, which allows the method to automatically add to the end of the file. The write mode allows read/write access to the file specified by the connection manager’s connection string.
Listing 19-4. Script Task Methods
public void Main(){
// TODO: Add your code here
string packageTime = Dts.Variables["System::StartTime"].Value.ToString() + "
";
string packageMessage = "The current package's name is: " +
Dts.Variables["System::PackageName"].Value.ToString() + "
";
appendToFile("**************************************************");
appendToFile(packageTime);
appendToFile(packageMessage);
Dts.TaskResult = (int)ScriptResults.Success;
}
private void appendToFile(string appendMessage)
{
try
{
FileStream fs = new
FileStream(Dts.Connections["DeployedPackageOutput"].ConnectionString.
ToString(), FileMode.Append, FileAccess.Write);
StreamWriter sw = new StreamWriter(fs);
sw.WriteLine(appendMessage);
sw.Close();
}
catch (IOException ex)
{
ex.ToString();
}
}
In order to execute a package that has been deployed as a part of a project, navigate to the package in the Integration Services catalog, right-click the package, and select Run. This pops up the Run Package window, shown in Figure 19-16, which allows you to configure the details of the execution. The first tab of the window, Parameters, allows you to configure the project-level parameters. For our demonstration, we will leave these values as the defaults from the project deployment. The execution of the packages takes place from the selected package’s scope. Only the specific package’s objects are configurable. In our case, the parameters and connection managers on CH19_Apress_DynamicParentPackage.dtsx are the only configurable objects.
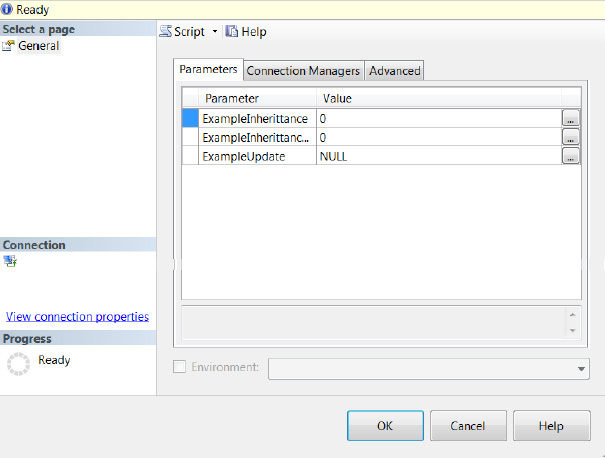
Figure 19-16. The Parameters tab of the Run Package window
The check box at the bottom allows you to use an environment that has been referenced in the project configuration. Selecting an environment will automatically apply the different object mappings that have been configured.
In order to modify the values of the parameters, the ellipsis button to the right of the Value field needs to be clicked. The Edit Literal Value for Execution window, shown in Figure 19-17, allows you to modify the value of any of the parameter values. Fill in the Value field with the value that is required for current execution. The values are used for only the current execution. If you need to reuse these values, we recommend creating an environment with the appropriate environment variables.

Figure 19-17. Edit Literal Value for Execution window
The Connection Managers tab, shown in Figure 19-18, shows the package’s connection managers. The same Edit Literal Value for Execution window is used to modify a connection manager’s property. Just like the parameter values, the value used applies only to the current execution. The value will default back to the original value that was provided when the project was deployed to the Integration Services catalog. If incorrect connection strings are passed in, the execution will fail and you will have to reconfigure all the properties. To avoid this hassle, we recommend that you design appropriate environments.

Figure 19-18. The Connection Managers tab of the Run Package window
The Advanced tab, shown in Figure 19-19, allows for the configuration of the minute details of the execution. The Property Overrides section allows you to specify the exact property that you need to modify. The Logging level lists the following execution logging options:
None disables logging for the execution. Selecting this option can provide some performance benefits, but depending on your standard operating procedures, logging may be required.
Basic logging records only error and warning messages.
Performance logging records all the events that are available.
Verbose logging records diagnostic information collected during the execution.
The Dump on Errors option allows you to create debug dump files in the case of errors during execution. The 32-Bit Runtime option allows you to run the package in 32-bit mode on a 64-bit machine. This option is vital if you are using providers that do not have a 64-bit driver, such as the Microsoft Jet Database Engine for accessing Microsoft Excel files.
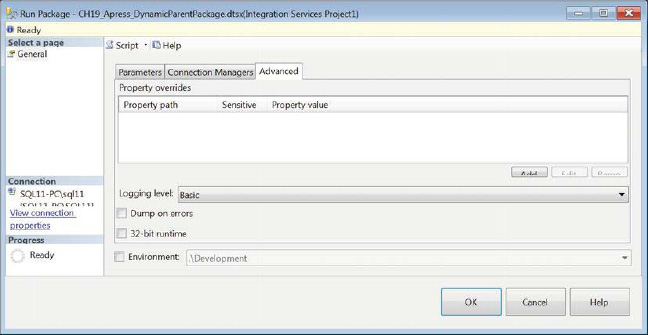
Figure 19-19. The Advanced tab of the Run Package window
![]() NOTE: Even though the Environment check box appears on all of the tabs, this checkbox applies to the execution as a whole. It does not use the mappings for the context of the tabs.
NOTE: Even though the Environment check box appears on all of the tabs, this checkbox applies to the execution as a whole. It does not use the mappings for the context of the tabs.
Specific package object properties are configured by clicking the Add button. The Property Override window, shown in Figure 19-20, allows you to identify the property by providing the property path. This identifies a property of a particular object that is defined within the package. The Property value field allows you to provide the override value for that property.
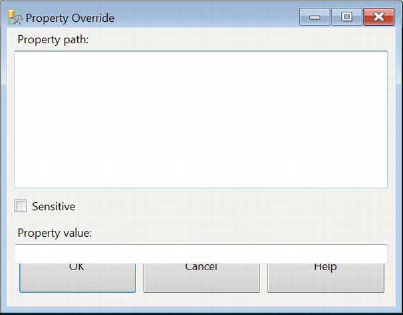
Figure 19-20. Property Override window
![]() CAUTION: There is no check to ensure that the value provided matches the data type of the property that needs to be overwritten. You should double-check the metadata before you start overriding properties.
CAUTION: There is no check to ensure that the value provided matches the data type of the property that needs to be overwritten. You should double-check the metadata before you start overriding properties.
With the configuration of the package’s execution complete, you can click the OK button to start the execution. As the execution starts, Management Studio will have a pop-up window providing you with the ID of the operation as well as the option to open the Overview Report. The Overview Report is a new addition to SQL Server 11 that provides a detailed report of SSIS package execution through the Integration Services catalog. Figure 19-21 shows the pop-up window that allows you to view the Overview Report of the execution.
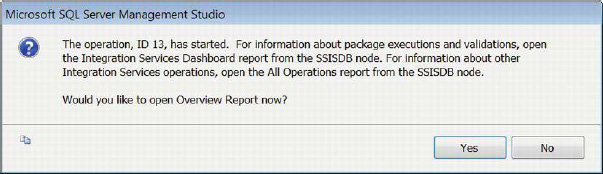
Figure 19-21. Overview Report request
Clicking the Yes button on the Overview Report request allows to you review all the details of the package execution. Figure 19-22 provides a snippet of the report, which contains information such as the start and end times of the package execution, the duration of the execution of each executable within the package, and in our particular example, the execution duration of child packages. There is a section that also reports the property overrides that were defined for the execution.

Figure 19-22. Execution Overview Report snippet
![]() NOTE: The Overview Report itself cannot be saved, but the history of all the executions is stored within the Integration Services catalog. To view the history of executions, navigate to the folder with the project whose history you need to review, right-click the folder, and select Reports> All Executions. This will provide you with a quick overview of the different executions. If you wish to see a catalog-wide history of SSIS package executions, right-click the catalog instead of a particular folder. These reports are created by using Report Definition Language (RDL), and as such custom reports can be created and added to allow viewing from within SSMS.
NOTE: The Overview Report itself cannot be saved, but the history of all the executions is stored within the Integration Services catalog. To view the history of executions, navigate to the folder with the project whose history you need to review, right-click the folder, and select Reports> All Executions. This will provide you with a quick overview of the different executions. If you wish to see a catalog-wide history of SSIS package executions, right-click the catalog instead of a particular folder. These reports are created by using Report Definition Language (RDL), and as such custom reports can be created and added to allow viewing from within SSMS.
With the use of File Connection Manager, the Script tasks within each package appended a string to a file that existed in a location where the server had access. Listing 19-5 shows the contents of the files after two executions of CH19_Apress_DynamicParentPackage.dtsx.
Listing 19-5. CH19_Apress_DynamicParentPackage.dtsx Result
**************************************************

10/1/2011 11:55:30 AM


The current package's name is: CH19_Apress_DynamicParentPackage
10/1/2011 11:55:35 AM
The current package's name is: CH19_Apress_ChildPackage
10/1/2011 11:55:38 AM
The current package's name is: CH19_Apress_ChildPackage1
10/1/2011 11:55:42 AM
The current package's name is: CH19_Apress_ChildPackage2
**************************************************
10/10/2011 12:05:46 AM
The current package's name is: CH19_Apress_DynamicParentPackage
10/10/2011 12:05:49 AM
The current package's name is: CH19_Apress_ChildPackage
10/10/2011 12:05:49 AM
The current package's name is: CH19_Apress_ChildPackage1
10/10/2011 12:05:50 AM
The current package's name is: CH19_Apress_ChildPackage2
![]() NOTE: This dynamic parent package had a similar setup to the dynamic parent package demonstrated in Chapter 16. As you can see, the disabled child package did not append a string to the file indicating that the package property value was overwritten by the parameter mapping that was configured in the parent package.
NOTE: This dynamic parent package had a similar setup to the dynamic parent package demonstrated in Chapter 16. As you can see, the disabled child package did not append a string to the file indicating that the package property value was overwritten by the parameter mapping that was configured in the parent package.
The Import Process
The import process refers to using the Integration Services Import Project Wizard to import an existing project into a new one. The wizard looks very similar to the deployment wizard except that it does not allow you to specify a destination for the imported project. After you import the project from its source, you can copy and paste it to the appropriate location. We discussed this process in Chapter 2.
The Migration Process
The migration process has been introduced with this version of SSIS to allow for legacy projects to comply with the new deployment model and features. This process is used also because prior versions of SSIS used Visual Studio 2005 and 2008, whereas the latest version uses Visual Studio 2010. The Visual Studio Conversion Wizard is designed to make the process as painless as possible. When you attempt to open a project file from a prior version of SSIS, Visual Studio will automatically prompt you with the wizard shown in Figure 19-23. This wizard will then guide you through the steps of upgrading your project files.

Figure 19-23. Visual Studio Conversion Wizard—Introduction
Because Visual Studio already knows the project you are trying to upgrade, it will not bother asking you for the location of the project file and items that belong to the project. The next page of the wizard, shown in Figure 19-24, gives you the option of creating a backup of the files before you convert. We highly recommend that you take redundant backups before you proceed. You can always go back and clean up, but if the only copy is corrupted, it is corrupted. Having a source code versioning system can also provide some peace of mind. The second page of the wizard allows you to specify the location of the backup.
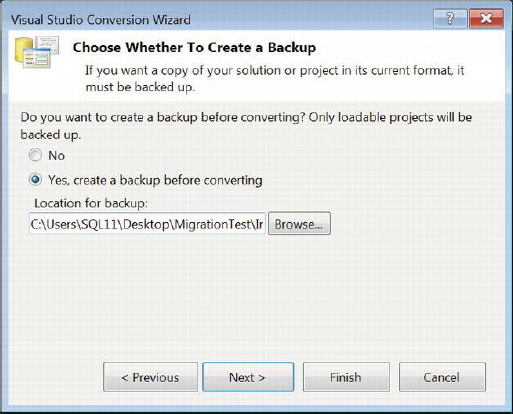
Figure 19-24. The Visual Studio Conversion Wizard’s backup options
Before Visual Studio converts the files, it provides one last warning about version control. The last page of the wizard is shown in Figure 19-25. It shows a summary of the location of the project and the backup. Clicking Finish will prompt a message reporting a successful completion of the process. After you close the wizard, you will leave the project and all the items loaded in the Solution Explorer of that specific Visual Studio window.

Figure 19-25. Visual Studio Conversion Wizard—Summary
![]() CAUTION: Visual Studio 2010 will not open project files from prior versions without upgrading the files. Ensure that you have proper backups of the legacy code before attempting to upgrade to the latest version.
CAUTION: Visual Studio 2010 will not open project files from prior versions without upgrading the files. Ensure that you have proper backups of the legacy code before attempting to upgrade to the latest version.
Summary
With the introduction of the new deployment model in SSIS, you can now deploy your ETL processes to SQL Server without the overhead that existed in prior versions. The new environments and the environment variables remove the need for maintaining configurations for the deployment to different testing and production environments. We showed you how to build and deploy your SSIS project to SQL Server as well as how to migrate your legacy SSIS packages to the new model. The next chapter covers source control and SSIS administration and security.