C H A P T E R 2
BIDS and SSMS
At each increase of knowledge, as well as on the contrivance of every new tool, human labour becomes abridged.
—Inventor Charles Babbage
After gathering the requirements and specifications for the new processes, it is time to design the ETL flow. This includes deciding the tools to use, the time frames for data processing,the criteria for success and failure, and so forth. One of the integral parts of deciding which tools to use is determining the sources for the data and the capability of the tools to gain access to it with ease and to extract it efficiently. As we discussed in Chapter 1, efficiently describes the taxing of the network, hardware, and overall resources optimally. One of the best characteristics of SSIS is its ease of development and maintenance (when best practices and standards are followed), the widerange of sources it can access, the transformations that it can handle inflight, and most important, cost, as it comes out of the box with SQL Server 11.
When installing SQL Server 11, you have options to install three toolsets essential for developing ETL processes: Business Intelligence Development Studio (BIDS), SQL Server Management Studio (SSMS)—Basic, and Management Studio—Complete. BIDS uses the Visual Studio 2010 platform for the development of SSIS packages as well as the creation of projects that cater to the components of the SQL Server 11 suite. Management tools include SSMS, the SQL Server command-line utility (SQLCMD), and a few other features. With these core components, developers can issue Data Definition Language (DDL) statements to create and alter database objects. They can also issue Data Manipulation Language (DML) statements to query the database objects using Microsoft’s flavor of the Standard Query Language (SQL), Transact-SQL (T-SQL). Data Control Language (DCL) allows users to configure access to the database objects.
This chapter covers the project templates that BIDS supports.It also provides a brief overview of the elements of the SQL Server 11 suite.
SQL Server Business Intelligence Development Studio
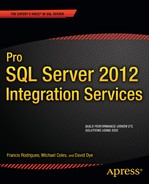
BIDS, which utilizes Visual Studio 2008 as the development platform, supports a few project templates whose sole purpose is to provide insight into data. This insight can come from moving pertinent data from a source to a database (ETL processes using SSIS projects), from developing cubes that can provide optimal high-level summaries of data (cubes developed using SQL Server Analysis Services, SSAS projects), and from creating reports that can be run directly against databases or cubes (reports designed using SQL Server Reporting Services, SSRS projects). Figure 2-1 shows the business intelligence projects that are available within Visual Studio.
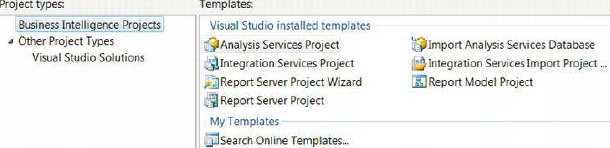
Figure 2-1. Projects available with BIDS
For SQL Server 11, the projects require the installation of .NET Framework 3.5. Visual Studio solutions can maintain multiple projects that address the different disciplines within the SQL Server suite. A few elements carry across multiple projects. These elements are listed next, and logically tie together at a solution level:
- Data sources are the disparate sources that have the data that will be imported by the members. These sources can be created by using a wizard and edited through the designer.Various components within the project can access these connections.
- Data source views(DSVs) are essentially ad hoc queries that can be used to extract data from the source. Their main purpose is to store the metadata of the source. As part of the metadata, key information is also stored to help create the appropriate relationships within the Analysis Services database.
- Miscellaneousis a category includingall files that serve a support function but are not integral. This includes configuration files for Integration Services.
Analysis Services Project
The Analysis Services project is used to design, develop, and deploy a SQL Server 11 Analysis Services database. More often than not, the purpose of ETL projects is to consolidate several systems into one report-friendly form in order to summarize activity at a high level. Analysis Services cubes perform roll-up calculations against dimensions for quick and efficient reporting. This project template provides a folder structure depicted in Figure 2-2 that is needed to develop an Analysis Services database. After development, the cube can be deployed directly to Analysis Services.
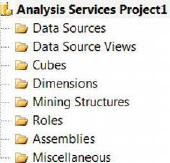
Figure 2-2.Folder structure for an Analysis Services project
These folders organize the files in a developer-friendly format. This format also helps with building and deploying projects. A partial list of the folders is listed below:
- Cubescontains all the cubes that are part of the Analysis Services database. The dimensions can be created using a wizard, utilizing the metadata stored within the DSVs.
- Mining Structures apply data-mining algorithms on the data from the DSVs. They can help create a level of predictive analysis depending on the quality of the data and the usage of the appropriate algorithm. You can use the Mining Model Wizard to help create these as well as the Mining Model Designer to edit them.
- Rolescontains all the database roles for the Analysis Services database. These roles can vary from administrative permissions to restrictions based on the dimensional data.
- Assemblies holds all the references to Component Object Model,COM, libraries and Microsoft .NET assemblies.
![]() TIP: SSIS packages can be used to process cubes. These packages can be executed at the end of a successful ETL process.
TIP: SSIS packages can be used to process cubes. These packages can be executed at the end of a successful ETL process.
The Analysis Services database, like Integration Services, can source data from a variety of locations and physical storage formats. The DSVs use the same drivers and are not necessarily limited to the SQL Server database engine. Prior versions of SQL Server as well as other relational database management systems (RDBMSs) are available as sources. The languages for querying SQL Server cubes arecalled Multidimensional Expressions (MDX) and Data Mining Extensions (DMX). Some of the objects that can be defined in a cube for analytic purposes are measures, measure groups, attributes, dimensions, and hierarchies. These objects are critical in organizing and defining the metrics and the descriptions of those metrics that the end user is most interested in.Another important feature that Analysis Services provides is the concept ofkey performance indicators (KPIs).KPIscontain calculations related to a measure group. These calculations are vital in evaluating the performance of a business.
Integration Services Project
The Integration Services project template enables the developer to create SSIS packages. The package is the executable work unit within SSIS. It consists of smaller components that can be executed individually during development, but Integration Services executes at the package level. The debugging option in Visual Studio will execute the package as a whole,but the control flow executables can also be individually tested. Figure 2-3 shows a sample Integration Services project. This project will automatically be added to your current solution if you have one open. Otherwise, a temporary solution will be created.
![]() NOTE: Even though Visual Studio has the ability to execute packages, we recommend using the command line to execute them when testing. Visual Studio debugging mode should be used during development. Wediscuss more options on running SSIS packages in Chapter 20.
NOTE: Even though Visual Studio has the ability to execute packages, we recommend using the command line to execute them when testing. Visual Studio debugging mode should be used during development. Wediscuss more options on running SSIS packages in Chapter 20.
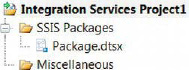
Figure 2-3.Folder structure for an Integration Services project
The following list describes the objects and folders that will appear in your project:
- SSIS Packages contains all the packages associated with the project. These work units are the actual components that will execute the ETL.All the packages are added to the
.dtprojfile. This XML-based file lists all the packages and configurations that are part of the project.- Miscellaneous contains all the file types other than the
.dtsxfiles. This folder is essential for storing configuration files and will be useful for consolidating connections, especially when utilizing a source control application. Team Foundation Server is introduced later in this chapter.
![]() NOTE: With SQL Server 11, data sources and data source views cannot be added to a project. Instead, these connections can be added to the individual packages. In prior versions, data sources could be added as connection managers and were allowed to refer to the included DSVs as the tables in source components. Using this methodology to access data on SQL Server was not the optimal way to extract data.
NOTE: With SQL Server 11, data sources and data source views cannot be added to a project. Instead, these connections can be added to the individual packages. In prior versions, data sources could be added as connection managers and were allowed to refer to the included DSVs as the tables in source components. Using this methodology to access data on SQL Server was not the optimal way to extract data.
The debugging option in Visual Studio executes the current package. This feature is useful for watching the behavior of the package (how quickly rows pass through the components in the Data Flow tasks, how quickly executables complete, the successful matches of Lookups and Merge Joins, and so forth). During the execution, three colors indicate the status of the executable and data flow components: yellow—in progress, red—failure, and green—success. This use of different colors is helpful during development because it shows how the precedence constraints and the Data Flow tasks move the data through.
![]() NOTE: Unless a package calls another package as an executable, the current package is the only one that will run in Debug mode, not all the packages in the project. Visual Studio will open every package that is called in a parent-child configuration and execute them. If there are too many packages, certain ones may open with a Memory Overflow error displayed, but the package may execute in the background and continue onto the subsequent packages.
NOTE: Unless a package calls another package as an executable, the current package is the only one that will run in Debug mode, not all the packages in the project. Visual Studio will open every package that is called in a parent-child configuration and execute them. If there are too many packages, certain ones may open with a Memory Overflow error displayed, but the package may execute in the background and continue onto the subsequent packages.
TO UNDO OR REDO, THAT IS THE QUESTION
Report Server Project Wizard
The Report Server Project Wizard allows you to automatically create a Report Server project. You have to specify the connections to data sources, including security information if necessary, queries for the reports, and so forth. After the project has been created, the Report Designer can be used to make all the modifications.
Report Server Project
The Report Server projectallows the developer to create all the objects necessary for reports. The reports can be deployed on a portal, where end users can access them. The portal can utilize SharePoint, where users can even save their own reports that they frequently utilize. Usually a web browser is used to access the reports. Reports should use a cube if they summarize data (that is, perform counts, sums, and averages). If the reports display detail-level information, querying a database is most likely the more efficient route. Including too much detail on a report can impact the load time on the end user’s browser as well as the query time on the server. Figure 2-4 demonstrates the folder structure that is available for Report Server projects.

Figure 2-4.Folder structure for a Report Server project
The folders contain objects that perform the following tasks:
- Shared Data Sourcescontains necessary components of the Report Server project. These components allow the reports to connect to the data sources that will be the basis for the reports.
- Shared Datasetscontains multiple reports used to source common datasets.
- Reports stores all the
.rdlfiles that are the actual reports. You can modify the reports by using the designer.
When you are creating reports, the Design view enables you to modify the visual layout of the page and the code for the data that goes into each element. Depending on the source for the data, you will have to use the appropriate variant of SQL or MDX. Sources for reports can include RDBMSs, report models, and XML. In addition to the Design view, there is a Preview view that can be used to run the report to make sure that the data renders as desired. Using this view caches the data locally on the developer’s machine, so clearing the cache often is recommended.
Import Analysis Services Database
The Import Analysis Services Database project template automatically generates all the items of an Analysis Services project. The wizard asks you to point to anAnalysis Services database. The wizard will reverse-engineer all the project items based on the existing database. The project can be used to modify the objects and redeploy them to the server to update the database.
Integration Services Project Wizard
The Integration Services Project Wizard will automatically generate all the items of an Integration Services project. The wizard will ask for the source of an existing project (either the .dtproj file or a package deployed on a SQL Server instance). This wizard will import all the objects from the existing project.
Report Model Project
The Report Model project utilizes SQL Server databases to generate reports. By definition, a report model stores the metadata of its sources and their relationships. The data sources allow you to access the DDL of the specified source and utilize it for the report models. The DSVs allow you to store the metadata from the sources and generate models for reporting. The Model Designer can create report models by using the SQL Server or Oracle 9.2.0.3 and later versions of the RDBMSs. While models based on an RDBMS can be modified, those based on Analysis Services cannot. All the data within a data source is automatically included in the model. Figure 2-5 demonstrates all the objects and folders available to a Report Model project.
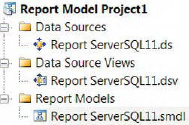
Figure 2-5. Folder structure for a ReportModel project
![]() NOTE: An
NOTE: An.smdl file can refer to only one data source (.ds) and one data source view (.dsv). This limitation will prevent you from performing cross-database joins.
There are three parts to the report model: the Semantic model, which assigns business-friendly names to the data objects; the Physical model, which represents the objects in data source views and outputs metadata of queries contained within; and the mapping, which aligns the Semantic and Physical models. The Semantic Model Definition Language (.smdl) contains only one Semantic and Physical model, and mapping. As Figure 2-6 demonstrates, the DDL can be read by the designer and used to generate a model that describes the objects of the data source view.
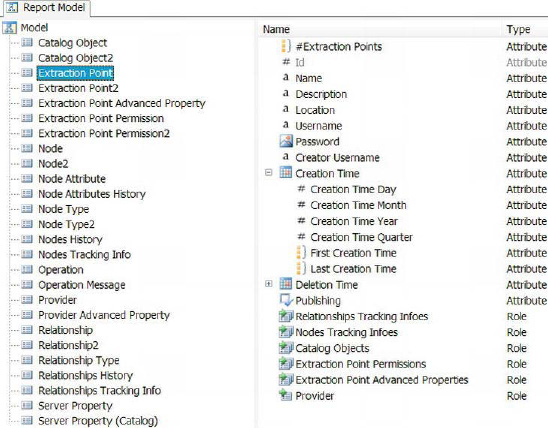
Figure 2-6. Model for import from a DSV
Deploying the Report Model project allows end users access to the data that is present in the underlying databases. The project needs to be deployed to a report server, where the users have access to it.
Integration Services
The basis forenterprise ETL processes in SQL Server 11 is the SSIS package.The Development Studio has undergone some radical changes since SQL Server 2008 in terms of the interface and some performance enhancements in the components. Developing packages begins with a Visual Studio 2008 BIDS project. The project file (.dtproj) will be the manager of the packages. It enumerates the packages that will be built and deployed; we discuss this process in greater length later in Chapter 19. The project file also assists with development within Team Foundation Server (TFS), a Visual Studio code repository system. Setting up TFS and working within this framework of source control is covered in Chapter 20. During the build process, all the configuration files (.dtsxConfig) will be created as listed in each of the packages included in the project.
One of the biggest changes that will get developers excited is the ability to undo and redo changes. In prior versions of the toolset, you had to close the package without saving changes and reopen the package. This meant that if you wanted to maintain a change but had made an unwanted one after it, your only option was to close the package without saving. The other alternative was to disable tasks, which often lead to packages that were swamped with disabled executables or containers. Figure 2-7 shows the history of changes that the Undo and Redo functionality now provides.
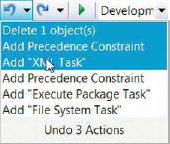
Figure 2-7. Undo and Redo functionality
Project Files
Some of the changes in SSIS 2012 are the properties available for project files. The properties of the project file allow for the configuration of build process— namely, the folder path of the packages. The folder path property also allows the user to directly deploy the project onto a SQL Server database, an Integration Services catalog. The Integration Services catalog is discussed in further detail in Chapter 18. Manually adding or deleting package (.dtsx) files in the file system will not modify or update the project file. In fact, deleting packages from the file system will actually corrupt the project. Listing 2-1 demonstrates the XML tags that can be modified to add or remove packages from the project.
![]() NOTE: We recommend adding existing packages within Visual Studio. However, if a package already exists in the project folder, a copy of the original package will be created and the copy will be added to the project by Visual Studio. Usually the copy package name will be appended with “(1)”.
NOTE: We recommend adding existing packages within Visual Studio. However, if a package already exists in the project folder, a copy of the original package will be created and the copy will be added to the project by Visual Studio. Usually the copy package name will be appended with “(1)”.
Listing 2-1. Sample from a Project File
<Database>

<Name>Integration Services Project1.database</Name>

<FullPath>Integration Services Project1.database</FullPath>

</Database>

<DataSources />

<DataSourceViews />

<DeploymentModelSpecificContent>

<Manifest>


<SSIS:Project SSIS:ProtectionLevel="DontSaveSensitive"

xmlns:SSIS="www.microsoft.com/SqlServer/SSIS">


<SSIS:Properties>

<SSIS:Property SSIS:Name="ID">{bf2a36bf-0b7c-471d-95c7-3ee9a0d74794}

                </SSIS:Property>
<SSIS:Property SSIS:Name="Name">Integration Services Project1</SSIS:Property>

<SSIS:Property SSIS:Name="VersionMajor">1</SSIS:Property>

<SSIS:Property SSIS:Name="VersionMinor">0</SSIS:Property>

<SSIS:Property SSIS:Name="VersionBuild">0</SSIS:Property>

<SSIS:Property SSIS:Name="VersionComments">

</SSIS:Property>

<SSIS:Property SSIS:Name="CreationDate">

        2011-02-14T22:44:55.5341796-05:00</SSIS:Property>

<SSIS:Property SSIS:Name="CreatorName">SQL11</SSIS:Property>

<SSIS:Property SSIS:Name="CreatorComputerName">SQL11</SSIS:Property>

<SSIS:Property SSIS:Name="OfflineMode">0</SSIS:Property>

<SSIS:Property SSIS:Name="Description">

</SSIS:Property>

</SSIS:Properties>


<SSIS:Packages>

<SSIS:Package SSIS:Name="Package.dtsx" SSIS:EntryPoint="1" />

</SSIS:Packages>

<SSIS:Parameters />


<SSIS:DeploymentInfo>

<SSIS:PackageInfo>

<SSIS:PackageMetaData SSIS:Name="Package.dtsx">

<SSIS:Properties>

<SSIS:Property SSIS:Name="ID">{A41A08A6-7C50-4DEC-B283-D76337E73505}</SSIS:Property>

<SSIS:Property SSIS:Name="Name">Package</SSIS:Property>

<SSIS:Property SSIS:Name="VersionMajor">1</SSIS:Property>

<SSIS:Property SSIS:Name="VersionMinor">0</SSIS:Property>

<SSIS:Property SSIS:Name="VersionBuild">1</SSIS:Property>

<SSIS:Property SSIS:Name="VersionComments">

</SSIS:Property>

<SSIS:Property SSIS:Name=

        "VersionGUID">{9181C329-7E44-4B3D-B125-14D94639BF03}</SSIS:Property>

<SSIS:Property SSIS:Name="PackageFormatVersion">6</SSIS:Property>

<SSIS:Property SSIS:Name="Description">

</SSIS:Property>


<SSIS:Property SSIS:Name="ProtectionLevel">0</SSIS:Property>


</SSIS:Properties>


<SSIS:Parameters />


</SSIS:PackageMetaData>

</SSIS:PackageInfo>

</SSIS:DeploymentInfo>

</SSIS:Project>

</Manifest>

</DeploymentModelSpecificContent>

<Miscellaneous />

<Configurations>


<Configuration>


<Name>Development</Name>
<Options>


<OutputPath>bin</OutputPath>


<ConnectionMappings />

<ConnectionProviderMappings />

<ConnectionSecurityMappings />

<DatabaseStorageLocations />

<ParameterConfigurationValues />

</Options>

</Configuration>

</Configurations>
This portion of a simple project file contains all the essential elements to developing and using an SSIS ETL process. As you may have guessed, this information is stored as Extensible Markup Language (XML). This makes it feasible to modify the project directly by editing the XML.
We would like to highlight the following key tags/properties (further details are discussed in later chapters):
ProtectionLevelallows you to secure sensitive information such as credentials. This property can be set at the project level as well as the package level. However, both settings should be the same. All the packages within a project need to have the same protection level set as the project file when building the project. We discuss this property at greater length in Chapter 19.
Packagescontains all the packages that are associated with the project. Copying and pasting this tag and modifying the name to reflect a package that exists in the working directory will forciblyadd the package to the project. When the project is opened in Visual Studio, the package will be listed in the packages folder. Modifying the project file directly can sometimes help avoid the hassle of creating clean file names as opposed to using the Visual Studio wizard to add existing packages.
Parameterscan be used at runtime to set values in the package. This property allows for certain components of the package to change values. The most notable place for this is in the OLE DB source component that can parameterize a SQL statement. Parameterizing a package is covered in greater detail in Chapter 16.
Configurationdetermines whether you build or deploy the project. By default,the property is set to build the project. Different settings can be used for the various configurations that you create, depending on the purpose for each configuration. The configuration manager on the Project Settings allows you to create different configurations.
OutputPathsets the folder path to the objects that will be built for the project. By default, it is set to the bin directory. When the deployment utility needs to be created, a different path can be defined. In 2005 and 2008, creating the deployment utility used the default folder path ofbinDeployment.
Tool Windows
The BIDS environment provides tools that organize all the components into easy-to-find sections. To begin, a Start page contains some important reference items. The Recent Projects panel contains a history of some of the projects that were opened. At the bottom of this pane are links to open existing projects anda link to create BIDS projects and other Visual Studio projects. The Getting Started pane contains links to BOL topics that can help developers learn the toolsets. If the Team Foundation Server Team Explorer utility is installed, a Source Control page is available. This page allows the developer to quickly access the projects assigned to him or her and refresh the copies of the code with specific versions stored on the repository.
The Tool window within BIDS assists with the development, as shown in Figure 2-8. The middle section is the actual designer for SSIS packages. An addition to the designer comes in the form of a Zoom tool that is clear when it is inactive, but when the mouse hovers over it, it becomes opaque. Right below the Zoom scale is a Zoom-to-Fit button that will automatically determine the best zoom level to show the contents while maintaining the current arrangement.
Below the designer are the connection managers. These are the sources and destinations for the ETL process. They contain the connection information such as server name, database name, and depending on the protection level that is defined, security credentials. Drivers might be needed for certain connections to be created. Only certain drivers come by default. Others can be obtained from Microsoft. Most of the drivers are free to download from Microsoft; other companies may charge for them. Certain practices should be followed when using or naming connection managers; we discuss them in Part 2 of the book.
![]() NOTE: If the BIDS tools are installed on a 32-bit operating system, only the 32-bit version of the drivers will be installed. On a 64-bit operating system, both 32-bit and 64-bit tools will be installed. It is also important to note that not all 32-bit tools are available in 64-bit. The Microsoft OLE DB Provider for Jet (Office Access and Excel engine) and the SQL Server Compact Provider (SQL Server Compact) are not available in 64-bit. In a 64-bit environment, the default execution of the packages in Visual Studio utilizes the 64-bit tools. If these are unavailable, the package will either hang or fail. The
NOTE: If the BIDS tools are installed on a 32-bit operating system, only the 32-bit version of the drivers will be installed. On a 64-bit operating system, both 32-bit and 64-bit tools will be installed. It is also important to note that not all 32-bit tools are available in 64-bit. The Microsoft OLE DB Provider for Jet (Office Access and Excel engine) and the SQL Server Compact Provider (SQL Server Compact) are not available in 64-bit. In a 64-bit environment, the default execution of the packages in Visual Studio utilizes the 64-bit tools. If these are unavailable, the package will either hang or fail. The Run64BitRuntimeproject property controls this execution. When set to True, all the packages associated with the project will be run in 64-bit mode.False results in 32-bit execution.
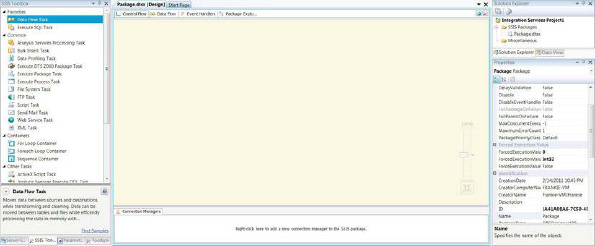
Figure 2-8. Tool window for SSIS 2011
Designer Window
The tabs across the top of the designer show the controls for the ETL process. The control flow consists of the three distinct types of components: containers that can logically group tasks together, tasks for the package’s functional requirements, and the precedence constraints that control and order the flow between the executables, containers, and tasks. We cover the control flow in detail in Chapters 5 and 6.
The Data Flow tab is the designer that allows the developer to take control of the actual dataprocessing. The Data Flow task is the component that moves data from the sources to the destinations, while allowing for transformations to occur inflight.
The Event Handlers tab allows for actions to be designedfor runtime events according to the triggers that are activated (OnError, OnExecStatusChanged, and so forth). The triggers can be attached to all the executables and tasks in the package. We give an in-depth walk-through of event handling in Chapter 10.
The Package Explorer tab provides a quick glance at the entire package. It shows all the contents of the package in tree view, as shown earlier in Figure 2-8. As you can see in the figure, the variables appear in different places; this is due to thedefined scope of the variable. Variables are discussed in Chapter 11.
One of the new features that has been added with regards to variables is the addition of a variable property, RaiseChangedEvent. This allows for certain change criteria to trigger events that can be captured by the event handlers. It also allows for SSIS logging to capture this event through the log provider you use. Figure 2-9 shows the tree diagram view of the objects in a package.
![]() NOTE: When developing SSIS packages, the concept of focus plays an important role. Focus basically means which component is currently selected. This is critical to keep in mind when creating variables. Having a container or an executable accidentally selected when creating a variable will limit it to that particular object. BIDS allows you to “move” variables between scopes. However, all Visual Studio does is create a new variable in the new scope with the name of the original variable having a
NOTE: When developing SSIS packages, the concept of focus plays an important role. Focus basically means which component is currently selected. This is critical to keep in mind when creating variables. Having a container or an executable accidentally selected when creating a variable will limit it to that particular object. BIDS allows you to “move” variables between scopes. However, all Visual Studio does is create a new variable in the new scope with the name of the original variable having a 1 appended, and then Visual Studio deletes the original variable.
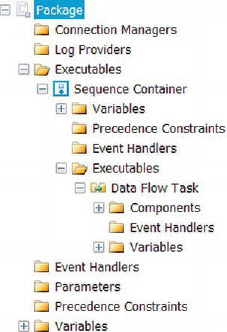
Figure 2-9. The Package Explorer
During the execution of the package, a Progress tab appears to the right of the Package Explorer tab. This tab continuously updates with the current state of the execution process until the end with either a success or failure. This tab will show which executable(s) is currently running, the number of rows that lookup components have cached, and more. It also captures the progress of the pre-execute processing as well as the post-execute processing. After the execution, it renames itself to the Execution Results tab. The Execution Results tab contains the same output as the very end of the Progress tab. One of the most critical pieces of information stored in the Execution Results tab is the number of rows committed to the destinations.
At the top-right corner of the Designer window, there are two buttons. These buttons are shortcuts to the Parameters and Variableswindow pane and the SSIS Toolbox window pane. They come in handy when trying to quickly look at the parameters and variables and the tools available for the selected context.
Resolve References
An exciting new feature for the data flow is the Resolve References utility. This is available by right-clicking on a data flow path between two components and selecting Resolve References. This is a powerful tool because it allows mappings to be generated and maintained in an Excel spreadsheet and then simply be added as the mapping between the source and the input of the destination. This is a vast improvement on the previous version’s Restore Invalid Column References Editor that usually caused worry among developers when it was used. Figure 2-10 displays the Resolve References utility as it appears in Visual Studio.

Figure 2-10. Resolve References utility
This tool can quickly update the metadata due to DDL changes or source/destination changes. Its usefulness comes in the ability to see all the columns in the pipeline at once as opposed to seeing them in a drop-down list, one column mapping at a time. In the Mapped Columns pane of the utility, the buttons perform the following functions from left to right:
Automap Columns attempts to best match the columns in the source and the columns in the destination based on the name. This feature has been present in SSIS in previous versions, usually generating the mappings in destination components.
Insert Cell allows you to stagger present mappings without losing all the mapped columns currently present. It will shift the cells down from the currently selected cell in either the Source or the Destination column.
Insert Row inserts a whole row so that entirely new mappings can be constructed. As in set theory, order is not important. The order that the mappings present themselves does not matter, just as long as the mappings exist.
Delete Cell shifts the cells up to the current highlighted cell. This can be used to shift the mappings from their correct position.
Delete Row deletes an entire row of unwanted mappings. Use this to remove columnmappings—for example, if the Automap feature created a relationship between unrelated columns.
Eliminate Blank Rows deletes all the rows that do not contain both sides of the mapping. It will not delete a row if there is a Source or a Destination columnpopulated.
Copy Mappings to Clipboard copies the contents of the entire mapping table in Excel format. This can be used to store the mappings in a spreadsheet for documentation purposes.
Paste from Clipboard pastes the contents of the Clipboard into the utility. It will allow you to paste columns that don’t exist in the metadata, but after the grid is populated, it will validate the mappings. If the columns do not exist, error messages will appear at the bottom of the pane informing you that the column specified does not exist. Also, pasting always appends to the existing mappings; you cannot overwrite a mapping if it is already present in the table. The only prerequisite to using this button is making sure that there are only two columns in the Clipboard.
Clear All Mappings wipes away the contents of the mapping table and moves the columns back to their respective panes, Unmapped Output Columns and Unmapped Input Columns.
![]() NOTE: If columns are removed from the source of a data flow, they will be recognized as still existing upstreamin the pipeline when a component downstream is still using it in its mapping.After the dependencies are removed, the column will be removed from the pipeline.
NOTE: If columns are removed from the source of a data flow, they will be recognized as still existing upstreamin the pipeline when a component downstream is still using it in its mapping.After the dependencies are removed, the column will be removed from the pipeline.
In order to keep the packages organized and readable, a menu item named Format allows you to line up the elements of the control flow and the data flow according to your desires. For simple flows, the Auto Layout should suffice to make the package presentable. For more-complex packages, there are options to align the components, to modify the distance between them, and to make them the same size. For these options, the components to which the formatting is to be applied need to be selected prior to applying these changes. The first component selected will be the reference for the rest of the components. For example, the other components will have their alignment determined with respect to the first selected component.
SSIS Toolbox
To the left of the Designer window is the SSIS Toolbox. This is a name change from prior versions of BIDS, where it was known as justToolbox. There is a Toolbox still present in Visual Studio, but it does not have any components for the SSIS Designer.The SSIS Toolbox changes to show only the components that are pertinent to the current view of the designer.
At the bottom of the SSIS Toolbox, there is a brief description of the selected component that can be helpful for first-time developers. Right-clicking the description shows the option to Show Type Information. This option gives detailed information about the selected tool, such as the assembly name and the location of the .dll. With this description, there are two reference points, a Help button in the top-right corner of this section and the Find Samples hyperlink, which takes you to CodePlex with a prepopulated search.
The SSIS Toolbox is organized in a completely different way than previous versions. The new organization of the Control Flow components is organized into four groups: Favorites, Common, Containers, and Other Tasks. The Favorites by default include the workhorses of the SSIS world, the Data Flow task and the Execute SQL task.
![]() TIP: By default, SSIS 11 has its own grouping of components, but this grouping can be changed according to your needs. Tasks can be moved to the other groupings by right-clicking the component and moving it to the desired grouping. Containers are the exception; they can be moved only to Favorites or Common.
TIP: By default, SSIS 11 has its own grouping of components, but this grouping can be changed according to your needs. Tasks can be moved to the other groupings by right-clicking the component and moving it to the desired grouping. Containers are the exception; they can be moved only to Favorites or Common.
The SSIS Toolbox for the data low is organized in a similar fashion to the control flow. The components are divided into categories: Favorites, Common, Other Transforms, Other Sources, and Other Destinations. Just as with the control flow tasks, this grouping is modifiable to a degree for personal preferences. The default favorites for the data flow are new to SSIS:the Destination Assistant and Source Assistant. These assistants organize the connection managers defined in the package by their storage type, as shown in Figure 2-11. By default, they show only the data storage applications that have drivers installed on the machine. The assistants can be used to create new connection managers if the desired ones do not already exist.
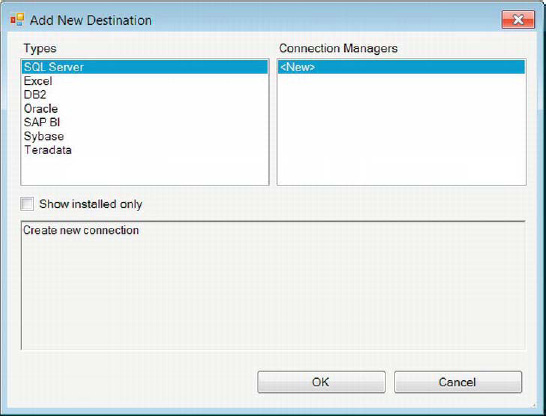
Figure 2-11. Destination Assistant
Package Code View
The actual code behind SSIS packages is stored as .dtsxfiles thatare XML based. The XMLis available either by opening the package file in a text editor or by clicking the View menu in Visual Studio and selecting View Code when the package is open. The differences between the XMLcontainedin the .dtsx files in SQL Server 2008 and in SQL Server 11 are vast. The attributes for each of the tags is given on a new line, making the code much more human readable. This feature also makes the packages modifiable using diff tools. In TFS, the Compare Files tool now becomes a viable option for identifying differences between package versions. It also makes the Merge tool in TFS easier to operate to combine two versions of a package. Listing 2-2 shows a sample from an SSIS 11 package’s data flow source component.
Listing 2-2. Data Flow Task Component
<component


     refId="PackageData Flow TaskOLE DB Source"


componentClassID="{165A526D-D5DE-47FF-96A6-F8274C19826B}"

contactInfo="OLE DB Source;Microsoft Corporation;

        Microsoft SQL Server; (C) Microsoft Corporation; All Rights Reserved;

        http://www.microsoft.com/sql/support;7"

     description="OLE DB Source"

     name="OLE DB Source"

     usesDispositions="true"

     version="7">

<properties>

<property

         dataType="System.Int32"

         description="The number of seconds before a

        command times out.  A value of 0 indicates an infinite time-out."

         name="CommandTimeout">0</property>

<property

         dataType="System.String"

         description="Specifies the name of the database object used to open a rowset."

         name="OpenRowset"></property>

<property

         dataType="System.String"

         description="Specifies the variable that contains the

        name of the database object used to open a rowset."

         name="OpenRowsetVariable"></property>


<property

         dataType="System.String"

         description="The SQL command to be executed."

         name="SqlCommand"


         UITypeEditor="Microsoft.DataTransformationServices.Controls.ModalMultilineStringEditor,

        Microsoft.DataTransformationServices.Controls, Version=11.0.0.0, Culture=neutral,

                PublicKeyToken=89845dcd8080cc91">SELECT 1 AS A

WHERE 1 = 1;</property>


<property

         dataType="System.String"

         description="The variable that contains the SQL command to be executed."

         name="SqlCommandVariable"></property>

<property

         dataType="System.Int32"
         description="Specifies the column code page to use

        when code page information is unavailable from the data source."

         name="DefaultCodePage">1252</property>

<property

         dataType="System.Boolean"

         description="Forces the use of the DefaultCodePage

        property value when describing character data."

         name="AlwaysUseDefaultCodePage">false</property>

<property

         dataType="System.Int32"

         description="Specifies the mode used to access the database."

         name="AccessMode"

         typeConverter="AccessMode">2</property>

<property

         dataType="System.String"

         description="The mappings between the parameters in the SQL command and variables."

         name="ParameterMapping">"0",{F05D0A62-4900-482A-88D9-DE0166CB4CB9};</property>

</properties>

<connections>


<connection

         refId="PackageData Flow TaskOLE DB Source.Connections[OleDbConnection]"

         connectionManagerID="Package.ConnectionManagers[FRANKIE-VMSQL11.SSISDB]"

         description="The OLE DB runtime connection used to access the database."

         name="OleDbConnection" />


</connections>

<outputs>

<output

         refId="PackageData Flow TaskOLE DB Source.Outputs[OLE DB Source Output]"

         name="OLE DB Source Output">


<outputColumns>

<outputColumn

             refId="PackageData Flow Task

        OLE DB Source.Outputs[OLE DB Source Output].Columns[A]"

             dataType="i4"

             errorOrTruncationOperation="Conversion"

             errorRowDisposition="FailComponent"

             externalMetadataColumnId=

        "PackageData Flow TaskOLE DB Source.Outputs

        [OLE DB Source Output].ExternalColumns[A]"

             lineageId="PackageData Flow TaskOLE DB Source.Outputs

        [OLE DB Source Output].Columns[A]"

             name="A"

             truncationRowDisposition="FailComponent" />

</outputColumns>

<externalMetadataColumns

           isUsed="True">

<externalMetadataColumn

             refId="PackageData Flow TaskOLE DB Source.Outputs

        [OLE DB Source Output].ExternalColumns[A]"
dataType="i4"

             name="A" />

</externalMetadataColumns>


</output>

<output

         refId="PackageData Flow TaskOLE DB Source.Outputs[OLE DB Source Error Output]"

         isErrorOut="true"

         name="OLE DB Source Error Output">

<outputColumns>

<outputColumn

             refId="PackageData Flow TaskOLE DB Source.Outputs

        [OLE DB Source Error Output].Columns[A]"

             dataType="i4"

             lineageId="PackageData Flow TaskOLE DB Source.Outputs

        [OLE DB Source Error Output].Columns[A]"

             name="A" />

<outputColumn

             refId="PackageData Flow TaskOLE DB Source.Outputs

        [OLE DB Source Error Output].Columns[ErrorCode]"

             dataType="i4"

             lineageId="PackageData Flow TaskOLE DB Source.Outputs

        [OLE DB Source Error Output].Columns[ErrorCode]"

             name="ErrorCode"

             specialFlags="1" />

<outputColumn

             refId="PackageData Flow TaskOLE DB Source.Outputs

        [OLE DB Source Error Output].Columns[ErrorColumn]"

             dataType="i4"

             lineageId="PackageData Flow TaskOLE DB Source.Outputs

        [OLE DB Source Error Output].Columns[ErrorColumn]"

             name="ErrorColumn"

             specialFlags="2" />

</outputColumns>

<externalMetadataColumns />

</output>

</outputs>

</component>
Some key points to highlight when looking through the XML of an extremely simple source component includethe simplicity of the package in comparison to that of prior versions of SSIS, and some changes in how the objects are now tracked by the package. One of the key reasons for the readability improvement of the XML is that some default settings are not generated. If, for example, the IsSorted property of a source component is left at the default value of False, as was done in Listing 2-2, no extra XMLwill be generated to store that metadata. In prior versions of SSIS, all the gritty details are stored in the XML of a package. The following list highlights some of the more important properties:
refId indicates the path to the object within the package. This property uniquely identifies the component within the package.
SqlCommandis a property that usually contains the exact query that will execute against the RBDMS.
Connectionscontains all the connection information stored within the package for the data source component. It is possible to save login credentials for the package, but it is not recommended. Even the connection managers haverefId.
Output Columnsthe metadata about the output of the package is important to make sure that the data is inserted properly. If there is a failure simply with converting the data into something SQL Server can process, the package can be set to fail as a result.
Another change that is noticeable just by looking at the XML is the way the lineageId is tracked in the XML. A lineageId is used by SSIS to track all columns within data flows, including the error columns that get added to the pipeline by components. Instead of hard-coding an integer value as was done in previous versions, SSIS now uses the names of the objects to essentially create a path to an object, and because objects have to have unique names within SSIS, the path itself creates the unique identifier for the columns.Another great improvement in the readability of the XML was made by replacing the < and > entity encodings with their appropriate special characters.
A new addition to the XML of the package is a section called CDATA, which captures the visual layout of the components in a package. Listing 2-3 demonstrates this section of the package code. It captures not only the size and location coordinates of the package, but also the shape of the data flow path between data flow components and the precedence constraints in the control flow. This metadata is noncritical to the package itself and will be regenerated if corrupt or missing when the package is opened in Visual Studio.
Listing 2-3. CDATA Section of a Simple Package
<![CDATA[<?xml version="1.0"?>

<!--This CDATA section contains the layout information of the package.

        The section includes information such as (x,y) coordinates, width, and height.-->

<!--If you manually edit this section and make a mistake, you can delete it. -->

<!--The package will still be able to load normally but the previous layout

        information will be lost and the designer will automatically

        re-arrange the elements on the design surface.-->

<Objects

  Version="sql11">

<!--Each node below will contain properties that do not affect runtime behavior.-->

<Package

    design-time-name="Package">

<LayoutInfo>

<GraphLayout

        Capacity="4" xmlns="clr-namespace:Microsoft.SqlServer.IntegrationServices.Designer.Model.Serialization;assembly=

        Microsoft.SqlServer.IntegrationServices.Graph">

<NodeLayout

          Size="152.276666666667,42"

          Id="PackageData Flow Task"

          TopLeft="5.49999999999999,5.49999999999989" />

</GraphLayout>

</LayoutInfo>

</Package>

<TaskHost
    design-time-name="PackageData Flow Task">

<LayoutInfo>

<GraphLayout

        Capacity="4" xmlns="clr-namespace:Microsoft.SqlServer.IntegrationServices.Designer.Mode

        l.Serialization;assembly=Microsoft.SqlServer.IntegrationServices.Graph"

        xmlns:mssgle="clr-namespace:Microsoft.SqlServer.Graph.LayoutEngine;assembly=

        Microsoft.SqlServer.Graph" xmlns:x="http://schemas.microsoft.com/winfx/2006/xaml">

<NodeLayout

          Size="151.083333333334,42"

          Id="PackageData Flow TaskOLE DB Source"

          TopLeft="15.918333333333,5.5" />

<NodeLayout

          Size="171.920000000001,42"

          Id="PackageData Flow TaskOLE DB Destination"

          TopLeft="5.50000000000001,107.5" />

<EdgeLayout

          Id="PackageData Flow Task.Paths[OLE DB Source Output]"

          TopLeft="91.46,47.5">


<EdgeLayout.Curve>

<mssgle:Curve

              StartConnector="{x:Null}"

              EndConnector="0,60"

              Start="0,0"

              End="0,52.5">

<mssgle:Curve.Segments>

<mssgle:SegmentCollection

                  Capacity="5">

<mssgle:LineSegment

                    End="0,52.5" />

</mssgle:SegmentCollection>

</mssgle:Curve.Segments>

</mssgle:Curve>

</EdgeLayout.Curve>

<EdgeLayout.Labels>

<EdgeLabelCollection />

</EdgeLayout.Labels>

</EdgeLayout>


</GraphLayout>

</LayoutInfo>

</TaskHost>

<PipelineComponentMetadata
    design-time-name="PackageData Flow TaskOLE DB Source">

<Properties>

<Property>

<Name>DataSourceViewID</Name>

</Property>

</Properties>

</PipelineComponentMetadata>

<PipelineComponentMetadata

    design-time-name="PackageData Flow TaskOLE DB Destination">

<Properties>

<Property>

<Name>DataSourceViewID</Name>

</Property>

<Property>

<Name>TableInfoObjectType</Name>

<Value

          type="q2:string">Table</Value>

</Property>

</Properties>

</PipelineComponentMetadata>

</Objects>]]>
As the default comment explains, this data is stored using (x,y) Cartesian plane coordinates and width and height pairings, in that pairing order.The highlighted section shows the capturing of the data flow paths’ lines.
SQL Server Management Studio
SQL Server 11’s built-in tool for access and maintenance is the Management Studio. It allows you to configure, administer, and develop components of SQL Server. Connecting to the database engine allows you to use T-SQL as well as the SQL Command utility by using SQLCMD mode for operating-system commands. The database engine allows the use of DDL to create the objects, DML to access the data in the objects, and DCL to define user access to the objects for DDL and DML.Management Studio allows you to create and modify T-SQL, MDX, DMX, XML,and XML for Analysis(XMLA) scripts, and even plain-text files.
Management Studio is critical in developing SQL queries for SSIS. These queries can be used by the source component, Execute SQL task,lookup component, and the OLE DB command component. The most efficient way to retrieve data from a database for SSIS Data Flow tasks is to specify only the columns that are required. This allows the buffers to fill with rows rather than columns, which will be disregarded. This is especially important for lookup components as well, because by default they cache the result set and thus only the key columns and the output columns should be specified in the select statement rather than the whole dataset.
![]() NOTE: Cascading lookup components will stack the buffers created during runtime. Each lookup will create a copy of the buffer preceding it and add the new lookup result columns to the copy of the buffer. The buffers are not released until the batch of rows is committed or reaches the end of the data flow. Stacking multiple lookups in the data flow may lead to memory overflows and poor performance. Only the necessary columns should be brought into the pipeline by components.
NOTE: Cascading lookup components will stack the buffers created during runtime. Each lookup will create a copy of the buffer preceding it and add the new lookup result columns to the copy of the buffer. The buffers are not released until the batch of rows is committed or reaches the end of the data flow. Stacking multiple lookups in the data flow may lead to memory overflows and poor performance. Only the necessary columns should be brought into the pipeline by components.
Tool Windows
The query window for accessing the database engine is shown in Figure 2-12. With the addition of IntelliSense in SQL Server 2008, query development became easier because of the quick reference information that is returned on functions and the AutoFill on database objects. With SQL Server 11, Management Studio has been built around the Visual Studio framework. This is most evident with the startup screen that declares this fact.
By default, three windows compose the Management Studio environment.On the left is the Object Explorer window; it allows you to see all the objects that are defined through a tree view with the server as the root node. In addition to displaying the objects, it provides wizards and options to perform management and administration tasks. The Object Explorer can be used to connect to multiple instances as well as the different engines of SQL Server. With the database engine, the query window is the primary mode of access. The query window by default sits in the middle, but can be dragged anywhere on the screen. It is not limited to the Management Studio window. If multiple screens are used, the query window can be moved to a different screen from the one with Management Studio.

Figure 2-12. Tool windows for SQL Server Management Studio
By default, the setup of Management Studio has three bars at the top: the menu bar, the toolbar, and the context menu. These bars can help you quickly access the objects and data that you need without having to hunt around for options. The following list highlights the populartoolbar buttons:
New Queryopens a new query window based on the context of the Object Explorer. If the selected object is a member of a database engine, the query will be a SQL query. Ifthe object is an Analysis Services database, the query will be an MDX query. The query will automatically be connected to the service that the selected object belongs to, or it will use the connection information of the current query window.
Database Engine Query opens a new query window and asks for connection information needed to access the database. The connection is necessary to execute and parse queries.
Analysis Services MDX Query creates a new query window that can query cube data. For those who are not Analysis Services developers, using the Browse Cube option through the Object Explorer may suffice.
Analysis Services DMX Querycreates a new query window for data-mining expressions. These queries are used to access the data-mining models that are present on a cube.
Analysis Services XMLA Query creates a new query window for defining Analysis Services database objects. This query is usually developed using BIDS, and they run against Analysis Services to create a cube.
Activity Monitor opens a window that shows the state of the server. The refresh rate can be modified to show the information at a desired pace. Figure 2-13 demonstrates the various statistics that are tracked by the monitor.
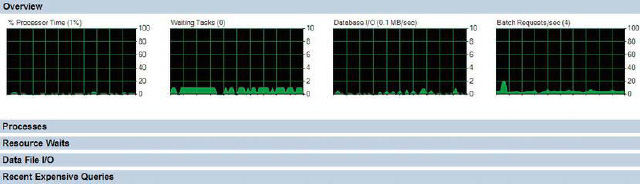
Figure 2-13. Management Studio Activity Monitor
The context menu is specific to the query window that is currently selected. The MDX and DMX queries have the same menu, whereas thedatabase engine and XMLA queries have a slightly different one. The main differences between the cube queries and the T-SQL queries are the result display and the execution plan options that are present with the T-SQL queries but not with the cube queries.Because the XMLA does not query the data but rather defines the objects that perform the analysis, it has a completely different toolset.Cube and T-SQL queries both have the following tools:
Connect connects a disconnected query to a database that is appropriate for the query type.
Change Connection prompts you with the connection information to allow you to change the instance being queried.
Available Databases is a drop-down list of all the available databases on the current instance.
Execute, which is by far the most commonly used, executes the query in the current window. If a section of code is highlighted, it will execute only the code that is highlighted.
![]() NOTE: Errors in execution usually will display a line number where the error is most likely to be found. This line number is in respect to the start of the batch where the statement began. Line 10 might actually be line 30 in the query window. To help locate errors, we recommend you turn on Line Numbers through the Options menu and selecting Text Editor.
NOTE: Errors in execution usually will display a line number where the error is most likely to be found. This line number is in respect to the start of the batch where the statement began. Line 10 might actually be line 30 in the query window. To help locate errors, we recommend you turn on Line Numbers through the Options menu and selecting Text Editor.
Parse, which is another popular function, will parse the query to verify that it is syntactically correct. It will not verify that the objects exists. Usually IntelliSense will provide some error highlighting if a connection is made to a SQL Server 2008 or later instance.
CommentOutthe Selected Lines adds a single-line commentwith two hyphens (
--) at the beginning of each of the current or selected lines.Uncomment Out the Selected Lines removes any single-line comments, marked by two hyphens (
--), from the beginning of each of the current or selected lines.Decrease Indent removes any present indentation from the beginning of the current or selected lines of code.
Increase Indent adds indentation to the selected or current line of code. By default, the indentation is a tab, but this can be changed in the Options menu.
Specify Values for Template Parameterspops up a window that will replace the parameters in a query template with the values specified. The utility automatically reads in the parameters defined in the template, as shown in Figure 2-14. There are a wide range of templates available for both SQL Server and Analysis Services. Figure 2-15 displays the templates for both.
T-SQL queries have a few extra context options that the other query types do not. These involve outputting the results and query plan explorers. The buttons associated with the SQL queries are as follows:
Display Estimated Execution Plan shows the estimated query plan for the queries in the query window. The plan is displayed graphically at the bottom in the output screen with its own tab, Execution Plan. This utility is essential when you are performance-tuning your queries.
Query Options opens a Query Options window that allows you to set certain options for query execution and the result set.
IntelliSense Enabled toggles IntelliSense on and off.
Include Actual Execution Plan includes the query plan with the results. This plan differs from the estimated plan in that it displays the actual actions taken by the query optimizer. The plan is displayed in a tab called Execution Plan.
Include Client Statistics displays the client statistics in a tab called Client Statistics. This utility will actually record the statistics from different executions of the queries, showing changes from each execution as well as averages for each statistic.
Results to Text outputs the results from the queries as text output. The output is space delimited and can be hard to read, but in the absence of a spreadsheet program, it is the easiest way to transmit the results of a query.
Results to Grid displays the results in a grid format that can be easily copied to Excel or another spreadsheet editor. The result set can be copied entirely, specific columns or specific records at a time.
Results to File outputs the results directly to a specified file. The file needs to be defined with each execution of the query. The default format for the result set is a report file (
.rpt).
For the XMLA query, the context menu is mainly composed of XML editor options. These are meant to help close the current tags and give information about the current attribute of the object.
SQL Server Management Studio Project
Just as in BIDS, SSMS supports projects. These projects, however, are limited to three types: SQL Server scripts, consisting of T-SQL scripts; Analysis Services scripts, consisting of MDX, DMX, and XMLA scripts; and SQL Server Compact Edition scripts. The projects consist of three parts: Connections, Queries, and Miscellaneous. The following list provides a brief description of these parts:
Connections stores all the connections related to the project. After the connection has been created, queries can be created with the connection set without having to use the Object Explorer. If a connection isn’t created independently, connections made for a query in the projectare automatically added.
Queries contains all the queries associated with the project. Depending on the type of the project, only the supported files can be added to this folder (for example,
.sqlfor SQL Server).
The connection information of the queries is stored within the project file (.ssmssqlproj or.ssmsasproj) itself. Just as with BIDS, the project files contain vital information. For Management Studio projects, they contain information such as time-out periods, the queries contained, and the connection information for the queries. Opening a query included in a project will open it with the connection to the server it was originally connected to.
Templates
SQL Server Management Studio provides many templates to store common DDL and DCL statements. These statements exist for both SQL Server and Analysis Services; the templates are shown in Figure 2-14. The templates contain parameters that are easily replaceable using a utility known as Specify Values for Template Parameters, shown in Figure 2-15. This utility performs similar functionality to Search and Replace, but is built specifically to identify all the parameters and to display them all in one place. The templates are stored in a treestructure with the template type at the root. To access the Template Explorer, you can select View from the toolbar and click Template Window. At the top-left corner of the window, you will see two buttons that will allow you to open either SQL Server templates or Analysis Services templates. The templates open as new query windows.
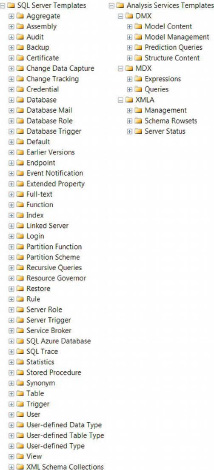
Figure 2-14. Code templates in Management Studio
After expanding to the tree that you desire, you can add the template to a query window by simply double-clicking it. After the template is open, the Specify Values for Template Parameters button on the context menu can be used to prompt the utility. The real power behind the templates is that you can create your own set of templates that are specific to your needs. You can add comment blocks at the top of the scripts that provide details about the script and its contents, and all of this can be parameterized. The parameters have the following format:<parameter_name, data_type, value>. The parameter_name specifies the name of the parameter, the data_type specifies the data type of the parameter, and the value specifies the value that will replace every instance of the parameter.

Figure 2-15. Specify Values for Template Parameters
You can also add your templates to the folder of your choosing. Becausemost objects have folders for their templates, you are likely to create a template in an existing folder rather than creating your own template folder.
Code Snippets
Code snippets have been present in the Visual Studio environment for a few iterations. With SQL Server 11, they are now available with Management Studio. They work in a similar fashion as the templates, but unlike the templates, they can be inserted directly into the current query window. Ctrl+K, Ctrl+X brings up the snippet inserter with a drop-down of available snippets. The best part of the snippets is the ability to add your own custom snippets for code packets you utilize most often. This feature has been extremely helpful with Visual Studio development and is a welcome feature in SQL Server 11. Listing 2-4 displays a custom snippet that we created to script a drop and a create statement for a table.
![]() NOTE: The default set of snippets consist mainly of DDL and DCL object create scripts. This is extremely useful because SSMS stores the actual syntax that we developers most likely would use to reference Microsoft Developers Network, MSDN, or Book Online, BOL. With the ability to create your own snippets, it is likely that 90 percent of your everyday syntax can be coded for this purpose. Aside from syntax, common blocks for your queries (joins you perform on a majority of your queries,
NOTE: The default set of snippets consist mainly of DDL and DCL object create scripts. This is extremely useful because SSMS stores the actual syntax that we developers most likely would use to reference Microsoft Developers Network, MSDN, or Book Online, BOL. With the ability to create your own snippets, it is likely that 90 percent of your everyday syntax can be coded for this purpose. Aside from syntax, common blocks for your queries (joins you perform on a majority of your queries, where clauses that are crucial to the business logic, and so forth) can all be scripted so that they can be added to your code with a few keystrokes rather than typing them out over and over again.
Listing 2-4. Snippet for Drop and Create Table
<?xml version="1.0" encoding="utf-8" ?>


<CodeSnippets xmlns="http://schemas.microsoft.com/VisualStudio/2005/CodeSnippet">


<_locDefinition xmlns="urn:locstudio">

<_locDefault _loc="locNone" />


<_locTag _loc="locData">Title</_locTag>


<_locTag _loc="locData">Description</_locTag>

<_locTag _loc="locData">Author</_locTag>

<_locTag _loc="locData">ToolTip</_locTag>

</_locDefinition>

<CodeSnippet Format="1.0.0">

<Header>


<Title>Drop and Create Table</Title>


<Shortcut></Shortcut>

<Description>Drops a table if it exists, then creates a table.</Description>

<Author>Rodrigues, Coles</Author>

<SnippetTypes>

<SnippetType>Expansion</SnippetType>

</SnippetTypes>

</Header>

<Snippet>

<Declarations>


<Literal>

<ID>SchemaName</ID>

<ToolTip>Name of the schema</ToolTip>

<Default><![CDATA[<schema_name, sysname, dbo>]]></Default>

</Literal>


<Literal>
<ID>Tablename</ID>

<ToolTip>Name of the table</ToolTip>

<Default>Sample_Table</Default>

</Literal>

<Literal>

<ID>column1</ID>

<ToolTip>Name of the column</ToolTip>

<Default>ID</Default>

</Literal>

<Literal>

<ID>datatype1</ID>

<ToolTip>Data type of the column</ToolTip>

<Default>INT IDENTITY(1,1) NOT NULL</Default>

</Literal>

<Literal>

<ID>column2</ID>

<ToolTip>Name of the column</ToolTip>

<Default>Desc</Default>

</Literal>

<Literal>

<ID>datatype2</ID>

<ToolTip>Data type of the column</ToolTip>

<Default>NVARCHAR(50) NULL</Default>

</Literal>

</Declarations>


<Code Language="SQL">

<![CDATA[

IF  EXISTS

(

SELECT *

FROM sys.objects

WHERE object_id = OBJECT_ID(N'[$SchemaName$].[$Tablename$]')

AND type in (N'U')

)

DROP TABLE [$SchemaName$].[$Tablename$];

GO

CREATE TABLE $SchemaName$.$Tablename$

(

    $column1$ $datatype1$,

    $column2$ $datatype2$

);

GO

$end$]]>

</Code>


</Snippet>

</CodeSnippet>

</CodeSnippets>
Some of the key components of the snippets are highlighted in Listing 2-4 and detailed here:.
Titleis the name that Management Studio will use to uniquely identify your custom snippet. The wizard that adds snippets to the collection will forcibly rename the snippet if it detects a collision with an existing snippet in the same folder path.
Literaldefines the components of the snippet that can be replaced quickly. Using the Tab key traverses through the literals in the code. The literal can be defined as a default value that can be set as a parameter. Using parameters as the default values for literals is the key to repurposing the Specify Values for Template Parameters utility for code snippets.
Codecontains the actual code that is to be inserted in the script. The code block will be inserted as it is in theCDATAblock. It will preserve the whitespace and replace the literals with their specified defaults.
After a code snippet has been inserted using the snippet inserter, you can use the Tab key to navigate the query by automatically highlighting the replacement points and replacing them with your own strings. For more-complex snippets that reuse code, it may be a better idea to utilize parameters, as we have shown in Listing 2-4. This allows you to take advantage of the Specify Values for Template Parameters feature within Management Studio.
Queries for SSIS
The queries that are created in Management Studio can be saved on the file system to be easily incorporated into SSIS. For example, an OLE DB source component has a Browse button in the editor that will allow you to import the query saved on the file system as the SQL command for the source component. This option becomes available only if SQL Command is used as the data access mode. Queries can also be imported by lookup components if they are set to use the results of a SQL query. With this functionality, it becomes easier for developers to write the SQL that they will be using to extract the data and to import it directly to their SSIS packages as needed. Combining this with the code snippet functionality of Management Studio, convoluted joins and where clauses can be stored for easy access to any script.
Summary
SQL Server 11 offers the capabilities of an entire business intelligence endeavor through its Business Intelligence Development Studio. This chapter introduced all the new features of and enhancements to an important tool in the arsenal, Integration Services. We also introduced a crucial component of maintaining and administering the SQL Server suite, Management Studio. We concluded by describing how all of these components come together to build an end-to-end solution as well as some enhancements made for the developers’ code reusability. Chapter 3 will walk you through developing your very first package and introduce you to some of the best practices you should get in the habit of using from the start.