
C H A P T E R 10
Scripting
You’re darn right more power!
—Tim Allen, Home Improvement
SSIS provides several stock control flow tasks and data flow components out of the box, all described in the previous chapters. Despite all these great tools, you’ll inevitably encounter a situation when you need to do something that’s not covered by the stock toolkit. The Script task and script component are two tools that give you an extra power boost. With the Script task and script component, you can use .NET code to enhance your SSIS packages and to manipulate and transform your data in ways the stock components can’t.
Script Task
SSIS comes with more than 20 stock control flow tasks that perform a variety of functions. Whether you need to put or get files via File Transfer Protocol, FTP, execute another package or process, or perform common DBA database maintenance tasks, SSIS control flow tasks have you covered. Sometimes, though, you need a little more flexibility. At times like these, you can whip out the Script task and embed .NET code directly in your control flow.
One of the simplest tasks for which SSIS developers use the Script task is SSIS variable initialization in the control flow. For this example, we’ll set a string variable to the postal abbreviation for a state to limit results returned by a query in a data flow. To start our example, we dragged a Script task and a Data Flow task onto the designer surface, as shown in Figure 10-1.
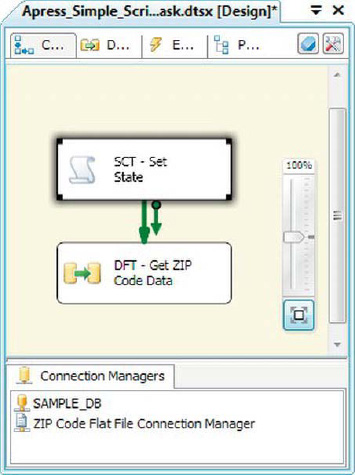
Figure 10-1. Control flow with Script task
We then declared a string variable named State with package scope, as shown in Figure 10-2.
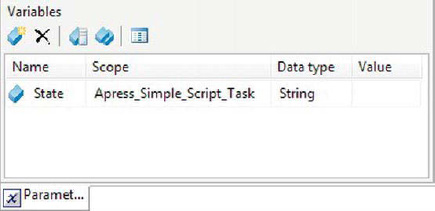
Figure 10-2. Declaring a variable
At this point, we’re ready to use the Script task to initialize our variables. When you double-click the Script task, you’ll see the editor shown in Figure 10-3.

Figure 10-3. Script page of the Script Task Editor
On the Script page of the editor, you can choose your preferred scripting language with the ScriptLanguage parameter. The current options are Microsoft Visual C# 2008 and Microsoft Visual Basic 2008. Our preference is for C#, so our script code samples will be presented in this .NET language. You can also choose the EntryPoint for the Script task, which is the name of the function in the script that the task will execute when it runs. The default EntryPoint function name is Main.
You can also choose to expose variables to your script as read-only variables or read/write variables from pop-up dialog boxes, shown in Figure 10-4. The ReadOnlyVariables property lets you choose a list of SSIS variables to expose as read-only. Your script can’t change the values of read-only variables. The ReadWriteVariables property exposes a list of variables to your script for reading and writing. You can change the values of read/write variables in your script. Because we’re changing the value of the User::State variable in the script, we’ve exposed it as a read/write variable.
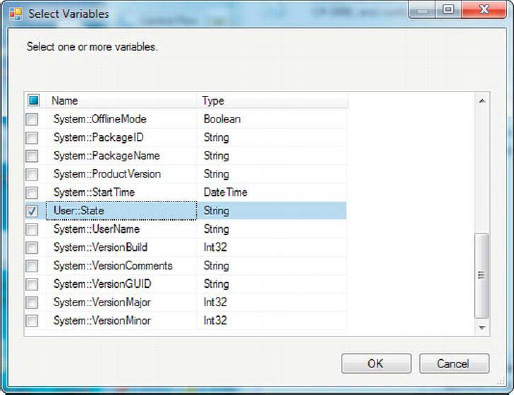
Figure 10-4. Choosing variables from the Select Variables dialog box
To write your script, click the Edit Script button to open the Visual Studio Tools for Applications (VSTA) Editor. By default, the Script task generates a class called ScriptMain, which inherits from the VSTARTScriptObjectModelBase class. There are also some autogenerated comments in the script that provide tips on how to access particular functionalities. Comments aside, the generated script code looks like this:
using System;

using System.Data;

using Microsoft.SqlServer.Dts.Runtime;

using System.Windows.Forms;


namespace ST_ab23c7f2534d47459000c7bfe5e99f2e.csproj

{

  [System.AddIn.AddIn("ScriptMain", Version = "1.0", Publisher = "", Description = "")]

  public partial class ScriptMain :

    Microsoft.SqlServer.Dts.Tasks.ScriptTask.VSTARTScriptObjectModelBase

  {


    #region VSTA generated code

    enum ScriptResults

    {

      Success = Microsoft.SqlServer.Dts.Runtime.DTSExecResult.Success,

      Failure = Microsoft.SqlServer.Dts.Runtime.DTSExecResult.Failure

    };
#endregion
public void Main()
{
Dts.TaskResult = (int)ScriptResults.Success;
}
}
}
The Main function, shown in bold in the preceding script, is where the magic happens. This function is called every time the Script task runs—it’s where your code begins. Our task here is simple: we just want to set a variable. To do this, we’ll change the Main function to set our variable as shown here:
public void Main()

{

  Dts.TaskResult = (int)ScriptResults.Success;

  Dts.Variables["User::States"].Value = "LA";

}
After editing the script, click the Save (disk icon) button. To finish off this sample, we created a simple data flow with an OLE DB source and a flat file destination, as shown in Figure 10-5.
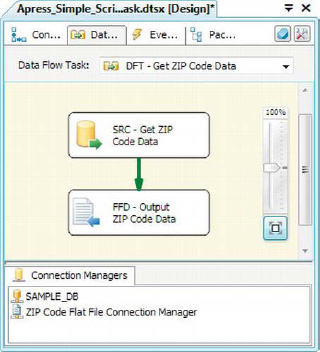
Figure 10-5. Moving ZIP Code data from a database table to a flat file
We used the following query in the OLE DB source component:
And we set the source’s Parameter0 value to the User::State variable. The end result is a flat file with the ZIP codes from the database, but only those for the state of Louisiana (LA).
Advanced Functionality
Our first Script task example was admittedly simplistic, but its goal was just to introduce the concept of adding .NET scripting to the control flow. The Script task lets you perform processing tasks that range from very simple to extremely complex, and they allow you to do things that are not always directly supported by the other stock control flow tasks. This section gives you a sample with a little more meat on it to demonstrate.
For this example, we want to reference back to the Foreach loop container, discussed in Chapter 5. The Foreach loop container has a Foreach File Enumerator mode, which iterates files in a directory for you, populating a string variable with the file names and/or fully qualified file paths in turn. Figure 10-6 shows the editor for the Foreach loop container in Foreach File Enumerator mode.
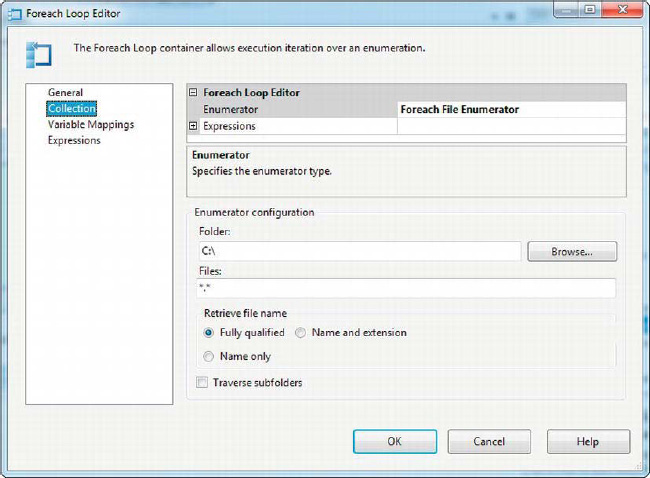
Figure 10-6. Foreach loop container in File Enumerator mode
The Foreach loop container’s File Enumerator mode is very useful, but it is limited—it returns only file names and/or file paths. Files in the file system have a lot more metadata attached to them that can be useful for processing. Every file has a creation date and read-only flag attached to it, for instance. This information comes in handy if you want to process or archive files older than a specified date, or if you need to check whether a file is read-only before trying to delete it. We can get at this extra information by using a Script task.
To create our sample package, we dragged a Script task onto the designer surface, followed by a Foreach loop container with another Script task inside it, as shown in Figure 10-7.
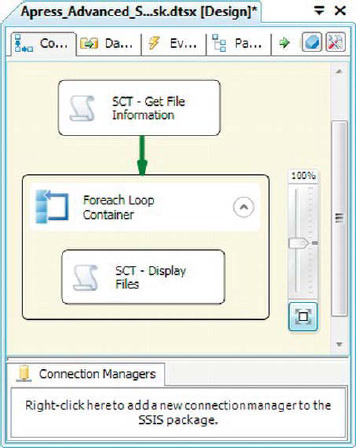
Figure 10-7. Script tasks with Foreach loop container package
We also created some variables scoped at the package level and some scoped at the Foreach loop container level. The two variables at the package level are as follows:
User::Path: A string containing the full path of the directory in which we wish to enumerate files.
User::Files: An object that will hold the results of the file enumeration, which will be stored as an ADO.NETDataTableobject.
The variables at the Foreach loop container level are populated with file names, dates, and other related information on each iteration of the loop. Figure 10-8 shows the variables we declared at both levels.
![]() NOTE: We discuss variables and variable scope in detail in Chapter 9.
NOTE: We discuss variables and variable scope in detail in Chapter 9.
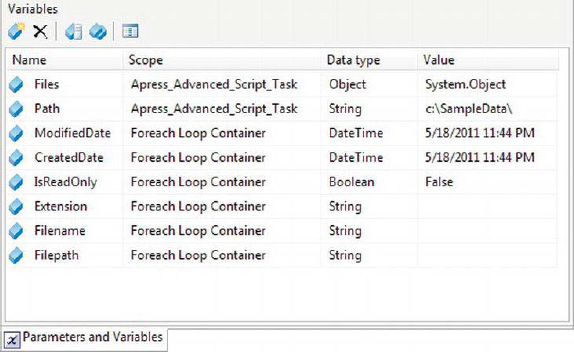
Figure 10-8. Variables, scoped at two levels in the sample package
After the Script tasks, Foreach loop container, and variables were added to the package, we edited them. The first Script task (outside of the Foreach loop container) requires access to two of the variables we created: User::Path and User::Files. We’re also passing in a system variable named System::TaskName, which holds the name of the current Script task so we don’t have to hard-wire the name into any of our messages. The Script task needs only read-only access to the User::Path and System::TaskName variables, but needs read/write access to the User::Files variable because the task will place its results in this variable. Figure 10-9 shows the Script Task Editor with the variables.
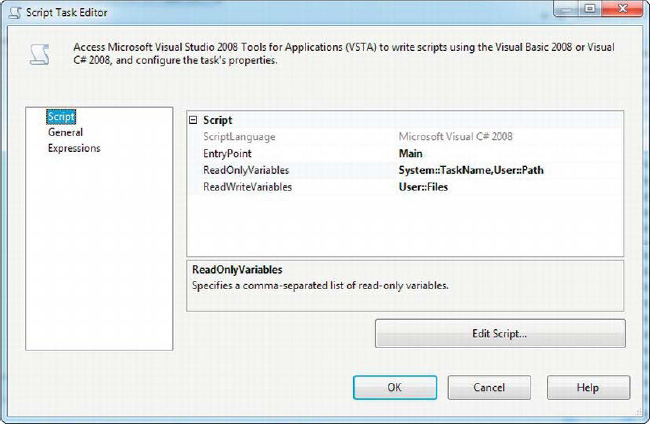
Figure 10-9. First Script Task Editor
The script we created in this Script task creates a .NET DataTable object with columns to hold the file name, path, and other file attributes. Each row in the DataTable represents a different file. The following code creates the DataTable, populates it with file information, and returns the DataTable in an SSIS object variable named User::Files:
public void Main()

{

  Dts.TaskResult = (int)ScriptResults.Success;


  // Get the name of the current task

  string TaskName = Dts.Variables["System::TaskName"].Value.ToString();

  bool b = true;


  try

  {

    // Fire an OnInformation event that we’re starting

    Dts.Events.FireInformation(-1, TaskName, "Starting", "", 0, ref b);


    // Define our output data table

    DataTable dt = new DataTable();

    dt.Columns.Add("Filename", typeof(string));

    dt.Columns.Add("Extension", typeof(string));

    dt.Columns.Add("Filepath", typeof(string));
dt.Columns.Add("CreatedDate", typeof(DateTime));
dt.Columns.Add("ModifiedDate", typeof(DateTime));
dt.Columns.Add("IsReadOnly", typeof(Boolean));
// Get the file info and add it to the data table
string path = Dts.Variables["User::Path"].Value.ToString();
DirectoryInfo di = new DirectoryInfo(path);
FileInfo[] fi = di.GetFiles("*.*", SearchOption.AllDirectories);
foreach (FileInfo f in fi)
{
dt.Rows.Add(new object[] { f.Name, f.Extension, f.DirectoryName, f.CreationTime,
f.LastWriteTime, f.IsReadOnly });
}
// Output the data table
Dts.Variables["User::Files"].Value = dt;
}
catch (Exception ex)
{
// If an error occurs fire an OnError event
Dts.Events.FireError(-1, TaskName, ex.ToString(), "", 0);
}
finally
{
// Fire a final OnInformation event that we’re finished
Dts.Events.FireInformation(-1, TaskName, "Finished", "", 0, ref b);
}
}
![]() TIP: It’s a good idea to use
TIP: It’s a good idea to use try-catch blocks in any .NET code that accesses external resources (such as the file system in this case). If the external resource is not accessible, you may need to set the TaskResult to the Failure value or perform other cleanup tasks before returning from the script.
SCRIPT TASK EVENTS
After we populate the SSIS object variable with the list of files in DataTable format, we need to use those results. For this task, we pass the User::Files variable in to a Foreach loop container in Foreach ADO Enumerator mode. This mode lets you iterate the rows in an ADO.NET DataTable or DataSet or an ADO Recordset. We configured the Collection tab of the Foreach Loop Editor to iterate the rows in the first table and set the ADO object source variable to User::Files, as shown in Figure 10-10.

Figure 10-10. Configuring the Foreach loop container to iterate rows in a .NET DataTable
We finished configuring the Foreach loop container by setting the options on the Variable Mappings page of the editor, as shown in Figure 10-11. This page has two columns named Variable and Index. The Index column holds the zero-based indexes of the columns in your DataTable; the Variable column holds the variables these columns are mapped to. On each iteration of the loop, the variables listed will be populated with the values from the columns they are mapped to for each row in the DataTable.

Figure 10-11. Mapping the DataTable columns to SSIS variables in the Foreach loop container
We put a second Script task inside the Foreach loop container and passed it the variables we populate on each loop, as shown in Figure 10-12. All we need to do is read the values of these variables, so we passed them in as read-only variables.
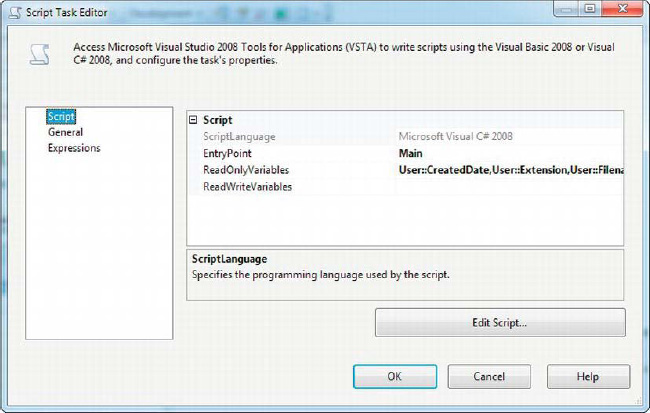
Figure 10-12. Configuring the read-only variables in the inside Script task
The script for this Script task is simple, as you can see here:
public void Main()

{

  Dts.TaskResult = (int)ScriptResults.Success;

  MessageBox.Show(String.Format("{0}, {1}, {2}, {3}, {4}, {5}",

    Dts.Variables["User::Filename"].Value.ToString(),

    Dts.Variables["User::Extension"].Value.ToString(),

    Dts.Variables["User::Filepath"].Value.ToString(),

    Dts.Variables["User::CreatedDate"].Value.ToString(),

    Dts.Variables["User::ModifiedDate"].Value.ToString(),

    Dts.Variables["User::IsReadOnly"].Value.ToString()));

}
This script simply takes the values of the read-only variables passed in and displays them in a Windows message box. The result, as you can see in Figure 10-13, is a pop-up message box displaying the metadata for each file on each iteration.

Figure 10-13. Displaying file metadata on each loop iteration
For this example, we simplified the result, simply displaying the file metadata in pop-up message boxes, but in a real application, you might use this metadata to back up, delete, or choose files to process based on some specific criteria. The important point here is that the first Script task retrieves the data and makes it accessible to the second Script task via variables set by the Foreach loop container.
![]() CAUTION: In our example, we used a Windows message box to display variable values in the Script task. This is a very useful feature for SSIS script development and troubleshooting. Make sure you don’t use message boxes in packages that you deploy to production, however, because this will cause a scheduled job to hang or fail.
CAUTION: In our example, we used a Windows message box to display variable values in the Script task. This is a very useful feature for SSIS script development and troubleshooting. Make sure you don’t use message boxes in packages that you deploy to production, however, because this will cause a scheduled job to hang or fail.
Script Component Source
SSIS allows you to add .NET to your control flow with the Script task. You can also use .NET to manipulate your data in ways the other SSIS stock components don’t natively support with the SSIS Script Component transformation. The Script Component transformation has three modes of operation: you can use it to create .NET script-based source, destination, and transformation components. As with the stock data flow components, a Script Component source retrieves data and pushes it into the data flow, a Script Component destination accepts data from the data flow and pushes it out to storage, and a Script Component transformation manipulates your data within the data flow.
When you drag a script component into your data flow, BIDS presents you with a pop-up menu to select the component type, as shown in Figure 10-14. To create a Script Component source, choose Source from the pop-up menu. The Script Component source has no inputs, but at least one output, and is always synchronous by design.
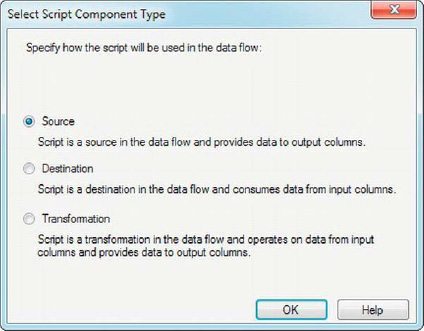
Figure 10-14. Selecting the script component type from the pop-up menu
Instead of pushing the data from our Script Component source to an output, we just pushed it into a Row Count component and enabled the data viewer on the source’s output. This is a common method of testing SSIS data flows, because it allows you to review your data “in flight” during the ETL process without the hassle of persisting it to output. The data flow for our example looks like Figure 10-15.

Figure 10-15. Data flow with Script Component source
After we dragged the script component onto the data flow and selected the source type, we had to configure it. The first step was adding columns to the script component output. To do this, we opened the Script Component Editor and went to the Inputs and Outputs page. Once there, we clicked on the Output Columns of Output 0 and clicked the Add Column button seven times. The columns are added with default names such as Column 1, Column 2, and so on, all with a default data type of four-byte signed integer [DT_I4].
We renamed each column to make the names more descriptive and changed the data type for each to string [DT_STR] with a length of 200. The one exception is the Description column, which we changed to string [DT_STR] with a length of 2000. Figure 10-16 shows the Inputs and Outputs page of the editor.
![]() TIP: In addition to changing the name of the columns in the output, you can also change the name of the output itself. In this example, we kept the default name of
TIP: In addition to changing the name of the columns in the output, you can also change the name of the output itself. In this example, we kept the default name of Output 0.
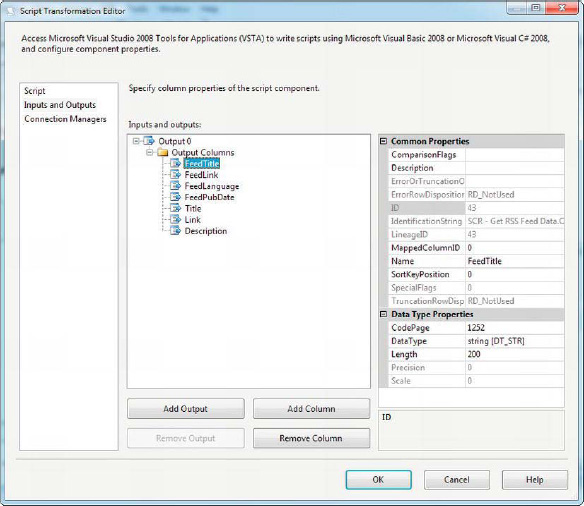
Figure 10-16. Adding columns to the script component output
The Script Component source inherits from the UserComponent class and implements three of its methods. The methods are called in the following order when the script component executes:
- The
PreExecute()method fires exactly once when the script component starts, before any rows are added to the output.- The
CreateNewOutputRows()method is also called once for the script component. It is in this method that you can add new rows to the output, most often with a loop of some sort.- The
PostExecute()method fires once when the script component ends, after you have finished adding rows to the output. This method is useful for performing any cleanup tasks after your script component has completed.
In our example, we grabbed the CNN Top Stories RSS feed. Really Simple Syndication (RSS) is an XML format used for syndicating web content, such as blog posts and news stories. In the script component, we used .NET to grab the latest RSS feed document and shred the XML to rows and columns, which we then placed into the component’s output buffer. To begin, we declared a .NET XmlDocument object at the ScriptMain class level to hold our RSS feed page first, as shown here:
[Microsoft.SqlServer.Dts.Pipeline.SSISScriptComponentEntryPointAttribute]

public class ScriptMain : UserComponent

{

  // XML Document to hold RSS feed page

  XmlDocument RssXML = null;

  bool b = true;

  string ComponentName = "";


  // Method overrides will go here...


  ...


}
The PreExecute() method starts by grabbing the name of the script component for use in logging messages later. It then calls the base.PreExecute() method. Although it may not always be necessary to call base methods, it’s a good idea to call them to ensure that any functionality they provide is not missed. Next we used .NET’s built-in HttpWebRequest and HttpWebResponse classes to retrieve the CNN RSS feed and place it in the RssXML variable.
We also used the ComponentMetaData.FireInformation() method here, which fires OnInformation events that are useful for logging debugging information. Because our code is dependent on an external resource out of our control (namely a web site), we wrapped the web request in a try-catch block. If an exception is caught, we fire an OnError event with the FireError() method. The FireError() method in a data flow component doesn’t stop the data flow. The error is propagated up to the Data Flow task, at which point SSIS decides whether to stop processing or not (based on package settings). In the case of the pre-execute phase of this component, a failure means we don’t have good XML data to process for some reason, so there’s no point in continuing. Therefore, we force a hard stop by rethrowing the exception with a throw statement.
public override void PreExecute()

{

  // Get Name of Component

  ComponentName = this.ComponentMetaData.Name;
// Fire OnInformation event for starting
this.ComponentMetaData.FireInformation(-1, ComponentName, "Beginning Pre-execute", "",
0, ref b);
// Perform base PreExecute() method
base.PreExecute();
try
{
// Fire OnInformation event for getting RSS feed data
this.ComponentMetaData.FireInformation(-1, ComponentName,
"Start - Getting RSS Feed data (Pre-execute)", "", 0, ref b);
// Retrieve RSS feed
HttpWebRequest req = (HttpWebRequest)HttpWebRequest.Create
(
"http://rss.cnn.com/rss/cnn_topstories.rss"
);
HttpWebResponse res = (HttpWebResponse)req.GetResponse();
Stream str = res.GetResponseStream();
// Put RSS feed document into XML Document
RssXML = new XmlDocument();
RssXML.Load(str);
// Fire OnInformation event for getting RSS feed data
this.ComponentMetaData.FireInformation(-1, ComponentName,
"Complete - Getting RSS Feed data (Pre-execute)", "", 0, ref b);
}
catch (Exception ex)
{
// Fire OnError event if an error occurs
this.ComponentMetaData.FireInformation(-1, ComponentName, ex.ToString(), "", 0, ref b);
// Rethrow exception to stop processing
throw (ex);
}
finally
{
// Fire OnInformation event for finished
this.ComponentMetaData.FireInformation(-1, ComponentName, "Finished Pre-execute", "",
0, ref b);
}
}
We don’t have any special post-execution processing to perform, but we still have to override the PostExecute() method. In this case, all we did in PostExecute() was call the base.PostExecute() method:
The CreateNewOutputRow() method is where the real processing takes place. First we grabbed the RSS feed header information including feed title, link, and publication date and placed it in string variables. Then we looped over the <item> tags in the RSS feed, each one representing a syndicated article, and put the article title, link, and description in string variables. In the loop, we called the AddRow() method of the output buffer and assigned our string values pulled from the XML document to the output buffer columns. After the loop completed, and all rows were added to the output, we called the SetEndOfRowset() method on the buffer to signal SSIS that no more rows were coming.
![]() TIP: Even if you don’t think you need any special error handling right now, putting
TIP: Even if you don’t think you need any special error handling right now, putting try-catch blocks around your .NET code will make it easier to add special handling for errors in the future.
SCRIPT COMPONENT EVENTS
Along the way, we keep a count of processed rows, and report our progress by firing OnProgress events with the FireProgress() method. Like OnInformation, these events are useful for troubleshooting and debugging code. If we encounter an exception in this code, it’s with a single row, so we call FireError() to log the error and let SSIS decide whether to stop processing at the task level. The code listing is as follows:
public override void CreateNewOutputRows()
{
// Fire OnInformation event for starting
this.ComponentMetaData.FireInformation(-1, ComponentName,
"Start - Create new output rows", "", 0, ref b);
try
{
// Get feed properties
string feed_title = RssXML.SelectSingleNode("(/rss/channel/title)[1]").InnerText;
string feed_link = RssXML.SelectSingleNode("(/rss/channel/link)[1]").InnerText;
string feed_language = RssXML.SelectSingleNode("(/rss/channel/language)[1]").InnerText;
string feed_pubDate = RssXML.SelectSingleNode("(/rss/channel/pubDate)[1]").InnerText;
// Initialize counters and shred articles
int CurrentRowCount = 0;
int CurrentPercent = 0;
int LastPercent = 0;
XmlNodeList xl = RssXML.SelectNodes("/rss/channel/item");
int TotalRows = xl.Count;
// Iterate articles
foreach (XmlNode xn in xl)
{
// Get article properties
string title = xn.SelectSingleNode("(title)[1]").InnerText;
string link = xn.SelectSingleNode("(link)[1]").InnerText;
string description = xn.SelectSingleNode("(description)[1]").InnerText;
// Create new output row
Output0Buffer.AddRow();
// Assign values to the output buffer columns
Output0Buffer.FeedTitle = feed_title;
Output0Buffer.FeedLink = feed_link;
Output0Buffer.FeedLanguage = feed_language;
Output0Buffer.FeedPubDate = feed_pubDate;
Output0Buffer.Title = title;
Output0Buffer.Link = link;
Output0Buffer.Description = description;
// Increment row counter, log progress
CurrentRowCount++;
CurrentPercent = CurrentRowCount * 100 / TotalRows;
// Log progress every time % changes if (LastPercent != CurrentPercent)
{
// Fire OnProgress event
this.ComponentMetaData.FireProgress(string.Format("{0} of {1} rows processed.",
CurrentRowCount, TotalRows), CurrentPercent, CurrentRowCount, 0,
ComponentName, ref b);
// Update % complete
LastPercent = CurrentPercent;
}
}
}
catch (Exception ex)
{
// Fire OnError event if an error occurs
this.ComponentMetaData.FireInformation(-1, ComponentName, ex.ToString(), "", 0, ref b);
}
finally
{
// Perform base CreateNewOutputRows() method
base.CreateNewOutputRows();
// End of rows
Output0Buffer.SetEndOfRowset();
// Fire OnInformation event for starting
this.ComponentMetaData.FireInformation(-1, ComponentName,
"Complete - Create new output rows", "", 0, ref b);
}
}
![]() NOTE: The .NET
NOTE: The .NET SelectNodes() and SelectSingleNode() methods we used in this example accept an XPath expression and return XML nodes. XPath is a language that allows you to locate and retrieve individual nodes, or sets of nodes, from XML documents. A discussion of the details of XPath is beyond the scope of this book. However, if you want more details on this technology, check out the .NET XPath Reference at http://msdn.microsoft.com/en-us/library/ms256115.aspx.
When this package is executed, the data viewer displays the results—the contents of the CNN Top Stories RSS feed, shown in Figure 10-17. Note that because CNN is constantly updating its news feeds, the content of your results is likely to differ from those shown in the figure.

Figure 10-17. RSS feed contents in the data viewer
Synchronous Script Component Transformation
The Script Component synchronous transformation is extremely flexible. It differs from the Script Component source in that it has an input and an output. This section demonstrates a simple synchronous transformation with the script component. For this example, we expanded the previous package by adding another script component to the designer and selecting the transformation type, as shown in Figure 10-18. This new script component will perform a commonly needed—yet simple—function that is not included in the stock components. It will simply number the columns of the data flow for us.

Figure 10-18. Selecting the transformation script component type
After we added the new script component to the designer, we routed the data flow through it, as shown in Figure 10-19.
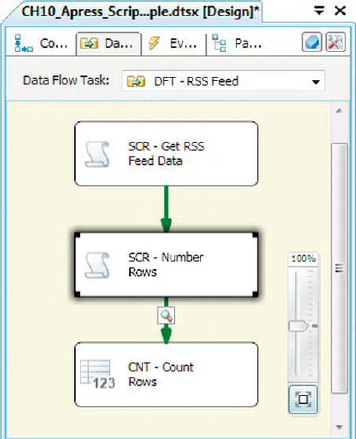
Figure 10-19. Adding the Script Component synchronous transformation to the data flow
SYNCHRONOUS OR ASYNCHRONOUS?
We discussed the differences between synchronous and asynchronous transformations in Chapter 8. The script component allows you to create both types of transformations. By default, the Script Component synchronous transformations are synchronous, and our sample is synchronous.
The setting that determines whether a script component is synchronous or asynchronous is the SynchronousInputID, which can be found on the Inputs and Outputs page of the editor. When this property of the component is set to the name of the input (Input 0 by default), the component is synchronous. When it’s set to None, the component is asynchronous. The below figure shows how to set the SynchronousInputID property of the component.
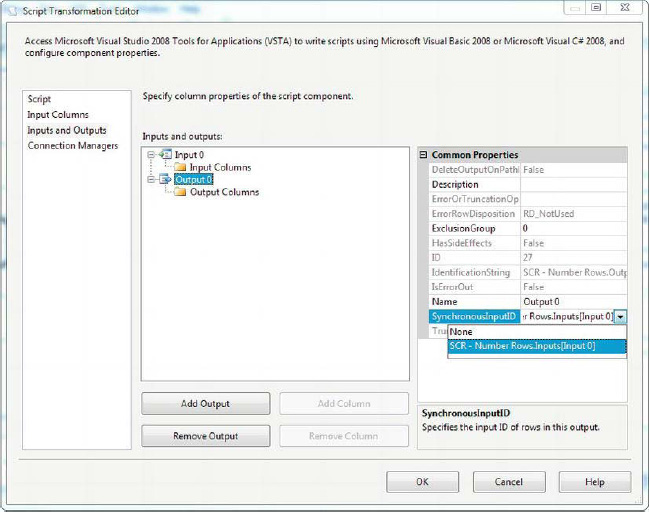
Figure 10-20. Setting the SynchronousInputID of the script component
On the Input Columns page of the editor, you can choose Input Columns and Output Columns. The Input Columns you choose are accessible from within the script; all other columns are “passed through” the component to the next component in the data flow. You can add Output Columns to the data flow on this tab as well. In our simple example, we’ve added a four-byte signed integer [DT_I4] type column named RowNumber to the output, as shown in Figure 10-21. This new column will hold the number assigned to each row, beginning with 1.
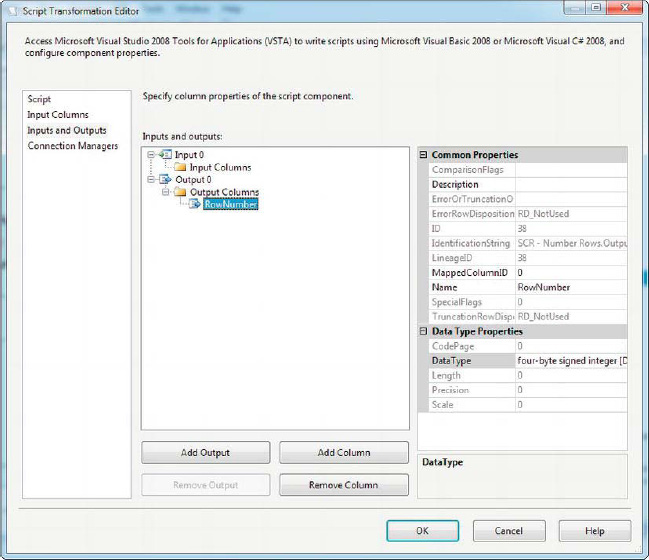
Figure 10-21. Adding a new column to the script component output
The Script Component synchronous transformation overrides three methods:
- Like the Script Component source, the asynchronous transformation type overrides the
PreExecute()method. This method is executed exactly once at the start of the script component, before any data is processed. This method is useful for performing initialization tasks in your transformation.- The Script Component synchronous transformation also supports the
PostExecute()method. This method is executed exactly once, when all data has been processed by the component. This method allows you to perform any cleanup steps after the transformation is complete.- Finally, the transformation provides the
ProcessInputRow()method, which has the name of your input prepended to it. In our example, where the input is namedInput 0, theProcessInputRow()method is namedInput0_ProcessInputRow(). In a synchronous transformation, this method is called once for every single row of data that passes through it. This method is “where the magic happens” in your transformation.
The script we used in this script component starts by declaring a class-level integer variable named row_number to keep track of our row count, as shown here:
[Microsoft.SqlServer.Dts.Pipeline.SSISScriptComponentEntryPointAttribute]
public class ScriptMain : UserComponent
{
int row_number;
...
}
The PreExecute() method calls the base.PreExecute() method and initializes the row_number variable to 1:
public override void PreExecute()
{
// Execute base PreExecute() method
base.PreExecute();
// Initialize row number
row_number = 1;
}
The PostExecute() method simply calls the base.PostExecute() method:
public override void PostExecute()
{
  base.PostExecute();

}
The Input0_ProcessRow() method is called once for each row of the input. For each row passed in, we assign the value of the row_number variable to the RowNumber column of the data flow and then increment the row_number by 1.
public override void Input0_ProcessInputRow(Input0Buffer Row)

{

  // Assign row_number to RowNumber column

  Row.RowNumber = row_number;


  // Increment row_number

  row_number++;

}
The results of our simple row-numbering script component are shown in Figure 10-22.
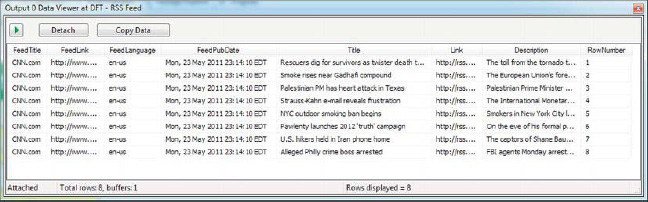
Figure 10-22. Results of row-numbering script component
Asynchronous Script Component Transformation
In addition to synchronous transformations, the script component allows you to create powerful asynchronous transformations. As we discussed in Chapter 8, asynchronous transformations are useful when you want to change the “shape” of your dataset by pivoting it, aggregating it, or by adding and removing rows. This example extends the previous package to incorporate a new asynchronous script component into the data flow. We will parse the article Title and Description columns into individual words and output them in a single column, along with an occurrence count for each word. In the real world, this type of transformation can be useful for performing text data mining and analysis.
We begin this sample by adding another script component to the task, as we did when adding a syncronous Script Component transformation. As before, we chose the Transformation option from the dialog box. We directed the data flow from the synchronous row-numbering script component to the new script component. We also added a new Row Count transformation to catch the input of the second output and enabled the data viewer on the output. The result looks like Figure 10-23.
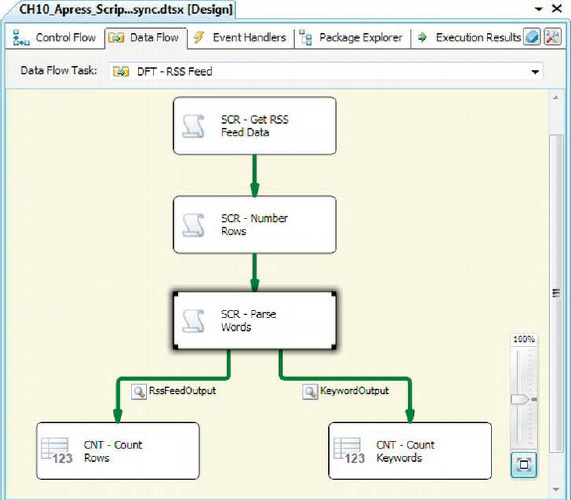
Figure 10-23. Adding the new word-parsing script component to the data flow
In this example, we’re going to introduce two features of script transformations: (1) processing input data by using asynchronous transformations and (2) multiple outputs. For one of the outputs, which we’ve renamed RssFeedOutput, we’ll output the RSS feed articles in the same form that we retrieved them in. The transformation will also extract the keywords out of the RSS feed Description column and count the number of occurrences of that word in each article. The results are sent to the second output, which we renamed KeywordOutput.
After dragging the new script component onto the designer surface, we went into the Input Columns page of the editor. We selected all inbound columns from the data flow, making them available to the script component, as you can see in Figure 10-24.

Figure 10-24. Adding inbound columns to the script component’s input columns
After we added the inbound columns to the script component’s input columns, we went to the Inputs and Outputs page. Once there, we added a second output to the Inputs and Outputs page. We then changed the SynchronousOutputID to None on both outputs. This disconnects them from the input and makes them asynchronous.
![]() TIP: Although you can add multiple outputs to a Script Component transformation, you can have only one input. If you need multiple inputs (one example is the stock Union All component), you’ll need to create a custom component, which we discuss in Chapter 22.
TIP: Although you can add multiple outputs to a Script Component transformation, you can have only one input. If you need multiple inputs (one example is the stock Union All component), you’ll need to create a custom component, which we discuss in Chapter 22.
By default, the outputs are named Output 0 and Output 1—for this sample, we renamed them to RssFeedOutput and KeywordOutput to better reflect the data we’ll push into it. We then created the output columns under each output. RssFeedOutput will contain the RSS feed contents exactly as they come into the component, while KeywordOutput will hold all the parsed keywords. You can see the Inputs and Outputs page with two asynchronous outputs in Figure 10-25.

Figure 10-25. Adding two asynchronous outputs to the script component
When building a Script Component synchronous transformation, as we saw previously, the inbound columns flow through to the output by default. This is because in synchronous transformations, the input and output buffer are one and the same. You need to explicitly name only those columns that your transformation adds to the output. In an asynchronous transformation, the input and outputs are disconnected, so you need to explicitly create every single column you want in every output. In our example, the RssFeedOutput columns mirror the input columns, while the KeywordOutput contains only four columns, as shown in Figure 10-26. Table 10-1 lists the details of the KeywordOutput columns.
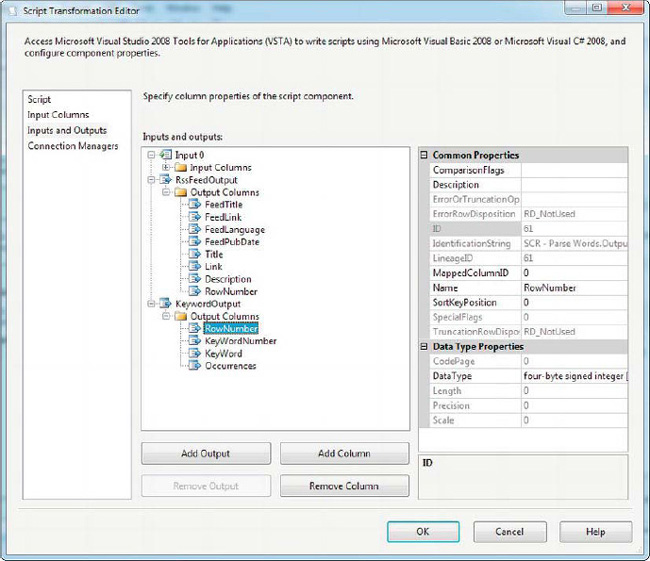
Figure 10-26. Adding columns to the script component’s two outputs


In the Script Component asynchronous transformation, we have four main methods that need to be overridden:
- The
PreExecute()method fires once for the component before any rows are processed.- The
PostExecute()method fires once for the component after all rows have been processed.- The
ProcessInput()method fires once during execution of the component. This method iterates the rows of the buffer, calling another method—ProcessInputRow()—to process them. TheProcessInput()method is prefixed with the name of the input; in our example, it isInput0_ProcessInput().- The
ProcessInputRow()method fires once for every row passed to it. Normally, this will be once for every row in the input buffer, although this depends on theProcessInput()method. TheProcessInputRow()method is also prefixed with the name of the input. In our example, it is namedInput0_ProcessInputRow().
The PreExecute() and PostExecute() methods in our sample simply call the base methods shown here:
public override void PreExecute()

{

  // Call base method

  base.PreExecute();

}


public override void PostExecute()

{

  // Call base method

  base.PostExecute();

}
The Input0_ProcessInput() method uses a while loop and the input buffer’s NextRow() method to iterate the inbound rows. It calls the Input0_ProcessInputRow() method for each row along the way. After the input buffer has been completely processed, the base ProcessInput() method is called, and then the SetEndOfRowset() method for both output buffers is called to signal to the SSIS runtime that all rows have been processed through the script component.
public override void Input0_ProcessInput(Input0Buffer Buffer)

{

  // Get Component Name
ComponentName = this.ComponentMetaData.Name;
// Iterate rows and process them one at a time
while (Buffer.NextRow())
{
Input0_ProcessInputRow(Buffer);
}
// Call base method
base.Input0_ProcessInput(Buffer);
// At end of input buffer set end of rowset market on both outputs
if (Buffer.EndOfRowset())
{
KeywordOutputBuffer.SetEndOfRowset();
RssFeedOutputBuffer.SetEndOfRowset();
}
}
Finally, the Input0_ProcessInputRow() method processes each inbound row from the buffer. In our sample, we add a new row to the RssFeedOutputBuffer for each row and then assign the inbound values to the corresponding columns of the output buffer. For the KeywordOutputBuffer, we do a bit more work. First we clean up the incoming Description column, eliminating all punctuation except for spaces. Then we use the .NET Regex (regular expression) class to split up the text into individual words. Next, we iterate those words and count them, storing the words and their occurrence counts in a .NET Hashtable. The last step is to iterate the entries in the hash table and add them to the output.
![]() NOTE: A detailed discussion of the .NET
NOTE: A detailed discussion of the .NET Regex and Hashtable classes is beyond the scope of this book. Detailed information can be found on MSDN, at http://msdn.microsoft.com, with a search for either.
public override void Input0_ProcessInputRow(Input0Buffer Row)

{

  bool b = true;

  try

  {

    // Add a new row to RssFeedOutputBuffer

    RssFeedOutputBuffer.AddRow();


    // Set columns of new rows on output

    RssFeedOutputBuffer.Description = Row.Description;

    RssFeedOutputBuffer.FeedLanguage = Row.FeedLanguage;

    RssFeedOutputBuffer.FeedLink = Row.FeedLink;

    RssFeedOutputBuffer.FeedPubDate = Row.FeedPubDate;

    RssFeedOutputBuffer.FeedTitle = Row.FeedTitle;

    RssFeedOutputBuffer.Link = Row.Link;

    RssFeedOutputBuffer.RowNumber = Row.RowNumber;

    RssFeedOutputBuffer.Title = Row.Title;
// Eliminate all punctuation from description, except spaces
StringBuilder sb = new StringBuilder(2200);
foreach (char c in Row.Description)
{
if (Char.IsLetterOrDigit(c) || c == ' ')
sb.Append(c);
else
sb.Append(' '),
}
// Split the clean string
string[] words = Regex.Split(sb.ToString(), " ");
int i = 1;
// Loop iterate keywords and count occurrences; store in hash table
Hashtable occurrence = new Hashtable(100);
foreach (string keyword in words)
{
if (occurrence.ContainsKey(keyword))
occurrence[keyword] = ((int)occurrence[keyword]) + 1;
else
occurrence.Add(keyword, 1);
}
// Send results stored in hash table out to second output
foreach (DictionaryEntry d in occurrence)
{
if (d.Key != "")
{
KeywordOutputBuffer.AddRow();
KeywordOutputBuffer.RowNumber = Row.RowNumber;
KeywordOutputBuffer.KeyWordNumber = i;
KeywordOutputBuffer.KeyWord = (string)d.Key;
KeywordOutputBuffer.Occurrences = (int)d.Value;
i++;
}
}
}
catch (Exception ex)
{
this.ComponentMetaData.FireError(-1, ComponentName, ex.ToString(), "", 0, out b);
}
}
Figure 10-27 shows a sample result from both outputs of the asynchronous script component.
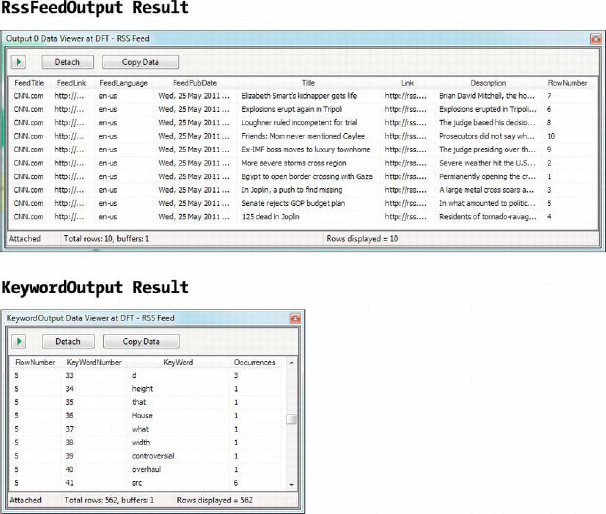
Figure 10-27. Sample results of both outputs of the asynchronous script component
Script Component Destination
The final type of script component you can create is the destination. In our example, we’ll create Script Component destinations that output the results of the previous samples in HTML table format in output files. To start, we replaced the Row Count components in the previous sample with script components. When we added the script components to the data flow, we selected the Destination option from the pop-up menu, as shown in Figure 10-28.
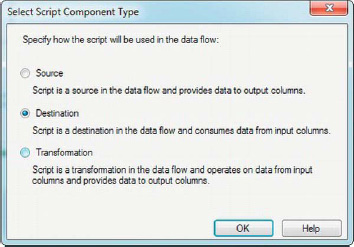
Figure 10-28. Choosing the Destination script component type
Next we opened the editor on each and chose all columns on the Input Columns page. The input columns for the first script component are shown in Figure 10-29.
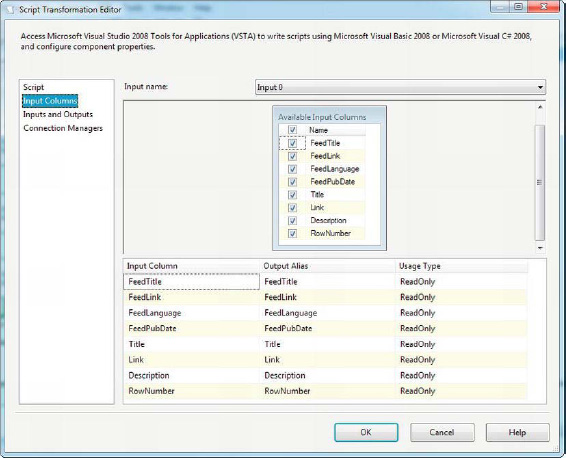
Figure 10-29. Choosing input columns on the destination script component
Now, as we explained previously, this destination script component will accept columns as input and then output them, formatted as HTML files. To make this work, we need to define an output file. We defined a File Connection Manager on the Connection Managers page of the editor. We gave it the name FileConnection, and created a new connection from the Connection Manager drop-down menu. This option displays the Add SSIS Connection Manager dialog box, shown in Figure 10-30.
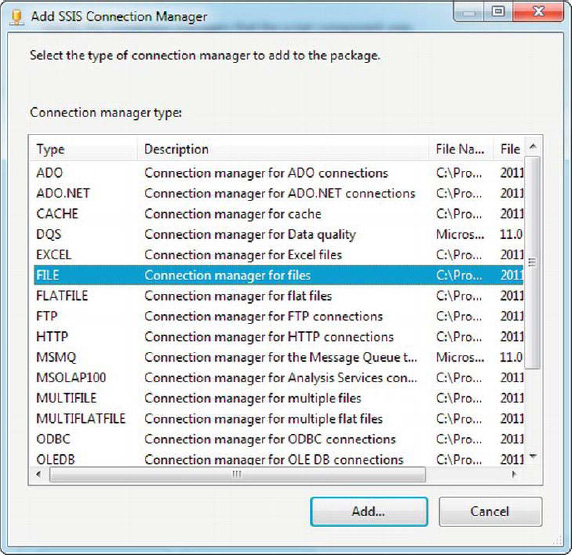
Figure 10-30. Choosing a FILE connection manager from the Add SSIS Connection Manager menu
After we chose to create a FILE connection manager, we configured it by choosing Create File from the drop-down menu and entering a full path for the file, as shown in Figure 10-31.

Figure 10-31. Choosing the name of the target file
After we finish the connection manager configuration, the editor looks like Figure 10-32.
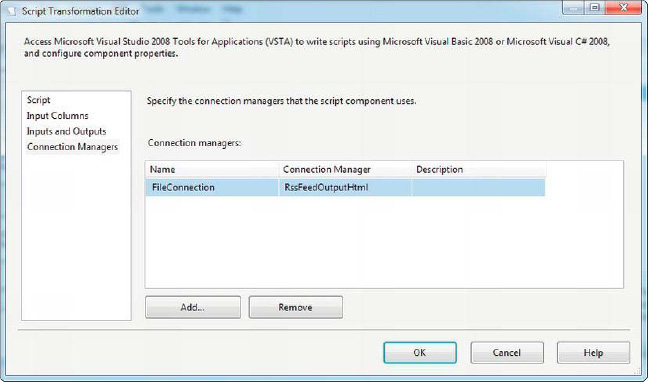
Figure 10-32. Assigning the connection manager to the script component
After we configured the script component, we edited the script. The body of the ScriptMain class, the default entry point for the script, is as follows:
[Microsoft.SqlServer.Dts.Pipeline.SSISScriptComponentEntryPointAttribute]

public class ScriptMain : UserComponent

{

  string filename;
TextWriter outputfile;
bool headerout = false;
// Method overrides go here ...
...
}
We declared a few variables at the class level to hold the name of the output HTML file, a TextWriter to write out to the target file and a bool variable that tells us whether we’ve already written a header out to the HTML file. We talk more about this later in this section.
The first method, which is called during package design in BIDS and when the package is run, is AcquireConnections(). We use this method to grab the full path to the target file from the FileConnection connection manager.
public override void AcquireConnections(object Transaction)

{

  base.AcquireConnections(Transaction);

  IDTSConnectionManager100 connmanager = this.Connections.FileConnection;

  filename = (string)connmanager.AcquireConnection(null);

}
Our next methods are PreExecute() and PostExecute(). These methods are called at the beginning and end of package execution. In the PreExecute() method, we open the output file for writing. In the PostExecute() method, we write the closing tags for our HTML table and page out to the file, and then flush and dispose of the TextWriter object.
public override void PreExecute()

{

  base.PreExecute();

  outputfile = new StreamWriter(filename, false);

}


public override void PostExecute()

{

  base.PostExecute();

  outputfile.Write("</table></body></html>");

  outputfile.Flush();

  outputfile.Dispose();

}
As we showed with the previous components, the script component exposes inbound columns by name, by using the buffer object in the ProcessInputRow() method. For instance, we could access the FeedTitle columns by using syntax such as the following:
string title = Row.FeedTitle;
In this instance, however, we want to be a little cleverer in our solution. Partly because we have to create this same destination script component twice (once for each output of our asynchronous transformation script component), we don’t want to hard-code the column names into the component. We’d rather just copy and paste the code. This means we need to output every input column regardless of the inbound column metadata. To do this, we need to introduce a new method of the script component, the ProcessInput() method:
public override void ProcessInput(int InputID, string InputName, PipelineBuffer Buffer,

  OutputNameMap OutputMap)

{

  if (!headerout)

  {

    outputfile.Write("<html>
<body>
<table border="1">
<tr>");

    foreach (IDTSInputColumn100 column in

      this.ComponentMetaData.InputCollection[0].InputColumnCollection)

    {

      outputfile.Write("<th>{0}</th>", column.Name);

    }

    outputfile.Write("</tr>");

    headerout = true;

  }

  while (Buffer.NextRow())

  {

    outputfile.Write("<tr>");

    for (int i = 0; i < Buffer.ColumnCount; i++)

    {

      outputfile.Write(string.Format("<td>{0}</td>", Buffer[i].ToString()));

    }

    outputfile.Write("</tr>");

  }

}
The ProcessInput() method (notice the lack of an input name prefix on this method) gives us direct access to the ComponentMetadata and the PipelineBuffer. This means we can get the column names for writing out our table header row and the contents of every column of every row, all accessible by indexer (essentially array subscripts).
The first step in our implementation was to check whether we’d written out the HTML table header. If not, we iterate the input columns (IDTSInputColumn) in the InputColumnCollection. We grab the names from these and write them out to the HTML table header. We also set the flag indicating the header has been written, so we don’t write it out again. This is important because the ProcessInput() method may be called multiple times by the SSIS runtime. Finally we iterate the buffer rows with the Buffer.NextRow() method. In this loop, we iterate the input buffer columns and output the values as HTML table data elements.
We copied and pasted the destination script component and put the copy at the end of the KeywordOutput to generate a second HTML file. The result looks like Figure 10-33.

Figure 10-33. SSIS package with two destination script components
The end result of our destination script components are a couple of HTML files with the data flow column data saved in HTML files, as shown in Figure 10-34.
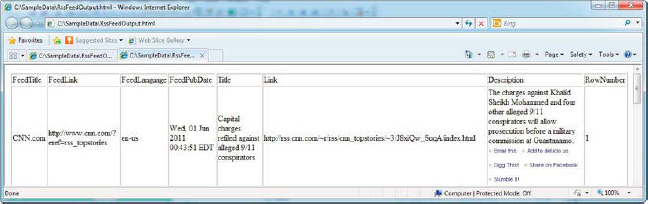
Figure 10-34. HTML file generated by destination script component
![]() NOTE: You’ll notice we had to copy and paste the script component in this example to duplicate its functionality. This makes these script components in particular prime candidates for conversion to SSIS custom components. We explore custom components in Chapter 22.
NOTE: You’ll notice we had to copy and paste the script component in this example to duplicate its functionality. This makes these script components in particular prime candidates for conversion to SSIS custom components. We explore custom components in Chapter 22.
Summary
This concludes our discussion of scripting in SSIS. In this chapter, we discussed the Script task, which lives in the control flow, and the flexible script component, which can serve multiple purposes within a data flow. The script component can act as a data flow source, a transformation, or a destination, allowing you to take full advantage of .NET scripting in either VB or C# to add powerful processing capabilities to your package, above and beyond what the stock components offer. The next chapter covers SSIS errors and event handling.