C H A P T E R 9
Variables, Parameters, and Expressions
Old expressions are the best, and short ones even better.
—Prime Minister Winston Churchill
In order to create modular and robust solutions, developers will often create variables and routines to access those variables. Integration Services is no different in this regard. The variables available to SSIS have their own data types that often correlate to SQL Server data types. Parameters are used to pass values between parent and child packages to extend the modularity of an ETL project. And an expression language is provided to allow the ETL process to read or modify the values of both during runtime. The expression language can certainly get convoluted, so it is recommended that you take Churchill’s words to heart and keep the logic minimal, readable, and easily modifiable.
Variables allow flexibility when running packages by allowing you to evaluate conditions, modify data in the stream, parameterize SQL, and many other options. These variables can be used to store scalar values or tabular values, depending on their data types. Scalar values are useful for parameterizing SQL, whereas tabular values can control loop containers. This chapter covers the data types that SSIS variables can have and shows how they interact with the package during runtime.
What Are Variables and Expressions?
Variables are used to store values that SSIS executables can access at runtime. Defaults can be provided at design time for variables of certain data types, but it is during runtime that they truly shine. There are two kinds of variables: system variables and user-defined variables.
The system variables capture the status of the package during runtime. They are defined by SSIS and in some cases will automatically update. You can neither modify the values of system variables nor define any system variables. You can, however, access the values of the system variables such as System::StartTime in order to store the execution information for tracing the process. System:: denotes the namespace that the variable belongs to; we introduce namespaces later in this chapter. Variable names are case sensitive in SSIS.
User-defined variables are extremely useful because they can extend the functionality of SSIS by making processes modular. Scalar variables defined as String and Date data types, among others, can be used to parameterize Execute SQL tasks and source queries. Tabular variables defined as Object data types can be used to control loop containers as well as allow script components access to the data. You can create user-defined variables and can define the level of access, read-only or read/write, that individual components may have to the variables. In order to add variables to a package, you can use the Variables window. The window can be opened by right-clicking on the control flow of the package and selecting the Variables option, as shown in Figure 9-1. The other option is to use the View menu to choose Other Windows ![]() Variables.
Variables.

Figure 9-1. Variables window in Visual Studio
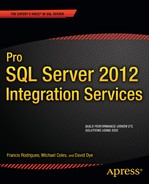
Expressions are used in SSIS to return a value based on the evaluation of criteria. The expression language itself consists of identifiers, literals, functions, and operators. Some expressions can be written to assign values to variables, return the value of a calculation, or be used as conditional statements. The expressions, just like most programming languages, adhere to a strict grammar. The grammar determines the proper usage of the identifiers, literals, functions, and operators. In order to assist you with writing expressions, SSIS provides an expression evaluator and builder. Figure 9-2 shows the Expression Builder with the expression evaluator. The evaluator will parse and validate the expression’s adherence to the grammar. The Expression Builder provides quick access to all the available variables, functions, type casts, and operators. You can click and drag the item you need from its respective position into the expression text box to add it to the expression.
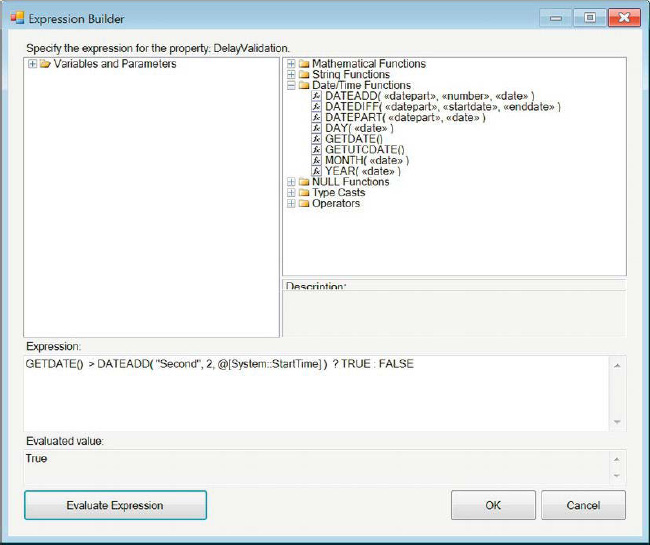
Figure 9-2. Expression Builder
The expression GETDATE() > DATEADD( "Second", 2, @[System::StartTime] ) ? TRUE : FALSE evaluates to a Boolean value. It performs a simple check to determine whether 2 seconds have passed since the package’s execution began. This particular expression uses the ? : syntax to handle an IF THEN statement. The DATEADD function allows us to adjust the time interval for our check. We use this expression to modify the values of control flow task properties such as DelayValidation. This expression can be set only to properties that have Boolean definitions.
![]() NOTE: The system variables will store the values once the package is opened for design time evaluation. For example, the
NOTE: The system variables will store the values once the package is opened for design time evaluation. For example, the System::StartTime variable will maintain the timestamp from when the package was initially opened. This value will not update even if the package is run using Debug mode. It will update only if you close and reopen the package.
What Are Parameters?
In order to support the new deployment model for SSIS, parameters have been introduced in this version. Parameters basically replace the need for configurations to specify values. Parameters can be used at the package level or at the project level.
Package-level parameters are extremely useful for the parent-child package design. They allow you to pass specific values between the parent packages in order to configure the child packages. Prior to passing the parameters to the child package, you need to create the package parameters. Certain objects within a package can be bound to properties so that when a value is inherited from the parent, it will directly impact the child package’s property. Bindings can also be created to map to the objects’ properties that exist within the child package.
Figure 9-3 demonstrates how to bind the parameter to a package property. You can either create a new parameter by using the wizard or you can use a project parameter whose value is available to all the packages in the project. Parameter names are case sensitive. We discuss parameterizing packages later in this chapter. All the executables, containers, and event handlers can be parameterized as well. The package parameters that are created can be bound to the specific properties of each of these objects in the package. Connection managers cannot be parameterized directly but properties such as ConnectionString can be modified by using Script tasks and variables that inherited values from parent packages.

Figure 9-3. Parameterizing a package
The Parameterize dialog box appears when you right-click the control flow background or when you right-click an object and select Parameterize. Using the dialog box will create any new parameters you require. All package parameters can be seen in the new Parameters designer window that has been added to the BIDS. The designer window is shown in Figure 9-4.

Figure 9-4. Parameters designer window
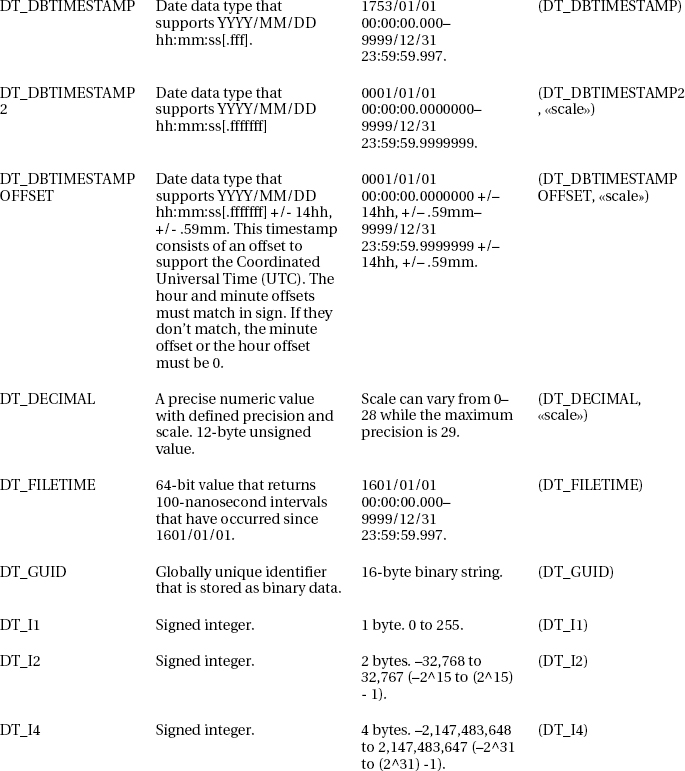
Project parameters are available to all the packages included in the project. Adding project parameters creates a file in the solution that allows you to view all the parameters that exist at the project level. Visual Studio has a designer window specifically for project parameters, shown in Figure 9-5.
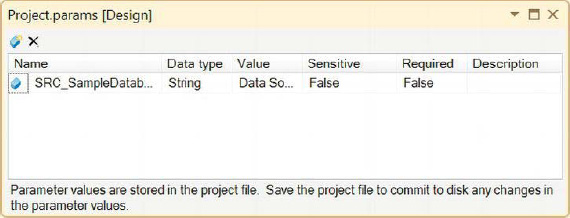
Figure 9-5. Project-level parameters
Following are descriptions of the various parameters:
Name specifies the name of the project parameter.
Data Type specifies the data type of the parameter.
Value provides a default value for the parameter.
Sensitive specifies whether the data contained within the parameter is sensitive. This is so that sensitive data may be encrypted, not saved or left as is depending of the level of security behind the project. This field may come in handy if username and password information is contained within the parameter.
Required specifies that this parameter must be provided during the execution of the package, after it has been deployed to a server.
Description provides a short synopsis of the parameter.
The parameters are not limited to just modifying package properties. They can be accessed in the Expression Builder just like the rest of the variables. This allows you to access strings or integer values set at the project level without having to worry about keeping multiple package variables in sync, as was the case in older versions. With this ability, configuration files will no longer be required to maintain variable values across multiple packages.
SSIS Data Types
As with most programming languages, SSIS variables also require data types. For the most part, these data types match up with SQL Server data types. When extracting data from SQL Server, each column is recognized as one of these data types. The Data Conversion task will use these data types to convert data types from other sources so that the data can seamlessly map into a SQL Server database.
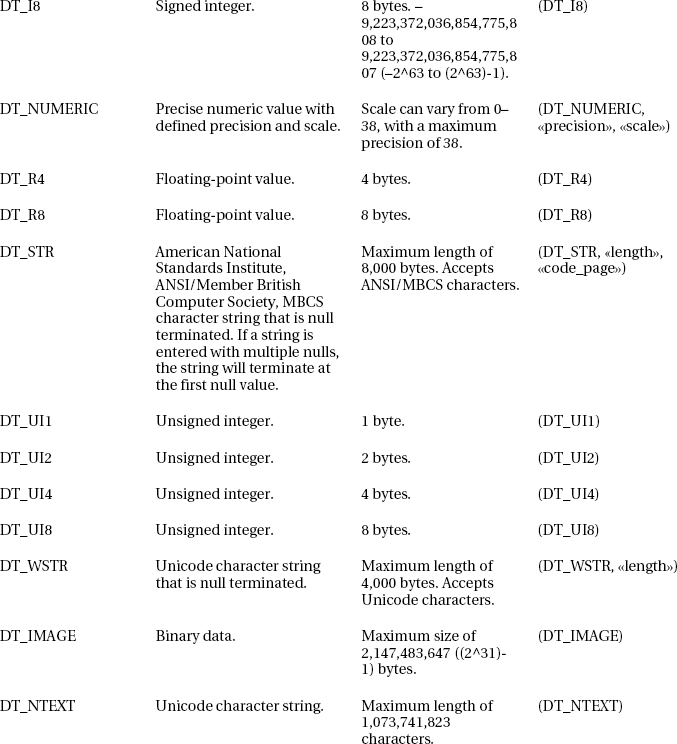
Table 9-1 shows the data types that SSIS uses. We included a column that shows the Type Cast function that can be used in expressions to convert a value. You can use the functions in expressions in the following manner: (<<type cast function>> [, <<param1>>, <<param2>>, … ]) (<<expression>>). The parentheses around the expression are not required, but will make it easier to determine what is being type casted.


Variable Scope, Default Values, and Namespaces
SSIS provides several ways to group variables so that you do not end up with a confusing mass. Your naming conventions will assist you greatly in keeping the variables in order. If you do not have these standards, the methods that come by default in SSIS should assist in providing some semblance.. The variable’s scope physically limits your variable from being accessed by all methods. Namespaces assist you in grouping variables that serve a particular purpose. Assigning a default value insures that a user defined variable will have a value other than NULL. The default values will be used during Debug mode and runtime unless they are modified by using expressions or Script tasks.
Scope
Most programming languages provide scope for their variables. Scope is defined as the context of the variables with relation to the values and expressions. For SSIS, this translates to which executables, containers, and event handlers have access to the variables. To define a variable at the package implies that all the objects within the package will have access to the variable. In order to limit the variable’s scope to a particular executable, you should select the object in the control flow designer window when you add the variable. If you do not select any object, the default is the package scope. The variable window has several icons at the top that allow you to modify the variables, as shown in Figure 9-6.
Figure 9-6. Variable options
The following list describes the functions of each of the buttons on the Variables toolbar:
Add Variable adds a variable to the collection by using selected objects as the defined scope of the variable.
Move Variable moves the variable to a different scope.
Delete Variable deletes the highlighted variables.
Show System Variables displays all the system variables.
Show Variables of All Scopes displays all the user-defined variables defined in the package. By default, only the variables of the selected object are shown. This helps to quickly identify only the available variables.
Choose Variable Columns opens a dialog box that allows you to quickly look at all the available columns.
The Choose Variable Columns icon is important because it allows you to gain control over all the aspects of a variable. By default, the only columns provided are Name, Scope, Data Type, and Value, as shown earlier in Figure 9-1. Figure 9-7 shows all the available columns that you can modify for the user-defined variables. The Namespace and Description columns are left out, but with the dialog box, you can add them back. The Raise Event When Variable Value Changes check box shows whether the specific variable is tied to an event that will fire when the value changes.

Figure 9-7. Choose Variable Columns dialog box
![]() NOTE: You have to add the Namespace and Description column back every time you restart Visual Studio. The columns reset to the default after the Visual Studio window is closed.
NOTE: You have to add the Namespace and Description column back every time you restart Visual Studio. The columns reset to the default after the Visual Studio window is closed.
Figure 9-8 shows the Variables window after we add all the variables we will need for this package. The objective of the CH09_Apress_ChildPackage is to extract the states that were accepted after 1900, convert the Date column into a DateTime column, and load only the states whose capitals lie north of 35.493259. The purpose of using two variables for row filtering is to demonstrate that a SQL query in a source component can be parameterized and to show that a conditional split can be used to filter out based on a variable value after the data has entered the data stream.

Figure 9-8. Variables defined in CH09_Apress_ChildPackage.dtsx
![]() NOTE: The variable SSIS data types map to the SSIS data types that are used in the ETL. For example, the Int32 data type refers to a 32-bit signed integer, the String data type maps to a Unicode character string, and Decimal refers to the
NOTE: The variable SSIS data types map to the SSIS data types that are used in the ETL. For example, the Int32 data type refers to a 32-bit signed integer, the String data type maps to a Unicode character string, and Decimal refers to the DT_NUMERIC data type. The data type names shown in Figure 9-8 are more reader friendly than the names that appear in a metadata viewer inside a data flow.
After the variables have been added, their scope can be changed by using the Select New Scope dialog box shown in Figure 9-9. This process works by copying all the properties of the selected variables to the new scope. After these new variables have been created, the names will have a 1 appended, and the original variables will be deleted. The dialog box will display all the available objects and the containers that they may be nested in so that you can move the variable scope to that object. The dialog box will also display all the event handlers that you may have created.

Figure 9-9. Select New Scope dialog box
Default Values
For most programming languages, you need to initialize a variable or at the least assign it a value before you can use it in a statement. The Value column allows you to specify the default values for the variables in SSIS. Certain data types automatically provide a default such as the DateTime and Int32, while others such as the Object data type will not accept any default values. The DateTime variables will use the time and date that they were created as their default value, while the default value for Int32 variables is 0. If you do not provide a valid value when setting defaults, you will receive an error dialog box similar to the one shown in Figure 9-10. The most common places for the values of variables to change are Execute SQL task and Script tasks.

Figure 9-10. Invalid Variable Default Value error message
Namespaces
Namespaces are one of the best ways to organize your variables. They allow you to group your variables in any way you see fit. The convention we showed in Figure 9-8 groups the variables by the function they serve in the ETL process. We use the Extract namespace when we need variables that will be used during the extract phase, the Transformation namespace when we need a variable to use in the transformation of the data, and the Load namespace if we need to modify the data before we load it. The default namespace for a user-defined variable is User, and because we always create variables with a very specific purpose in mind, we should use this feature to our advantage.
One slight drawback to using namespaces is that the lists of variables are sorted by the name rather than the extended name (Namespace::Name) in the Expression Builder or any editor that exposes the list in a drop-down. In Expression Builder, the RunTime variable will be referred to as @[Audit::RunTime]. In the drop-down lists that show variables, it will appear as Audit::RunTime. The namespaces are case sensitive, because they are part of the variable identifier.
System Variables
SSIS provides variables that allow you to view minute details about a package and its objects. These variables are known as system variables, and they belong to the System namespace. These variables are accessible in most of the scopes, but depending on the scope in which they are area accessed the values might be different In order to access these variables, you must use @[System::<<variable_name>>].
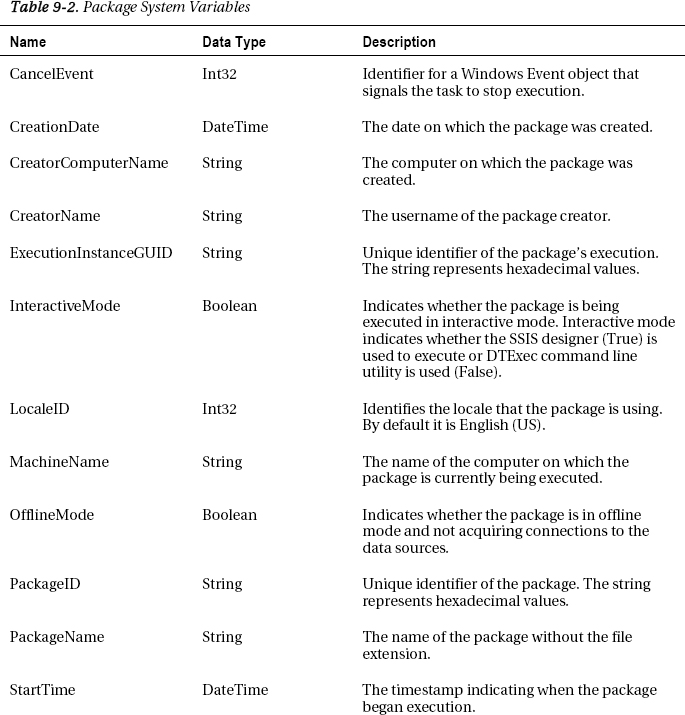
Package System Variables
System variables that belong to the package show important information about the package itself. All the objects defined within the package have access to these variables. Table 9-2 lists all the package system variables and their data types.

Container System Variable
The containers have only one system variable that is specific to them, LocaleID. This 32-bit integer identifies the locale that the container uses. This variable can be used within Sequence, For Loop, and Foreach Loop containers. Accessing the LocaleID variable within a container will default to this value rather than the package’s LocaleID.
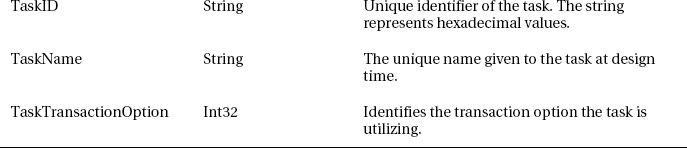
Task System Variables
The control flow tasks get their own set of system variables after they are created. These variables are usually not directly accessible for most of the tasks other than the Data Flow task. The Data Flow task allows you to access its variables by using Script transformation tasks, Derived Column transformations, and Conditional Split transformations. Using these transformations, you can access these variables and use their values as part of your data stream. Table 9-3 shows all the system variables that are available with tasks.

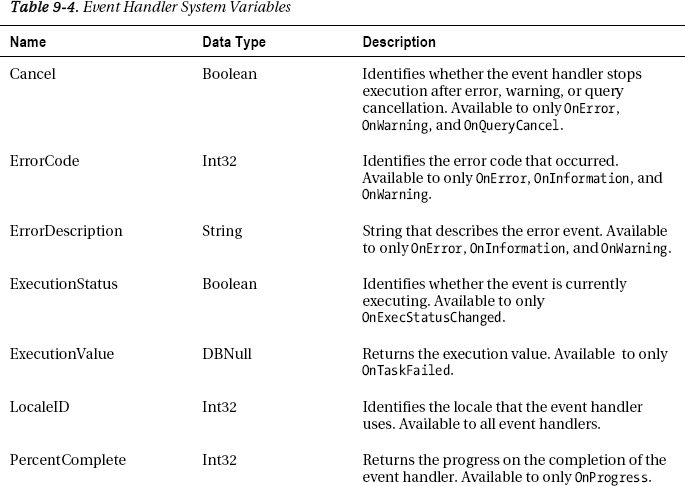
Event Handler System Variables
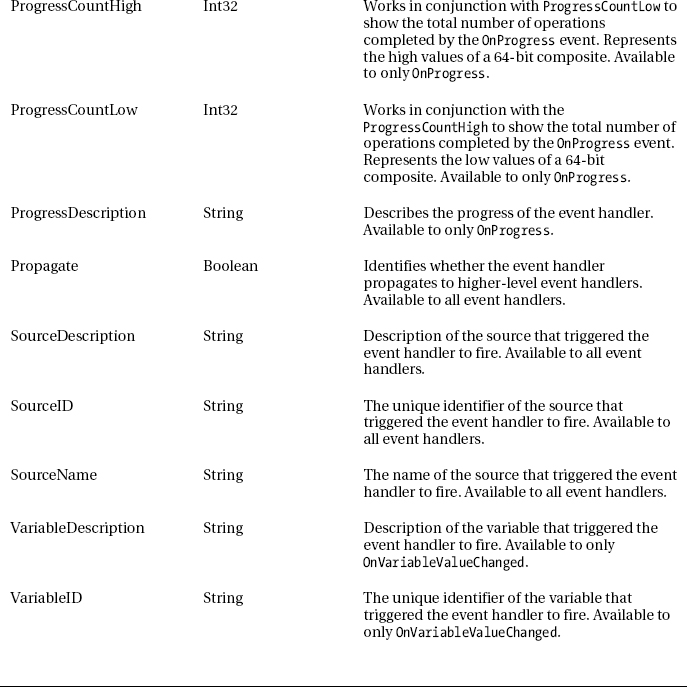
The last type of executables in SSIS, event handlers, also has its own set of system variables. These variables often do not apply to all the event handlers. The general rule that applied to the tasks also applies to the event handler system variables. Table 9-4 describes all the event handler system variables.
Accessing Variables
After you create all the variables you need for your ETL process, you will most probably want to access them. SSIS provides multiple ways to access the variables. Only the user-defined variables are modifiable. The values stored within the variables can be used to either construct a new value based on the variable value or to divert rows in the data flow.
To illustrate the different methods for accessing variables and parameters, we created two packages, CH09_Apress_ParentPackage.dtsx and CH09_Apress_ChildPackage.dtsx. The parent package’s sole task is to execute the child package by using the Execute Package task. Figure 9-11 demonstrates the contents of the parent package’s Package Explorer. The variable is in place to show the passing of variables to child packages by using parameters.

Figure 9-11. CH09_Apress_ParentPackage.dtsx Package Explorer
The child package is a little bit more complicated, as you can see in Figure 9-12. It serves to show two examples. The first example to execute is the SEQC_States sequence container. Its goal is to demonstrate how variables can be accessed by using transformations in a Data Flow task, a Foreach Loop container, and a Script task. The end result of this example is showing a message box displaying a string repeatedly until all the records have been iterated by the Foreach Loop container. The second example’s main purpose is to show the implementation of generating and executing dynamic SQL. This is done by using an Execute SQL task to retrieve a set of strings that will help create the different SQL statements, a Script task to concatenate the strings into executable SQL, and a final Execute SQL Task to execute the query stored within that string.
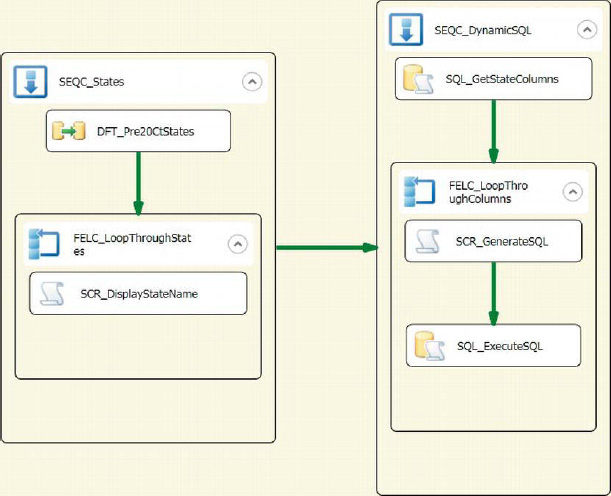
Figure 9-12. CH09_Apress_ChildPackage.dtsx control flow designer window
Parameterized Queries
Another excellent way that SSIS allows us to use variables is to parameterize source queries in Data Flow tasks. In order to parameterize queries, you need to use the SQL Command option as the data access mode. Listing 9-1 demonstrates the query we used inside the source component, SRC_GetPre20CtStates.
Listing 9-1. Parameterized Source Query
SELECT DISTINCT Name

      ,Abbreviation

      ,Capital

      ,Flag

      ,Date

      ,Fact

      ,Long
      ,Lat

FROM dbo.State s

WHERE YEAR(s.Date) < ?;
The question mark is the qualifier used to mark the placement of the parameter. We recommend placing all the required parameters in the same area so that reading and maintaining the SQL does not become a nightmare. In order to map the proper variable value to this qualifier, we must use the Parameters button on the source editor. Figure 9-13 shows our configuration for the parameter mapping. We used the Extract::StateYearFilter variable in order to limit the data that is coming through. The Parameter0 name is predetermined because we are using the OLE DB source component. Refer to Chapter 7 for more information about the parameter-naming conventions required with the different providers.
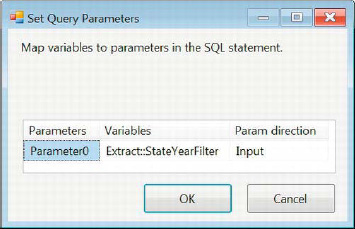
Figure 9-13. Set Query Parameters dialog box for SRC_GetPre20CtStates
![]() NOTE: We provided a default value for the
NOTE: We provided a default value for the Extract::StateYearFilter variable. This value can be modified by using the Script task and using an assignment statement after listing the variable in the ReadWriteVariables field.
Derived Column Transformations
After the data starts flowing through the pipeline, SSIS allows you to use Derived Column transformations to access the value stored in the variables. The same functionality can be used through a Script task transformation using similar code as shown earlier. For this particular part of the data flow, we want to be able to replace null values with a default value and add this transformation as a new column to the pipeline. In order to achieve this requirement, we use the expression ISNULL( [Date] ) ? @[Transform::StateAcceptanceTime] : (DT_DATE) [Date]. Figure 9-14 demonstrates how the Derived Column transformation automatically reads in the data type information from the type casts. We discuss type casts in more depth later in this chapter.
The ISNULL() function returns a Boolean value similar to the SQL Server function. If the conditional evaluates to True, we provide the value of the Transform::StateAcceptanceTime. Otherwise, we maintain the original date. The only difference is that this column contains timestamp information.
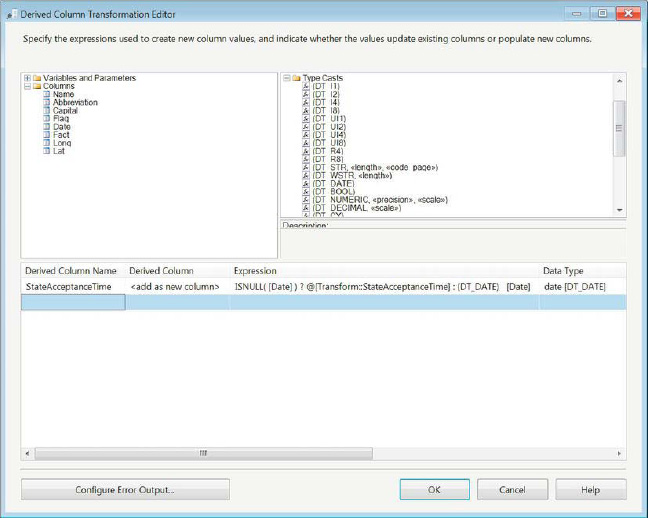
Figure 9-14. Derived column to replace missing data
![]() NOTE: Because we used a
NOTE: Because we used a WHERE clause with the equal operator in the source SQL query, the ISNULL([Date]) condition will always return False. Without that condition in the initial query, it is possible for ISNULL([Date]) to return True.
Conditional Splits
SSIS provides a Conditional Split transformation that can redirect data to multiple streams. In the simplest case, it can act as a WHERE clause, and in the more complicated cases, it can act as a CASE statement. For our example, we have a very simple criterion: we want to load only states whose capitals are north of Oklahoma City. We set the latitude value of Oklahoma City as the default value of Transform::StateCapitalFilter. With this value in place, we use the expression Lat > @[Load::StateCapitalFilter] in the conditional split shown in Figure 9-15 to pass through only the desired records. Because the latitude values increase as we approach the North Pole, the Greater Than comparison operator was used to determine whether the record should pass through.

Figure 9-15. Conditional split to exclude values based on the variable value
Recordset Destinations
After we perform all the transformations that are required, we need to store the data somewhere. The recordset destination allows us to load the data into an Object data type variable. This functionality works similarly to the Execute SQL task storing a Full result set output in a variable. Figure 9-16 shows the recordset destination configuration that is required to load the data into a variable. The essential part is to determine which variable to use.
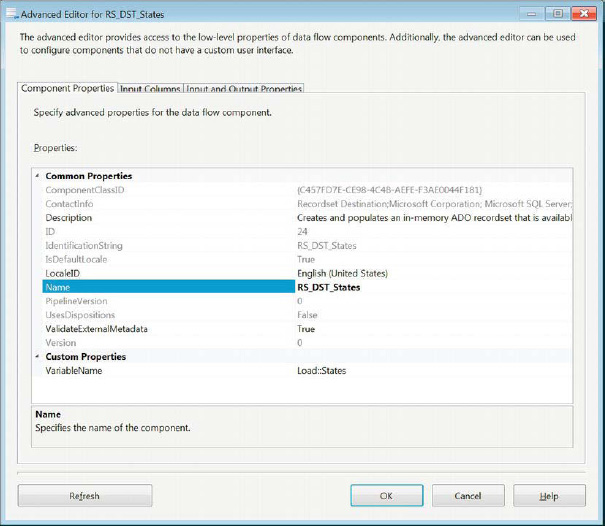
Figure 9-16. Configuration of the recordset destination
![]() NOTE: Reusing object variables for storing data will cause them to be cleared before they are loaded with the new data. Object variables do not append data after they are loaded. This can allow you to reuse the same variable for various datasets, but we do not recommend this approach because you will start to lose track of the tabular structure of the variable. Each load can add or remove columns, making the reuse of the variable a development pitfall. It is pretty easy to lose track of the column mappings in the objects, especially with entities that have numerous columns. Changing the structure several times will create an even greater complexity. This becomes especially noticeable if you use the object as the iterator in multiple Foreach Loop containers. You need to go back and forth to make sure that you are mapping the results in the proper order based on how the latest dataset was loaded.
NOTE: Reusing object variables for storing data will cause them to be cleared before they are loaded with the new data. Object variables do not append data after they are loaded. This can allow you to reuse the same variable for various datasets, but we do not recommend this approach because you will start to lose track of the tabular structure of the variable. Each load can add or remove columns, making the reuse of the variable a development pitfall. It is pretty easy to lose track of the column mappings in the objects, especially with entities that have numerous columns. Changing the structure several times will create an even greater complexity. This becomes especially noticeable if you use the object as the iterator in multiple Foreach Loop containers. You need to go back and forth to make sure that you are mapping the results in the proper order based on how the latest dataset was loaded.
After the variable is chosen as the destination, we need to specify the columns we will need to access. Figure 9-17 shows the column mapping that we can pass to a Foreach Loop container as we iterate through the object. After we have the dataset in the variable, the Foreach Loop container can read the values and assign them to other variables whose purpose is to hold the value during that iteration. This is very similar to the functionality provided by a cursor in SQL Server.
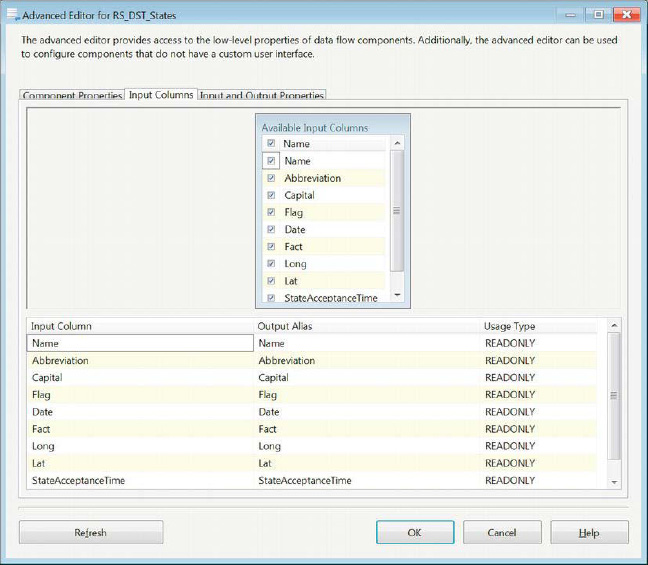
Figure 9-17. Recordset destination—column mapping
Foreach Loop Containers
Foreach Loop containers within SSIS can utilize Object data type variables as their iterators. In order to load the data, we need to first load data into the variable we intend to use. We demonstrated loading the data by using the recordset destination. As Figure 9-18 demonstrates, the Foreach Loop container utilizes the Foreach ADO enumerator as its iterator. We specified the Load::States variable as the enumerator because we populated it with the States dataset.

Figure 9-18. Foreach Loop container—Collections page
After the enumerator has been defined, we need to ensure that every column that is populated in the object is mapped to a variable. As the container loops through the object, the Foreach Loop container will assign the data value in each column to a variable. Skipping mappings will result in SSIS throwing unfriendly error messages. The container will automatically assign the index value shown in Figure 9-19, so we recommend mapping the variables in the same order as the columns are mapped to the enumerator variable.

Figure 9-19. Foreach Loop container—Variable Mappings page
Script Tasks
One of the easiest ways to access variables is by using the SSIS Script tasks in either the control flow or the data flow. In our sample package, CH09_Apress_ChildPackage.dstx, we will use the Script task at the control-flow level to display a string in a message box. Figure 9-20 demonstrates the ability to specify the access mode of the variables in a Script task. In our case, we only want to be able to read the value of the System::PackageName variable. Because we will not be modifying any existing variable values, we leave the ReadWriteVariables field empty.
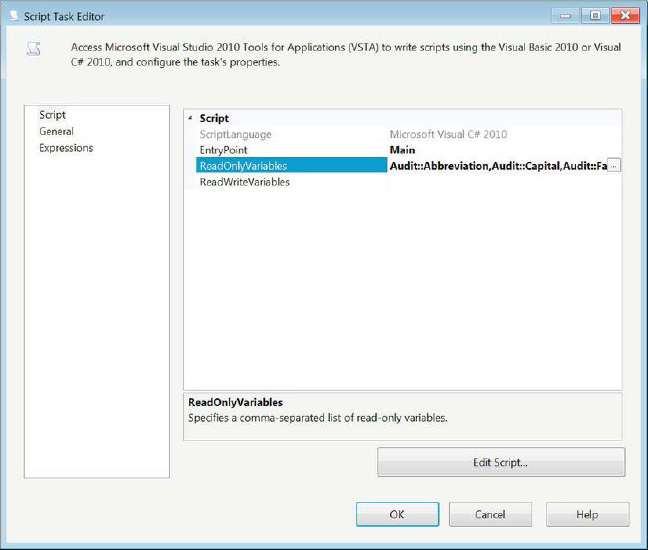
Figure 9-20. Configuration of SCR_DisplayPackageName
Using Visual C#, we can access only the variables listed in the configuration shown in Figure 9-20. The code goes directly into the main method of the script. Listing 9-2 demonstrates the C# that we used to access the value of the variable and display it in a message box at runtime. The section highlighted in bold allows the Script task to access the variables collection in Dts. After we extract the value, we can manipulate it in any manner we need. The quotes around the fully qualified variable name are necessary to properly identify the variable. The variable is case sensitive, so the code needs to be very precise.
Listing 9-2. Variable Accessor Script
MessageBox.Show("The name current state's name is: " +

        Dts.Variables["Audit::StateName"].Value.ToString()+"
"+

        "Its abbreviation is: " + Dts.Variables["Audit::Abbreviation"].Value.ToString() + "
" +

        "A fact about this state: " + Dts.Variables["Audit::Fact"].Value.ToString() + "
" +
        "The state capital is: " + Dts.Variables["Audit::Capital"].Value.ToString() + "
" +

        "The capital is located at: (" + Dts.Variables["Audit::Lat"].Value.ToString() + ", " +

        Dts.Variables["Audit::Long"].Value.ToString() + ")." + "
" +

        "The state was accepted at: "+Dts.Variables["Audit::StateAcceptanceTime1"].

        Value.ToString());
With Listing 9-2 code, when we execute the package, we receive a small message box. The code concatenates the values extracted from the object variable into one string that is used to populate the message box. Figure 9-21 shows the value that is concatenated by the code. The package will not proceed until you close the message box. After the message box is closed, the Foreach Loop will proceed to the next record in the enumerator and expose its values in a similar message box.
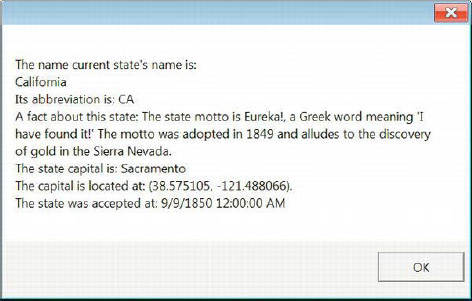
Figure 9-21. Message box displaying the package name derived from the system variable
Execute SQL Task Result Sets
The Execute SQL task allows you to store result sets directly from the executed query. The query can return a scalar value, a one-column value with one row, a full result set, or an XML value. These result sets can be stored in variables with the proper data types. In our example, we will store a full result set based on the query shown in Listing 9-3. This query retrieves all the columns in the dbo.State table. With this result set, we will show a quick data-profiling process contained in CH09_Apress_ChildPackage.dtsx. Figure 9-22 shows the configuration of the SQL_GetStateColumns task that stores the result of the query.
Listing 9-3. SQL_GetStateColumns—column names query
SELECT c.COLUMN_NAME

FROM INFORMATION_SCHEMA.COLUMNS c

WHERE c.TABLE_NAME = 'State';

Figure 9-22. SQL_GetStateColumns configuration
![]() NOTE: If the variable contains values prior to the execution of this task, those values will be overwritten by its results.
NOTE: If the variable contains values prior to the execution of this task, those values will be overwritten by its results.
Source Types
The final way to access variables is not exactly a single task or transformation but rather a property that appears in several tasks. This is the source type property that usually allows you to specify Direct input, Variable, or File. In our example for the profiling process, we use an Execute SQL task, SQL_ExecuteSQL, to execute a query stored within the variable, Transform::StateQuery. The process we use to modify this variable is covered in the following “Dynamic SQL” section. Figure 9-23 shows the configuration of the SQL_ExecuteSQL task that accesses the dynamically generated query.

Figure 9-23. SQL_ExecuteSQL sourcing Transform::StateQuery
Dynamic SQL
In most of our examples, we have demonstrated only reading the variable values without actually modifying any values. One of the most frequent areas that require variable modification is in generating dynamic SQL queries. In SSIS, this process usually replaces cursors and runs a set of queries that can vary in number, but have some very important components that are similar in structure. As mentioned in the preceding section, we want to demonstrate a very basic data-profiling process. We already showed you how we retrieved our controller set by using the Execute SQL task to store the column names in the Load::StateColumns variable. We also showed you how we executed the resulting query by using the SQLSourceType option on a separate Execute SQL task. This section shows you how the variable’s value is set so that it becomes an executable query.
The first step we need to take is to extract the name of each column as we iterate through all the columns. We implemented this by using a Foreach Loop container, FELC_LoopThroughColumns. Because Load::StateColumns has only one column, Name, the variable mappings are very simple, as we demonstrate in Figure 9-24. This configuration overwrites the value of Load::StateColumnName with every row in the object, one iteration at a time.

Figure 9-24. FELC_LoopThroughColumns variable mappings
With the variable value changing with every row in the object, we can run some queries that can give some meaningful insight into the data. For our query, we chose to perform a distinct count on the values stored in each column in the dbo.State table. Options include loading the data into a table by using INSERT INTO. We included a sample value in the commented-out C# on the last line of the code sample. The Execute SQL task, SQL_ExecuteSQL, will run a query for every column name that is stored in the object. With this particular query, you can see how the values in each of your columns vary.
Listing 9-4. StateQuery Assignment
Dts.Variables["Transform::StateQuery"].Value =

        "SELECT COUNT(DISTINCT " + Dts.Variables["Load::StateColumnName"].Value.ToString()

                + ") FROM dbo.State WITH (NOLOCK);";


// SELECT COUNT(DISTINCT Name) FROM dbo.State WITH (NOLOCK);
Passing Variables
One of the main difficulties with parent-child design patterns in prior versions of SSIS was the dependency of the child packages on the parent packages. At first glance this may not seem like an obstacle, but in some cases the dependency would make it very difficult to unit-test the child package on its own. With the introduction of parameters in this version of SSIS, this obstacle disappears. You essentially have the ability to define a default value for a parameter that under normal execution would be overwritten.
We begin by adding a parameter to the child package, as shown earlier in Figure 9-4. This will provide us with a parameter that can be accessed just like a variable in SSIS expressions and script components. We can provide a default if we are anticipating that the package may be executed on its own. With the parameter added, the parent package’s Execute Package task should automatically detect it. You can create a mapping that allows the parent value to overwrite the child value while configuring the other properties of the Execute Package task. The mapping in CH09_Apress_ParentPackage.dtsx is shown in Figure 9-25.
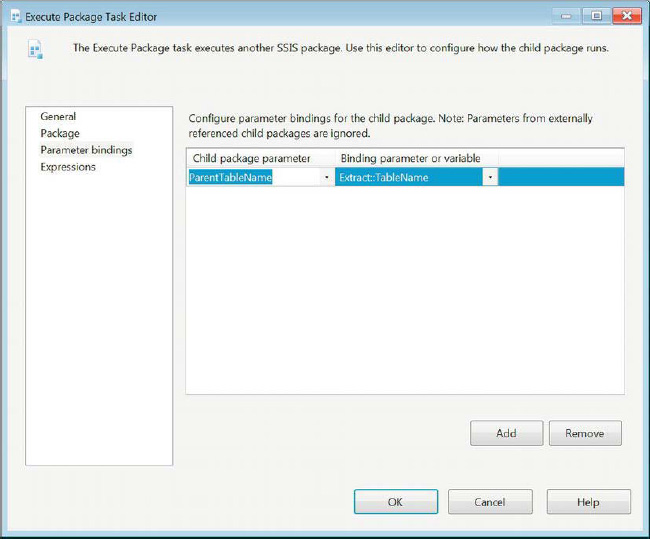
Figure 9-25. Execute Package task parameter bindings
SSIS Expression Language
The SSIS Expression Language allows you to extend the functionality of your process to incorporate variables. The language contains a whole set of functions and operators that can be used to evaluate columns, variables, or expressions. The functions return different data type values. They are usually grouped by their input types in the Expression Builder. We already covered the casting functions in the “SSIS Data Types” section of this chapter. The function names are not case-sensitive, unlike most of the other identifiers in the expression language. We recommend that you use a distinct case when using functions in order to make the code a little easier to read.
Functions
Mathematical functions accept numeric values as their inputs to return numeric values after performing operations on them. The following are the mathematical functions available within SSIS:
ABS( «numeric_expression» )returns the absolute value of the input.
CEILING( «numeric_expression» )returns the smallest integer greater than or equal to the input.
EXP( «numeric_expression» )returns the exponent to base e of the input.
FLOOR( «numeric_expression» )returns the largest integer less than or equal to the input.
LN( «numeric_expression» )returns the natural logarithm of the input.
LOG( «numeric_expression» )returns the base-10 logarithm of the input.
POWER( «numeric_expression», «power» )returns the value of raising the first parameter to the power specified in the second parameter.
ROUND( «numeric_expression», «length» )returns the first input round to the length specified in the second parameter.
SIGN( «numeric_expression» )returns the positive, negative, or zero sign of the input.
SQUARE( «numeric_expression» )returns the value of the input raised to the second power.
SQRT( «numeric_expression» )returns the square root of the input.
String functions evaluate character expressions. These are the string functions available in the Expression Builder:
CODEPOINT( «character_expression» )returns the Unicode value of the first character in the input.
FINDSTRING( «character_expression», «string», «occurrence» )returns the index of the occurrence of the specified string in the input. The index values start at 1.
HEX( «integer_expression» )returns a string hexadecimal value of the input.
LEFT( «character_expression», «number» )returns a string that consists of the specified number of characters at the beginning of the first parameter.
LEN( «character_expression» )returns the length of the input.
LOWER( «character_expression» )returns a string that consists of the lowercase characters of the input.
LTRIM( «character_expression» )returns a string stripped of the leading whitespaces from the input.
REPLACE( «character_expression», «search_expression», «replace_expression» )returns the character expression value after a string that has been replaced with another string or empty string within the original character expression.
REPLICATE( «character_expression», «times» )returns a string with the character expression repeated a specified number of times.
REVERSE( «character_expression» )returns a string whose characters are in the reverse order of the input.
RIGHT( «character_expression», «number» )returns a string consisting of the specified number of the rightmost characters in the character expression.
RTRIM( «character_expression» )returns a string stripped of the trailing whitespaces in the input.
SUBSTRING( «character_expression», «start», «length» )returns a string consisting of the characters from the specified starting index to the specified length of the character expression.
TOKEN( «character_expression», «delimiter_expression», «occurrence» )returns a string consisting of all the characters between the specified occurrence and the first delimiter expression that is encountered in the character expression.
TOKENCOUNT( «character_expression», «delimiter_expression» )returns the number of tokens that are present in the character expression based on the delimiter expression as the token terminator.
TRIM( «character_expression» )returns a string stripped of the leading and trailing whitespaces in the input.
UPPER( «character_expression» )returns a string that consists of the uppercase of the characters of the input.
The date functions perform operations on date and timestamp values. The following are the available date functions in the Expression Builder:
DATEADD( «datepart», «number», «date» )returns a date value after adding the specified number of time units to the specified part of the date input.
DATEDIFF( «datepart», «startdate», «enddate» )returns the value of the length of time units between the starting date and the ending date supplied.
DATEPART( «datepart», «date» )returns an integer value representing part of the specified date. A date in the month of January would return 1 if the datepart was specified as the month.
DAY( «date» )returns an integer value that represents the day of month of the input date.
GETDATE()returns the current date and time set on the host machine.
GETUTCDATE()returns the current date and time set on the host machine in Universal Time Coordinate.
MONTH( «date» )returns an integer representing the number of the month of the input date.
YEAR( «date» )returns an integer representing the number of the year of the input date.
The last category of functions that exists in SSIS is composed of the NULL functions. All but one of the functions in this category returns a NULL value type casted for a certain data type. In order to return a NULL of a certain data type, you pass the function as your expression NULL(«data type») and fill in the required data type name. The ISNULL(«expression») function will evaluate the input expression and return a Boolean indicating whether it evaluates to NULL.
Operators
The operators in the expression language work similarly to the operators in C#. There are unary operators and binary operators. The operators do have a hierarchy when the expression is being evaluated. To maintain clarity, we recommend using parentheses whenever possible, or ambiguity may appear when reading the code quickly. The following are the operators available in SSIS:
+(Add/Concatenate) adds two expressions together. It can also be used to concatenate strings.
-(Subtract/Negate) subtracts two expressions. It can also be used to return the negative value of a numeric expression.
*(Multiply) multiplies two numeric expressions.
/(Divide) divides two numeric expressions.
%(Modulo) returns the integer remainder of the division of two numeric expressions.
()(Parentheses) are used to prioritize the evaluation of expressions.
==(Equal) logically evaluates two expressions for equality.
!=(Unequal) logically evaluates two expressions for inequality.
> (Greater Than)logically evaluates whether the expression on the left side of the operator is greater than the expression on the right side.
< (Less Than)logically evaluates whether the expression on the left side of the operator is less than the expression on the right side.
>=(Greater Than or Equal To) logically evaluates whether the expression on the left side of the operator is greater than or equal to the expression on the right side.
<=(Less Than or Equal To) logically evaluates whether the expression on the left side of the operator is less than or equal to the expression on the right side.
&&(Logical AND) performs a logicalANDoperation on the expressions on the left and right side of the operator.
||(Logical OR) performs a logicalORoperation on the expression on the left and right side of the operator.
? :(Conditional) performs a conditional check on the expression preceding the question mark. If the expression evaluates toTrue, the expression between the question mark and the colon is returned. If the expression evaluates toFalse, the expression following the colon is returned.
&(Bitwise AND) performs a bitwiseANDoperation on two integer values on either side of the operator.
|(Bitwise Inclusive OR) performs a bitwise inclusiveORoperation on two integer values on either side of the operator.
^(Bitwise Exclusive OR) performs a bitwise exclusiveORoperation on two integer values on either side of the operator.
~(Bitwise Not) performs a bitwise negation of an integer value.
!(Logical Not) negates the value of a Boolean expression.
Summary
SQL Server 11 offers many ways to make your ETL processes dynamic and modular. This chapter introduced the SSIS variables, parameters, and expression language. The code we provided allowed you to see in depth the different roles that variables and parameters can play in an ETL process. We also introduced how to pass variable values between packages. We concluded by describing all functions and operators that make up the expression language. Chapter 10 will walk you through scripting in SSIS.