C H A P T E R 6
Advanced Control Flow Tasks
It is not worthwhile to try to keep history from repeating itself, for man's character will always make the preventing of the repetitions impossible.
—Author Mark Twain
Chapter 5 introduced you to SQL Server 11’s most widely used executables, containers, and precedence constraints. The executables and containers are organized in the SSIS Toolbox in configurable groups. We already introduced the Favorites and Common groups as well as one of the containers. This chapter presents the remaining tasks in the Other Tasks group and the remaining containers. These tasks and containers generally perform administrative tasks for database objects. The containers are designed to repeatedly execute the contained processes. As the preceding quote suggests, executing certain processes multiple times might be a necessary component of the ETL design. The containers discussed in this chapter support controlled, repetitive executions of certain processes.
Advanced Tasks
The tasks detailed in the previous chapter assist us in preparing our sources and destinations for the ETL process. The remaining group, Other Tasks, consists of tasks that carry out administrative objectives. A majority of the tasks handle transferring database objects between databases.
![]() NOTE: Because DTS packages will no longer be supported in future versions of SQL Server, the ActiveX Script task and Execute DTS 2000 Package task are deprecated.
NOTE: Because DTS packages will no longer be supported in future versions of SQL Server, the ActiveX Script task and Execute DTS 2000 Package task are deprecated.
Analysis Services Execute DDL Task
The Analysis Services Execute DDL task allows you to execute DDL statements against a SQL Server Analysis Services (SSAS) database. This task is capable of creating, dropping, and altering data-mining objects as well as multidimensional objects on an Analysis Services database. Figure 6-1 demonstrates how this task appears in the control flow designer window. The icon, a cube with a green arrow pointing at it, shows the SSIS task’s ability to access Analysis Services objects.

Figure 6-1. Analysis Services Execute DDL task
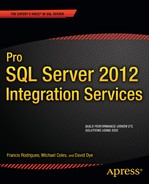
Modifying this task is mainly handled on the DDL page of the Analysis Services Execute DDL Task Editor, shown in Figure 6-2. A connection manager pointing to an SSAS database is required to utilize this task. The connection manager can be specified in the Connection drop-down list. The SourceType allows you to select between Direct input, File connection, and Variable. This field specifies the location of the DDL to be executed.Direct input allows you fill in the DDL directly to the task. File connection specifies a file connection to a file that contains the DDL. The Variable option stores the DDL in an SSIS string variable. With the Direct input option, the field SourceDirect allows you to type in the DDL. The File connection and Variable options change the field name to Source and allow you to select a defined file connection or SSIS variable from a drop-down list. The General page allows you to modify the Name and Description of the task. The Expressions page allows you to define expressions that can modify the task’s property values.
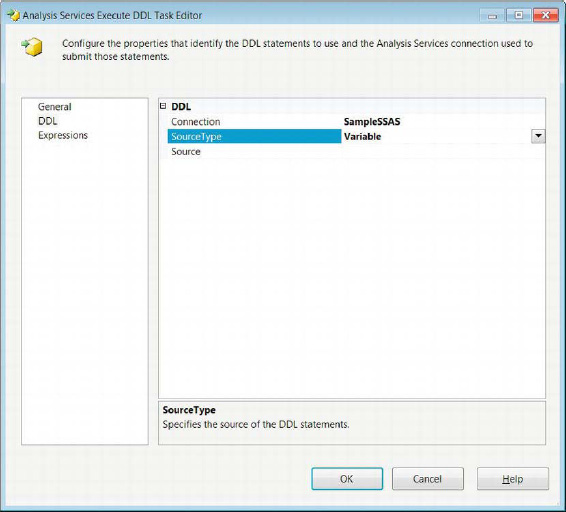
Figure 6-2. Analysis Services Execute DDL Task Editor—DDL page
The DDL for the task is written in Analysis Services Scripting Language (ASSL). The ASSL contains information defining the Analysis Services database and database objects. This includes login information and other sensitive information. The ASSL is stored inside an XML of Analysis (XMLA) command. The XMLA commands are used to create, drop, and alter objects on the server.
![]() TIP: If you place the DDL directly into the package, you may want to consider using the
TIP: If you place the DDL directly into the package, you may want to consider using the EncryptAllWithUserKey or EncryptAllWithPassword protection levels. Because the XMLA may contain sensitive information, encrypting it is advisable.
Data Mining Query Task
The Data Mining Query task allows you to run Data Mining Extensions (DMX) statements based on data-mining models defined on an Analysis Services database. The output for these queries usually is a predictive analysis based on the provided data. The DMX statement can reference multiple models, each using its own predictive algorithm. Figure 6-3 shows the task as it appears in the control flow designer window. The icon, a pickax with some files behind it, shows the basic idea behind data mining, which is digging through the data that is available to find the meaningful pieces. This task utilizes the ADO.NET Connection Manager to connect to the Analysis Services database.
Figure 6-3. Data Mining Query task
Data Mining Query Task Editor—Mining Model Tab
The Mining Model tab of the Data Mining Task Editor allows you to specify the database and the mining model to use for a specific query. Figure 6-4 shows the options that are available on this page of the editor. The UI for this particular task’s editor is different from the rest you have encountered so far. Instead of having the pages listed to the left side of the field options, the pages are shown as tabs.
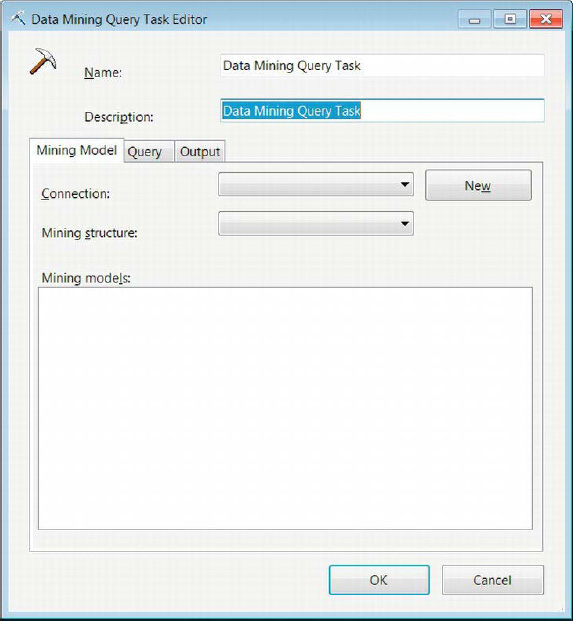
Figure 6-4. Data Mining Task Editor—Mining Model tab
The following are properties that are modifiable in the Mining Model tab:
Name uniquely defines the Data Mining task.
Description provides a brief summary of the task’s purpose.
Connection allows you to select a defined connection to an Analysis Services database.
New creates a new SQL Server Analysis connection.
Mining Structure lists all the mining structures defined on the Analysis Services database.
Mining Model lists all the mining models created on the selected mining structure.
Data Mining Query Task Editor—Query Tab
The Query tab of the Data Mining Task Editor allows you to either manually type a query or use a graphical tool to create the desired query. The query accepts SSIS variables as parameters. It can also store the results from the query into SSIS variables. The parameter mapping rules shown in Chapter 5 apply to this task as well. The naming convention of the parameter is dependent on the connection manager type that is used, in this case the ADO.NET connection manager for Analysis Services. Each of these modifications has its own tab within the Query tab, as shown in Figure 6-5.

Figure 6-5. Data Mining Query Task Editor—Query tab
These properties are configurable in the Query tab:
Build Query contains a text field that allows you to type the data-mining query.
Build New Query button opens a graphical tool that will assist you with generating the data-mining query. After the query has been generated, it will be imported from the tool into the text field. You can further modify it after it is in the field.
Parameter Name lists the parameters used by the data-mining query.
Variable Name lists the SSIS variable that is mapped to the particular parameter.
Add button adds a mapping to the parameter list.
Remove button removes the selected mapping from the parameter list.
Result Name is the name of the result from the data-mining query. It can be changed to be the real result name provided by the query.
Variable Name specifies the variable for storing the result set.
Result Type allows you to define the result as either a single row or a dataset.
Add button allows you to add a mapping for a result value.
Remove button allows you to remove an existing mapping from the list of results.
Data Mining Query Task Editor—Output Tab
The Output tab of the Data Mining Query Task Editor allows you to store the output of the data-mining query. The storage is handled by ADO.NET and OLE DB connections only. Figure 6-6 shows the Output tab of the Data Mining Query Task Editor. The data can be inserted into SQL Server tables for further querying.
Figure 6-6. Data Mining Query Task Editor—Output tab
The Output tab supports the configuration of the following properties:
Connection lists all the ADO.NET and OLE DB connections that have been defined in the package.
New button creates a new ADO.NET or OLE DB connection if the desired one does not already exist.
Output Table provides the name of the table to store the results of the data-mining query.
Drop and Re-create the Output Table allows you to clear prior data by dropping and rebuilding the table. This enables metadata updates to be loaded without issues.
Message Queue Task
The Message Queue task uses Microsoft Message Queuing (MSMQ) to send messages between SSIS packages or between custom applications. The messages themselves can be composed of text and can carry data files or SSIS variable values. There are some primary reasons for using the Message Queue task in your ETL solutions. One way to utilize the message queuing is to suspend a package’s execution until the package receives a certain message. This allows external, non-ETL processes to complete and then immediately initiate the ETL. Along with suspension of the SSIS packages, this task can be used to transmit files as a part of its message. This file can be the output of the ETL process or external processes that indicate to the package that data source files are ready for SSIS access. The task can also be used to transfer files across the system. Figure 6-7 shows the task as it appears in the control flow. The icon contains two envelopes, one overlapping the other, with a downward blue arrow specifying an ordered transmission.
![]() NOTE: By default, the Microsoft Message Queuing service is not started on older versions of Microsoft operating systems. On the newer operating systems (Vista and later, and Server 2008 and later), you need to install the appropriateWindows features in order to use the service.
NOTE: By default, the Microsoft Message Queuing service is not started on older versions of Microsoft operating systems. On the newer operating systems (Vista and later, and Server 2008 and later), you need to install the appropriateWindows features in order to use the service.

Figure 6-7. Message Queue task
Message Queue Task Editor—General Page
The General page of the Message Queue Task Editor allows you to define whether the task is responsible for sending or receiving messages. Depending on the role of the task, the pages available are automatically modified to allow for Send or Receive options. Figure 6-8 shows the Message Queue Task Editor’s General page.
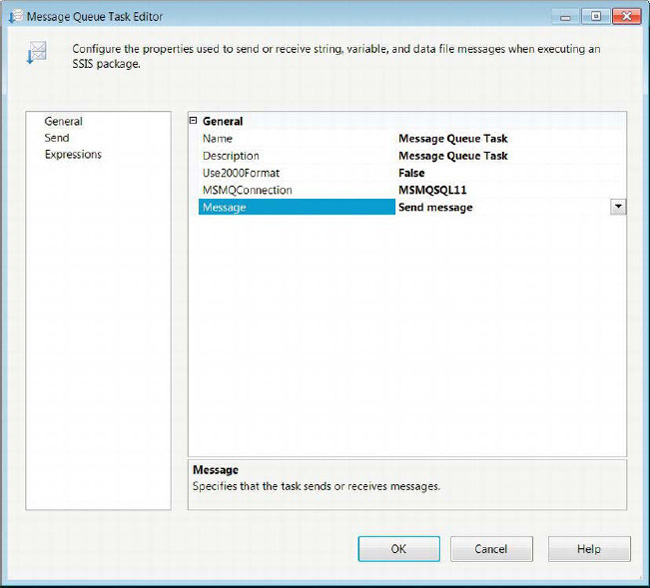
Figure 6-8. Message Queue Task Editor—General page
The following properties are configurable on the General page:
Nameprovides a unique name for the Message Queue task.
Descriptionprovides a brief statement about the object of the particular Message Queue task.
Use2000Formatspecifies whether to use the 2000 version of Message Queuing.
MSMQConnectionlists all the defined Microsoft Message Queuing Connection Managers. This field also allows you to create a connection manager if one does not exist.
Messageallows you to choose whether the task sends or receives a message. This option will modify the pages available in the editor.
Message Queue Task Editor—Send Page
The Send page of the Message Queue Task Editor becomes available only when the Send option is selected for the Message property. This particular page allows you to modify the properties associated with sending messages to other applications or packages. Figure 6-9 shows you all the properties that are available for modification.
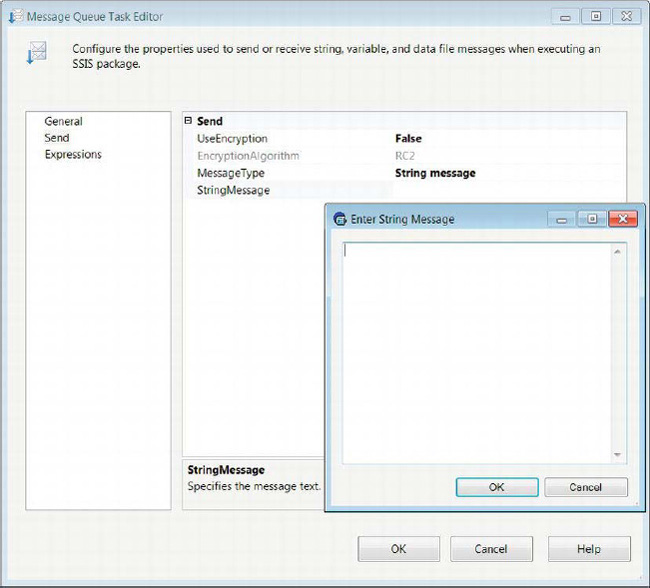
Figure 6-9. Message Queue Task Editor—Send page
The Message Queue task’s properties are as follows:
UseEncryptionspecifies whether the message is encrypted.
EncryptionAlgorithmspecifies the name of the encryption algorithm to use. This property becomes available only if theUseEncryptionproperty is set toTrue. The only encryption algorithms supported by MSMQ are the RC2 and RC4 algorithms. These are relatively weak compared to newer ones and therefore will require some scrutiny before implementing the Message Queue task.
MessageTypedefines the type of message the task will transmit. The options areData file message,Variable message, andString message. Choosing the different options will automatically alter the succeeding property displayed in the editor.
DataFileMessagetransmits the message stored within a file. The ellipsis button allows you to navigate to the desired file.
VariableMessageindicates that the message is stored in an SSIS variable.
StringMessageindicates that the message is stored within a string that is provided directly. As Figure 6-9 demonstrates, a text box can be used to type in longer messages.
Message Queue Task Editor—Receive Page
The Receive page of the Message Queue Task Editor is available only when the Receive option is selected for the Message property. This page allows for the modification of the properties that can be set when the package receives a message from MSMQ. Certain configurations will allow the package to receive only very specific messages. Figure 6-10 shows the Receive page of the Message Queue task. The Expressions page allows you to define expressions that can modify the task’s properties’ values.

Figure 6-10. Message Queue Task Editor—Receive page
The properties of the Message Queue task are as follows:
RemoveFromMessageQueueindicates whether the message should be removed from the MSMQ service after it is received by the package.
ErrorIfMessageTimeOutspecifies whether the task should fail when it is timed out.
TimeoutAfterdefines the length of time, in seconds, after which the task will time out.
MessageTypelists the types of messages the task can anticipate. Selecting the options will dynamically modify the properties that are available for modification in the editor. The options areData file message,Variable message,String message, andString message to variable.
SaveFileAsdefines the name and location of the file to which the message will be stored. This property is available only with theData file messageoption selected as the message type.
Overwriteallows the previous contents of the file to be deleted before the new message is stored. This property is available only with theData file messageoption selected as the message type.
Filteridentifies whether the package receives a message from a particular package. There are two options for this property,No filterandFrom package.No filterindicates that the task does not filter out messages.TheFrom packageoption receives messages from a specific package. This property is available only forData filemessages andVariablemessages.
IdentifierReadOnlycan contain theGUID of the package from which the message may originate. This option is available only with theFilterproperty set toNo filter. It is read-only. This property is available only forData filemessages andVariablemessages.
Identifiercontains the GUID of the package from which the task will receive messages. The name of the package can also be specified by using the ellipsis button to locate the package.This property is available only forData filemessages andVariablemessages.
Comparedefines the match criteria used to compare and filter the message. The options available areNone,Exact match,Ignore case, andContaining. Depending on the option chosen, theCompareStringproperty becomes modifiable. TheNoneoption does not allow for any comparison of the message that is received.Exact matchfilters messages based on the exact match of the provided string.Ignore casefilters out messages based on a case-insensitive match.Containingmatches will filter messages based on the messages containing the provided string. This property is available only forString messagesandString messages to variables.
CompareStringdefines the string that will be used for the comparison criteria. This property is available only forString messagesandString messages to variables.
Variablespecifies the variable that will receive the message. The ellipsis button allows you to create a new variable, if one isn’t defined, that will receive the message. This option is available only when theVariable messageoption is selected for the message type. This property is available only withString message to variableselected.
Transfer Database Task
A crucial nonfunctional task of an ETL process might be to move source databases to different servers with appropriate hardware that can support the ETL queries. The Transfer Database task allows you to move or copy databases between servers or even on the same server. The copy and move processes can operate on databases in offline and online mode. The task utilizes the SQL Management Object Connection Manager to move the databases. Figure 6-11 shows the task as it appears in the control flow designer window. The icon is a yellow cylinder with a bent arrow indicating that the database is being transmitted.

Figure 6-11. Transfer Database task
The Databases page of the Transfer Database Task Editor, shown in Figure 6-12, contains the properties that will configure the transfer of the database. In this particular example, we are simply copying a database, its .mdf(master data file), and its .ldf(log data file) files. In addition to the location of these files, we need to specify the network file-share location of the files as well. The General page allows you to modify the Name and Description of the task. The Expressions page allows you to define expressions that can modify the values of the task’s properties.
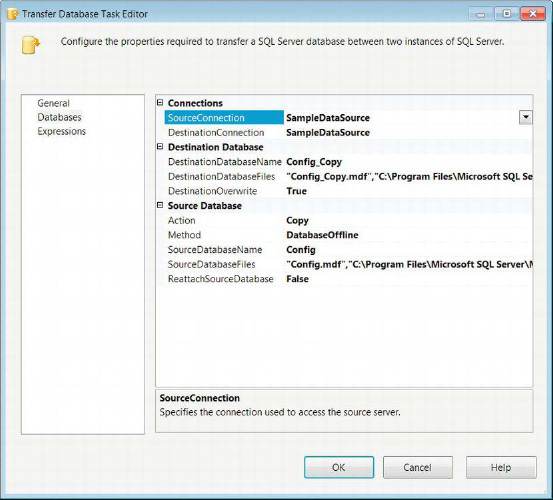
Figure 6-12. Transfer Database Task Editor—Databases page
The configurable properties are as follows:
SourceConnectionlists all the SMO Connection Managers defined in the package. Select the connection that contains the database you require to be copied or moved. It allows a new connection to be created if the desired one does not exist.
DestinationConnectionspecifies the SMO connection to the server to which the source database should be copied or moved.
DestinationDatabaseNamespecifies the name of the database after it is moved or copied to the destination server.
DestinationDatabaseFilesspecifies the file names of the.mdfand.ldffiles for the destination database. The ellipsis button allows you to use a dialog box to specify the location of these files. The network file share for each of the file locations can also be specified. The dialog box will automatically use the server settings to populate the folder paths for the.mdfand the.ldffiles. You will have to specify the network file share.
DestinationOverwritespecifies whether the destination database should be overwritten if it exists on the server.
Actiondefines the task’s operation as either a copy or a move of the source database.
Methoddefines whether the Database Transfer task will source a database that is in online or offline mode. For offline mode, the user who executes the package must have sysadmin authority to the server. This authority is required because this mode will create a copy of the present.mdf,.ldf, and.ndffiles. For online mode, the user who executes the package must be either a system administrator or the database owner of source database. It will leave the database operational and will use the .NET SMO namespace.
SourceDatabaseNamespecifies the name of the database that is to be copied or moved from the source server.
SourceDatabaseFilesspecifies the files associated with the specified source database. The ellipsis button opens a dialog box that allows you to locate the files. The dialog box will automatically populate the information for the files based on the database settings for the file locations. You need to specify the network file share.
ReattachSourceDatabasespecifies whether the task should reattach the source database if an error occurs during the execution.
Transfer Error Messages Task
A set of database objects that may be crucial for an ETL process are the user-defined error messages. The Transfer Error Messages task can be used to transfer these messages across servers. The task uniquely identifies the user-defined error message with the combination of the identifier and the language of the error message. Based on this combination, the task can manage existing error messages by overwriting existing error messages, failing the task when an existing error message is found, or by ignoring the existing error message. Figure 6-13 shows the task as it appears in the control flow. The icon shows a brief message with a caution sign and an arrow. The arrow indicates the transfer of such messages.

Figure 6-13. Transfer Error Messages task
![]() NOTE: The Transfer Error Messages task will not copy system error messages, that is, messages with identifier values below 50,000.
NOTE: The Transfer Error Messages task will not copy system error messages, that is, messages with identifier values below 50,000.
The Messages page of the Transfer Error Messages Task Editor allows you to modify the properties of the task in order to perform the transfer on the required server and objects. The task uses a SQL Management Object Connection Manager to connect to the required server as the source of the user-defined error messages. The General page allows you to modify the Name and Description of the task. The Expressions page, shown in Figure 6-14, allows you to define expressions that can modify the values of the task’s properties.
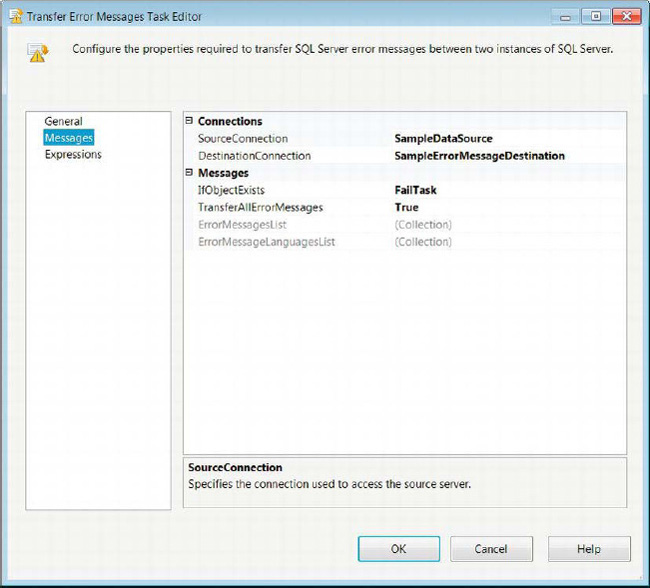
Figure 6-14. Transfer Error Messages Task Editor—Messages page
The Transfer Error Messages task’s modifiable properties are as follows:
SourceConnectionlists the SMO Connection Managers available to be used as the source of the user-defined error messages.
DestinationConnectionlists the SMO Connection Managers available to be used as the destination of the user-defined error messages. The user that executes the package must have sysadmin or serveradmin authority to the server in order to create user-defined error messages.
IfObjectExistslists the options that are available if the transferred error message exists on the destination server. The options areFailTask,Overwrite, andSkip. TheFailTaskoption causes the task to error when a duplicate message is encountered. TheOverwriteoption overwrites the error message on the destination server. TheSkipoption ignores the duplicate error message on the destination server.
TransferAllErrorMessagesdefines whether the task will copy all user-defined error messages or just a specified list of error messages. The two options for this property areTrueandFalse.
ErrorMessageListallows you to create a list of user-defined error messages to copy.
ErrorMessageLanguageListallows you to create a list of the languages for which to create copies of the error messages. A message must have theus_englisherror message version before storing in other languages. The code page forus_englishis 1033.
Transfer Jobs Task
Another set of objects that can be vital to an ETL process and that need to be moved between SQL Server instances are SQL Agent jobs. The Transfer Jobs task serves this exact requirement. It utilizes the SQL Management Object Connection Manager to transfer these objects. In order to use this task, the user executing the package needs to have sysadmin access or a SQL Agent role on the msdb database on both the source and destination instances. Figure 6-15 demonstrates the Transfer Jobs task as it appears in the control flow. The task’s icon shows a process flow controlled by an application. The icon is indicative of SQL Server Agent jobs thatrun processes in a given order.

Figure 6-15. Transfer Jobs task
The Jobs page of the Transfer Jobs Task Editor allows you to configure all the properties necessary to copy SQL Server Agent jobs between two instances of SQL Server. Figure 6-16 shows all the properties that are available on this page. Just like the previous transfer tasks, the Transfer Jobs task uses the SMO Connection Manager. The General page allows you to modify the Name and Description of the task. The Expressions page allows you to define expressions that can modify the values of the task’s properties.

Figure 6-16. Transfer Jobs Task Editor—Jobs page
The Jobs page enables you to configure the following properties:
SourceConnectionlists the SMO Connection Managers that are defined in the package. Select the connection that points to the instance you need to use as your source of the SQL Server Agent jobs.
DestinationConnectionidentifies the SMO Connection Manager that points to the instance you need to use as the destination for the SQL Server Agent jobs.
TransferAllJobsallows you to choose either transferring all the SQL Server Agent jobs that exist on the source instance or those on a defined list. SelectingFalseallows theJobsListproperty to become definable.
JobsListenumerates the specific SQL Server Agent jobs to copy to the destination instance.
IfObjectExistsallows you to determine the action to perform if the SQL Server Agent job already exists on the destination instance. The choices areFailTask,Overwrite, andSkip.FailTaskcauses the task to error when it encounters the same job on the destination instance.Overwritere-creates the duplicate job on the destination instance with the definition found in the source instance.Skipignores the duplicate job altogether.
EnableJobsAtDestinationallows you to enable the copied jobs to be enabled on the destination instance. The two options areTrueandFalse.
Transfer Logins Task
Logins are vital for access to data within a database. They can restrict access to different objects within a database. The Transfer Logins task provides for a quick way to copy logins between SQL Server instances. This task can copy all logins, specified logins, or specified logins for a particular database. The task uses SMO Connection Managers to transfer the logins. The user who executes the packages must have sysadmin access to both servers for the transfer of the logins. Figure 6-17 demonstrates the task as it appears in the control flow. The icon shows a picture of a person with a lock and an arrow. The lock and the picture denote the security information that will be transferred.

Figure 6-17. Transfer Logins task
The Logins page, shown in Figure 6-18, allows you to configure all the necessary properties in order to transfer SQL Server logins between two SQL Server instances. The General page allows you to modify the Name and Description of the task. The Expressions page allows you to define expressions that can modify the values of the task’s properties.

Figure 6-18. Transfer Logins Task Editor—Logins page
The Logins page allows the configuration of the following properties:
SourceConnectionlists the SMO Connection Managers that can be used as the source for the SQL Server logins.
DestinationConnectionlists the SMO Connection Managers that can be used as the destination for the SQL Server logins.
LoginsToTransferallows you to define the logins to transfer to the destination. TheAllLoginsoption will copy all the logins defined on the source SQL Server instance to the destination server SQL Server instance.SelectedLoginsallows you to enumerate specific logins to transfer to the destination.AllLoginsFromSelectedDatabaserequires you to specify the logins to transfer to the destination; however, the logins are further limited by theDatabaseListproperty.
LoginsListenumerates the specific logins to transfer to the destination, depending on the option chosen forLoginsToTransfer. The ellipsis button provides you with a list of all the logins on the server to select from. This list is limited if a database list is specified.
DatabasesListenumerates only the databases whose logins you need to transfer.
IfObjectExistsdefines how the task handles duplicates. The options for this property areFailTask,Overwrite, andSkip.FailTaskcauses the task to error when it encounters the existing login on the destination.Overwritere-creates the login with the definition from the source.Skipleaves the login as is on the destination server.
CopySidsspecifies whether the copy operation should include the security identifiers with the logins. It is vital for this property to be set toTruewhen transferring databases because otherwise the logins will not be recognized by the destination database.
Transfer Master Stored Procedures Task
The user-defined stored procedures on the master database of a SQL Server instance are often required when generating a new SQL Server instance. The Transfer Master Stored Procedures task allows you to perform this operation by using the SMO Connection Manager. The user executing the package needs to have read access to the master stored procedures on the source SQL Server instance and sysadmin authority on the destination in order to create them. Figure 6-19 shows the task as it appears in the control flow. The icon, an application window with an arrow, resembles stored procedures in the sense that procedures contain a few statements.

Figure 6-19. Transfer Master Stored Procedures task
The Stored Procedures page of the Transfer Master Stored Procedures Task Editor, shown in Figure 6-20, allows you to configure all the necessary properties in order to copy master stored procedures between the master databases of two SQL Server instances. The task will uniquely identify the master stored procedures based only on their names. The General page allows you to modify the Name and Description of the task. The Expressions page allows you to define expressions that can modify the values of the task’s properties.
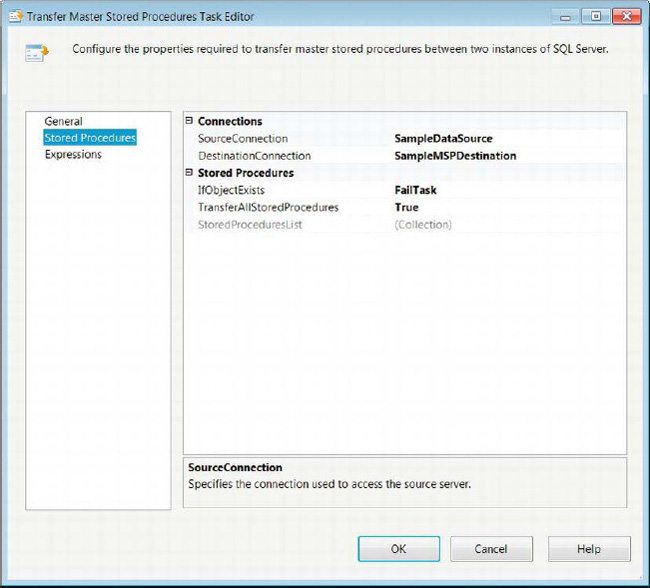
Figure 6-20. Transfer Master Stored Procedure Task Editor—Stored Procedures page
The Stored Procedures page provides these properties to be configured:
SourceConnectionidentifies the SMO Connection Manager to use as the source for the master stored procedures.
DestinationConnectionidentifies the SMO Connection Manager to use as the destination for the master stored procedures.
IfObjectExistsallows you to manage the existence of the master stored procedure on the destination SQL Server instance. TheFailTaskoption causes the task to error when a duplicate master stored procedure is encountered on the destination server. SelectingOverwritere-creates the master stored procedure with the definition on the source server.Skipleaves the definition of the master stored procedure on the destination server as it is.
TransferAllStoredProceduresallows you to choose between copying all of the user-defined stored procedures on the source master database or a specified set. Setting this property toTrueenables theStoredProcedureListproperty for edit.
StoredProcedureListspecifies the list of the user-defined stored procedures you need to copy to the destination server. The ellipsis button opens a dialog box that lists all the available stored procedures available for transfer.
Transfer SQL Server Objects Task
One way to transfer select data and objects from a SQL Server database is to use the Transfer SQL Server Objects task. By combining a few of these tasks, you can copy objects from several SQL Server databases and create them in one SQL Server database. This functionality is extremely useful, especially if you intend on using a staging database to store your data in a similar system as a preprocess of your ETL process. We discuss more options on preprocessing your data in Chapter 14. Figure 6-21 shows the task as it appears in the control flow designer window. The icon, acylinder on a script with an arrow indicating the transfer, represents the scripts of the various database objects that will be used during the transfer.

Figure 6-21. Transfer SQL Server Objects task
The Objects page of the Transfer SQL Server Objects task, shown in Figure 6-22, allows you to configure all the necessary properties for transferring the required objects between databases. The actual transfer will utilize SMO Connection Managers. The General page allows you to modify the Name and Description of the task. The Expressions page allows you to define expressions that can modify the values of the task’s properties.
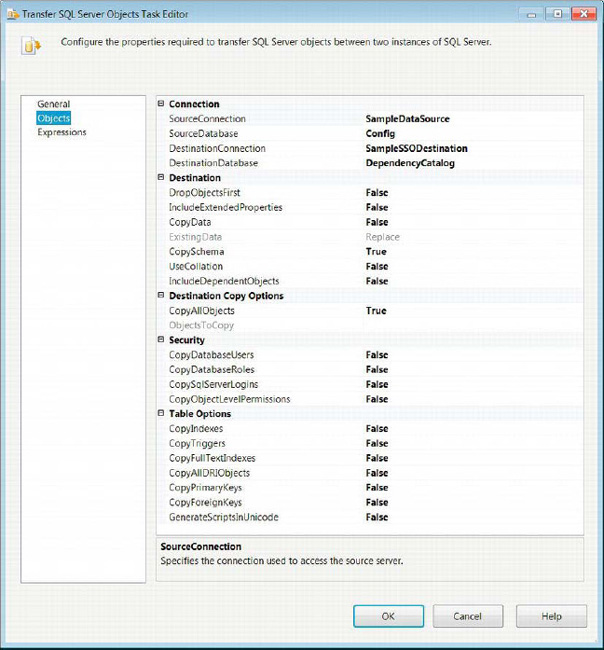
Figure 6-22. Transfer SQL Server Objects Task Editor—Objects page
The Objects page allows you to modify the following context-specific properties:
SourceConnectionselects the SMO Connection Manager that will be the source of the database objects.
SourceDatabaselists all the databases that exist on the SQL Server instance to source the database objects. Select the databasethat has the objects you need to copy.
DestinationConnectionselects the SMO Connection Manager that points to the destination server.
DestinationDatabasenames the database that you need to contain the new objects. The database must exist on the server before you can assign this field.
DropObjectsFirstdetermines whether the existing objects that are being transferred should be dropped before the transfer.
IncludeExtendedPropertiesspecifies whether the defined extended properties of the objects should be copied to the destination as well.
CopyDataspecifies whether the data should be copied along with the objects.
ExistingDatadefines whether the data should replace or append the existing data in the destination database. This option is available for edit only when theCopyDataproperty is set toTrue.
CopySchemadefines whether the schema should be copied over along with the object.
UseCollationdefines whether the default collation of the destination server should be used or copied from the source database.
IncludeDependentObjectsspecifies whether the selected objects should cascade to the objects on which they depend.
CopyAllObjectsdefines whether all the defined objects on the source database should be copied to the destination. If this option is set toFalse, all the required objects need to be manually set.
ObjectsToCopyexpands to show all the types of objects that can be copied. With each of the types, there is a property to copy every object of that type. The types of objects are Assemblies, Partition Functions, Partition Schemas, Schemas, User-Defined Aggregates, User-Defined Types, and XML Schema Collections. There are a set of properties for each of these object types.
CopyAllTablesdetermines whether all the tables in the source database are to be copied.
TablesListspecifies the tables that should be copied from the source database.
CopyAllViewsdetermines whether all the views in the source database are to be copied.
ViewsListspecifies the views that should be copied from the source database.
CopyAllStoredProceduresdetermines whether all the stored procedures in the source database are to be copied.
StoredProceduresListspecifies the stored procedures that should be copied from the source database.
CopyAllUserDefinedFunctionsdetermines whether all the user-defined functions in the source database are to be copied.
UserDefinedFunctionsListspecifies the user-defined functions that should be copied from the source database.
CopyAllDefaultsdetermines whether all the default definitions in the source database are to be copied.
DefaultsListspecifies the defaults that should be copied from the source database.
CopyAllUserDefinedDataTypesdetermines whether all the user-defined data types in the source database are to be copied.
UserDefinedDataTypesListspecifies the user-defined data types that should be copied from the source database.
CopyAllPartitionFunctionsdetermines whether all the partition functions defined on the source database should be copied.
PartitionFunctionsListspecifies the partition functions that should be copied from the source database.
CopyAllPartitionSchemasdetermines whether all the partition schemas defined on the source database should be copied.
PartitionSchemasListspecifies the partition schemas that should be copied from the source database.
CopyAllSchemasdetermines whether all the schemas in the source database should be copied.
SchemasListspecifies the schemas that should be copied from the source database.
CopyAllSqlAssembliesdetermines whether all the SQL assemblies in the source database should be copied.
SqlAssembliesspecifies the SQL assemblies that should be copied from the source database.
CopyAllUserDefinedAggregatesdetermines whether all the user-defined aggregates in the source database should be copied.
UserDefinedAggregatesListspecifies the user-defined aggregates that should be copied from the source database.
CopyAllUserDefinedTypesdetermines whether all the user-defined types in the source database should be copied.
UserDefinedTypesspecifies the user-defined types that should be copied from the source database.
CopyAllXmlSchemaCollectionsdetermines whether all the XML Schema collections defined in the source database should be copied.
XmlSchemaCollectionsspecifies the XML Schema collections that should be copied from the source database.
CopyDatabaseUsersspecifies whether the defined database userson the source database should be transferred.
CopyDatabaseRolesspecifies whether the defined database roleson the source database should be transferred.
CopySqlServerLoginsspecifies whether the logins from the SQL Server instance should be transferred.
CopyObjectLevelPermissionsspecifies whether the object-level permissions on the source database should be transferred.
CopyIndexesdetermines whether all the indexeson the source database should be transferred.
CopyTriggersdetermines whether all the triggers on the source database should be transferred.
CopyFullTextIndexesdetermines whether all the full-text indexes on the source database should be transferred.
CopyPrimaryKeysdetermines whether all the primary keys on the source database should be transferred.
CopyForeignKeysdetermines whether all the foreign keys on the source database should be transferred.
GenerateScriptsInUnicodedetermines whether all the scripts used in the transfer should be generated in Unicode.
WMI Data Reader Task
An extremely useful functionality of SQL Server Integration Services is the ability to query the Windows log of the host computer or another computer. The WMI Data Reader taskuses the Windows Management Instrumentation Query Language (WQL) to return data from the WMI about a machine. The queries can return information about the machine’s Windows event log, the machine’s hardware, and the applications installed on the machine. Figure 6-23 shows the task as it appears in the control flow. The icon, a clipboard with some tools on it, indicates a diagnostic or checklist.

Figure 6-23. WMI Data Reader task
The WMI Options page of the WMI Data Reader task, shown in Figure 6-24, allows you to configure all the necessary properties to query and store the relevant machine information. As the page demonstrates, WQL queries are very similar to SQL queries. The General page allows you to modify the Name and Description of the task. The Expressions page allows you to define expressions that can modify the values of the task’s properties.
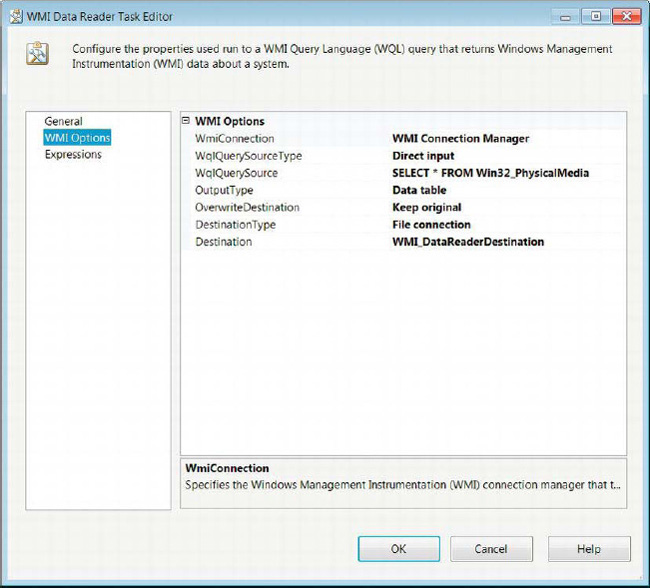
Figure 6-24. WMI Data Reader Task Editor—WMI Options page
The WMI Options page provides for the configuration of the following properties:
WMIConnectionNamelists the WMI Connection Manager that points to the Windows machine you need to query.
WQLQuerySourceTypedefines the method of passing the query to the task. TheDirect inputoption allows you to type the WQL query into theWQLQuerySourcefield.File connectionindicates that the query is stored within a file that can be accessed through a file connection manager. TheVariableoption allows the query to be stored in an SSIS variable.
WQLQuerySourceidentifies the access method for the query. WithDirect input, you can type the query into this field.
OutputTypedefines the result set of the query. There are three options for this property:Data table,Property name and value, andProperty value. These options show different ways to output the same dataset. TheData tableoption outputs the data in a relational format, with the first row as the column names and the subsequent tuples as the actual information.Property name and valueshows the information in a more denormalized format. The properties are listed as the rows, with a comma and whitespace separating them from their values. Each of the rows of data will have their own set of data. TheProperty valuehas the same format as theProperty name and value, but there is no property name to identify the value.
OverwriteDestinationdefines whether the data contained within the destination should be overwritten, appended, or kept.
DestinationTypedefines the destination of the query result. The results can be sent to a flat file by using theFile connectionoption or to an SSIS variable using theVariableoption.
WMI Event Watcher Task
An important ability enabling an application to run is determining whether the conditions on the host machine are suitable for its execution. The SSIS WMI Event Watcher task allows for this functionality. It utilizes WQL queries directed at WMI event classes to listen to the system’s events. The task can be used to wait until a certain event occurs to continue the execution, to delete files to create space if the amount of free space goes below a threshold, or even to await the installation of an application. Figure 6-25 demonstrates the task as it appears in the control flow. The icon is a clipboard with a yellow lightning bolt on it. It shows that the task is watching and waiting for firing of very specific events.

Figure 6-25. WMI Event Watcher task
The WMI Options page of the WMI Event Watcher Task Editor, shown in Figure 6-26, allows you to configure all the necessary properties to watch for and respond to WMI events. This page defines the actions to take after the required event takes place.
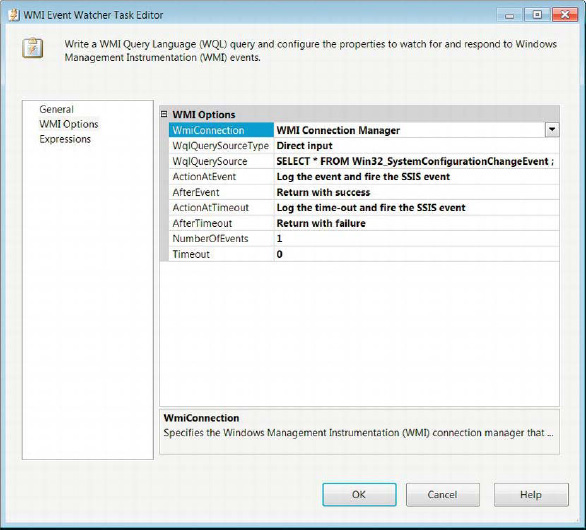
Figure 6-26. WMI Event Watcher Task Editor—WMI Options page
The WMI Options page of the WMI Event Watcher task allows the modification of the following properties:
WMIConnectionNamelists all the WMI Connection Managers defined in the package. Select the one the pointing to the target machine.
WQLQuerySourceTypedefines the method of passing the query to the task. TheDirect inputoption allows you to type the WQL query into theWQLQuerySourcefield. File connectionindicates that the query is stored within a file that can be accessed through a file connection manager. TheVariableoption allows the query to be stored in an SSIS variable.
WQLQuerySourceidentifies the access method for the query. WithDirect input, you can type the query into this field.
ActionAtEventdefines the action to take when the WQL query returns a result set indicative of the target event. The options areLog the event, andLog the event and fire the SSIS event. TheLog the eventoption causes the event to be logged without causing SSIS to issue its own event. The second option logs the event as well as have SSIS issue an event as a result.
AfterEventdefines the action the task takes after detecting the required event. TheReturn with failureoption causes the task to error when it receives the result from the WQL query. TheReturn with successoption results in the task completing with success after the required event occurs.Watch for the event againcontinues listening for the event for the number of times specified in theNumberOfEventsfield.
ActionAtTimeoutdefines the action to take when the WQL query times out. TheLog the time-outoption causes the event to be logged without causing SSIS to issue its own event. TheLog the time-out and fire the SSIS eventoption logs the time-out as well as has SSIS issue an event as a result.
AfterTimeoutdefines the action the task takes after reaching the time-out period. TheReturn with failureoption causes the task to error when the time-out is reached. TheReturn with successoption causes the task to complete with success even if the required event does not occur. TheWatch for the event againoption restarts the time-out counter, and the task will continue to wait for the event.
NumberOfEventsdefines the number of times the event the task watches for the event occurence before the task completes.
Time-out, a nonzero value, sets the number of seconds without the WQL query returning a result set, after which the task will stop listening for that iteration.
Advanced Containers
The previous chapter introduced the Sequence container as a way of organizing your control flow to make it easier to read. This chapter introduces the other two default containers: the For Loop container and the Foreach Loop container. As their names suggest, these two containers are used to run a set of executables repeatedly. The For Loop container executes a predetermined number of times,whereas the Foreach Loop container relies on an enumerator to dictate its iterations. The containers limit precedence constraints from crossing multiple containers. The iteration commences when the last executable or concurrent executables within the container complete execution. In order to add executables to a container, you need to click and drag them from the SSIS Toolbox onto the space inside the container. The Task Host container cannot be directly accessed, but it keeps the control flow executables organized.
For Loop Container
The For Loop container, which should be used when the number of executions is predetermined, does not rely on objects to determine the number of iterations. The For Loop container utilizes expressions to set, evaluate, and increment the iterator. Figure 6-27 shows the container as it appears in the control flow without any executables. The task’s icon is a square with an arrow forming a loop around it. The square represents the process being continuously executed. This loop can also behave as while or a do while loop, depending on the expressions provided. The arrow on the right side of the name tag allows you to collapse the container to minimize the space used in the control flow.

Figure 6-27. For Loop container
The For Loop page of the For Loop Editor, shown in Figure 6-28, allows you to configure the For loop’s control. The configuration consists of defining expressions that will initialize, evaluate, and increment the iterator.

Figure 6-28. For Loop Editor—For Loop page
The For Loop page of the Editor allows you to modify the following properties:
InitExpressionprovides the expression that will set the initial value of the loop iterator. The expression does not need an assignment value; providing a numeric variable will automatically evaluate to its value. This property is optional for some types of loops.
EvalExpressionprovides a logical expression whose evaluation determines the continuation of the loop.
AssignExpressionprovides an expression that will increment the iterator. This field is optional.
Nameprovides a unique name for the For Loop container.
Descriptionprovides a brief explanation of the looping executables.
![]() NOTE: Because the For Loop container can be implemented as a
NOTE: Because the For Loop container can be implemented as a while ordo while loop, take extra precautions with the expressions and SSIS variable values used. It is possible for this loop to continue indefinitely.
Foreach Loop Container
The Foreach Loop container utilizes enumerators to control its looping behavior. The enumerator itself can consist of various types of objects. Unlike the For Loop container, this loop cannot run indefinitely. The loop will iterate for every member of the enumerator. However, if there are no members, the container will not execute. Figure 6-29 shows the container as it appears in the control flow. The icon consists of three squares stacked on top of each other, with an arrow leading from the square on the bottom to the square on top. This shows that the container loops through a defined list of items.For all types of enumerators, you have the ability to retrieve data from each element as you traverse through the list. This is useful, for example, if you intend to truncate a set of tables on a database. An Execute SQL task inside a Foreach Loop container can generate a SQL statement using values derived from the enumerator.
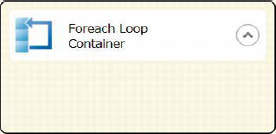
Figure 6-29. Foreach Loop container
Foreach Loop Editor—Collection Page
The Collection page of the Foreach Loop Editor, shown in Figure 6-30, allows you to configure many of the properties that will determine the looping structure of the container. The page will dynamically modify the properties that are available, depending on the type of enumerator you need to use. The enumerator types are Foreach File enumerator, Foreach Item enumerator, Foreach ADO enumerator, Foreach ADO.NET Schema Rowset enumerator, Foreach From Variable enumerator, Foreach Nodelist enumerator, and Foreach SMO enumerator.
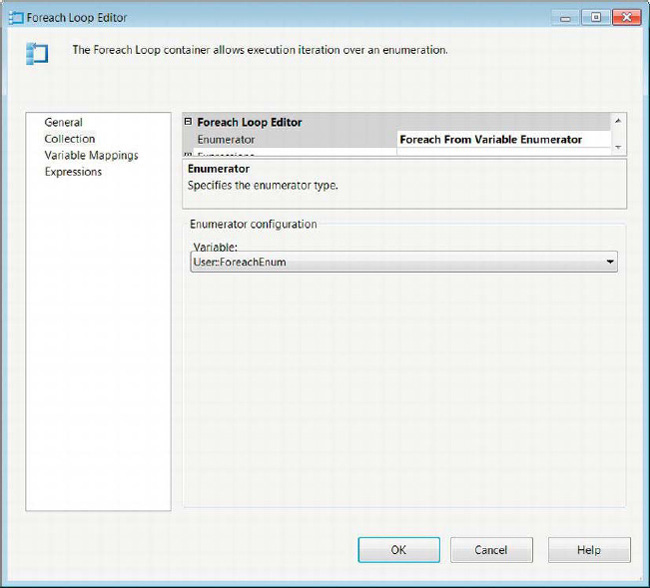
Figure 6-30. Foreach Loop Editor—Collection page
The Collection page allows you to configure the following context-specific properties:
Enumerator lists all the types of enumerators available for the Foreach Loop container to traverse.
Foreach File Enumerator allows the container to traverse a list of files.
Folder specifies the working folder within which the files to be enumerated are located.
Browse allows you to navigate the file system to easily find the file folder.
Files lists the files to be used as the enumerator in a comma-separated format. Wildcards can be used to identify files by extension or common naming standards.
Fully Qualified retrieves the folder path, file name, and file extension as thecontainer traverses the file list. This value can be assigned to a variable to be used by an executable within the container.
Name and Extension retrieves the file name and the file extension as the container traverses the file list. This value can be assigned to a variable to be used by an executable within the container.
NameOnly retrieves the file name as the container traverses the file list. This value can be assigned to a variable to be used by an executable within the container.
TraverseSubfolders allows you to include files inside subfolders for the file list.
Foreach Item Enumerator allows you to define a custom list of items for the container to loop through. A window on the Collection page allows you to identify the different elements of the list. The Column button is used to add columns to the enumerator. A new row is added to the list after the last row is populated with values.
Columns button opens a dialog box that allows you to add columns to the enumerator and define their data types.
Remove deletes an element from the enumerator.
Foreach ADO Enumeratorallows the usage of ADO or ADO.NET objects as the enumerators of the container. The ADO objects will enumerate the rows of a singular data table, whereas the ADO.NET objects may enumerate rows in multiple data tables or the data tables themselves.
ADO Object Source lists all the user-created variables within the scope of the container. This variable will be traversed as a data table or a set of data tables.
Rows in First Tabletraverses the rows that appear in the first data table only. This option can be applied to both ADO and ADO.NET objects.
Rows in All Tables (ADO.NET Dataset Only) traverses all the rows in all the data tables.
All Tables (ADO.NET Dataset Only) traverses the data tables themselves.
Foreach ADO.NET Schema Rowset Enumeratoruses a .NET provider for OLEDB to connect to SQL Server and enumerate certain database objects.
Connection lists the .NET provider for OLEDB connections to SQL Server defined in the package.
Schema defines the scheme to be used as the enumerator.
Set Restrictions creates restrictions for each of the schema’s properties. A dialog box allows you to define the restriction based on a string value or a variable value.
Foreach From Variable Enumeratorallows you to enumerate the data in an object variable.
Variable lists all the user-created variables.
Foreach Nodelist Enumeratorallows you to enumerate specific nodes of an XML statement resulting from an XPath expression.
DocumentSourceType defines the input method of the XML statement. The
FileConnectionoption allows you to specify a connection manager that points to the XML file with the nodes you need. TheVariableoption indicates that the XML is stored within an SSIS variable. TheDirectInputoption requires you to type the XML directly into the editor.DocumentSource specifies the XML source depending on its type. For the
FileConnectionandVariableoptions, you get a drop-down list that either contains file connections or SSIS variables, respectively. ForDirectInput, the editor provides a text field to type in the XML.EnumerationType defines the type of enumeration of the XML nodes. The
Navigatoroption utilizes theXPathNavigatorto enumerate the XML. TheNodeoption uses XPath expressions to retrieve the XML nodes. TheNodeTextoption uses XPath expressions to retrieve text nodes. TheElementCollectionoption uses XPath expressions to retrieveelement nodes. The first three options require the use of the outer XPath expression that is applied to the XML. The last option uses an outer XPath expression and can applyan inner XPath expression to the element collection.OuterXPathStringSourceType provides the source type for the XPath expression that is applied to the XML statement. The
FileConnectionoption allows you to specify a connection manager that points to the XPath expression. TheVariableoption indicates that the XPath expression is stored within an SSIS variable. TheDirectInputoption requires you to type the XPath expression directly into the editor.OuterXPathString specifies the XPath expression source depending on its type. For the
FileConnectionandVariableoptions, you get a drop-down list that either contains file connections or SSIS variables, respectively. ForDirectInput, the editor provides a text field to type in the XPath expression.InnerElementType specifies the type of inner element in the list. The options for the types are
Navigator,Node, andNodeText.InnerXPathSourceType provides the source type for the XPath expression that is applied to the element collection. The
FileConnectionoption allows you to specify a connection manager that points to the XPath expression. TheVariableoption indicates that the XPath expression is stored within an SSIS variable. TheDirectInputoption requires you to type the XPath expression directly into the editor.InnerXPathString specifies the XPath expression source depending on its type. For the
FileConnectionandVariableoption, you get a drop-down list that either contains file connections or SSIS variables, respectively. ForDirectInput, the editor provides a text field to type in the XPath expression.Foreach SMO Enumerator uses anADO.NET Connection Manager to enumerate objects at a server or database level as well as run queries to return information about certain objects.
Connection lists all the ADO.NETConnection Managers defined in the package.
Enumerate defines the objects to enumerate. This property can be automatically populated by using the Browse dialog box.
Browse opens a dialog box to select the required object from the server. This will automatically generate the necessary expression to populate the
Enumerateproperty.
Foreach Loop Editor—Variable Mappings Page
As the container iterates through the list, it is able to extract information from the enumerator. The elements can be stored in SSIS variables that will be overwritten with new values as the container iterates by configuring the Variable Mappings page, shown in Figure 6-31. Columns need to be defined to accept each of the values, depending on the structure of the enumerator.

Figure 6-31. Foreach Loop Editor—Variable Mappings page
The Variable Mappings page allows you to configure the following mappings:
Variable lists all the user-defined SSIS variables with appropriate scope for the container.
Index identifies the location of the variable in the enumerator. The index value represents the column number inside the enumerator. The values start with
0and increase to match the data inside the enumerator.
Task Host Controller
The Task Host container is implicitly configured when an executable is added to the SSIS control flow. The configurations apply exclusively to the executables and their dependents in the case of containers. This container allows for variables and event handlers to be tied directly to the task. This container also limits the scope of variables across the different executables.
Summary
This chapter introduced the advancedcontrol flow items that will allow you to perform many nonfunctional requirements. A majority of the advanced tasks transfer objects between SQL Server instances. We also introduced the advanced containers in the SSIS Toolbox. These containers loop through the execution differently, but they achieve similar goals. The implicit Task Host controller cannot be accessed directly but works behind the scenes to keep the package executables organized.Chapter 7covers the basic components of the Data Flow task.