
Working with Workflows in Visual Studio
At times you will come across scenarios when even SharePoint Designer workflows cannot meet your requirements, and you may need to create workflows in Visual Studio. This may be because you need to call some custom business logic components that do complex processing or access external data sources or external systems that is not possible to do in SharePoint Designer workflows. You might also need to create a Visual Studio workflow because you can use the additional workflow activities not present in the SharePoint Designer workflows.
Creating a SharePoint Workflow in Visual Studio 2010
You now create a new SharePoint workflow in Visual Studio 2010. The workflow is executed when a new item is added to a custom list called Loans. This list stores the LoanAmount, Salary, and LoanStatus. The workflow retrieves the Salary and LoanAmount and calls custom components that, based on some calculations, validate if the user is eligible for the specified LoanAmount. If the user is eligible, the workflow auto-approves the loan by setting the LoanStatus to Approved, or it creates a task for the administrator to manually verify the loan and update the status.
Try It Yourself: Create a SharePoint Workflow in Visual Studio 2010
1. Create a new SharePoint 2010 project of type Sequential Workflow and name it ComplexCalcWF.
2. The SharePoint Customization Wizard appears. Enter the site URL and click Next.
3. In the next screen of the wizard specify the workflow name as ComplexCalcWF and select the type of workflow as List Workflow. Click Next.
4. The next step prompts you to associate the workflow with a list. Uncheck the option as you will manually associate the workflow as shown in Figure 15.16. Click Finish.

Figure 15.16. Creating a new workflow in Visual Studio 2010
5. The workflow designer appears with OnWorkflowActivity as the first activity as shown in Figure 15.17. The first activity in any SharePoint workflow has to be the onWorkflowActivated activity. The onWorkflowActivity performs various important tasks such as setting the various context variables.
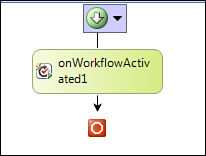
Figure 15.17. The OnWorkflowActivated activity
6. Before making any modifications to your workflow create your custom business logic component. Create a new project of type C# class library and name it CalculatorComponent. Ensure that the .Net Framework version for the class library is .Net 3.5.
7. Since the class library needs to be in GAC for the workflow to access it, add a strong name to the assembly.
8. Update the Class1.cs as shown in the following code:
namespace CalculatorComponent
{
public class LoanEligibilityCalculator
{
public static bool IsEligible(int salary, int loanAmount)
{
if (loanAmount / salary > 10)
{
return false;
}
else
{
return true;
}
}
}
}
9. The preceding code checks whether the loan amount is less than 10 times the salary and then passing true or false.
10. Build the CalculatorComponent Project. Add the reference of the CalculatorComponent Project to the workflow project.
11. Go back to the workflow designer and add an IfElse Activity after the onWorkflowActivity1 activity. Go to the code by pressing F7. Add the using for CalculatorComponent. Add the following function in the code:
public void Calculate(object sender, ConditionalEventArgs e)
{
int salary =
Convert.ToInt32(
workflowProperties.Item["Salary"].ToString());
int loanAmount =
Convert.ToInt32(
workflowProperties.Item["LoanAmount"].ToString());
e.Result = LoanEligibilityCalculator.IsEligible(salary, loanAmount);
}
12. The preceding code retrieves the Salary and LoanAmount and calls the IsEligible method of your custom component. The e.Result indicates whether the condition is true or false.
13. Go back to the workflow designer. Select the first branch of the IfElseActivity and go to the Properties panel. Select the CodeCondition option for Condition property in the Properties panel. As soon as you select the CodeCondition you can expand the Condition property. Expand the condition property and select Calculate as the Condition from the drop-down. This is shown in Figure 15.18.
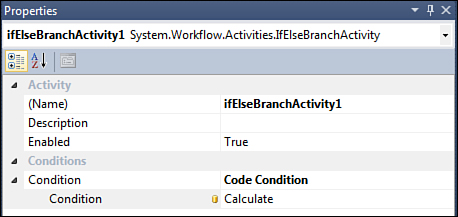
Figure 15.18. Code condition
14. Add a code activity to the first branch of the IfElse Activity. This gets executed when the condition evaluates to true. Name the activity automaticApproval. Go to the codebehind file and add the following function. You can see that we are setting the LoanStatus field to Approved in the code.
private void ApproveLoan(object sender, EventArgs e)
{
workflowProperties.Item["LoanStatus"] = "Approved";
workflowProperties.Item.Update();
}
15. Go back to the designer and select ApproveLoan for the Execute property of the automaticApproval code activity.
16. Create a task when the loan amount exceeds 10 times the salary. Add a CreateTask Activity to the other branch.
The create task activity is available under the SharePoint Workflow section in the Toolbox.
17. In the Properties for the CreateTask activity enter the CorrelationToken as correlationToken1.
Correlation tokens act as unique identifiers that enable mapping between the objects in a workflow and the environment that is hosting the Windows Workflow Foundation (WF) workflow runtime.
18. Now go to the TaskId property and click the ellipsis button. In the modal dialog that pops up, go to the Bind to a New Member tab and select Create Field as shown in Figure 15.19.
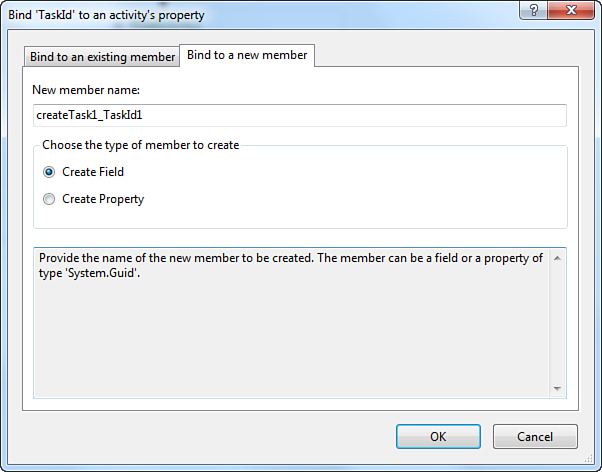
Figure 15.19. Bind TaskId
19. Repeat step 18 for TaskProperties in the properties window.
20. Now double-click the createTask1 property. This creates the MethodInvoking event handler in the codebehind. Update the method as in the following code. You can see that we are setting the various properties for the Task in the code.
private void createTask1_MethodInvoking(object sender, EventArgs e)
{
createTask1_TaskId1 = Guid.NewGuid();
createTask1_TaskProperties1.Title =
"Loan requires additional Approval";
createTask1_TaskProperties1.Description =
string.Format(@"
Loan amount has exceed 10 times the salary
Loan amount = {0},
Salary = {1}
Cannot perform automated approval.
Requires manual approval from Bank Manager",
workflowProperties.Item["LoanAmount"].ToString(),
workflowProperties.Item["Salary"].ToString());
createTask1_TaskProperties1.SendEmailNotification = true;
createTask1_TaskProperties1.AssignedTo =
workflowProperties.Originator;
}
21. The final view of the workflow designer should be as shown in Figure 15.20.
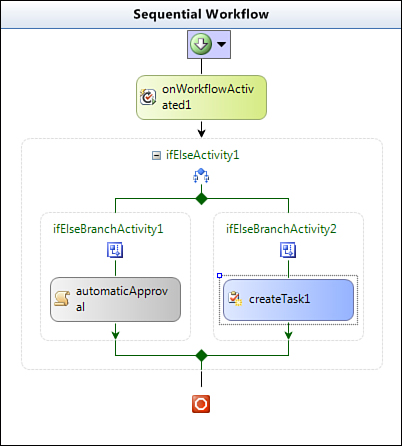
Figure 15.20. Final layout of the ComplexCalcWF workflow
22. Rebuild and deploy the workflow. You also need to add the CalculatorComponent to the GAC. You can do this by simply dragging the CalculatorComponent.dll to the GAC or by running the command gacutil /i CalculatorComponent.dll from the Visual Studio 2010 command prompt.
23. Now create the Loans list. Create a new custom list and add the fields shown in Table 15.2.
Table 15.2. Field for the Loans List

24. Associate your new workflow with the list and set it to start when a new item is created.
25. Create a new list item with Salary as 100, Loan Amount as 900, and Loan Status as Pending. You can see that as soon as you save the list item the loan status is changed to Approved, and you can see that the ComplexCalcWF workflow is completed. This is shown in Figure 15.21.

Figure 15.21. ComplexCalcWF status when LoanAmount < (Salary * 10)
26. Create another list item with Salary as 100, Loan Amount as 1100, and Loan Status as Pending. You can see that once you save the list item the workflow shows In Progress, and the Loan Status remains Pending.
27. Click the In Progress link to open the Workflow Status screen. You can see that a new task has been created by the workflow as shown in Figures 15.22 and 15.23.

Figure 15.22. ComplexCalcWF status when LoanAmount > (Salary * 10)
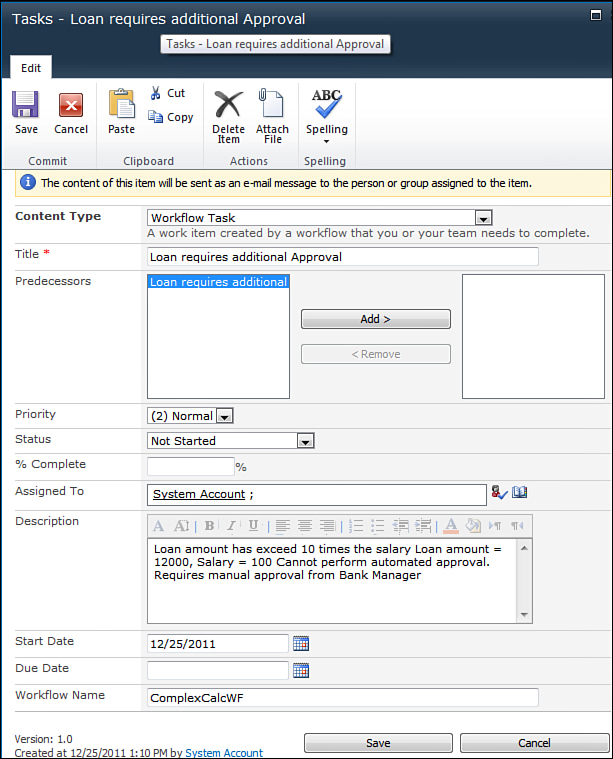
Figure 15.23. Task created by the ComplexCalcWF
28. The user can go ahead and manually update the status of the workflow to Approved or Rejected.