
Creating a Custom Timer Job
So far you have explored the core classes of the object model either by developing console applications or by developing custom web parts. This section discusses another interesting topic in SharePoint server side development—developing a custom timer job.
Timer jobs are primarily used to run scheduled workloads, for example, performing some custom housekeeping activity in a SharePoint site or sending out daily or weekly email notifications to users based on certain business rules. In such a scenario you can create a timer job and schedule it to run accordingly.
Try It Yourself: Create a Custom Timer Job

Figure 7.15. Creating announcements with a custom timer job
1. Fire up Visual Studio and create a new empty SharePoint project.
2. Add a new class called TimerJobDemo in the project.
3. To create a timer job definition, you inherit the TimerJobDemo class from the SPJobDefinition class and override its Execute method to specify a set of actions to perform when the job is executed, as demonstrated in the following code:
public override void Execute(Guid targetInstanceId)
{
// Get reference to web application
SPWebApplication webApp = this.Parent as SPWebApplication;
if (webApp != null && webApp.Sites.Count != 0)
{
// Get reference to root web of the
// first site collection in the web application
SPWeb web = webApp.Sites[0].RootWeb;
// Get reference to the announcements list
SPList announcements = web.Lists["Announcements"];
// App new announcement to the list
SPListItem newAnnouncement = announcements.AddItem();
newAnnouncement["Title"] =
"New Announcement, creation time: " +
DateTime.Now.ToShortTimeString();
newAnnouncement.Update();
}
}
In the preceding code, we get a reference to the root web of the first site collection in the web application and add a new announcement to the same.
4. Further, the job definition should be associated either with a web application or with a service. In our case, we would associate it with a web application. This requires creating a constructor to accept the SPWebApplication object as a parameter, as demonstrated in the following code snippet.
public TimerJobDemo(SPWebApplication webApp)
: base("TimerJobDemo", webApp, null, SPJobLockType.None)
{
}
Don’t forget to include a default constructor in your timer job class; otherwise, you end up with the error “TimerJobDemo cannot be deserialized because it does not have a public default constructor.” when activating the feature that installs the job.
5. To deploy this timer job, we create a Web Application scoped feature and add event receivers to handle the FeatureActivated and FeatureDeactivating events. In the FeatureActivated event, we instantiate the TimeJobDemo class and create a schedule to run it after 5 minutes at any time between 0th and 59th second of the minute, as shown in the following code:
public override void FeatureActivated(SPFeatureReceiverProperties properties)
{
SPWebApplication webApp = properties.Feature.Parent as
SPWebApplication;
// Create the timer job
TimerJobDemo timerJob = new TimerJobDemo(webApp);
// Schedule it to run after 5 minutes at any time
// between 0th and 59th second of the minute
SPMinuteSchedule schedule = new SPMinuteSchedule();
schedule.BeginSecond = 0;
schedule.EndSecond = 59;
schedule.Interval = 5;
timerJob.Schedule = schedule;
timerJob.Update();
}
6. In the FeatureDeactivating event, we loop through the web application’s job definitions and delete the timer job from the same, as shown in the following code:
public override void FeatureDeactivating(SPFeatureReceiverProperties properties)
{
// Delete the timer job
SPWebApplication webApp = properties.Feature.Parent as
SPWebApplication;
foreach (SPJobDefinition job in webApp.JobDefinitions)
{
if (job.Name == "TimerJobDemo")
{
job.Delete();
break;
}
}
}
When deploying the solution through Visual Studio, it is better to set the Activate on Default property to false, as shown in Figure 7.16. Otherwise, the timer job would be activated by default for all the web applications.

Figure 7.16. Setting the Activate on Default property to false
7. Next deploy the feature, navigate to Central Administration, and activate the TimerJobDemo feature for your web application. Once the feature is activated and the timer job starts running, you should see the timer job in the Job Definitions screen for your web application in Central Administration, as shown in Figure 7.17.
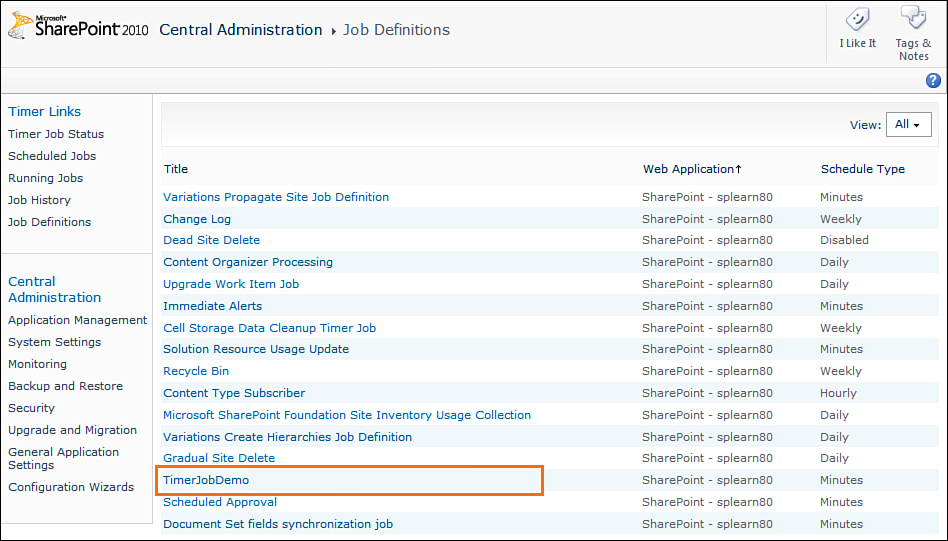
Figure 7.17. Examining the TimerJobDemo’s job definition in Central Administration
8. Click the timer job and further verify that the job has been scheduled to run after an interval of 5 minutes, as shown in Figure 7.18.

Figure 7.18. Verifying the TimerJobDemo’s schedule
At certain times on redeploying your source code for an already existing timer job, you may find that your changes are not getting reflected. To resolve the issue you can restart the Timer Service from the Windows Services Management console (services.msc).