
This chapter examines how users can leverage document libraries and more (specifically, Document Workspaces)to better facilitate online document collaboration. This chapter covers MOSS 2007 document library capabilities exclusively. Windows SharePoint Services 3.0 (WSS) may not have some of the document library or Document Workspace capabilities, so keep this in mind if you are operating in a WSS-only environment. When I reference MOSS 2007 or WSS, I am specifically talking about Microsoft Office SharePoint Server 2007 (MOSS) and Windows SharePoint Services Version 3.0 (WSS). Finding ways for the information worker to better share, review, and manage documents in the workplace is always one of the top priorities in any organization. Microsoft Office SharePoint Server 2007 (MOSS 2007) comes with a document repository component that is technically referred to as a document library. This chapter covers the ins and outs of creating and managing the document library component. It explains the guidelines that should be used when configuring document libraries and provides step-by-step instructions for doing so. Other topics that will be covered briefly in association with document libraries are: content types, custom metadata, site columns, workflow, and integration with 2007 Microsoft Office System clients.
This chapter also discusses Document Workspace sites, which can help coordinate the development process of one or more related documents with other individuals. I provide some sample scenarios that illustrate how Document Workspaces can be useful in an organization. I also cover the different configuration options that are available when creating and managing these workspaces, providing step-by-step instructions on doing so. Document Workspace sites can be an integral part of any project, in that they provide a tool for facilitating team collaboration. Some of the different lists that you will find when provisioning a Document Workspace are announcements, tasks, relevant links, and shared documents. It is very important to understand the capabilities of document libraries and Document Workspaces—if implemented improperly, they can become a nightmare to deal with on a day-to-day basis.
After reading this chapter, you should understand the following:
The differences between a document library and network file shares
The benefits of using document libraries instead of file shares
Configuring document libraries: custom metadata, site columns, content types, and workflow
The many different file types within a document library
Integration points with 2007 Microsoft Office Clients
How to effectively manage and deploy document libraries in your organization
When to create Document Workspace sites for collaboration needs, and which options to use
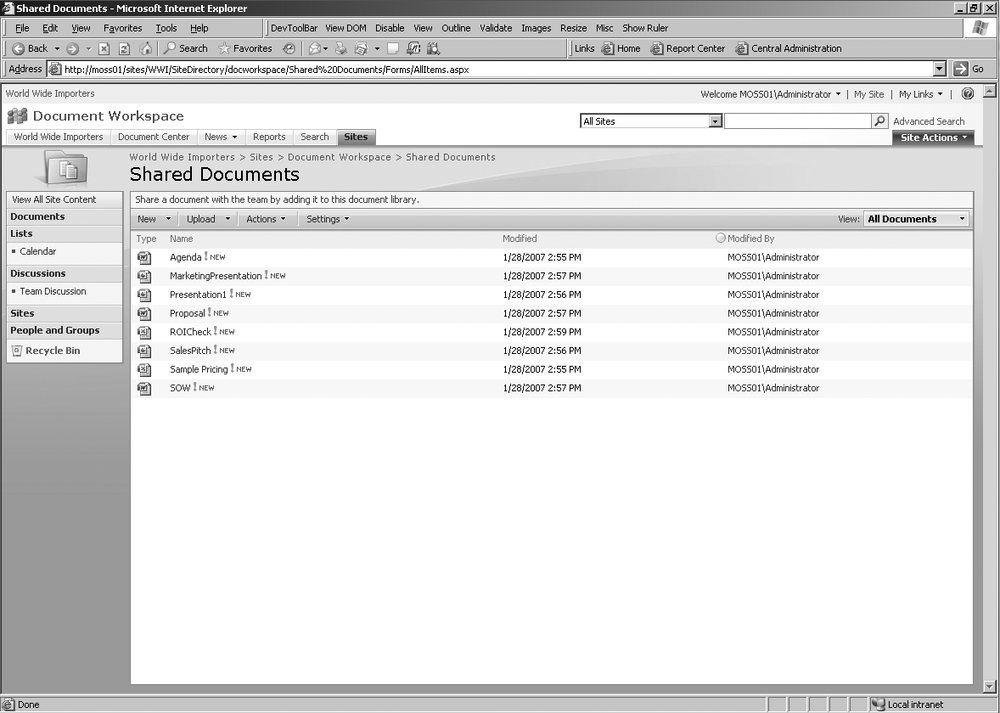
A document library is a SharePoint repository that can store many different types of files. The document library is available for creation in most, if not all, of the site templates that come out of the box with MOSS 2007. For example, if we were to go and provision a team site, when the site is complete, one of the first Web Parts that you will notice is Shared Documents. This is actually a document library that was provisioned on site creation. So, what is a document library? Document libraries provide a place where users can centrally manage, store, and organize documents across their organization. Document libraries are like any other standard list you will find within MOSS, except they are specifically optimized to hold documents as their items. Any other standard SharePoint list item will consider the document as an attachment to that list item. In other words, a document library lists the documents and other file types, whereas a standard list will store a document as an attachment instead of the list item itself. Document libraries are not limited to documents. As you can see in Figure 9-1, document libraries can manage other file types, such as spreadsheets, presentations, forms, and other common file types.
Once users begin using document libraries on a daily basis, they will quickly realize their benefits. The document library is a user-friendly, intuitive tool that can be easily customized to meet the changing needs of the information worker.
Now let’s dive into some of the details of working with document libraries on a daily basis. When using document libraries, there are a few basic tasks that we should first understand before going into the configuration options. These are:
Navigating to a document library in the web browser
Uploading documents into a document library
Uploading multiple documents into a library
If your site does not have a document library or you would like to create your own, you can follow these simple steps:
Navigate to your SharePoint site.
Click the View All Site Content link on the top of the lefthand side Quick Launch bar, and you should see something like Figure 9-2.
Click on the Create button under the All Site Content page title. You should see the Create screen.
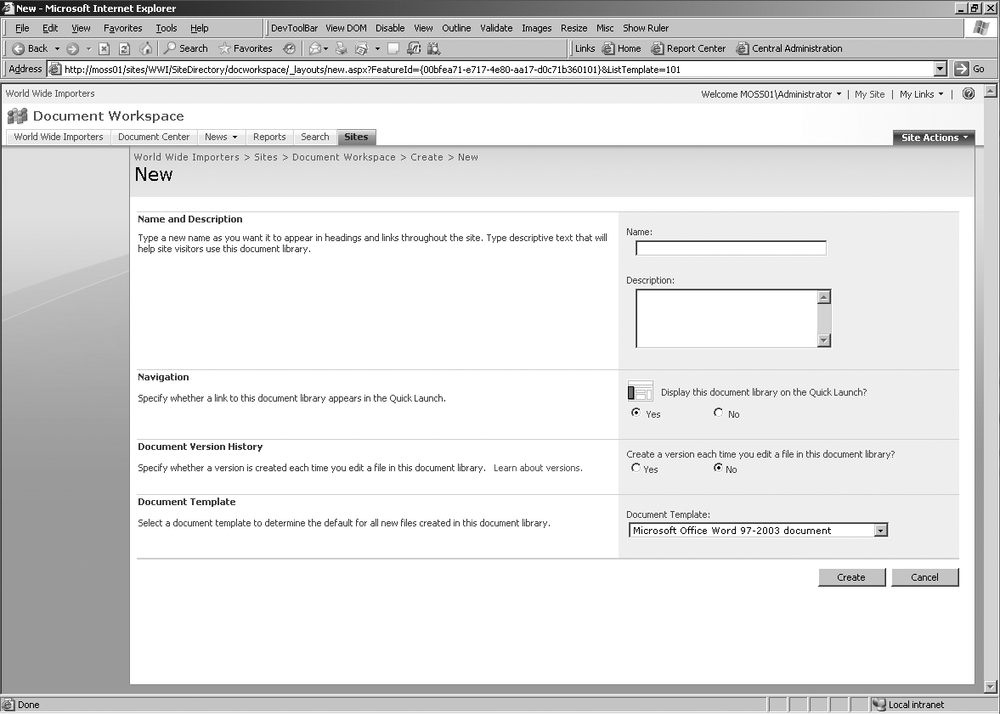
Select Document Library, which is located underneath the Libraries section header. You should see the New page, shown in Figure 9-3.
Add a descriptive title for the document library.
Then, select whether you would like to display it on the quick launch bar.
Enable document versioning. (We are going to visit this topic later in the chapter, and this will need to be enabled.)
Click Create at the bottom of the page.

Your document library has now been created.
Navigating to a document library is a simple task that requires opening your browser and performing the following steps:
Open your web browser and log onto your SharePoint site.
If you logged into a newly created site, you should see a Shared Documents Web Part.
Click this link and you will then be directed to the document library’s Allitems.aspx page; the URL should look something like this:
http://servername/sites/sitename/Shared%20Documents/Forms/AllItems.aspx If the Shared Documents Web Part is not on your page, you should have a Documents link in the Quick Launch section; click that link. That page will display all the document libraries for that site.
Click the link for the document library that you want to open.
Once you have created and navigated to your document library, there are a number of different actions that can be performed.
Now that we have gone through the steps of creating a document library, it’s time to explain the options that you have when uploading documents into the library. It is important to understand each of these methods and some of the considerations that should be taken when using them on a daily basis. Users have quite a few options when uploading documents into a library:
Uploading via the upload action button
Uploading from a Microsoft Office client
Using the Explorer view to upload
Uploading via the Windows Explorer action
Now let’s look at each of these methods and the pros and cons that come with each of them in Table 9-1.
Table 9-1. Pros and cons of the different upload methods
|
Upload method |
Pros |
Cons |
|---|---|---|
|
Document library; upload button from toolbar |
Uploading single documents; will prompt for required metadata Easy and intuitive to use Ability to browse for documents and check off multipe documents at once for upload |
When uploading multiple documents, required metadata will not be prompted for and will remain blank Office client 2003 or 2007 are required when uploading multiple documents |
|
Microsoft Office client |
Ability to fill in required metadata easily from client’s document information panel |
Must have Office 2007 in order to take advantage of document information panel Can be difficult to initially navigate to the document library when saving |
|
Explorer View |
Easily upload multiple documents by dragging and dropping into the Explorer View window Ability to move and copy documents between the Windows Explorer folder and document library |
Must have Office client 2000 or later installed on machine Required metadata for document library will remain blank |
|
Windows Explorer |
Most users are familiar with and understand how to use this method Drag-and-drop functionality when a separate Windows Explorer window pops up with document library contents Upload multiple documents more quickly than uploading each document separately Ability to open up Windows Explorer and save it quickly under My Network Places or map a network drive |
Required metadata for the document library will remain blank |
Now that we have laid out the options for uploading documents into a library, let’s run through each of them and provide some step-by-step demonstration instructions.
The first option we will look at is uploading documents from the document library’s Upload button, located on the toolbar. This method is fairly easy in that the steps are very straightforward. Any user with web browsing experience should be able to grasp this method with ease. So, let’s take a look at the steps needed to perform this action.
You must log on to your SharePoint site and navigate to the document library. Follow the steps provided earlier in the chapter under “Creating a document library” or “Navigating to a document library” before proceeding onto the next steps.
Once you have navigated to the document library, you will find the Upload button on the toolbar.
Click the Upload button, and you should see the options shown in Figure 9-4.
First we are going to look at the Upload Documents option, so click that.
You will then be taken to a screen where you are asked to browse for your specific document. Browse to your specific document and click OK.
If you have specified some required fields (which will be covered in more detail later in this chapter), you will be prompted to enter those required fields (Figure 9-5).
Once you have filled out the appropriate required fields, click the OK button, and your document will be successfully downloaded with all the required fields.
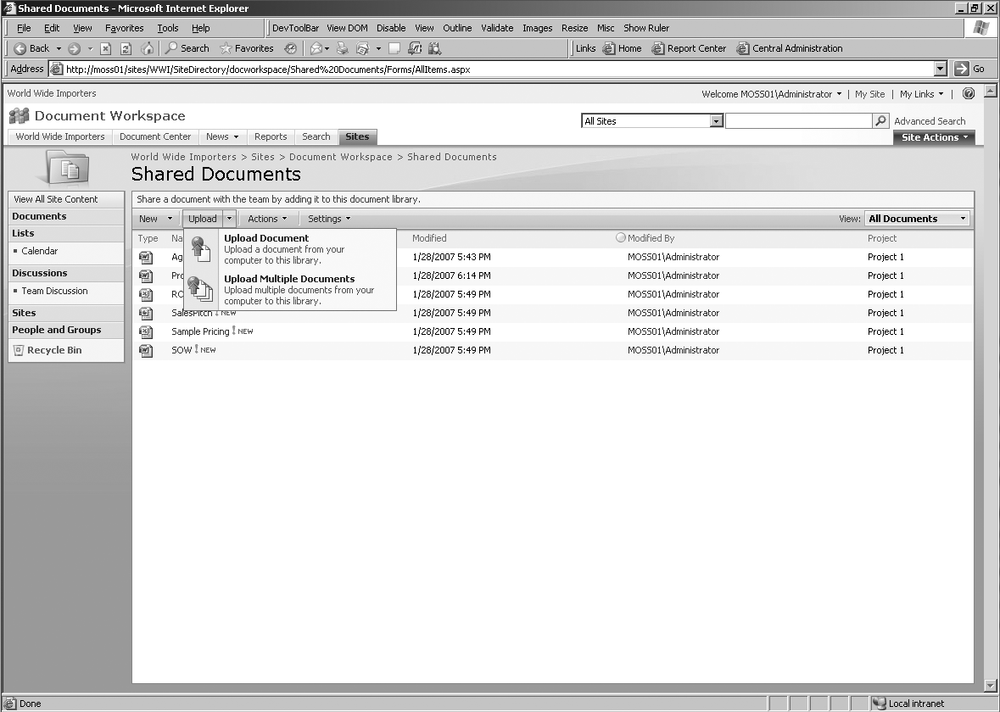

Click Upload Multiple Documents.
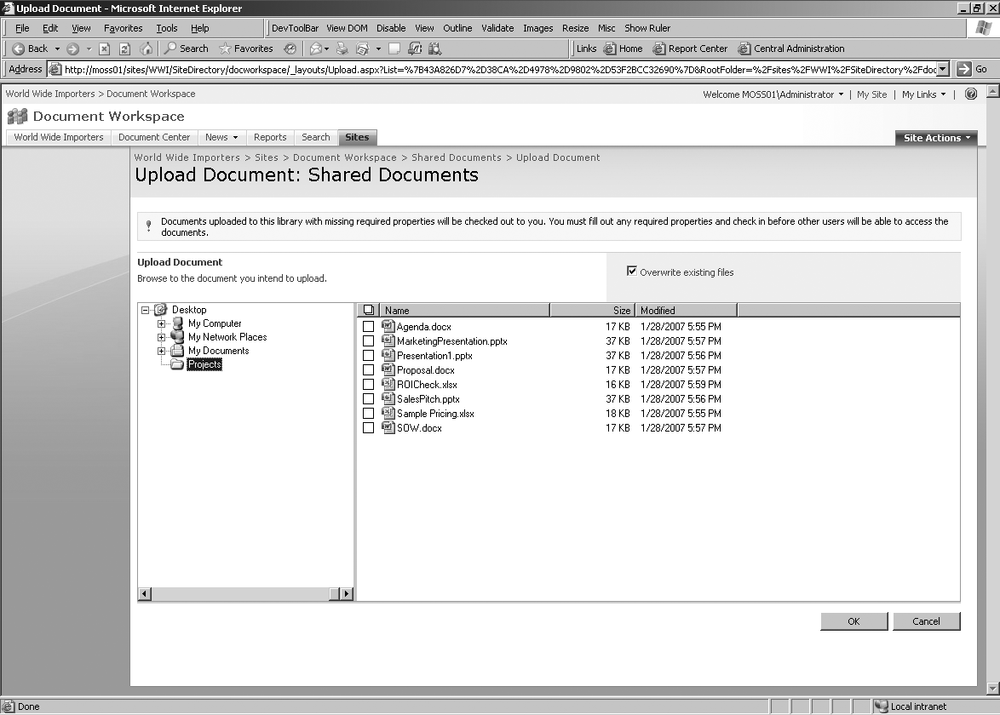
You should then be presented with a Windows Explorer tree-like view of your machine’s filesystem. Your screen should look something like Figure 9-6.
You can check off which documents you would like to upload by simply clicking the empty box next to each item.
Once satisfied with the amount of items you wish to upload to the document library, click the OK button at the bottom of the screen. Your documents are now uploaded to the document library.
Remember that uploading documents to the document library with this method bypasses the required metadata for the library.
These next two methods provide users with a common Windows Explorer-like look and feel. They both enable users to drag and drop documents into the library with ease. The Windows Explorer method uses the Web Distributed Authoring and Versioning (WebDAV)protocol. One important consideration for this method when moving multiple documents from one document library to another is that you lose all version history for that document. So, with that in mind, let’s quickly look at the steps for moving documents from one document library to another using each of these methods. Take into consideration that the default upload size limit for MOSS is 50MB. This limit can be changed, but as a general rule, it is dependent upon server and network speeds, and the limit should not be pushed to more than 300MB. After that threshold, performance will vary and some users may begin experiencing server time outs when uploading.
Navigate to the document library (steps shown earlier in this chapter).
Click the down arrow on the right side of the screen, underneath View.
Click Explorer View. Note that in order for this view to work, your machine must have Microsoft Office 2000 or later.
You screen should then look like Figure 9-7.
You can now drag and drop these documents as you would in Windows Explorer. You can also copy and paste from here.

Navigate to the document library.
Click on the Actions down arrow, and select “Open with Windows Explorer.”
A Windows Explorer window will pop up with all the documents that are in the library.
You can now drag and drop or copy and paste to move files as you wish.
Document libraries within MOSS 2007 come with the capability to receive emails and attachments. The library must have an email address associated with it in order for it to receive emails. Once the document library has been configured, you can send attachments directly to this email address from your email client. Please reference this URL for a step-by-step guide to implementing email-enabled document libraries in your environment:
| http://office.microsoft.com/en-us/winsharepointadmin/HA011608031033.aspx |
Now that we have an understanding of how documents are uploaded into a document library, let’s take a look at organizing these documents. Even though document libraries are designed to hold a large amount of documents, there are still some considerations to note. Limiting the number of documents in a document library is critical in keeping a friendly user experience. The limit that Microsoft has set is a hard limit of no more than 2,000 files per folder; the same goes for the root of the document library, with a limit of 2,000 files. Having more than 10,000 documents in a library will at best provide an unfriendly user experience, with varied performance depending on the pure size of the documents. Organizing these files in an effective and efficient manner that allows users to find what they are looking for in document libraries of this size can become very challenging.
This brings up another consideration about using folders within a document library. Users who are unfamiliar with document libraries and the search engine in MOSS 2007 will create folders within document libraries. Organizing using folders is what they are used to, since organizing file shares is most likely what they were using before document libraries. Document libraries are not meant to be a complete replacement for file shares. File shares should continue to have their place in an organization. Don’t get me wrong; live documents that are constantly under revision should live in a document library. However, if you are looking to just copy all of the documents from the file share to a document library in one quick swoop, don’t do it. If you are looking to do this so you can have a central place to go and search through these files, then have MOSS go out and crawl and index these file shares.
Utilizing the metadata and views when organizing a large amount of documents is much more powerful than nesting them in a bunch of folders. The metadata that is attached to these documents play a critical role in your ability to quickly and effectively filter out the documents you do not need, and display the documents that you are looking for. Metadata also plays a mission-critical role when using the enterprise search capabilities of MOSS. Managed properties can be set up on the MOSS search side, which enable a user to quickly search for a document when she is aware of a specific property of that document. For example, a user is searching for a document, and she is unsure of the title of the document, but she does know who authored the document. Because the author property is required metadata, the user will return much more relevant search results when querying.
Metadata is also known as custom columns. Custom columns can be created in a document library to help users organize and manage document libraries. These custom columns are helpful because they describe some key properties about that document without ever opening the document to see what it is. This in itself saves a huge amount of time when a user is not sure exactly what the document is.
Let’s go through the steps of creating a custom column for categorizing the different projects that are associated with each document. When selecting a data type that will be used for your custom column, consider how you are going to organize your library. For example, if you would like to organize and sort your information by data and time, then choose the data and time data type. The single line of text and multiple lines of text data types are free text fields, and therefore are somewhat more difficult to organize methodically. Free text fields make it considerably harder to know what is to be entered into those columns and organized by what one user types to the next.
Click on the arrow in the Settings menu, and then click on “Create column.”
Add a name for your column.
Select a data type for your column.
Add some detailed options for the type of information you selected.
Add some additional column information, which depends on what column type you select.
Click OK.
Now that we have created some custom columns, I want to briefly cover site columns. Site columns are custom columns that can be reused across multiple lists and across many SharePoint sites. Site columns are useful when you have a custom column that you would like to consistently use across your SharePoint sites. By pointing to an existing site column, you do not have to recreate this custom column when you need it. For example, suppose you define a site column as Project. You can then add that site column to any content type (explained later in chapter), list, or library. This insures complete control over the columns properties when it is first created. The following are step-by-step instructions for creating a site column.
Navigate to your SharePoint site.
Click on the Site Actions menu.
Then click on Site Settings.
Under Galleries, click on Site Columns. You should see something similar to Figure 9-8.
On the Site Column Gallery page, click Create.
Fill out the Name and Data Type you want to store in the Site Column.
In the Group section, either select an existing group or create a new group in which you would like to store this site column.
In the Additional Column Settings section, add the supplementary information, which is dependent on the data type that was previously selected.

Creating document library views is a powerful way to enable your users to quickly filter through and group documents within a document library. When looking at files within a document library, you can sort and filter by some of the metadata (columns) across the top of the library. This is great, but what if you want a consistent sort and filter automatically when navigating to that document library? Views can be configured directly through the web interface and include options such as Sort, Group by, Filtering, and Styles. Each option enables you to better organize your document into specific views that can be quickly used when sorting through large document libraries. For example, suppose you’re a project manager who is storing multiple project documents inside one document library. You want to be able to quickly group all of your documents by their associated projects, and to have these documents sorted by their project name in alphabetical order. You can create a simple view that groups and sorts these documents by the metadata assigned to these documents when they are uploaded into the document library.
The following demonstration quickly goes through the process of creating a view that satisfies this scenario.
Views are shown on the far right of the toolbar, as shown in Figure 9-9.
To create a new view, click the Settings button on the toolbar.
Click Create View.
You can choose among Standard view, Calendar view, Access view, Datasheet view, and Gantt view. Click Standard view for this demonstration.
In the View Name field, type a descriptive name for this view.
If you would like to see this view by default when navigating to the document library, then pick this view as the default. This view applies only to public views.
In Audience, select whether this view should be personal or public. Personal views can be created and pertain only to you.
In the Columns section, pick which columns you would like to show within this custom view.
In the Sort section, choose which column you would like to sort by in ascending or descending order. You can sort by multiple columns (e.g., sort by column A then sort by column B).
In the Filter section, select options for whether you want to filter files and how you want to filter them. A filtered view displays a smaller section of the files, which is good in document libraries with large amounts of files.
In the “Group by” section, you can group items in a document library with the same column values. For example some documents may apply to a specific location. As long as location is a custom column and this column has the same value as others, then these items can be grouped together.
The Totals section allows you to count the number of items in a column, such as the total number of tasks.
The Styles section lets you select a certain style for a specific view. Applying styles to views can make it more aesthetically pleasing for the user. For example, you could create a library in which every other row is shaded.
The Folders section lets you choose a flat view, which will display items without folders.
The Items section allows the view creator to limit the amount of items returned to the user.
If you are planning on accessing this site using a mobile device, the mobile section allows you to enable the view for the mobile device.
Figure 9-10 displays the Create View page and all of its configurable sections.


Content types, a new feature in MOSS 2007, enable organizations to more efficiently and effectively organize and centrally manage content across a site collection. You can define content types for specific kinds of documents and informational products. Content types can be defined in a list or library and can consist of multiple item types or document types. This is very useful because document libraries and lists can now contain multiple document and item types. For example, your HR department has multiple documents that they would like to make available so that users can come and create a new document from these document type templates. When users navigate to the document library, they can use the New command within the toolbar of the document library and create a new document from the chosen document type. The major advantage of using document types is that they may contain unique document properties and policies that are specific to this document. Content types such as this can, for example, be associated with a workflow so when a user creates a new document from this content type, a workflow can be initiated.
When a list content type is added to a document library or list, it is considered a child of the content type from which is was created. This child content type will inherit all of the properties of its parent’s content type. Some of the properties that can be attached to the parent site and inherited by the child site include its associated workflow(s), document templates, read-only settings, and all metadata. The child list content type can be customized for its specific container (i.e., list or library)without affecting the parent content type. If the parent list content type is changed, the child can inherit these changes if desired. If there are any attributes that the child list content type shares with the parent, these changes can be inherited, which will override all child attributes.
Multiple content types can be attached to a document library. Adding this ability makes it easy to build a document library that can store different document types. For example, a document library can contain the documents and related graphics that belong to a project. These different types of files will be organized according to their assigned content type.
Tip
Before content types can be added to a document library, the library must be set to allow multiple content types. Follow these steps for checking that the document libraries settings support multiple content types:
Navigate to the library in which you would like to enable multiple content types. Note that you cannot enable multiple content types on a Wiki library.
Click on the Settings menu, and then click “Document library settings.”
Under General Settings, click Advanced Settings.
In the Content Type section under “Allow management of content types,” select “yes” on the radio button.
Click OK.
Now that we have enabled this library to allow the management of content types, let’s add a content type to the library.
Tip
To add a content type to a library, the user must have at least Design permissions for that document library:
Navigate to the document library in which you’d like to add a content type. Make sure content type management has been enabled.
Click on Settings, and then Document Library Settings.
Under the Content Types section, click “Add from existing site content types.”
Figure 9-11 shows the Content Type section, which includes the “Add from existing site content types” link.

Figure 9-11. The document library with content type settings configured to allow the document library to manage multiple content types
Look at the Select Content Types section. In the “Select site content types from” list, click the down arrow to select the group of site content types from which to choose.
Click the content type that you would like to use from the “Available site content types” section, and then click Add to move the selected content type to the “Content types to add” list.
You can add additional content types by repeating steps 3–6.
In Figure 9-12, I have added a marketing presentation template document as my associated content type to this document library. I have added this so that when users from my marketing team need to create a new presentation, they can come here and use this centrally managed template. They will always know that this is up-to-date because any changes made to the template also will be made here. This document library can now store multiple document types in an organized, efficient manner.

The New Button order can be customized to display in the order that you specify. The first content type that is displayed when the New button is clicked becomes the default content type for the library. You can either change the order or make certain content types are not visible on the New button. To change the default content type or reorder the content types, follow these steps:
Navigate to the document library in which you would like to change the order of the content types shown when the New button is clicked.
Click on Document Library Settings.
Under the Content types section, click “Change new button order and default content.”
Once you have navigated to the Content Type Order section, you can perform either of the following:
Clear the Visible checkbox if you would like the content type to not be shown when the “New button” is selected.
Change the order in which the content type appears on the “New button” by clicking the arrow next to the corresponding content type in the “Positions from top” column and selecting the order number as desired.
Document management is a critical focus point in any organization. Building workflows to automate the business process around document management is where companies have really started to focus their energies. One of the many highlights around MOSS 2007 and its out-of-the-box capabilities is in the business process management (BPM) area. MOSS 2007 comes out of the box with some predefined workflows that are specifically designed to support common business processes. This is just the starting point for your company to create custom complex workflows that go above and beyond what is found outside of the box. This next section looks at some of these out-of-the-box workflows and how they can be added to document libraries and content types that may be used within these document libraries. We will also look at some of MOSS’s document management features, such as versioning, document approval, document routing, and Information Rights Management (IRM).
Workflow is very powerful because it enables organizations to streamline their common business processes, which in turn can save the company from having to go through the time taking manual steps to complete common business processes. MOSS 2007 has some predefined workflow templates that can be used to automate some of these common business processes. The predefined workflows that can be added to a document library in MOSS 2007 are Approval, Collect Signatures, Collect Feedback, and Disposition Approval.
This chapter is not focused on workflow, so I will not discuss each workflow in detail. Instead, this section will simply provide some demonstration steps on how to add workflows to your document library. It is important to note that outside of the predefined workflows that can be attached to a document library, custom workflows also can be developed and added to a document library. For example, SharePoint administrators can design no-code workflows with Microsoft Office SharePoint Designer 2007 that can be used in a specific document library. A custom workflow that is created in SharePoint Designer can only be connected to its associated container. So, for example, you cannot create a custom workflow template in SharePoint designer and then reuse it across different lists and document libraries. On the other hand, developers can create custom workflow solutions with Visual Studio 2005 Extensions for Windows Workflow Foundation. These workflows can then be deployed as a solutions package across multiple sites.
Now let’s take a look at adding a predefined workflow to a document library:
First, navigate to the document library to which you would like to add a workflow.
Click on the Settings button, and then click on Document Library Settings.
Under the “Permissions and Management” section, click on Workflow Settings.
If there are not any workflows added to this library, you should be taken right to the “Add a Workflow” page.
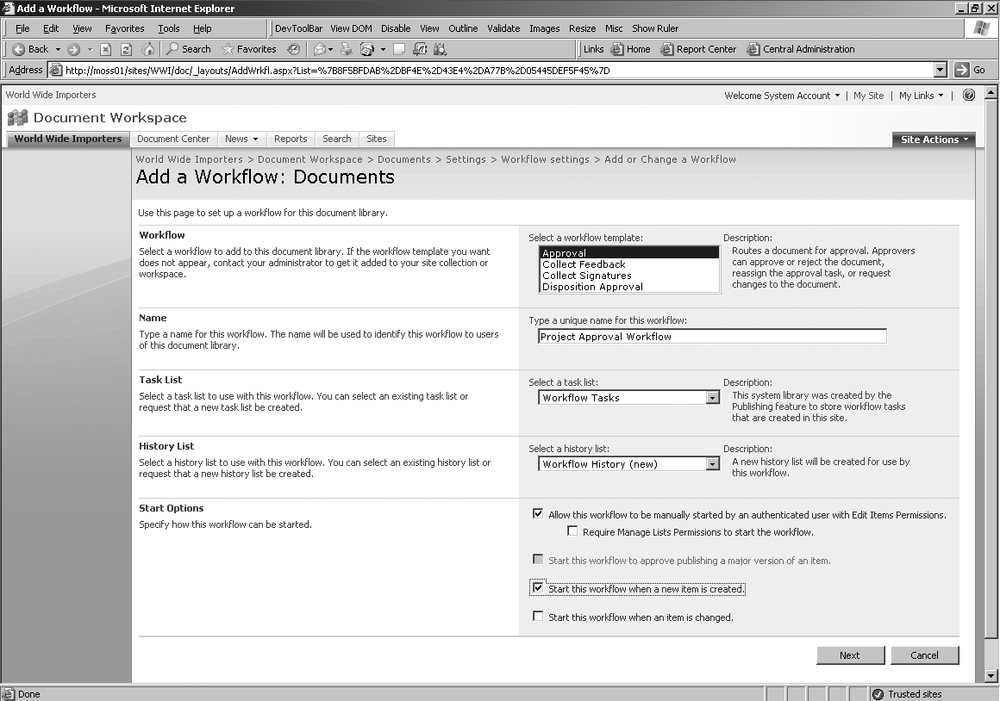
Select the workflow template that you would like to use. In this example, we will select Approval.
Type a descriptive name that you can use to identify this workflow later.
In the Task List section, specify a task list that the workflow will use. You can choose to use the system default tasks lists, which users can use to view their workflow tasks easily by selecting the My Tasks view, or you can create a new task list that if there is a need to conceal workflow information.
Select a history list to use with the workflow. The history lists displays each event that occurs throughout the life of the workflow.
Next, select the Start Options to specify how and when this workflow is initiated. Certain start options are available with certain configurations. For example, the start option “Start this workflow to approve publishing a major version” is enabled only when major and minor versioning has been enabled for that document library. Figure 9-13 shows the “Add a Workflow” window and all of the configuration options that come with the Approval workflow.
Click Next and configure your workflow customization as desired.
Once you have added workflow capabilities to a document library, you can now manually start your workflow on a document from within the document library. When starting a workflow, you must have at least Edit items permissions, and some workflows may require the Manage Lists permission. Your workflow may be set to automatically begin once the document has been uploaded to the document library. Otherwise, you can begin any workflow manually by following these steps:
Navigate to the document library where you have configured your workflow, as shown in previous demonstration steps.
Click the drop-down arrow next to the document in which you would like to manually start the workflow.
Click Workflows.
Figure 9-14 shows the custom workflow that we created in the previous demonstration called Project Approval Workflow.
Under the “Start a new workflow” section, select your custom workflow.
Add the names of the approvers who you would like to approve the document. You can select the Approvers people-picker button and search through directory services to select different people or groups.
Fill out the other sections appropriately.
Click Start to initiate the workflow.
To view your workflow tasks at any time, you can navigate to that site’s task list and click on the My Tasks view, which should display all of the workflow tasks that are assigned to you.
Version control has been improved from its predecessor, SharePoint Portal Server 2003 (SPS 2003). SPS 2003 did not have the ability to capture major versions versus minor versions. This is where MOSS 2007 fills the gap, giving the users the ability to specify major or minor versions when checking in documents. You can even take it a step further and specify how many versions to retain and which types to retain.

This is critical for an organization that is constantly making changes to a living, breathing document. With major and minor versions, team members can quickly differentiate between a major release of the document and a small grammatical change.
By default, major and minor versioning are not turned on and must be configured in the Document library settings. Under the General section, you will find Versioning settings. Figure 9-15 shows the versioning page in which you can configure the specifics of versioning and related settings that affect versioning.
Content approval is considered an interaction with versioning because if it is required, a file remains a draft until it is approved or rejected. If the file is approved, then it is assigned approved status in the library and is accessible to anyone who has permissions to view it. This is the same when the file is rejected, except it can only be seen by the user who submitted the document. Users can wrap a workflow around this common business process to automate this type of scenario.
Within the versioning configuration page, users can require check out for all documents in the library. Once they are checked out and changed, the documents must be checked back in with their respective version (major or minor) selected, along with any comments that go along with the version change. This ensures that a version is created only when a user checks out a file, makes a change, and then check it back in. This option helps to ensure a more effective versioning procedure, and also includes comments for each version.

Sometimes it is necessary to keep two copies of the same file within two different places. You can specify a custom Send To destination for a document library so that people can easily copy the necessary files to the specified destination. The Send To menu option appears on the drop-down menu for each file within the library. For example, you may have a drafting document library in which your team drafts important documents that will one day be available to all employees within the organization. Once these documents are ready to be consumed by the rest of the organization, you can place them in a general published document library, where they can be consumed by all people within your organization.
The Send To command does not simply copy the files to a new location; it also keeps tabs on the source file for any changes that might occur. When a user uses the Send To command, they can choose whether to update existing copies within the destination container. The server tracks the relationship between the source file and all of its destination copies. Users can centrally manage all of the copies through the Manage Copies page.
Document Workspace sites are specifically designed to help coordinate the development process of one or more documents. These sites provide the tools necessary to facilitate this sometimes complex and hectic process. Document Workspace tools include a document library, a list of members who are currently working in the workspace, a task list, announcements list, and a list of links to important information. These tools ensure that the work is performed directly on a document, and that it will have rich version history along with required check out so that users cannot overwrite each other’s work by editing the document at the same time.
Users of a workspace can set up alert subscriptions to be emailed on a weekly, daily, or immediate basis when the document has been changed. This will keep team members constantly in the loop about what changes are being made at any one time in the life of a document. Workspace members can also utilize the tasks list to prioritize a project’s tasks. Most of the time, Document Workspaces will be created temporarily and in an ad-hoc format, but they can be retained for as long as might be required. A Document Workspace does not function any differently than any of the other sites you might create within MOSS 2007. The only differences are the lists that are created upon site provision and the features associated with the document when the Document Workspace is created.
A Document Workspace can be created in a few different ways. The first way is to create a Document Workspace from a document within a library. This is probably the better-known method because you are dealing with all of these documents within a document library and while doing so may decide that a document warrants a workspace. To create a Document Workspace from a document within a library, follow these steps:
Navigate to the document library where your document is being stored.
Point to the name of the document and click the drop-down arrow.
Point to the Send To command.
Select Create Document Workspace. Figure 9-16 shows the pop-up menu that you will see when creating a Document Workspace from a document within a library.
Click OK.
Notice that the URL of the document library is the name of your document. For example, if your original site was http://moss01/sites/WWI/DOC and you created a Document Workspace from a document library within the site “DOC,” SharePoint takes the name of your document and appends it to the end of the URL from which you created your workspace. So, your newly created Document Workspace will now look like http://moss01/sites/WWI/DOC/DocumentName. The document from which you created this workspace will automatically be added to the Shared Documents document library on site creation. When a Document Workspace is created based on that document, you can publish that document back to its source location at any time. Figure 9-17 shows the “Publish to Source Location” command. Once you click this command, it will replace the source document with the most current version of the Document Workspace document.

If you want to create a Document Workspace but do not want to have it associated with a document within a document library, you can always create an empty Document Workspace. To create an empty Document Workspace, create a site like you normally would for a Team site or a Publishing site, but select the Document Workspace option, which is under the Collaboration tab on the Create page.
The Document Workspace can also be created when authoring a document through Microsoft Office Word 2007. This can also be done through Microsoft Office Word 2003, but the following step-by-step demonstration applies to Word 2007. Microsoft Office Word 2007 has many integration points with MOSS 2007, some of which we will briefly cover in the following chapters of this book. Figure 9-18 displays how a Document Workspace can be created from within the Office 2007 application itself.

To create a Document Workspace from within Word 2007, follow these steps:
Open Microsoft Office Word 2007 and the document from which you would like to create a Document Workspace.
In the right task pane in “Location for new workspace,” type in the URL or choose from the options given in the drop-down.
Select Create.
After the Document Workspace is created, the document you are authoring will be automatically saved to that workspace.
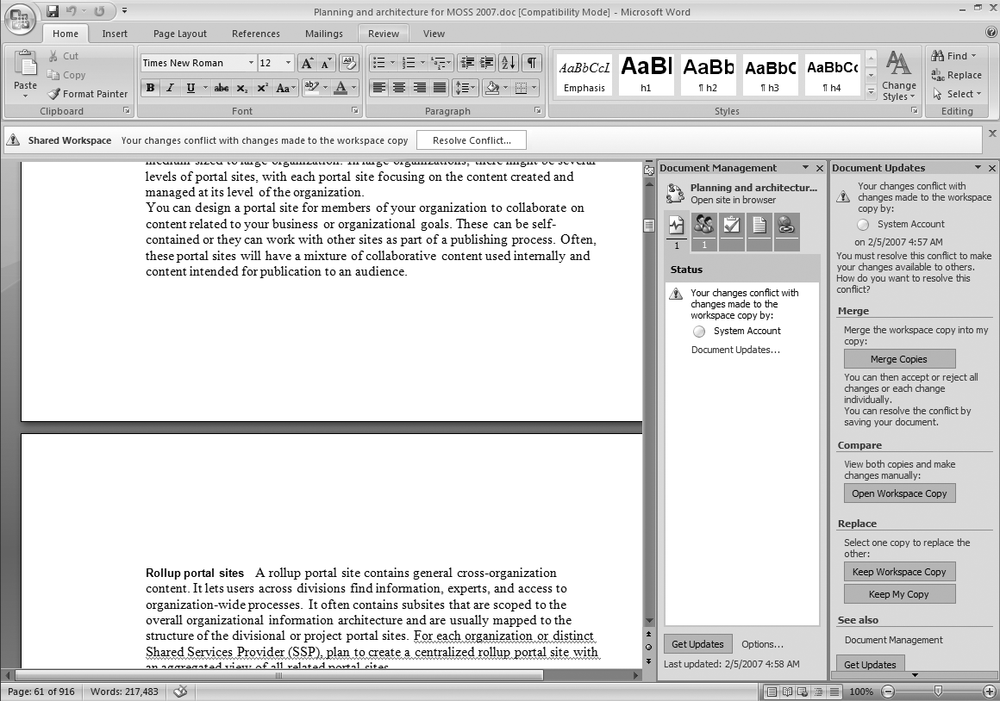
When working on a document through Microsoft Office Word 2007 that is stored inside a Document Workspace, you can access all of the great integration features. For example, there might come a time where the copy that you opened in Word is not the same copy that is in the Document Workspace. Word 2007 is smart enough to recognize this by communicating with the server. In the task pane on the right and in the document information panel, you will see a message stating that there is a conflict. You will then be presented with a screen that looks like Figure 9-19.
As you can see, Word 2007 has recognized this conflict and gives you many options for dealing with it. The task pane on the right also allows you to add members directly from Word to your Document Workspace. It also shows you the task list from the Document Workspace and the document library and all its contents, all from within the task pane. This is a key integration piece that enables the user to control just about anything he desires, all from within one application interface.

In conclusion, document libraries can play an integral role when it comes to organizing and utilizing documents and files within an organization. Document libraries have vastly improved from older versions. Utilizing documents libraries and Document Workspaces together empowers users to facilitate team collaboration at its highest level.