
MOSS 2007 makes extensive use of Microsoft Excel 2007 in organizing and presenting information to teams, departments, and organizations. The primary methods of sharing data between Excel worksheets and workgroups and SharePoint are through Excel Services and Excel Web Access.
Excel Services is defined by three components:
Excel Calculation Services (ECS) is the core of Excel Services, in some ways like the Report Center is the engine behind MOSS 2007 Business Intelligence. ECS loads worksheet and workbook data, calculates and refreshes internal and external data, and maintains connection sessions.
Excel Web Access (EWA) is a specific Web Part that allows you to access and interact with an Excel workbook from a web browser using Dynamic Hypertext Tag Markup Language (DHTML) and JavaScript. EWA can be connected to other Web Parts or Web Part Pages.
Excel Web Services (EWS) is a MOSS 2007 Web Service that offers numerous ways for a software engineer to use an Application Programming Interface (API) to develop applications based on data contained in an Excel workbook.
As a fully integrated component of MOSS 2007, you can take advantage of many SharePoint features to create, modify, and manage Excel workbooks directly from a SharePoint site.
The Excel Web Access Web Part displays spreadsheet information on a Web Part page in a format very similar to an Excel workbook. Features of the Web Part include:
The title and toolbar in the top section, which displays menus, commands, and a drop-down list.
The main window displays at least one worksheet in Worksheet view, a named item such as a chart or table in Named Item view, and an optional outline area.
The Parameters Task Pane displays parameter labels, text boxes for data entry, and optional tool tips.
The bottom section displays refresh data messages for external data sources.
The first step in utilizing Excel Services is to create an Excel worksheet or workbook. When you load your workbook into Excel Services, you allow that data to be accessible through SharePoint; however, Excel Services supports only a subset of Excel 2007 functionality. The following is a list of Excel features supported in Excel Services:
Calculation
Cells
Charts
Connections
Consolidation data from ranges
Data sources such as SQL Server 2000, Microsoft SQL Server 2005, OLEDB providers, and ODBC drivers
Dates
Excel tables
Formatting
Functions
Names
What-if analysis
There are a number of Excel 2007 features that are unsupported in Excel Services. If you attempt to access or use an unsupported feature, you will receive an alert saying so. The following is a list of the unsupported features:
Attached toolbars
Comments
Consolidation data from PivotTable reports
Controls for Form toolbars, Toolbox controls, and ActiveX controls
Data sources for Microsoft Business Solutions, Windows SharePoint Services lists, SQL Server, and external data ranges and tables linked to Windows SharePoint Services lists
Data validation
Digital signatures
Displayed formulas
External references to linked workbooks
Images and objects that are linked or embedded
Ink features
Legacy macro languages such as Microsoft Excel 4.0 Macro Functions and Microsoft 5.0 dialog sheets
OLE and DDE links
Queries, either text or web
Security and Privacy
Shared workbooks
Visual Basic for Applications (VBA) code, macros, add-ins, and user-defined functions (UDFs)
XML maps and embedded smart tags
Workbooks that contain unsupported features will not load or display in Excel Services properly. You will need to use the Excel Services command to save your workbook in Excel Services.
Another Excel Services feature allows you to expand or collapse data details in a PivotTable report. You can also choose different views of your workbook data. On the Excel Web Access Web Part, click the Open button to display the menu, click View, and then click either Worksheet view or Named Item view.
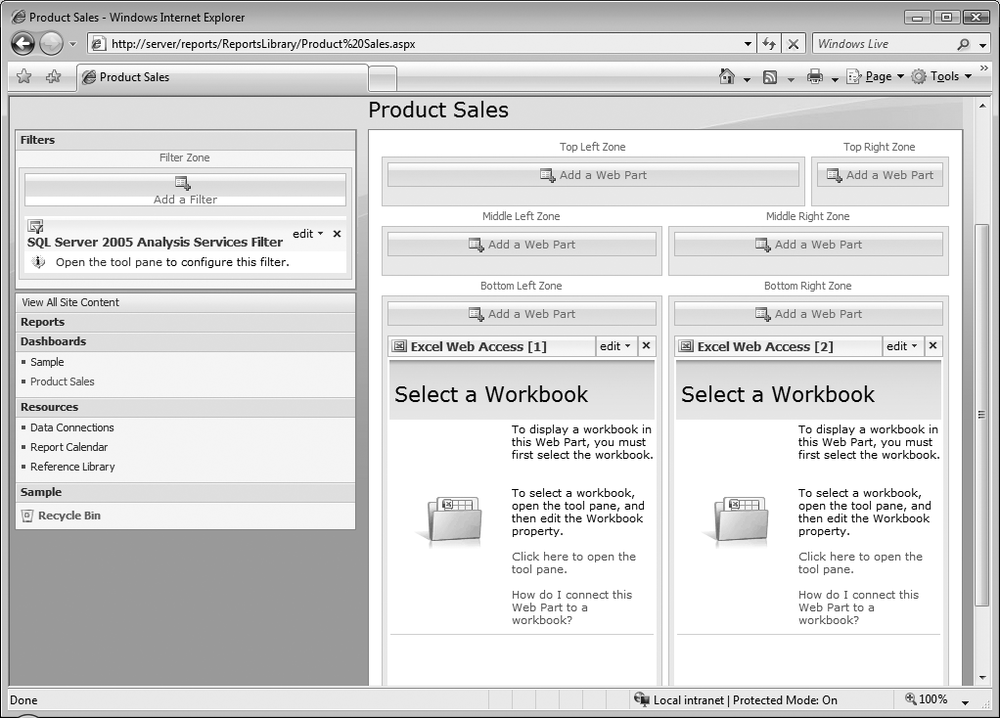
One of the real strengths of SharePoint is the ability to view and manage information without having to leave SharePoint or open the document source directly. The Excel Web Access Web Part allows you to see and manipulate Excel Workbook data without actually opening Excel or even having Office Excel 2007 installed on your local computer. An example of a page showing Web Access Web Parts in a Web Part page can be seen in Figure 18-1.
Warning
Verify that Excel Calculation Services is running by going to Central Administration. If the service is stopped, you will be unable to perform the following exercises.
Tip
See Chapter 8 for more information on Web Parts and Web Part pages.
Prior to publishing an Excel workbook in SharePoint, you (or your SharePoint administrator) must set up a trusted file location for your workbooks within the Shared Service Provider (SSP):
Open SharePoint Central Administration.
In the Quick Launch menu to the left, under Shared Services Administration, click the relevant SSP to open it.
Under Excel Services Settings, click Trusted File Locations, and select Add Trusted File Location from the list.
When the Excel Services Add Trusted File Location page opens, as in Figure 18-2, in the Location section under Address, type or paste the path or URL in the available field.
Just beneath the address field, click either the UNC or HTTP radio button to select the link type.
Under Trust Children, if you want child libraries to the Excel document library to be trusted, click the Children Trusted checkbox.
Type a brief description of the function of the trusted location in the Description field.
In the Session Management section under Session Timeout, type the maximum time in seconds that an Excel Calculation Services session can remain open and inactive before it is shut down.
Under Short Session Timeout, type the maximum time in seconds that an Excel Web Access session can remain open and inactive, prior to any user interaction, before it is shut down.
Under Maximum Request Duration, type the maximum duration in seconds of a single request in a session.
In the Workbook Properties section under Maximum Workbook Size, type the maximum size in MB of a workbook that can be opened by Excel Calculation Services.
Under Maximum Chart Size, type the maximum size in MB of a chart that can be opened by Excel Calculation Services.
In the Calculation Behavior section under Volatile Function Cache Lifetime, type the maximum time in seconds that a computed value for a volatile function is cached for automatic recalculations.
Under Workbook Calculation Mode, select the calculation mode option of workbooks in Excel Calculation Services. The options are:
File
Manual
Automatic
Automatic except data tables
In the External Data section under Allow External Data, select the location from which data connections from external sources are made.
Under “Warn on Refresh,” check the “Refresh warning enabled” checkbox if you wish to see a warning before refreshing external data for files from the previously indicated location.
Under “Stop When Refresh on Open Fails,” click the “Stopping open enabled” checkbox if you want to stop the open operation on a file in this location if the file contains a “Refresh on Open” data connection and the file cannot be refreshed while it is opening.
Under External Data Cache Lifetime, type the maximum time in seconds that the system can use external data query results in both the Automatic refresh (periodic/on-open) and Manual refresh fields.
In the Maximum Concurrent Queries Per Session field, type in the maximum number of external data queries that can execute concurrently in a single session.
In the User-Defined Functions session under Allow User-Defined Functions, check the “User-defined functions allowed” checkbox if you want to allow user-defined functions to be called from workbooks in this trusted location.
Click OK to finish.

Tip
The instruction in step 2 to click on “SharedServices1 (Default name)” assumes you are working with MOSS 2007 in a standalone server installation rather than on a server farm.
The Trusted File Location is created, as shown in Figure 18-3.

Before you can view an Excel workbook in an Excel Web Access Web Part, you must first publish the workbook to a SharePoint document library:
In the open Excel workbook, click the Microsoft Office button, as shown in the upper-lefthand corner of Figure 18-4.
From the list, click Publish, and then click Excel Services to send the workbook to the document library, as seen in Figure 18-5.
When the Save As dialog box appears, click the Excel Services Options button, and on the Show tab, select any item in the workbook you want to make available in the Web Access Web Part by clicking the desired checkboxes next to the item names.
Click the Parameters tab, and add any named ranges you want people viewing your workbook in Excel Services to be able to modify by clicking the Add button.
When you are finished with the dialog box, click OK.
In the Save As dialog box, browse to the path of the document library.
Click the Save button to publish the Excel workbook to the trusted document library, as in Figure 18-6.


Once an Excel Web Access Web Part is added to the appropriate Web Part page and the Web Part is linked to the Excel document, you can view the Excel workbook in the Web Access Web Part, as in Figure 18-7.
Despite the fact that you can work with spreadsheet data in SharePoint without using Office Excel 2007, there are times when you will want to save that information to your local computer. The following are methods and reasons for working with Excel Services data on your computer rather than inside SharePoint. The exercises in this section require Office Excel 2007 to be installed on your local computer.

You can save Excel Services spreadsheet data to your local computer either as a workbook or a snapshot, depending on the features you need. The reasons for saving the data as a workbook are as follows:
You can use the print features in Office Excel 2007, which are not available in SharePoint Excel Services.
You can modify the values in cells and formulas to calculate new results.
You can add or remove calculated columns in Excel tables and view different subtotals.
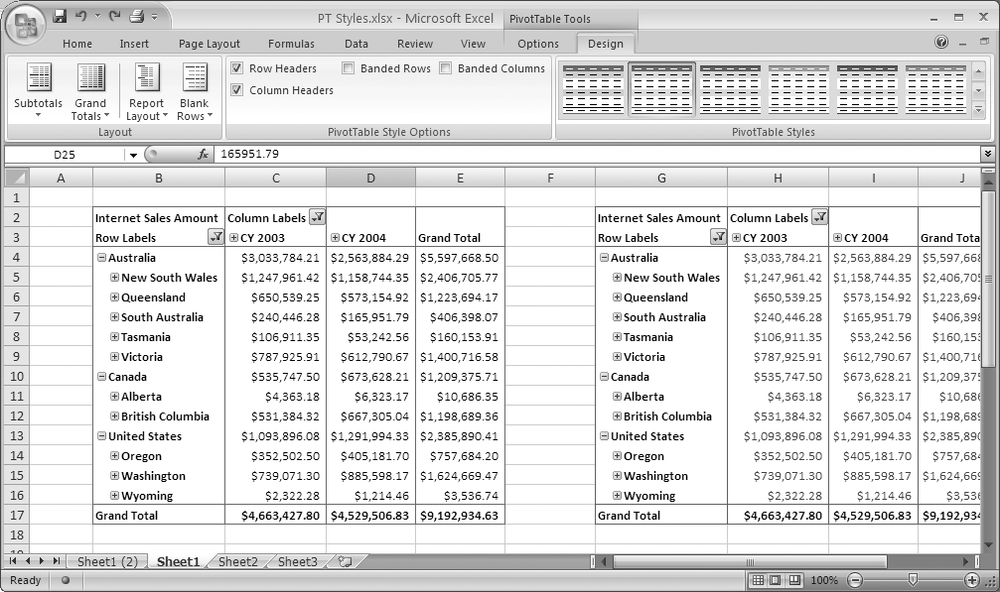
You can add or update charts, including PivotTable and PivotChart reports, as you can see in Figure 18-8.
You can use What-if analysis tools.
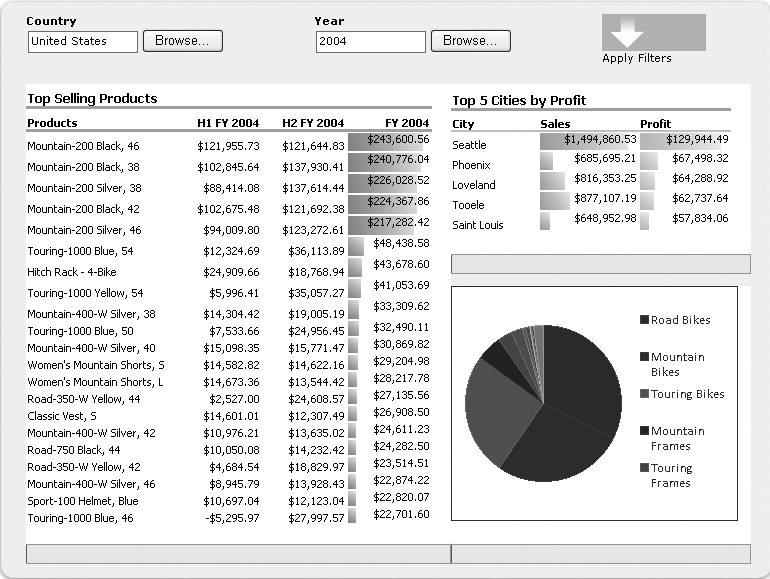
Figure 18-9 shows a Dashboard with Excel workbooks displayed using the Excel Web Access Web Parts.
A snapshot is a restricted view of a workbook with only some of the spreadsheet information saved to your local computer. The rationale for using a snapshot over a workbook is that only the values within each cell are made available to end users; they are unable to see any of the formulas. Table 18-1 outlines what is and isn’t saved to your hard drive when you use a snapshot.

On the Web Part page containing the desired Excel Web Access Web Part, click the Open arrow to display the menu.
To open an Excel Workbook, select Open in Excel, as in Figure 18-10.
To open an Excel Snapshot, select “Open snapshot in Excel.”
You can use different methods to print some or all of the spreadsheet data in a workbook.
This is a “quick and dirty” way to print information displayed in an Excel Web Access Web Part. The printed hard copy will include only the information currently displayed in your web browser. Any other information that you must scroll to view or that is on any other pages in the workbook will not be printed:
With the appropriate Web Part page open in your browser, go to the Web Access Web Part, and in the context menu that appears when you mouse over the workbook name, select “View in Web Browser.”
When the workbook opens in the Web Part, navigate to the desired workbook page and area and then click File in the web browser’s toolbar at the top.
To modify the page you want to print, select Page Setup in the File menu.
Tip
You can also click on Page Layout on the ribbon in Excel, as in Figure 18-11.
To modify the page’s orientation, click the Layout tab and select either Portrait or Landscape.
Tip
This option is also available on the Page Layout ribbon, as in Figure 18-12.
To preview what this page will look like when printed, click Print Preview.
Click OK to close the dialog box, and then click File → Print to print the document.
If after viewing an Excel worksheet in Page Layout view you want to return to the Normal view, click the View tab on the ribbon and click Normal, as seen in Figure 18-13.
Printing from a workbook versus a snapshot is a matter of which data is available in each format. The information in the “Working with Excel Web Access Data in Office Excel 2007” section earlier in this chapter outlines what is and isn’t present in workbooks and snapshots. A saved snapshot or workbook can be printed in the same way you print an ordinary Excel workbook, as seen in Figure 18-14.

If you don’t need to configure any of the options in the exercise “Printing a Saved Excel Workbook or Snapshot,” you can print your document without using the Print dialog box. This method is quick and easy; however, be sure that the current print settings are what you want. If they aren’t, you could end up with a printout you don’t really want:
Open the saved workbook or snapshot in Excel 2007.
Click the Microsoft Office button, click Print, and then click Quick Print.


You can use this method to modify how Excel Web Access information is displayed. For instance, when you publish a workbook to Excel Services, you can select the specific Named Items you want to be seen in the Web Access Web Part. Once you’ve added that Web Part to a Web Part page and configured it to display your workbook, you can create a List View Web Part and add the Named Items to the list. When you add the List View Web Part to a Web Part page, it will display the Named Items as separate items in the list. Anyone clicking an item on the list will see only the information contained in the individual Named Item from the workbook.

Tip
See Chapter 14 for more information about lists and list Web Parts.
On the desired Web Part page, click Site Actions and select Edit Page from the menu.
At the Excel Web Access Web Part, click the Edit list button, click Connections, and then select Get Workbook URL From.
Browse to the desired List View Web Part and select it.
In the Configure Connection dialog box, select Document URL from the Field Name listbox, and then click Finish.
Click Exit Edit Mode to return to the standard view of the Web Part page.
On the desired Web Part page, click Site Actions and select Edit Page from the menu.
At the opening screen of Excel Web Access Web Part, click the link “Click here” to open the tool pane.
In the tool pane, type or paste either the URL or UNC of the desired workbook in the Workbook text box, and then click OK.
At the Excel Web Access Web Part, click on the “Edit list” button, click Connections, and then select Get Named Item From on the list.
Browse to the desired List View Web Part and select it.
In the Configure Connection dialog box, select Title from the Field Name list-box, and then click Finish.
Click Exit Edit Mode to return to the standard view of the Web Part page.
Microsoft Office Excel 2007 allows you to specify different calculation formulas in a workbook. Once you set up a formula in a workbook and publish it to SharePoint’s Excel Services, your Excel calculation setting is supported and retained in the workbook. Table 18-2 presents the different calculation formula settings supported in both Office Excel 2007 and SharePoint Excel Services 2007.
Table 18-2. Calculation methods in Excel and Excel Services
|
Calculation method |
Office Excel 2007 and SharePoint Excel Services 2007 |
|---|---|
|
Manual workbook calculation |
You must manually initiate the calculation by issuing a toolbar or keyboard command. |
|
Manual worksheet calculation |
You must manually initiate the calculation by issuing a toolbar or keyboard command. |
|
Automatic calculation |
Your workbook is automatically recalculated whenever you change the formula or a cell referencing the formula |
|
Automatic except tables |
Your workbook is automatically recalculated whenever you change the formula or a cell referencing the formula, except for any formulas and referenced cells that were created by an Excel Data Table as part of the What-if analysis suite of commands. |
|
Recalculate Before Save |
When you save the workbook, it is automatically recalculated and then saved. |
Tip
If you want to always be able to see when the workbook was last calculated, you can add the following in one of the cells contained in this formula:
="Last calculated at: "& TEXT(NOW(),"m/d/yyyy h:mm")
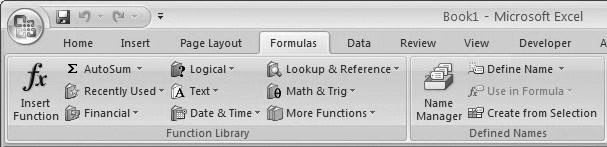
An example of Excel’s Formulas ribbon can be seen in Figure 18-15.
Tip
The following exercise can be performed either with data in an Excel Web Access Web Part or when the workbook is being displayed in Web Browser view.
On the appropriate Web Part page, open the workbook in the Excel Web Access Web Part.
On the Web Part’s toolbar, click the Update menu, and then click Calculate Workbook.
Repeat step 2 to perform a recalculation.
In addition to performing calculations, you can also find values in
spreadsheet data, such as dates, numbers, and text. As in other Microsoft Office
Find operations, the value you input is case-insensitive, so “find” is the same
as “FIND.” Also, cells may display a value such as (123) to indicate an underlying value of (–123). To find the cells, you must input the underlying value,
not the value viewed in the cell. For example, in a column where the data has
been formatted for accounting, negative numbers appear as positive numbers
wrapped in parentheses. To find all cells with a deficit greater than 1,000, you
would search for –1000 rather than (1000).
Warning
If the Find button is not on the Excel Web Access Web Part toolbar, the site owner or administrator may have configured Excel Services toolbar properties to not display Find.
On the appropriate Web Part page, open the workbook in the Excel Web Access Web Part.
On the Web Part’s toolbar, click the Find button to launch the Find dialog box.
Click either Up or Down to set the direction Find progresses from the active cell.
Type or paste the value you want to find in the “Find what” field.
Tip
The Excel Services Find function supports the use of wildcard characters such as “*” and “?”. To find special characters such as asterisks, question marks, and tildes contained in workbook cells, you must first insert a tilde (
~) character before adding the character you are trying to locate. For instance, if you want to find an asterisk in a workbook cell, you would type ~* in the “Find what” field.Click Find Next to begin the find process, and click Find Next again to continue progressing through the workbook.