In the previous chapters, you had the opportunity to read about some of the new features available in Microsoft Office SharePoint Server (MOSS) 2007, as well as how it has changed from SharePoint Portal Server 2003. At this point, you are probably eager to jump right in and get started with this exciting new product. This chapter provides an in-depth look at the installation process, ensuring that you are able to get MOSS up and running quickly and easily. It defines preinstallation tasks and prerequisites and then walks you through a single-server installation. If you are interested or ready to expand your deployment to more than one server, make sure to read Chapter 4.
Setting up a single MOSS server is a great way to expose yourself and your organization to this powerful application, and can provide many benefits:
If you are a developer creating Web Parts or applications that you want to integrate into MOSS, a single server acts as an excellent test environment.
If you are an IT professional looking to become acquainted with MOSS, you can bring up the single server to “play around with” without the fear of blowing anything up.
If you are an executive who needs to be convinced of MOSS’s value, then your IT staff can deploy a single server as a proof of concept. A representative subset of your user population can work with this proof of concept and provide feedback to you on whether MOSS brings enough value to the organization to warrant a full-blown implementation.
If you are a trainer and need to establish individual work environments for the students in your class, a single server is a great way to provide students with a hands-on experience.
If you have a limited IT budget but a strong need for MOSS, start with a single server and then expand as your budget allows.
Before you grab your MOSS 2007 CD or download and run the installer, there are a number of items you must consider:
The following sections discuss each of these points in more detail, ensuring that you have the necessary knowledge to move forward and enjoy a successful installation.
Tip
The following licensing information is for guidance only. You should consult with your local Microsoft licensing specialist to obtain the latest and most appropriate licensing information for your individual situation.
Unlike its predecessor, MOSS 2007 comes in two versions, Standard and Enterprise, which vary significantly in the feature sets offered. When you install MOSS, the only difference between the two versions during the process is the product key that you specify. You can always install the Standard version and upgrade at a later date by entering an Enterprise Edition product key (once you purchase Enterprise Edition client access licenses for all of your users), but you cannot downgrade from Enterprise Edition to Standard Edition.
It can sometimes be difficult to determine exactly which licenses you need. Currently, in order to properly license MOSS 2007 from Microsoft, you must purchase both the server licenses and the individual client access licenses, or CALs. This means that for every MOSS 2007 server you bring online, you must have a valid server license, and for each client accessing MOSS, a client access license must be purchased.
There is only one license type for each MOSS server, whereas the client access licenses come in both Standard and Enterprise Editions, and are additive. This means that you must purchase a Standard Edition license for each client utilizing MOSS, and if you would like to utilize the features included in the Enterprise Edition, you must then purchase an Enterprise CAL for each of those users as well. In the end, this means that each of your users must be licensed for both a Standard CAL and an Enterprise CAL; you cannot have a mix of users, some with just Standard CALs and others with both CALs—all users must have either Standard or Standard plus Enterprise.
When purchasing the individual CALs (no matter which version you are purchasing at the time), you should note that they are offered as both User CALs and Device CALs.
User CALs are assigned to individual users accessing MOSS and license all of the user’s connections to MOSS (laptop, desktop, PDA, etc.). Device CALs are assigned to the individual devices that connect to MOSS, and do not have any regard for the number of users accessing that particular licensed device. An example of an organization that would purchase Device CALs instead of User CALs is one that has a set number of computers that multiple shifts of employees utilize. For example, if an organization has 300 employees but only 100 desktop computers that can be used to access MOSS at any given time, the Device CAL would be more cost-effective, since 100 Device CALs need to be purchased instead of 300 User CALs.
MOSS 2007 has become much more extranet- and intranet-friendly, and is easier than ever to expose to the Internet and external users who may or may not be employees. Because of this, Microsoft offers a MOSS 2007 for Internet Sites server license, which allows you to have an unlimited number of external (non-employee) users connected to a MOSS server and utilizing the Enterprise Edition features. This license is purchased for each MOSS server, and is only to be used to collaborate on information that is not exclusively for internal use. For example, this license is useful for allowing clients access to an extranet site where they can monitor the progress of projects within your organization and communicate with the team. However, this license cannot be used for allowing your employees access to intranet-based resources.
A common point of confusion with SharePoint licensing is with SQL Server. If your deployment utilizes any version of SQL Server (other than SQL Express) as the backend database system, then for each user accessing SharePoint, you must also have an appropriate SQL Server client access license. If you have a large number of MOSS users, you should look at licensing SQL on a per-processor basis. This type of license allows you to host an unlimited number of SQL users on a server. The only difference is that you must own one of these SQL licenses per physical processor on your server.
Finally, you must also keep in mind that you need to properly license Windows Server 2003, including licenses for clients. Windows Server clients can be licensed via individual CALs or an External Connector. This licensing is outside the scope of this chapter, so please check with your licensing specialist for additional details.
Tip
You will probably hear about Microsoft Office SharePoint Server 2007 for Search and Microsoft Forms Server 2007. These are two separate licenses offered by Microsoft to organizations that would like to utilize the power of SharePoint’s search engine and/or InfoPath forms that are web-enabled, without actually implementing the entire MOSS 2007 product.
As mentioned in the previous section, MOSS 2007 comes in both Standard and Enterprise Editions. Based on the needs of your organization, you can choose to implement Standard Edition and upgrade to Enterprise Edition at a later time, or immediately implement Enterprise Edition with all of its additional features. Although there are many small differences between the two editions, the following are the significant features included in Enterprise Edition but not in Standard Edition:
- Excel Services
This feature provides access to Excel spreadsheets through a web browser and offloads the calculations to the server. It makes only specific areas of the spreadsheet visible to users, and ensures that there is “one version of the truth,” since only specified users can modify the underlying data. For more information, see Chapter 15.
- Report Center
This is a site provided out of the box that has been designed to simplify the management of reports and data connections. For more information, see Chapter 15.
- Business Data Catalog
This feature is a simplified way to bring data from external sources into SharePoint without costly custom development. With it, users do not need to access multiple systems to view the data they need—it is all available from one common interface provided by MOSS. For more information, see Chapter 28.
- Business Data Search
This feature allows users to search data that has been stored in separate systems exposed through MOSS (such as those connected via the Business Data Catalog). For more information, see Chapter 27.
- Forms Services
You can create forms within Microsoft Office InfoPath 2007 and publish them to SharePoint using Forms Services, allowing users without the InfoPath client to complete forms entirely through their web browsers. For more information, see Chapter 20.
It is recommended that you take some time to familiarize yourself with each of these features in-depth. If you are in the process of preparing your budget for a MOSS project, and you think you might need one or more of the Enterprise Edition features, it would be wise to include the necessary CALs in your budget calculations. You do not want to be caught in a situation where you have implemented Standard Edition and management requests a feature available only in the Enterprise Edition, but you have no budget left for the appropriate licensing.
It is often difficult to determine exactly which hardware is needed to perform the task at hand, especially with a product such as MOSS. Take a moment to consider some of the different functions a user could perform:
Browsing the site and downloading documents
Uploading documents and starting workflow processes
Completing online forms
Publishing or reviewing Excel spreadsheets
Retrieving data in separate systems using the Business Data Catalog
Searching across the entire enterprise for specific data
Running reports and aggregating data
In addition, you need a solid idea of the number of users who will be performing the different functions, along with the amount of data that is going to be stored within MOSS. From a simplified single-server, “get up and running quick” perspective, Microsoft specifies the hardware requirements listed in Table 3-1.
Table 3-1. Minimum requirements for installing a single-server instance of MOSS
|
Component |
Minimum Requirement |
|---|---|
|
Processor |
Single processor, 2.5GHz |
|
Memory |
1 GB |
|
Hard drive |
3 GB of free space |
|
Display |
1,024 × 768 resolution |
|
Operating system |
Windows Server 2003 |
|
Network |
56 Kbps between clients and server |
It is recommended that you review Microsoft’s "Plan for performance and capacity” article on TechNet, available at http://technet2.microsoft.com/Office/en-us/library/8dd52916-f77d-4444-b593-1f7d6f330e5f1033.mspx?mfr=true. This site will provide you with all of the information you need to purchase the appropriate hardware and scale as necessary for the additional MOSS components.
For the purpose of this chapter, we only concern ourselves only with the minimum requirements as specified in Table 3-1. In addition, it should be noted that MOSS 2007 can run in a virtualized environment: specifically, on a Windows Server 2003 that is virtualized using an application such as Microsoft’s Virtual PC.
This section explains the software prerequisites.
MOSS 2007 has made significant advances over SharePoint Portal Server 2003 in supporting a larger number of web browsers. Microsoft now supports two “levels” of browsers, with level 1 browsers providing users with full functionality, and level 2 browsers providing limited functionality. Microsoft states:
Level 2 Web browsers provide basic functionality, so that users can both read and write in SharePoint sites and perform site administration. However, because ActiveX controls are supported only in level 1 browsers and due to the functionality differences within different browsers, a different user experience might be provided and there could be some variances from the user experience from the level 1 browsers.
Level 1 browsers include:
Level 2 browsers include:
Any browsers not listed are not officially supported. However, many members of the SharePoint community have created workarounds that support other browser versions and types. Also, Microsoft occasionally releases updates that support new browser versions.
In addition to browser support, clients should have access to an email address and Microsoft Office 2007. Microsoft Office 2007 provides additional features over Office 2003 with MOSS, such as:
The ability to publish spreadsheets to Excel Services
The ability to publish forms to Forms Services
Integration of PowerPoint presentations with the slide library
Two-way synchronization of lists and libraries in SharePoint with Outlook 2007
Integration with Microsoft Office Groove for decentralized and offline collaboration
Although the latest version of Office is not required for using MOSS, if the features just listed are desired, Office 2007 is required.
Finally, if you are interested in the ability to modify your MOSS sites through a WYSIWYG editor such as FrontPage, you will need to purchase SharePoint Designer. SharePoint Designer is a new Microsoft product offering that replaces Microsoft FrontPage, specifically for editing MOSS sites and pages. Designer allows you to build custom workflows, modify master pages, and build ASP.NET pages, all from a simplified user interface.
Once you have ensured that your clients can utilize MOSS, you need to make sure that the server on which you want to install MOSS can support it. The following outlines the server-side software requirements, some of which will be discussed in detail in the step-by-step installation instructions.
MOSS 2007 can be installed on the following operating systems:
Windows Server 2003, Standard Edition
Windows Server 2003, Enterprise Edition
Windows Server 2003, Datacenter Edition
Windows Server 2003, Web Edition
Tip
If you are installing MOSS as a single-server deployment on Windows Server 2003, Web Edition, then you can utilize only SQL Server 2005 Express Edition or SQL Server 2000 Desktop Engine (MSDE).
Once the operating system is installed, Internet Information Services (IIS 6.0) must be installed, including the following components:
Finally, you must make sure that Microsoft .NET Framework version 3.0 is installed as well, with ASP.NET 2.0 enabled.
MOSS does not require any database engine to be preinstalled. If SQL is not installed within your environment for use by MOSS, then MOSS will install an instance of SQL Server Express Edition, where all of its data will then be stored. However, if you prefer to use a licensed version of SQL, MOSS supports the following:
SQL Server 2000 with SP3a or later
SQL Server 2005 with SP1 or later
The following steps and associated screenshots will walk you through the process of getting Microsoft Office SharePoint Server 2007 up and running within your environment, using SQL Server 2005 Express Edition as the database engine. By following these instructions, you will be able to quickly begin working with the powerful features of MOSS. While following along, you should be logged into the server as a user with local administrator privileges.
The first thing you must do is install IIS 6.0:
Click on the Start menu, select Control Panel, and then select “Add or Remove Programs.”
On the lefthand side of the window, select Add/Remove Windows Components.
Click to add a checkmark next to Application Server.
Then, double-click Application Server and ensure that the following components are checked:
Application Server Console
Enable Network COM+ Access
SMTP Service
Internet Information Services (IIS)
Next, double-click Internet Information Services and make sure the following components are checked:
Common Files
Internet Information Services Manager
World Wide Web Service
Make sure that FrontPage 2002 Server Extensions are not checked!
Double-click World Wide Web Service and make sure that the World Wide Web Service is checked.
Click OK three times and then click Next. The IIS components will then install. Note that you may be prompted to provide the Windows Server installation CD, so be prepared.
Next, you must install the .NET Framework 3.0:
Download the Microsoft .NET Framework 3.0 Redistributable Package from the Microsoft web site at http://go.microsoft.com/fwlink/?LinkID=72322&clcid=0x409.
Once you have reviewed and accepted the license agreement, click Install.
The installer will then need to connect to the Internet and download a number of files totaling approximately 54 megabytes. The installer will run in your taskbar and stay hidden until it is done; however, you can click on the icon at any point to check the status.
Once the necessary files have been downloaded, the installation will commence. Upon completion, you should be presented with the screen shown in Figure 3-1.

Once the .NET Framework 3.0 has been successfully installed, you need to enable ASP.NET 2.0 within IIS:
Click Start, select All Programs, and then select Administrative Tools and Internet Information Services Manager.
Click the plus sign next to the server name to expand the view.
Select Web Server Extensions.
In the righthand window pane shown in Figure 3-2, highlight ASP.NET v2.0. 50727 (or the latest 2.0 build of ASP.NET) and then click the Allow button. The status will change from Prohibited to Allowed.
Exit from IIS.

It is now time to install Microsoft Office SharePoint Server 2007:
If you are installing from a CD, insert the CD and then selectsetup.exe. If you have downloaded MOSS, run theOfficeServer.exe executable by double-clicking it.
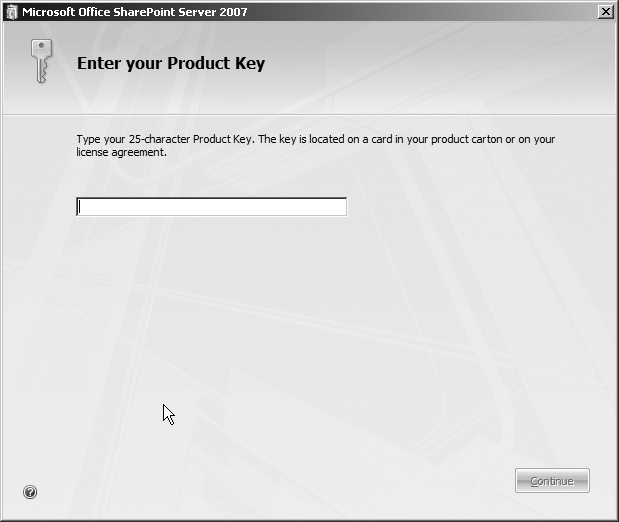
The installer will begin, and you will be immediately prompted to enter your license key (Figure 3-3). Depending on the version you purchased, input either the Enterprise or Standard Edition license key in the space provided. If you have entered the proper key, a green checkmark will appear next to the key. Click Continue.
On the next screen, you must review and accept the Microsoft Software License Terms. Do so by checking the box next to “I accept the terms of this agreement” and then click Continue.
You are now provided with the opportunity to choose the type of installation you want (Figure 3-4). Choose Advanced. Although you can choose Basic, choosing Advanced allows you to specify an alternate installation location and decide whether you wish to participate in the customer experience program.
If you were to choose Basic, the install would immediately start and MOSS would be installed in the following default locations:
Application files:C:Program FilesMicrosoft Office Servers
Search indexes:C:Program FilesMicrosoft Office Servers12.0Data
On the Server Type tab of the Advanced installation screen, choose “Standalone” (Figure 3-5). This will install SQL Server 2005 Express Edition along with MOSS 2007.
Next, click on the File Location tab (Figure 3-6). Browse to the folders in which you would like to install the MOSS application files and the search indexes. Note that if you plan to index a large amount of content, you should have a large amount of space available on the chosen hard disk.
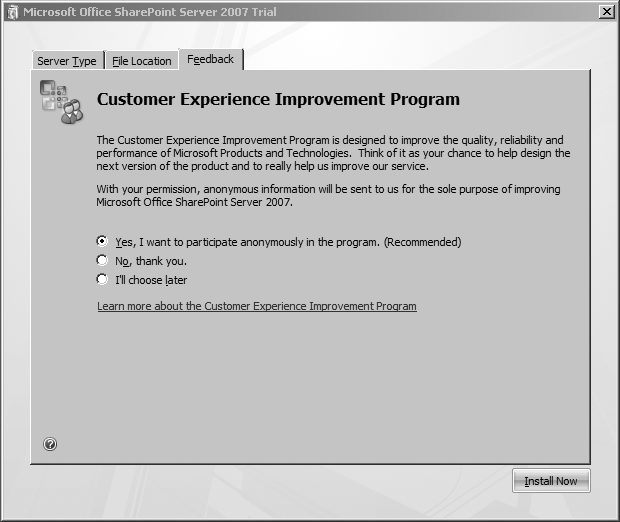
Select the Feedback tab (Figure 3-7). Based on your organization’s privacy preferences, you can choose whether or not to send anonymous feedback to Microsoft.
You are now set to install MOSS. Click the Install Now button to begin.
Once the initial installation is successful, you will then be presented with the screen shown in Figure 3-8. Run the SharePoint Products and Technologies Configuration Wizard by checking the box next to “Run the SharePoint Products and Technologies Configuration Wizard now,” and then click Close.
On the wizard’s welcome screen, click Next.
You will then be presented with a window asking whether IIS, the SharePoint Administration Service, and the SharePoint Timer Service can be started or reset during configuration (Figure 3-9). Click Yes.
The configuration wizard will then take some time to run. As it runs, you will be presented with a status indicator, showing where the process is within the 10 configuration steps. If at any time the wizard encounters a problem and stops functioning, you can check the configuration log located at:
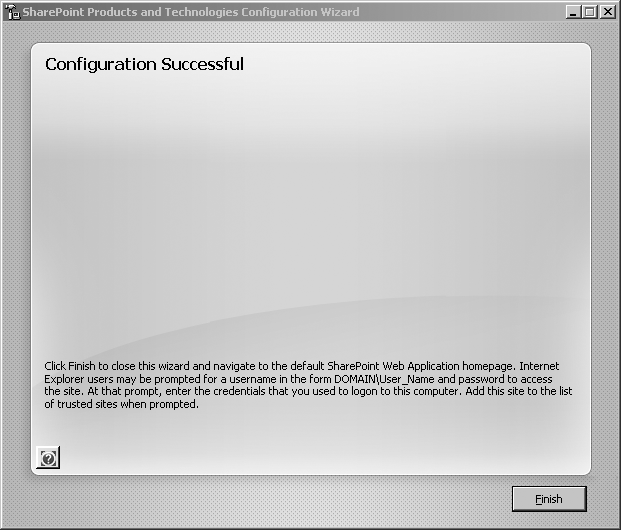
C:Program FilesCommon FilesMicrosoft Sharedweb server extensions12LOGS Once the wizard has completed successfully, you will be presented with the success screen shown in Figure 3-10. Click Finish.
After clicking Finish, a browser window will open and you will be taken to your first MOSS Site, which should look like Figure 3-11. You can explore the site, but then close your browser window. Congratulations—MOSS has been successfully installed!


Now that your site is up and running, you are probably eager to start working with MOSS. However, you must now go through the process of starting and configuring some of the additional MOSS services and features. Luckily, Microsoft has streamlined and simplified this process through an Administrator’s task list.

Click Start, then All Programs, then Microsoft Office Server and SharePoint 3.0 Central Administration.
Your browser will load, and you will be presented with the Central Administration home page, which contains the following areas:
- Administrator Tasks
These tasks have been provided by Microsoft to ensure that you complete the setup of MOSS successfully. It is recommended that you follow these tasks in order. As you complete each task, you will want to delete it from the list. You can do this by clicking on the task name, and then clicking the Delete link in the task detail screen.
- Farm Topology
This area shows all of the servers in your MOSS farm and what services are running on each. Since you have just completed a single server installation, you will see only one server listed, along with all of the services associated to it.
- Resources
This is an area where you can add links to useful resources that assist you with the management of MOSS 2007.
Your screen should appear similar to Figure 3-12.
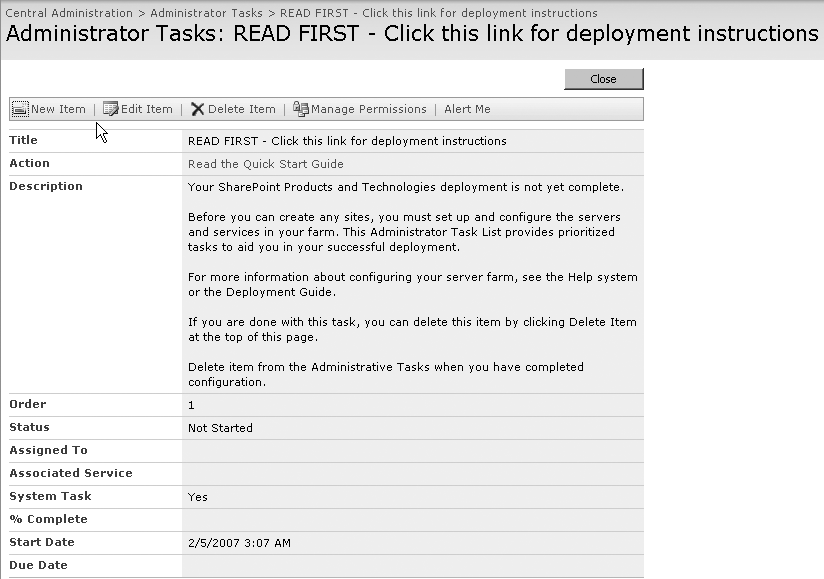
To get started with your additional MOSS configuration steps, click the first task in the Administrator Task list, entitled “READ FIRST–Click this link for deployment information.”
By clicking on the title of the task, you are taken to a details page that contains additional information about the task (Figure 3-13). Once you have read the details and the task has been completed, click the Delete button at the top of the window to remove the task from your list. For each task, you will notice an Actions field. Within this field there will typically be an associated link, which will take you to important instructions or a page associated with completing the action.
For Task 1, click the link under the Action field to “Read the Quick Start Guide.” The guide will load, and it will provide you with a wealth of additional information on how to complete the setup of additional settings. You should read the section entitled “Learn how to deploy Office SharePoint Server 2007 on a single server.” This section details the information you need to configure the following:
Once you have reviewed this information, you should move forward in the list of Administrator Tasks, completing each one until all of them have been completed.
Congratulations! You have now installed and configured Microsoft Office Share Point Server 2007! You are now ready to begin to build out your site.