
MOSS 2007 comes with a number of list templates. You will use different lists for different purposes on your site. You can access all of the lists by clicking on View All Site Contents and going to the Lists section of the page.
The list templates available in MOSS 2007 by default are:
- Announcements
These are used for sharing information with a group, including upcoming events, changes in staff, or other similar data. An Announcements List can contain images, hyperlinks, and formatted text.
- Contacts
These lists hold people, teams, and organizations you work with, your associates, and your customers. If you are using an email or contact management program such as Microsoft Office Outlook 2007, you can create and modify your Outlook contacts from inside of SharePoint.
- Discussion Boards
Discussions are presented as lists and are thus appropriate to mention in this context. See Chapter 11 to learn more.
- Links
These lists contain all of the hyperlinks commonly accessed by your company. You can create a single Links list, and then create different views appropriate for separate teams or departments.
- Calendar
These lists hold the date and time of specific events, such as meetings, presentations, training sessions, and holidays. MOSS 2007 lets you open both your SharePoint and Outlook 2007 Calendars side by side so you can compare and update them together.
- Tasks
These lists are used to assign and track projects for individuals or groups.
- Project Tasks
These lists are similar to Tasks lists, except they provide a visual or Gantt view with progress bars.
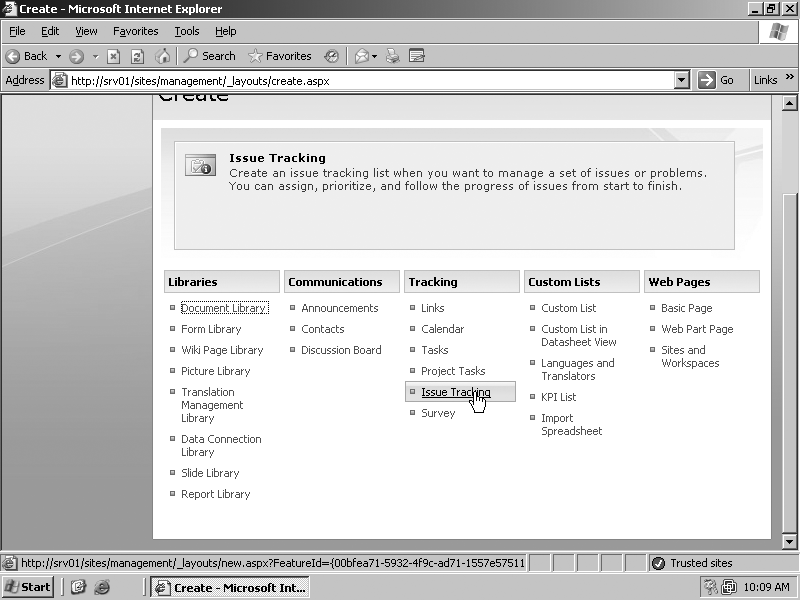
- Issue Tracking
These lists are similar to Tasks lists but track the progression of events such as help desk issues instead of projects.
- Survey
These lists allow you to query people or groups in your organization on a particular subject. For example, you can survey a group of software engineers on the feasibility of adding a new programming language to the list they support.
In addition to preconfigured list templates, you can create a customized list to suit specific needs. The Custom list is actually just another list template like those just mentioned, but its formatting is less complex. Additionally, any of the list templates can be modified to more closely satisfy your goals.
In SharePoint, just about everything is either organized as or displayed in lists. In addition to the default lists, you can create your own customized lists to meet your requirements and even create lists based on Excel spreadsheet data. This section of the chapter shows you the different ways in which you can make and modify lists.
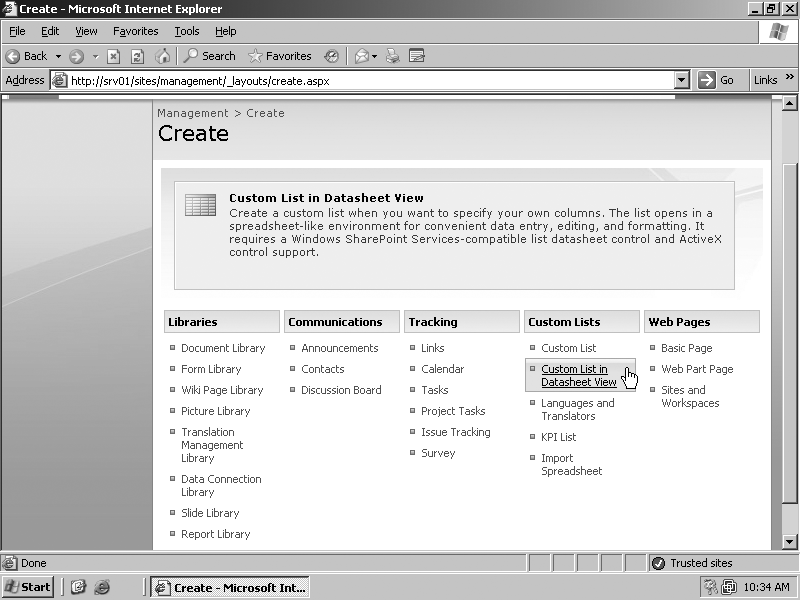
Creating a list from a template is a very similar process to creating a Site or Workspace from a template:
Either click Site Actions and select Create from the menu or click View All Site Content and click Create.
Start creating a list by doing one of the following:
Click a list type under Communications.
Click a list type under Tracking (see Figure 14-1).
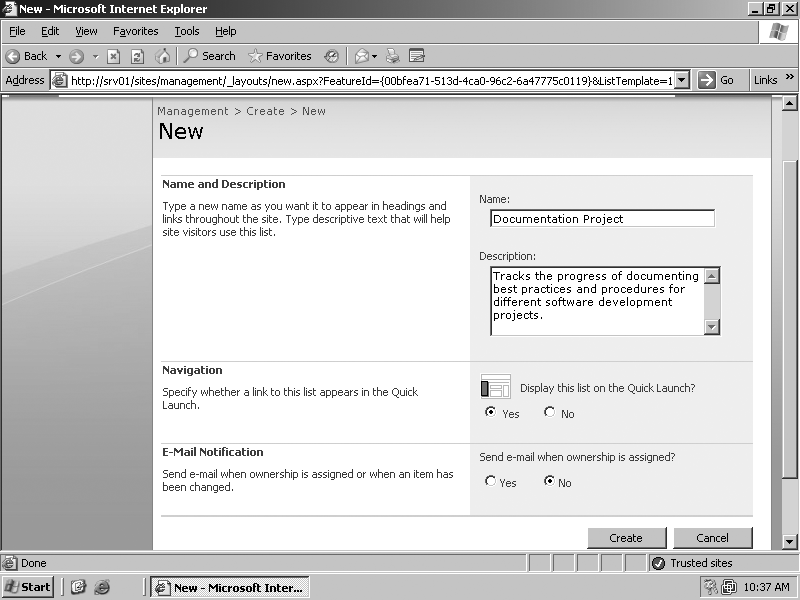
Type the name of your list in the Name field.
Type a brief description of your list in the Description field.
If you want a link to your list placed in Quick Launch, click Yes under Navigation. Remember, you can click on View All Site Content to view all lists.
Tip
For some lists, an Email section will appear. If you want users to send content to the list from their email clients, click Yes under “Enable this list to receive email,” and then add the email address to the list.
For some lists, an Email notification section will appear. If you want to send email notifications from the list when list items are assigned to users, click Yes under “Send email when ownership is assigned?”
Click Create.
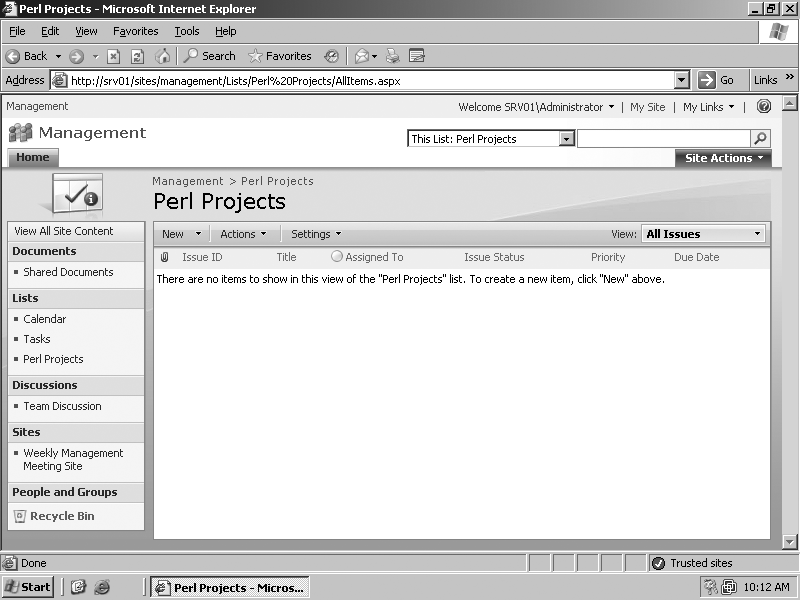
The list created from the template appears, ready to have content added (see Figure 14-2).
When you create a Custom List, by default the list will contain fewer options than a ready-made list. After you create the list, you can configure it by adding different features, such as columns, so that the list functions just the way you want:
Either click Site Actions and select Create from the menu or click View All Site Content and click Create.
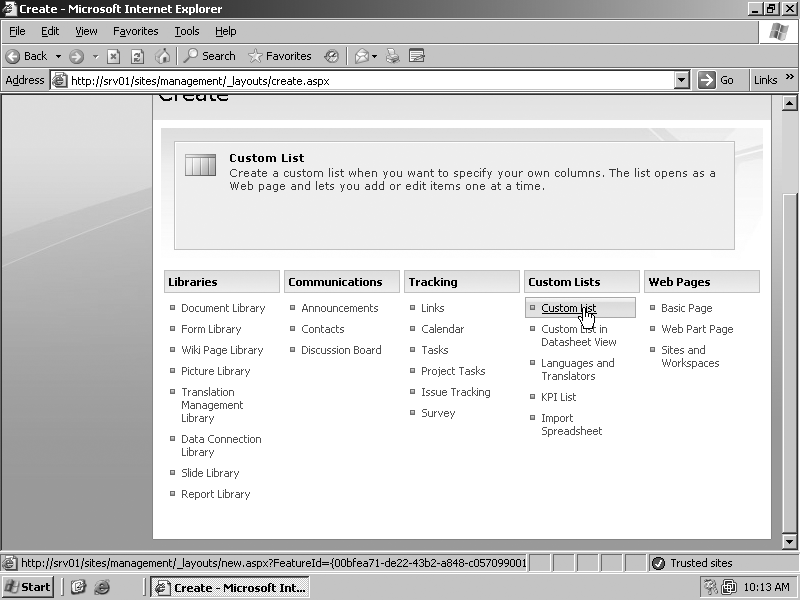
In the Custom List column, click Custom List, as illustrated in Figure 14-3.
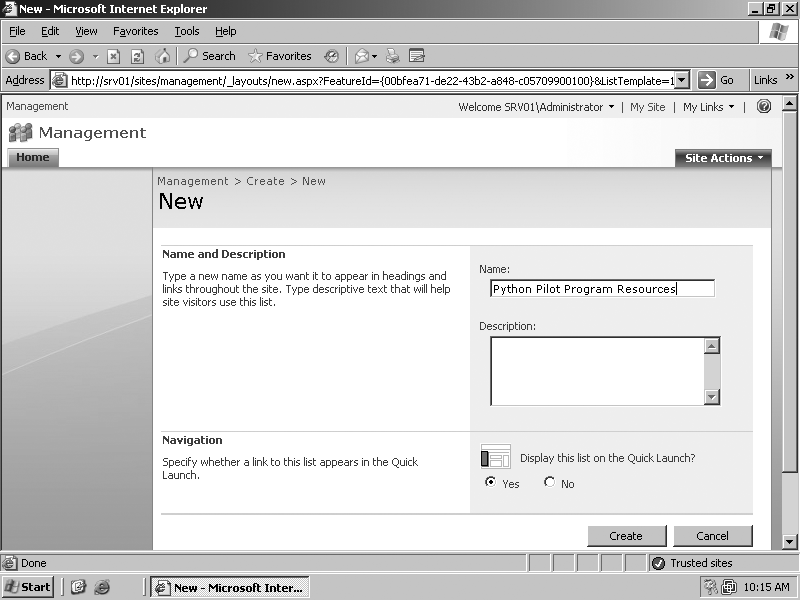
Type the name of your list in the Name field.
Type a brief description of your list in the Description field.
If you want a link to your list placed in Quick Launch, click Yes under Navigation, as seen in Figure 14-4.
Click Create.
You now have a “bare bones” list, ready to be customized to your specifications.
Once the basic Custom List has been created, it’s time to customize it. You can start by adding a column to the list:
Open the list, either by clicking the list’s name in Quick Launch or clicking View All Site Content and then clicking the list’s name.
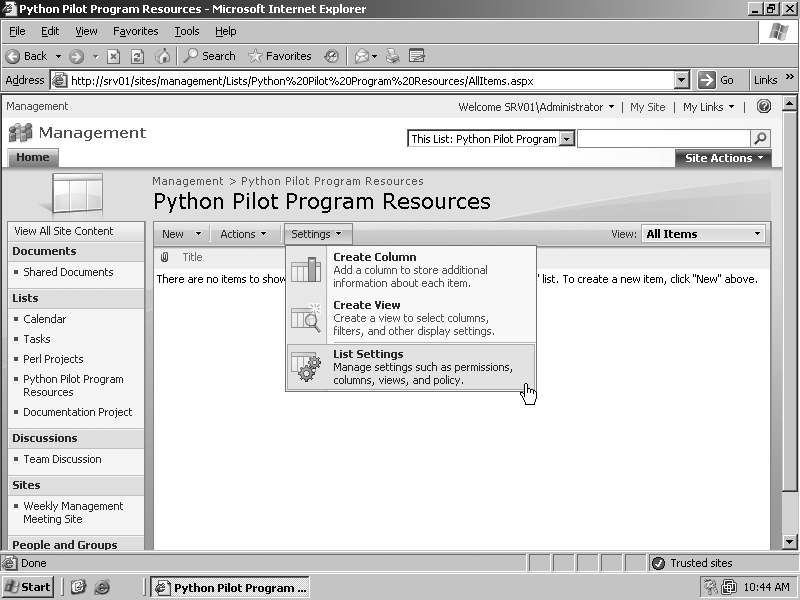
Click Settings and select Create Column from the list, as in Figure 14-5.
Under Name and Type, type the name of the column in the Column name field.
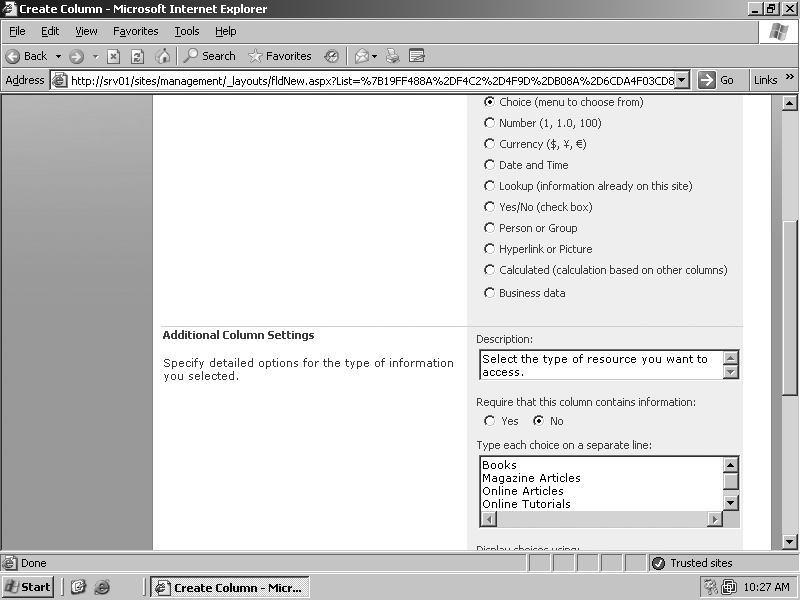
Under “The type of information in this column is,” select the property type for this column. Your choices are:
- Single line of text
Use this option when you want users to enter just a few words in a field.
- Multiple lines of text
Use this option when you want to give users the ability to enter a sentence or two of text.
- Number
This option allows users to enter in a number value.
- Currency
This lets users enter in a monetary value.
- Date and Time
This column type is used to contain calendaring information, such as date, day, and time.
- Lookup
Use this option when you want to link the column to other data in the SharePoint site.
- Choice
This property type allows or requires users to choose between two or more options in the list.
- Yes/No
This option presents the user with an “either/or” selection, such as true/false or zero/one.
- Hyperlink or Picture
This type lets the user either create a hyperlink to another web page or site or display an image through a link.
- Calculated
Use this information type to display a column of calculated values.
Tip
You can see how these column choices appear in Figure 14-6.
Under Additional Column Settings, type a description of the new column in the Description field.
Tip
Depending on the type of column option you chose in step 4, there may be additional selections available in this section. Figure 14-7 shows an example of how a column can be set up.
Click “Add to default view” if you want this column to appear in the default view of the list.
Click OK to add the column to the list. Figure 14-8 shows the result.


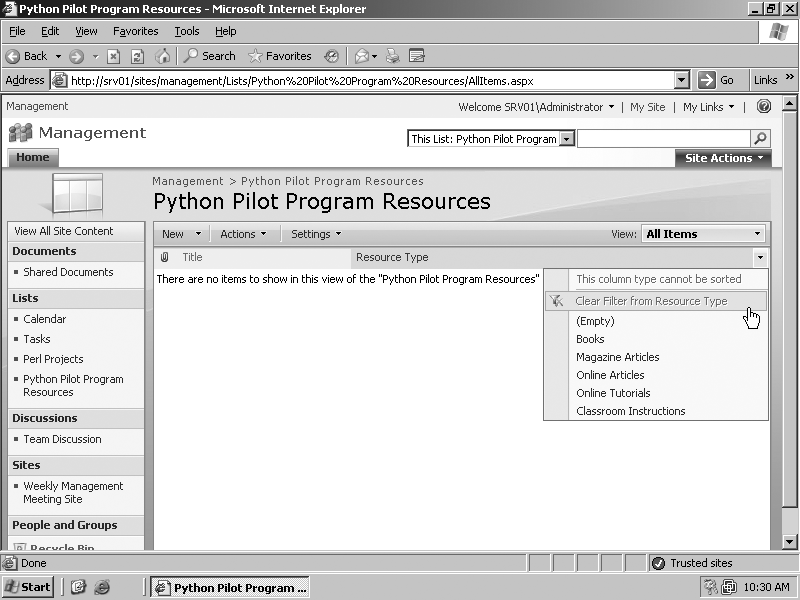
The configuration of certain list columns can be more involved than others. A lookup column is designed to provide a filtered list of data already available on the site. You can retrieve information by looking it up from any part of the site using the “Get information” option from the drop-down menu, as shown in Figure 14-9. Use the “In this column” drop-down menu to select from the following options:
ID
Content Type
Title
Version
Title (linked to item)
Check the “Add to default view” checkbox if you want this column to appear in the default view of this list.
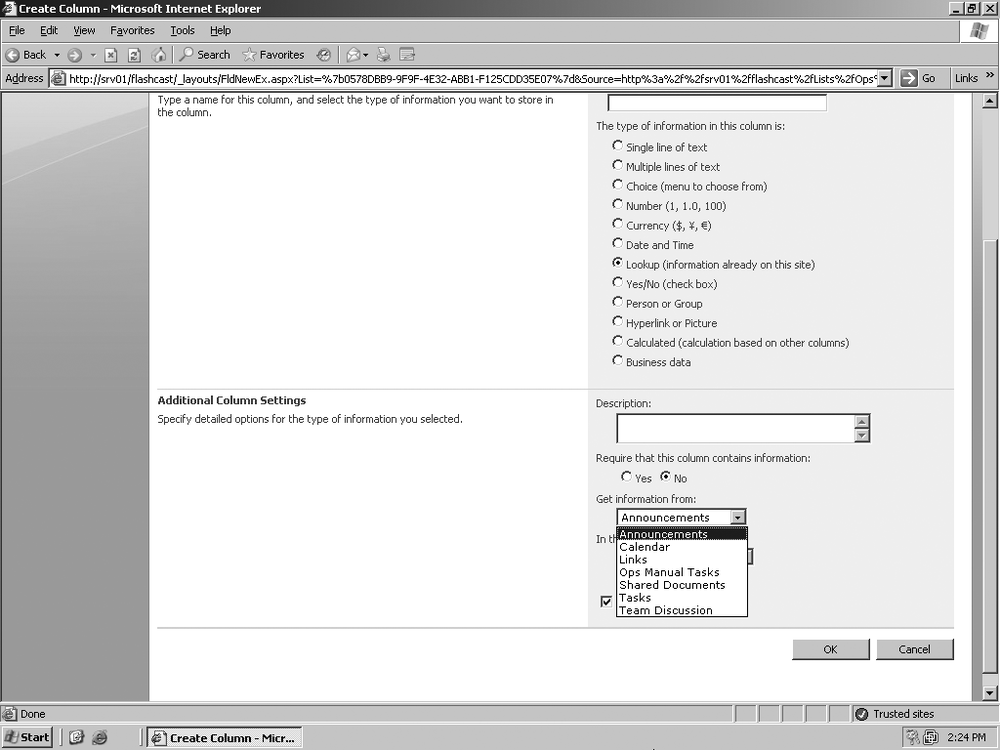
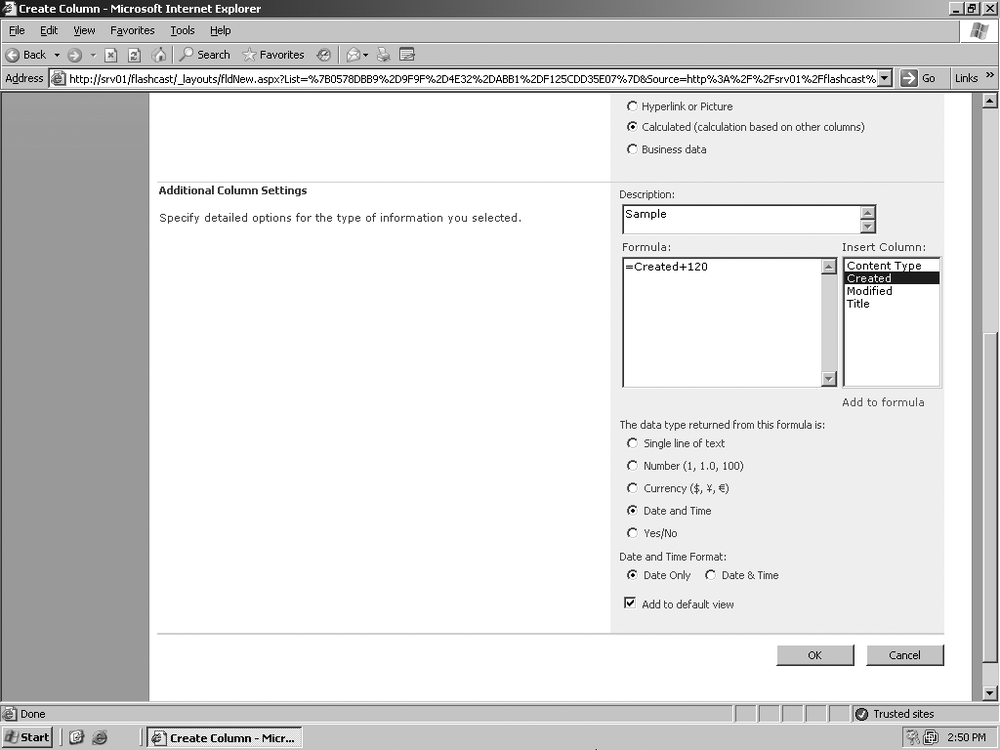
Another column that requires a closer look is the Calculated column. As you can see in Figure 14-9, the key to creating this column is what is input in the Formula field. You can write formulas to calculate a variety of items, from the age of a list item to a list of birthdays occurring this month. It’s also possible to manipulate text using this column.
Writing complicated calculated formulas is beyond the scope of this chapter, but this section presents a simple example:
In the Name and Type area, click the “Calculated (calculation based on other columns)” radio button.
After the page refreshes, type a brief (optional) description of the column in the Description field.
In the Insert Column box, select Created.
In the formula field, type
=Created+180to indicate that this column should provide a list of all list items created more than 180 days ago.Click the Date and Time radio button.
When the page refreshes, under “Date and Time format,” click the Date Only radio button.
If you want the column to be displayed in the default view of this list, check the “Add to default view” checkbox, and then click OK.
These settings are shown in Figure 14-10.
Sometimes the information you want to display in a SharePoint list already exists in spreadsheet format. Rather than reinventing the wheel, you can use the spreadsheet to create a new list. First, though, you need to make sure that all of the information in the spreadsheet is organized the way you want the list to be organized. For example, spreadsheet headings are converted to column names in the list.
Once the spreadsheet data is imported into the list, you can continue to modify the list and add more information. In order to perform this exercise, you must use a spreadsheet program compatible with SharePoint, such as Microsoft Office Excel 2007.
Tip
See Chapter 18 for more information.
Either click Site Actions and select Create from the menu, or click View All Site Content and click Create.
In the Custom Lists column (Figure 14-11), click Import Spreadsheet.
Type the name of your list in the Name field.
Type a brief description of your list in the Description field.
Under “Import from Spreadsheet,” click in the “File location” field, click the Browse button to navigate to the spreadsheet file, and then click Open.
Click Import.
In the “Import to Windows SharePoint Services” list dialog box, type in the range of cells you want to import into your list from the spreadsheet, and then click Import to create the list.
In Chapter 10, you learned how to create and manage a Task List. A Task List is used to keep track of which particular tasks have been assigned to which team members. You can also use the list to track the progress of the task.
A Project Task List is similar, but instead of keeping track of one task assigned to one person, this list manages a collection of tasks related to a particular project. For example, you may have a group of developers working on a project to create a new search application in Perl. You could have individual teams within the group, each managing a part of the project—for example, a Perl language team and a Perl modules team. Rather than scattering individual tasks in the project all over a Tasks List, you can organize them as a series of tasks under a single project:
Either click Site Actions and select Create from the menu, or click View All Site Content and click Create.
Type the name of your list in the Name field.
Type a brief description of your list in the Description field.
If you want a link to your list placed in Quick Launch, click Yes under Navigation. See what this page looks like in Figure 14-12.
Click Create.
Now that the basic list is created, you can add project tasks.
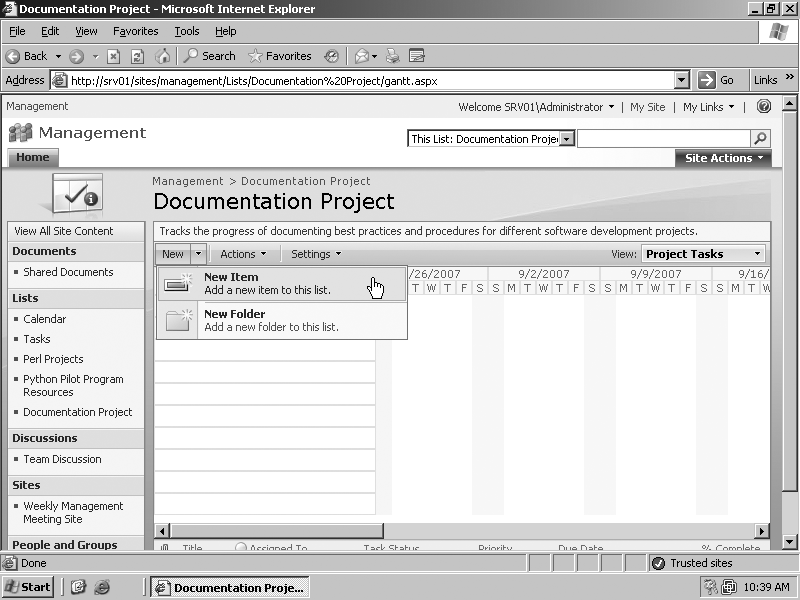
Open the list, either by clicking the list’s name in Quick Launch or clicking View All Site Content and then clicking the list’s name.
Click New and select New Item from the list, as shown in Figure 14-13.
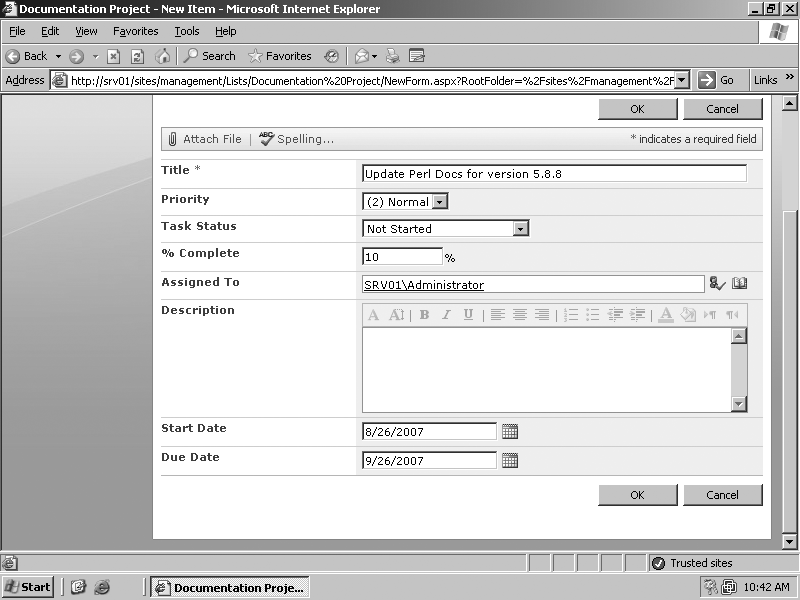
Type a name for the task in the Title field.
In the Priority section, click either the High, Medium, or Low radio button to assign a priority to the task.
In the “% Complete” section, type in the percentage value to indicate the task’s progress toward completion.
In the Assigned To section, either type in the name or names of the members assigned to the tasks or search for them in the system.
Use Check Names to verify that the users you selected are in the system.
Type a brief description of the task in the Description field.
Click the calendar applets to add a Start Date and a Due Date for the task.
If you want to attach a file to the task, click Attach File and then click Browse to navigate to the file’s location. Then, click “Open and Save” to attach the file.
Click OK to add the task to the Project Task List. View the new task configuration page in Figure 14-14.
Depending on the kind of information you are looking for, you can choose from several different views when reviewing a Project Task List:
Open the list, either by clicking the list’s name in Quick Launch or clicking View All Site Content and then clicking the list’s name.
Click View, and then select one of the following options from the list:
- Project Tasks
This is the default view for the Project Task List. It displays a bar chart with task names at the top. A list of all the tasks appears lower in the frame.
- Active Tasks
This view shows only currently active tasks, and not those that have not been started or those that have already been completed.
- By Assigned To
Use this view if you want to view tasks grouped by the names of members assigned to those tasks.
- Due Today
Click this view if you only want to see those tasks that are due to be completed today.
- My Tasks
This view shows only the tasks that are assigned to you.
Sometimes task parameters will change, making it necessary to modify the task list. You will likely want to keep some sort of record of completed tasks, but not necessarily in this list. If you keep all historical tasks in the list, your list could end up being very crowded over time. Archive older completed tasks on a separate list, and delete them from your active projects list:
Open the list, either by clicking the list’s name in Quick Launch or clicking View All Site Content and then clicking the list’s name.
Click to the right of the task name and select one of the following:
Click Edit Item to edit the task.
Click Delete Item to delete the task.
Once you have made your selection, perform one of the following actions to finish the exercise:
If you are editing the task, make whatever changes are necessary and then click OK to save the changes.
If you are deleting the task, click OK in the confirmation dialog box.
If RSS feeds are enabled on your site, you can set and configure RSS for the following types of lists:
Warning
RSS support must be enabled both in Central Administration and at the site collection level for this option to be available.
To modify the RSS settings:
Open the list, either by clicking the list’s name in Quick Launch or clicking View All Site Content and then clicking on the list’s name.
Click Settings and select List Settings from the list, as shown in Figure 14-15.
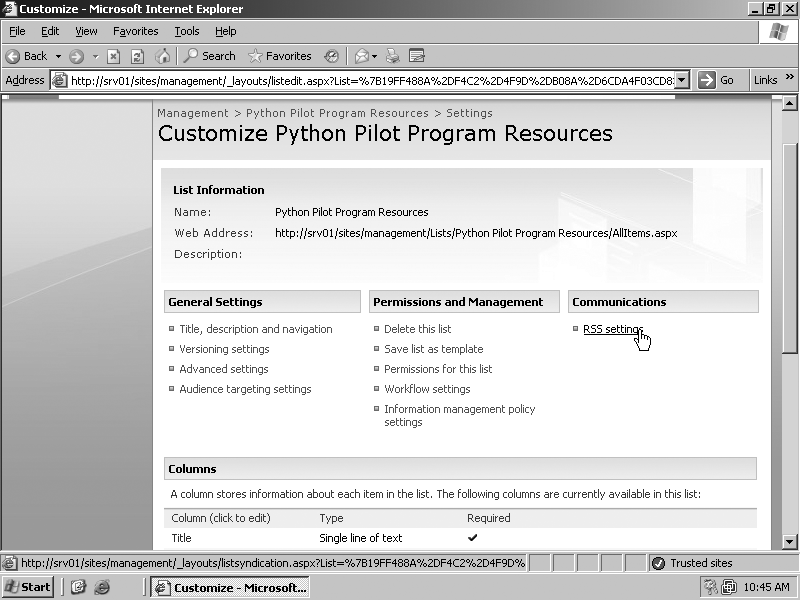
In the Communications column, click “RSS settings,” as in Figure 14-16.
On the Modify List RSS Settings page in the List RSS area, click the Yes radio button under “Allow RSS for this list?”
In the RSS Channel Information area, configure the following properties:
Truncate multiline text fields to 256 characters?
Title
Description
Image URL
In the Columns area, you can set the following columns to be displayed in the RSS description and also set their display order:
Resource Type
Content Type
Created
Created By
Modified (*)
Modified By (*)
Title (*)
Version
In the Item Limits area, you can add values to the following fields:
Maximum items to include
Maximum days to include
Click OK to save your settings. See this configuration page displayed in Figure 14-17.

Earlier in this chapter, in the "Creating Lists” section, you read the exercise “Creating a List from a List Template.” Building on that information, this section covers how to create and manage new list templates. Once you create one or more list templates, you can apply them on your site. You can also save a template on your local computer’s hard drive and then upload it to a completely different SharePoint site or site collection.
Open the list you want to turn into a template, either by clicking the list’s name in Quick Launch or clicking View All Site Content and then clicking the list’s name.
Click Settings and select List Settings from the list.
In the “Permissions and Management” column, click “Save list as template.”
On the “Save as Template” page, type a name for the list template in the File Name field.
Type a brief description of the list template in the Template Description field.
If you want to include the content of the list in the new list template, click the Include Content checkbox.
Tip
This option is grayed out in Figure 14-18 because there is no content in the list.
Click OK to create the template. See the “Creating a List Template” page in Figure 14-18.
When the Operation Successfully Completed page appears, click OK.
Warning
The original list’s security settings are not saved to the template, so you will need to modify the template’s settings immediately after creating it if you want to prevent unauthorized access. See Chapter 22, for more information.
Modify the properties of any list template to better suit your needs:
On the site containing the list template, click Site Actions and select Site Settings from the menu.
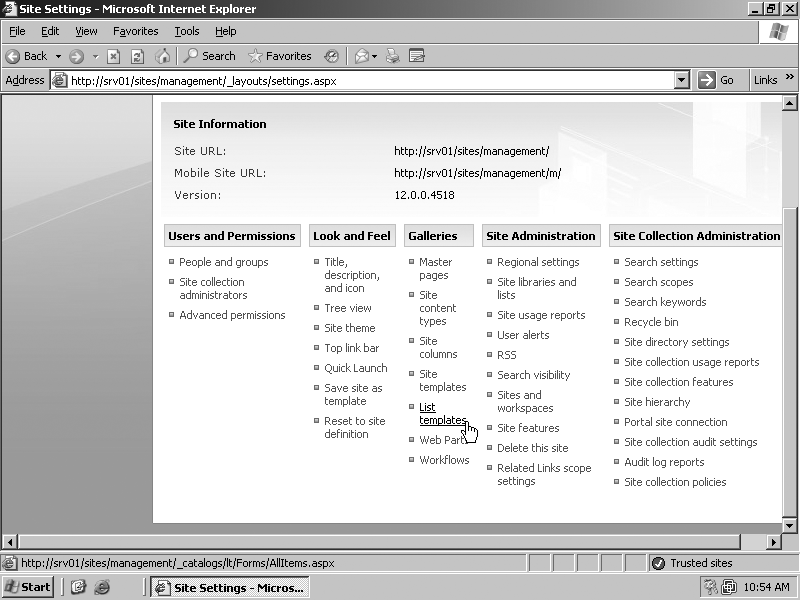
In the Galleries column, click List Templates, as shown in Figure 14-19.
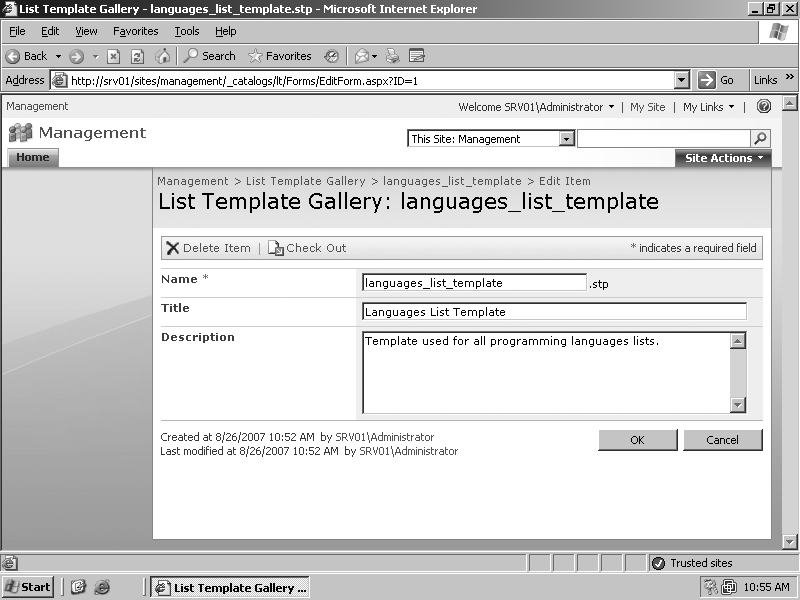
On the List Template Gallery page in the Edit column, locate the desired template and click the Edit Document Properties applet, as in Figure 14-20.
After you complete your editing task, click OK to save your changes, as in Figure 14-21.


As mentioned earlier in this section, in addition to using list templates on your site, you also can share them with other SharePoint sites. The first step is to download a list template to the hard drive of your local computer:
On the site containing the list template, click Site Actions and select Site Settings from the menu.
In the Galleries column, click List Templates.
On the List Template Gallery page in the Name column, click the name of the list template you want to download.
In the File Download dialog box, click Save.
In the Save As dialog box, either type in the path to the folder where you want to save the template or browse to that folder by clicking the Browse button.
In the Download Complete dialog box, click Close to conclude the download.
Now that you’ve downloaded and saved a list template to your hard drive, you’re ready to upload it to a separate site or site collection. You will need to have site owner or administrator rights to the site in order to perform the upload. This exercise assumes that you are on the site and ready to perform the upload:
On the site containing the list template, click Site Actions and select Site Settings from the menu.
In the Galleries column, click List Templates.
On the List Template Gallery page, click Upload.
On the Upload Template: List Template Gallery page, either type the path to the site template or click the Browse button and navigate to the folder holding the template.
If a different version of this template already exists in the gallery and you want to overwrite it when you upload the current version, click the “Overwrite existing file” checkbox.
Click OK to upload the template to the gallery.
If a list template becomes obsolete at some point, you can delete it from the gallery:
On the site containing the list template, click Site Actions and select Site Settings from the menu.
In the Galleries column, click List Templates.
On the List Template Gallery page in the Edit column, locate the desired template and click Edit Document Properties.
Click Delete Item.
When the confirmation dialog box appears, click OK.
As you have seen so far, managing small lists is fairly easy. Over time, though, at least some of your lists will begin to grow and finally come to hold a large number of items. There are several ways to manage and organize very large lists in SharePoint.
These techniques are meant for lists that exceed 1,000 items. Once a list gets to be that size, the list or the site as a whole will suffer from a degradation of performance. This isn’t caused by the existence of the list but by the volume of user activities on the list.
In theory, you can store millions of items in a list, but if you don’t take steps to manage that volume, your list and site will slow to a crawl. The following are some methods for managing very large lists.
Indexing a list column allows SharePoint to more quickly analyze data in that column, speeding up the process of accessing list items. Indexing goes hand in hand with filtering, but there are a few caveats. First of all, when you filter a view, the first filtered column must be a column that is indexed. Although you can index more than one column in a list, the more columns you index, the greater the performance hit on your database. Try to index only one column to receive the best results, or at least index only those columns that are frequently accessed:
Open the list, either by clicking the list’s name in Quick Launch or clicking View All Site Content and then clicking on the list’s name.
Click Settings and select List Settings from the list.
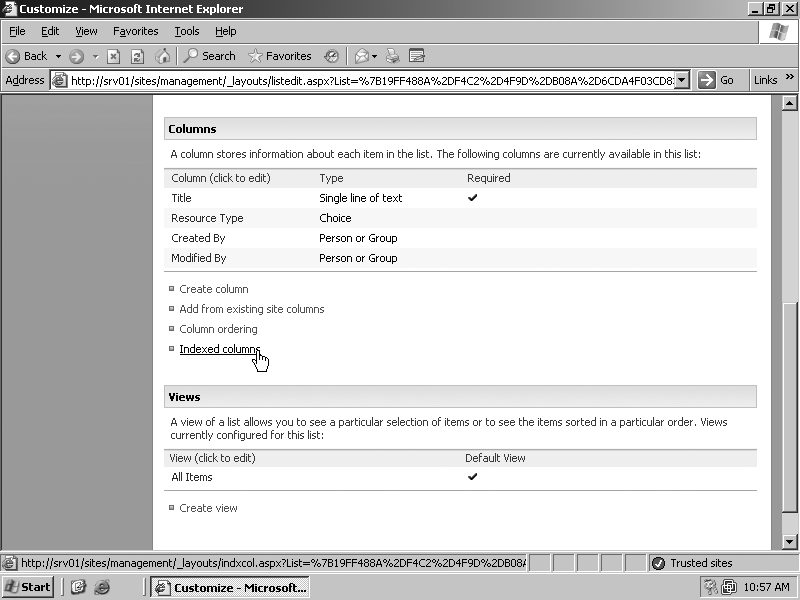
Under Columns, click “Indexed columns,” as seen in Figure 14-22.
Click the checkbox next to the column you want to index and then click OK, as in Figure 14-23.

Before applying a filter to an indexed column, make sure you have created all of the columns relevant to this list and have indexed the required columns:
Open the list, either by clicking the list’s name in Quick Launch or clicking View All Site Content and then clicking the list’s name.
Click the View arrow and select Create View from the menu.
Under “Choose a view format,” select the view you want to create. The options are:
Standard
Calendar
Datasheet
Gantt Chart
Type the name of your view in the View Name field.
In the Filter section, click “Show items only when the following is true,” and then use the drop-down list to select an indexed column.
Tip
See the “Customizing a List or Library View” section in Chapter 8 and the “Discussion Group Views” section in Chapter 11 for a more detailed list of column filtering options.
After selecting the indexed column, in the subsequent field, type the property by which you want to filter.
Configure any other properties you want for this filtered view, and then click OK to save the view.
You don’t have to create a new view in order to use indexed columns. Here’s how to add an index column to an existing view:
Open the list, either by clicking the list’s name in Quick Launch or clicking View All Site Content and then clicking on the list’s name.
Click the View arrow and select Modify this View from the menu.
Under Choose a view format, select the view you want to create.
Type the name of your view in the View Name field.
In the Filter section, click “Show items only when the following is true,” and then use the drop-down list to select an indexed column.
After selecting the indexed column, in the subsequent field, type the property by which you want to filter.
Configure any other properties you want for this filtered view, and then click OK to save the view.