
MOSS 2007, like its predecessor, has the ability to create one or more discussion boards. A discussion board is a web venue where members can create content and respond to content created by someone else. Discussions are collected in "threads,” usually by subject, and traditionally threads are organized by category. For example, let’s say you manage a group of software developers and you want to create discussion groups for three broad areas: Applications, Languages, and Libraries (APIs). The easiest way would be to create three discussion groups, one for each category. Then, in the Languages discussion group, you could have threads regarding C++, C#, Perl, Python, Visual Studio, and so on.
The latest incarnation of discussion boards in SharePoint comes with a group created by default called Team Discussion. If you need only one board, you can change the name of the default board and use it. You can also create more boards to contain discussions either by category, by team, or by any other criteria that suits your needs. The most recent additions to the board are displayed on top, showing you which threads have had the most recent posts and which ones are the most popular.
If your email program supports it, you can submit content to the discussion board directly from your email client. It’s just like sending any other email.
Discussion groups are basically just lists and, like other SharePoint lists, you can filter the view depending on how you want the list to be presented. Additionally, there are three unique ways to filter the view of a discussion board:
- Subject view
This view is available only for the top-level folder of the discussion group and presents discussions by their metadata, such as the titles of discussions.
- Flat view
This is the default view for SharePoint discussion groups. The title of the discussion is at the top, and each reply is shown in a tree structure, similar to Usenet Newsgroups. This view is available only in content folders, not at the top level.
- Threaded view
Like the Flat view, this view is available only in content folders. In this view, you can see whether a reply was made to the original posted message or to a subsequent message.
When you create or modify a view, there are a number of elements you can edit in the view:
- Name
Gives the name of the discussion board view. You can also make this or any other view the default view for the discussion group.
- Audience
Lets you determine whether this is a public or personal view. This option can be set only when you create the view.
Tip
A public view can be seen by any user, but a personal view can be seen only by the person who configured it.
- Columns
Lets you choose which columns of information appear in this view and in what order they appear.
Tip
You can choose to display such column content as Attachments, Subject, Posted By, Modified By, and so on.
- Sort
This option allows you to select a primary and secondary column and then sort the content, first by one column and then the other. Information in the columns can be sorted in either ascending or descending order.
- Filter
Lets you either display all information from all columns or make visible only content from selected columns. You can filter only two columns by default, but clicking on Show More Columns lets you add more.
- Group By
Allows you to group discussions by a particular column. For example, you can choose to group all discussions by Posted By so that each individual user’s posts are collected together.
- Totals
Contains the Count, Maximum, and Minimum options. You can either show the number of items present in a column by choosing Count or display the Maximum or Minimum values that can be contained by selecting those options in a drop-down box.
- Folders
Lets you decide whether discussions should appear in folders.
- Item Limit
Allows you to decide how many items will be visible in a view, regardless of how many items are actually present.
Tip
See Chapter 14 and the “Customizing a List or Library View” section in Chapter 8 for more on understanding and modifying list properties.
The default discussion board called Team Discussion is created when you install MOSS 2007. If you need only a single discussion board, you can use the default board right away.
On your site, you can access the default discussion board by performing one of the following actions:
On Quick Launch, click Team Discussion, as shown in Figure 11-1.
Click View All Site Content and then click Team Discussion.
To change the default name for the board, click Settings and select Discussion Board Settings from the menu, as in Figure 11-2.
Under General Settings, click “Title, description and navigation,” then modify the title and description fields with the desired content, as illustrated in Figure 11-3.
Click Save to exit the General Settings page, and then click the new name of the discussion board to return to the board.
When you return to your site’s main page, you’ll see links to both the default Team Discussion list and the new list in Quick Launch if you set them up to appear there.


You may want to create your own board from scratch or need to make additional boards in order to accommodate multiple groups or discussion types. Here’s how you can create a new discussion board:
On your site, click Site Actions and then click Create.
In the Communications column, click on Discussion Board.
Type the name of your discussion board in the Name field.
Type a brief description of your board in the Description field.
Under Navigation, select whether or not you want a link to the board to appear in Quick Launch.
Tip
This page is in the same format as the default Team Discussion page you modified in the previous exercise, as illustrated in Figure 11-4.
If you are going to enable the board to receive email content, under “Enable this list to receive email,” click Yes.
Warning
This option is available only if the server hosting SharePoint is enabled to receive email. Figure 11-4 shows that this server is not email-enabled.
Under Email Address, create a unique name for the email address of the board.
Click Create to save your actions and create the discussion board.

If you created a discussion group without enabling the email option and you now want to have the board receive emails, you will need to follow the steps in this exercise. Once this task is finished, discussion board members can send board content directly from their email clients by specifying the board’s address in the message’s To: or Cc: fields:
Open the discussion board, either by using Quick Launch or from the View All Site Content page.
Click Settings, and then select Discussion Board Settings from the list.
In the Communications column, click “Incoming email settings.”
Type the unique email address of the board in the “Email address” field.
Select any other optional settings you want, such as:
Messages sent in email should keep their attachments.
The original email message should be saved in the discussion board as an attachment.
Click OK to save your changes.
Whereas a default discussion group is created when SharePoint is installed, default discussions are not. You will need to start the first discussion. Typically, the first post in the first thread on a discussion board is to announce the board’s existence and welcome new members. It’s also a good idea to post any rules or guidelines that board members are expected to follow. An example of such a message can be found in Figure 11-6 at the end of this exercise.
Open the discussion board, either by using Quick Launch or from the View All Site Content page.
Click New and select Discussion from the list, as in Figure 11-5.
Once the text window opens, type in whatever message you want.
When you are finished, click OK to save the content (Figure 11-6).
Your message is now accessible in the board.
Previously in this chapter, in “Discussion Group Views,” you learned that three views can be set up for your board: Subject, Flat, and Threaded. You also read about the configuration options available for boards.


Tip
The configuration options are available for all lists in SharePoint, but the Subject, Flat, and Threaded views are unique to SharePoint Discussion Boards.
The following sections will show you how to make use of your knowledge of list configuration options and configure different views for your board.
You can either select one of the three default views for your board or use one of these defaults as the basis for creating a new customized view for the discussion board:
Launch the discussion board, either from Quick Launch or from the View All Site Content page.
Click Settings and then select Create View from the list, as in Figure 11-7.
On the Create View page under “Start from an existing view,” click the name of the desired default view.
Tip
In addition to the Flat, Subject, and Threaded views discussed earlier in this chapter, you can also choose from two additional view format types:
The Datasheet view allows you to view discussion group information in an editable spreadsheet format.
The Gantt view allows you to view discussion list items in graphical Gantt Chart format, ideal for quickly tracking group member task progress. These options can be seen in Figure 11-8.
Select whether you want your new view to be the default for this board.
In the Audience section, select whether this board will be visible in Public or Personal view.
In the Columns section, click the checkboxes next to the columns you want to appear in the board.
Select the order the columns will appear from left to right on the board by using the drop-down arrows next to column names and choosing the appropriate values, as in Figure 11-9.
In the Sort section, use the drop-down menus to determine which two columns will be used to sort the board view.
Tip
For example, you can sort first by “Created by” and then by Subject (linked to item with edit menu). You can also choose None if you do not want to sort by columns. See sample sort options in Figure 11-10.
In the Filter section, select the filter options if you want to filter this view.
In the Folders section, select whatever folder options you want to apply to your board.
Click OK to save your changes and finish creating your custom view.


As seen in Figure 11-11, if you made the customized view the default view, when you are returned to the discussion board, that view will be applied.
If you create a view and later want to change it, you can go back in and modify it. You actually can modify the folder-level view or the view of an individual discussion to have different views:
Launch the discussion board, either from Quick Launch or from the View All Site Content page.
With the discussion board open, perform one of the following operations:
If you want to modify the folder-level view, click the View menu and select the desired view, as in Figure 11-12.
If you want to modify the view of a specific discussion, click the discussion name to open it, click View, and then select the desired view, as seen in Figure 11-13.
Make the desired modifications and click OK to save your changes.


There are several reasons for deleting a view. You might create a custom view and later decide it doesn’t meet your needs. You may create one or more custom views that reflect your organization’s style and theme and then delete the original default views.
The one thing you can’t do is delete all views. If you have only one view available and you try to delete it, you will receive an error message saying that you cannot delete the default view. If you have several views available and you try to delete the default view, you will receive a notice stating that you must select another view as the default prior to deleting the current view:
Launch the discussion board, either from Quick Launch or from the View All Site Content page.
Click Settings, and select Discussion Board Settings from the list.
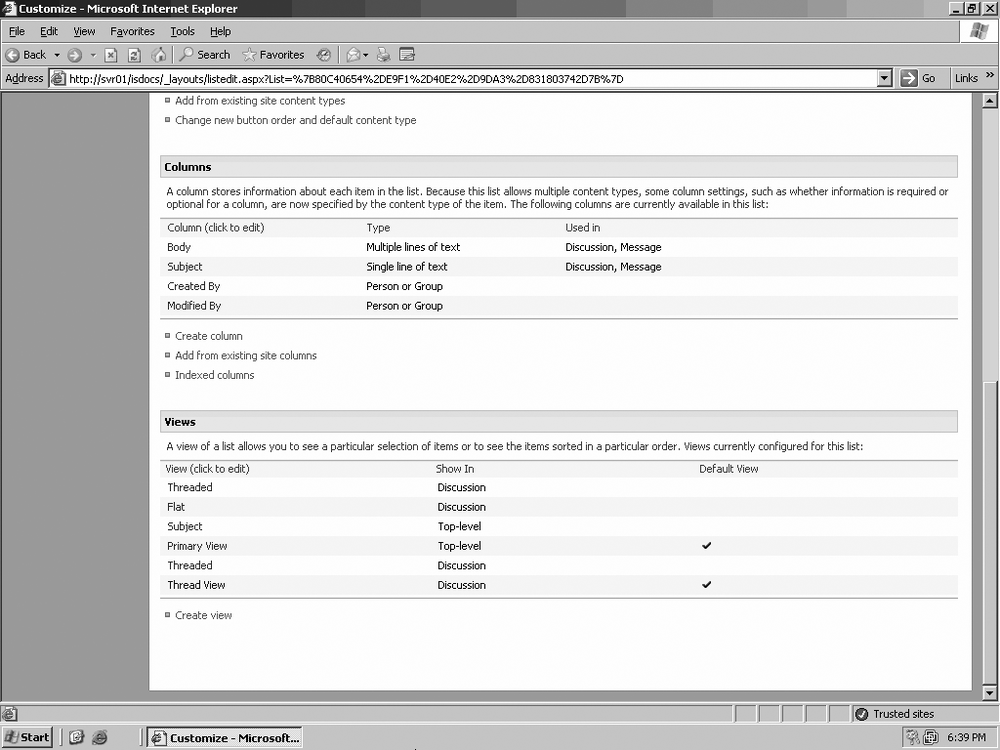
On the “Customize
discussion board nameDiscussion” page, scroll down to the Views section and click the name of the view you want to delete, as in Figure 11-14.Click Delete and then OK to delete the view, as shown in Figure 11-15.

Now that you’ve created your board, customized it, and added a welcome message, it’s ready to host discussions. The following sections describe how board members can create a new discussion thread, post a reply in a thread, edit their submissions, and more.
In the “Introduction” section of this chapter, some examples of discussion boards were presented that would be appropriate for a team of software developers. The example groups were Applications, Languages, and Libraries (API). Let’s say the three boards were created and one of the developers wants to start a discussion having to do with the Perl language in the Languages board. Here’s how the developer would proceed:
Launch the discussion board, either from Quick Launch or from the View All Site Content page.
Click New and select Discussion from the list.
When the text editor opens, type a title for your discussion in the Subject field, such as “Core Perl Documentation Update.”
Type whatever message you want in the text area.
Click OK to post your new discussion thread to the board, as shown in Figure 11-16.
Naturally, the software developer who posted the announcement about the update to the Core Perl Documentation will be expecting responses or questions regarding the message. Here’s how another developer would reply:
Launch the discussion board, either from Quick Launch or from the View All Site Content page.
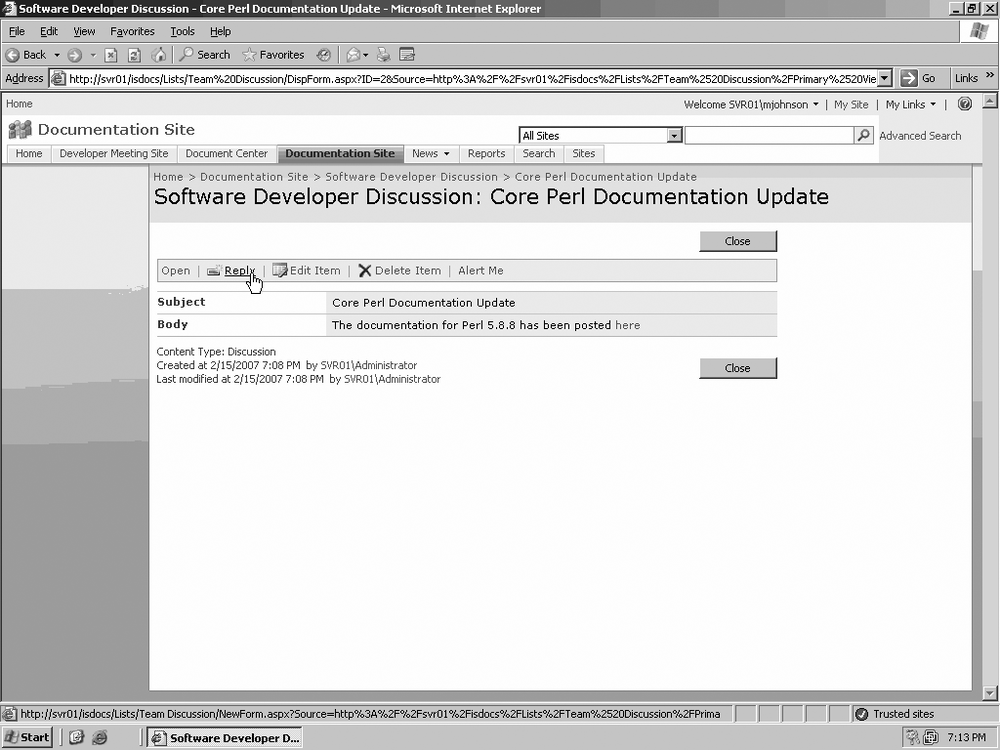
Click the name of the discussion thread that you want to read and reply; in this case, the name is “Core Perl Documentation Update.”
Click Reply in the bar above the message window, as in Figure 11-17.
Type and format your message as shown in Figure 11-18.
Click OK to post your reply to the discussion thread.


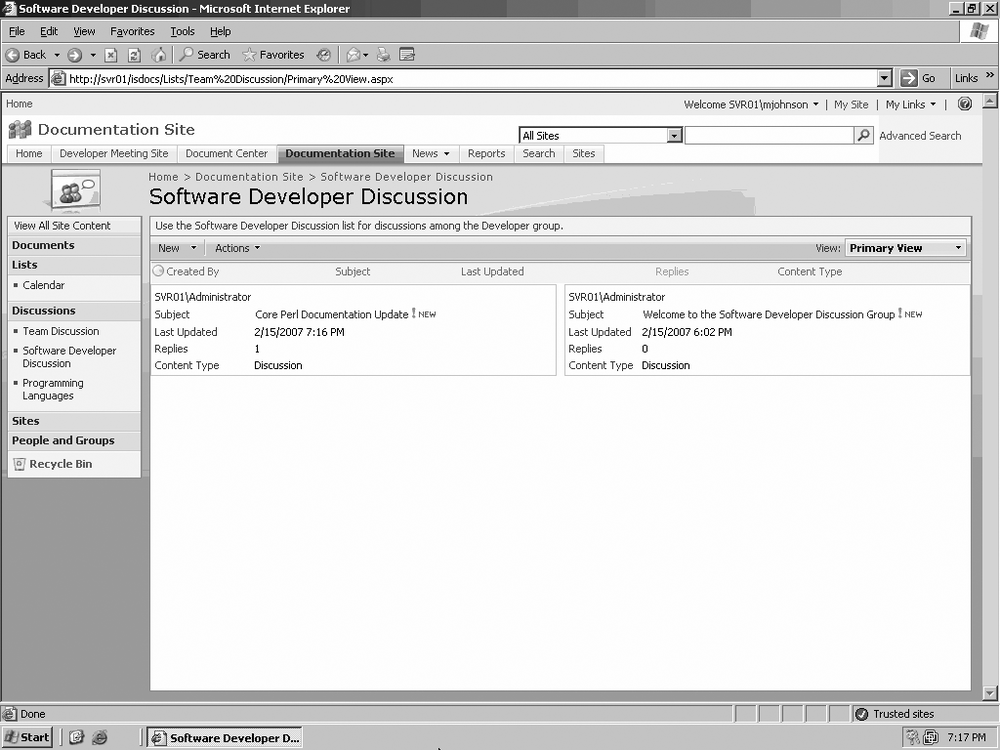
Now the original message and this reply are accessible by the discussion board members. Although you cannot see the content of the reply because you are not in Threaded view, when you are returned to the main discussion group page, you can see that the value has been incremented by one under Replies, as in Figure 11-19.
After creating or replying to a discussion, you may realize that you made some sort of error—e.g., spelling, syntax, or factual—in your message. Unless you’re the discussion board owner or an administrator, you can edit only the message you created. Although not required, discussion board etiquette suggests that whenever you edit one of your messages, you include a short sentence explaining the reason for the edit:
Launch the discussion board from Quick Launch or the View All Site Content page.
Depending on your specific situation, do one of the following:
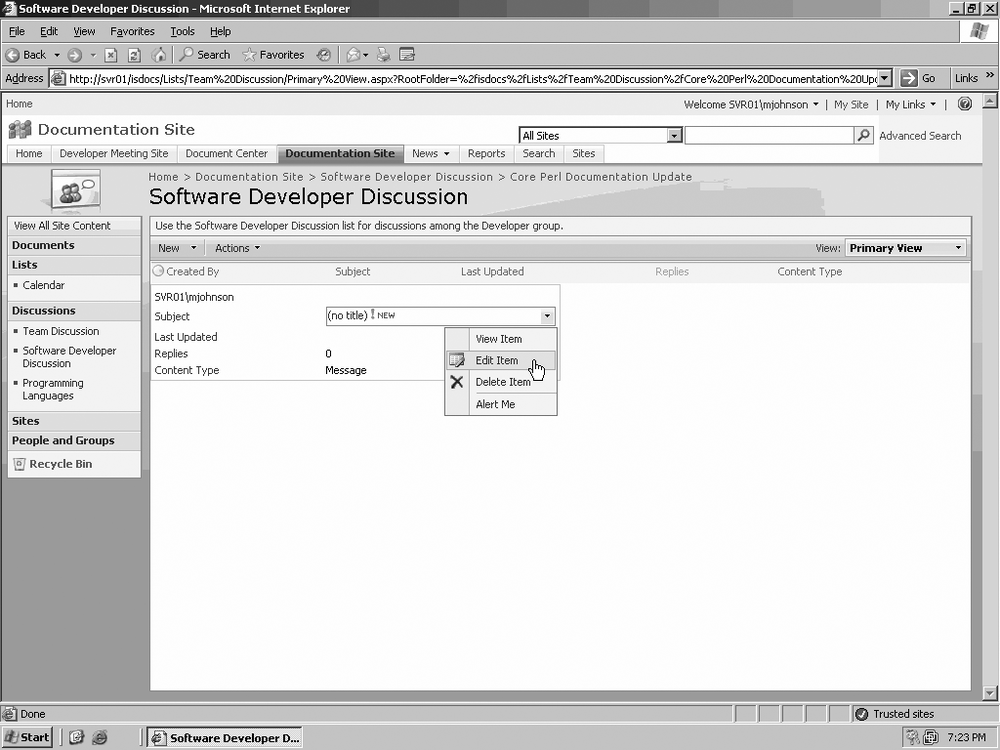
If you are editing the original message, click to the right of the subject name for the thread to open the menu and then click Edit Item, as in Figure 11-20.
If you are editing a reply to a thread message, click the name of the discussion to open it, locate your reply, click View Properties next to your reply to open the menu, and then click Edit Item, as illustrated in Figure 11-21.
Edit the text of your message, and then click OK to save your changes.

Besides entering plain text into the text editor, you can format your discussion message text to make it bold or italic, create bullet points, and access other word processing features. The toolbar above the text area gives you access to some of the more familiar formatting tools:
Figure 11-22 shows a sample message with the toolbar visible above the text field.

Up to this point, we have been viewing the discussion board using the default public view. This is the view all members of the board see when they open it. However, you can choose to set up your own personal view of the board that only you can see. For example, you may prefer to view the discussion board entries as threaded rather than flat, or you may want to sort by Subject and “Created by” rather than Subject and the creation date.
Follow the steps presented in the “Creating a Custom View” section found earlier in this chapter to make those changes. To make the view your personal view, review step 6 in that exercise and select Personal instead of Public view. If you want to make this view your default personal view, select that option as presented in step 5 of that exercise.
You can also create a separate personal view of individual discussion threads. Go back to the “Editing a View” section in this chapter and follow the steps in that exercise. Make sure you are in your personal view of the board when you make these changes.
The art of discussion isn’t dead; it’s just gone “high-tech.” In terms of MOSS 2007, discussions take advantage of the web format long used by Usenet groups and more recently seen in Internet discussion boards. Including discussion groups on your company’s site collection allows various work groups or teams to interact with each other on common projects, regardless of where they are located. A team in Singapore developing an application in Perl can consult with the Perl Languages team in Boise, exchanging ideas and suggestions. This conversation is recorded so that these groups can refer back to what was said. Other departments or field offices can also glean any information from these threads as it applies to their projects. Once you’ve implemented this option in your site collection, you will never want to be without it.