
In previous chapters, we went through installation of the Microsoft Office SharePoint Server 2007 (MOSS) multiserver farm, as well as basic usage scenarios of a majority of the MOSS features. Installation and configuration of Search, even for simple use of out-of-the-box features, is very important to the overall health of your MOSS farm, as well as the health of your end users’ search results.
Search in MOSS 2007 offers many significant improvements over SharePoint Portal 2003, and starting with the Office 2007 release, it is also available as a standalone product. Simply speaking, Search is an increasingly important tool for the end users as more and more data is stored in repositories that are indexed by the MOSS Search. But why is it important to an end user? Consider, for instance, as an end user, a task of finding a document stored either on a local computer or somewhere on a corporate file share. Finding the document in the first scenario may take up some time, depending on the user’s personal folder organization or use of some desktop search, but the second scenario may literally take hours. This is where the Search part of MOSS steps in. MOSS Search is one of the tools that will allow you to do such a search, and not only will it index data in MOSS sites, but, among other data sources, it will also index websites, file shares, Microsoft Exchange, and with additional work, many other line of business applications via its Business Data Catalog. A well-tuned Search literally can save hours of productivity per person.
Whether you are migrating from the Microsoft SharePoint Server 2003 or just starting out, overall Search components require a bit of planning and configuration—just installing Search will not yield any results. Hence, working with Search will be one of the key tasks for an administrator while configuring all of the elements of the MOSS farm. For medium and large companies, implementing and tuning Search will become a significant project task. Many different options should be researched before the implementation, including the number of servers involved, use of dedicated servers, scheduled crawls, and use of content access accounts.
More significantly, there will be day-to-day operational tasks associated with Search, ranging from service monitoring and dedicated backup, to usage reporting monitoring and inclusion of content owners in tuning of best bets and relevancy results.
Finally, developers can work with Search in many different ways, as many aspects of the technology are meant to be extensible. It is important to think of Search as yet another potential development platform. Not only can the developers write indexing add-ons, such as IFilters, but the developers can also write custom search applications or even customize existing elements of Search. A nice example of such a Search customization is the People search, a distinct tab that offers different options from a standard Search tab. The People search offers unique Web Parts and improved display of the results specifically for finding other people.
At the end of this chapter, you will be able to:
Understand different features of Search
Understand the architecture of Indexing and Search
Understand the basic administration elements of Search services
Understand advanced configuration options
Understand the extensibility options associated with Search
Search is one of the few applications that have become somewhat commoditized in the eyes of the end users. With Internet growth being fueled by many search services—such as Yahoo, Google, and MSN—everyone has an opinion and decent knowledge of what “search” is, what it should do, and how fast it should work. Search applications that deviate from common characteristics can be misunderstood by users and their adoption can fail. Fortunately, Search services in MOSS follow the majority of these characteristics, and therefore should be very familiar to most users.
Basic use of search is intuitive enough that almost no training is necessary, but it may be worthwhile to educate users on advanced searches, and eventually on enhanced application searches. MOSS is capable of searching through almost all of the data stored on the server, and it is capable of searching lists, content stored on different pages, document properties (metadata), and document contents (full-text search).
Warning
There are some small differences in Search when moving from Windows SharePoint Services 2.0 or SharePoint Portal Server 2003 to Windows SharePoint Services 3.0 or MOSS 2007. Although we will not dwell on the details, it is worth mentioning that WSS-style site searches now automatically include subsites, and automatically use Portal features (if available). Additionally, use of multiple search words automatically uses AND, not OR as in the past, which significantly improves the search results.
We’ll start off by discussing the common elements of Search that will be utilized by the end users, and then move onto the common tasks that power users or web designers can undertake to customize the search experience under MOSS.
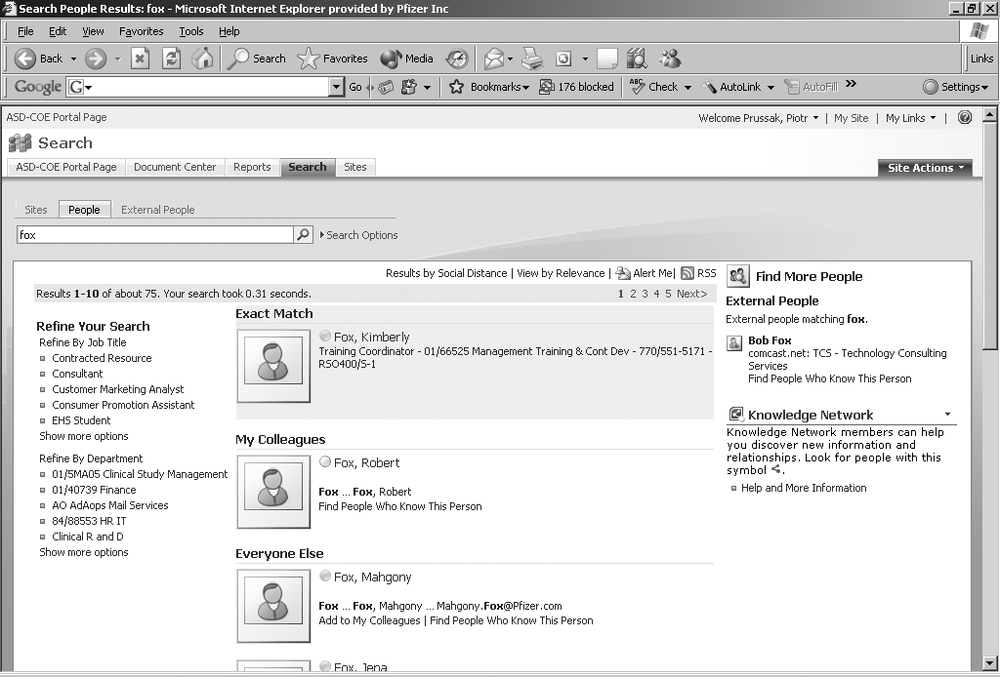
Search as an application includes a number of different elements that are visible to the end user (Table 27-1). Figure 27-1 shows a modified tab in a Search center application, with custom Web Parts from a Knowledge Network application. Conceptually, the tab is similar to Google but provides some improvements, such as the Refine Your Search Web Part, which allows for interactive filtering of search results.
Table 27-1. Search elements
|
Element |
Purpose/Placement |
|---|---|
|
Search Box |
• All Portal Pages, except settings and property pages |
|
Search Scopes (Figure 27-2) |
• Link to advanced search page |
|
• Search scopes drop-down (context-sensitive up to a list or site) | |
|
• Specialized use of search box with certain property keywords or symbols (implicit AND between search words) | |
|
Search Center (Figure 27-1) |
• Search-specific part of a portal enabled via use of features; also available as template |
|
• Customizable by site owners, in terms of location, appearance, new types of searches, or utilization of certain properties | |
|
• Typically contains a search box and links to advanced search | |
|
• Can contain specialized tabs for unique searches, e.g., people, external people, etc. | |
|
Search Results (Figure 27-3) |
• Same as Search center, plus results Web Parts |
|
• Any restrictions (language, number of results) can trigger advanced search | |
|
Advanced Search (Figure 27-4) |
• Ability to use complex logic |
|
• Additional filters available: language, content type, property | |
|
• Search multiple scopes |
As seen in Figure 27-1, a customized MOSS-based Search application, such as the Knowledge Network enhancement, can provide tremendous value to an organization. A collection of Web Parts provides a web-friendly way to:
Locate exact matches
Locate relevant matches (organized in an easily understood way)
View other relevant information (such as web advertisements)
Work with search refinement options
Leverage additional help
Tip
Knowledge Network will be a freely downloadable add-on to MOSS as a Technical Preview in the first half of 2007. Watch the KN blog at http://blogs.msdn.com/kn/.
In this sample, many different parts of Search have been utilized, but in most circumstances, the basics of Search will suffice. Next, we will go through the very simple scenarios of searching basic content embedded directly within a MOSS site.
A user’s first direct experience with Search will be via the Search Box, available in the top-right corner of the page (Figure 27-2). The search box allows the user to select a scope of the search, which is either context-sensitive (this site) or preconfigured by the administrator. Next, the user can enter search text, and either click on the magnifying glass to proceed with the search or select Advanced Search.
The search text itself can contain keywords, special characters, and property filters. If multiple search terms are used, MOSS assumes that an implicit AND has been used. Hence, when a user types in “quick brown fox,” the search is interpreted as “quick AND brown AND fox.” In the previous versions, SharePoint Search used OR, which led to too many results. Next, Search server can utilize different styles of keywords. Keywords can be classified as words (one or more characters with no spaces of punctuation), phrases (multiple words enclosed in quotation marks), or a prefix (part of a word). Further, keywords can be combined with special characters, which may signify inclusion or exclusion from search results. The default behavior of using multiple words without special characters is a simple AND, but without the guarantee of inclusion.

Table 27-2 lists these special characters.
The next major enhancement to MOSS Search is the ability to use Property Filters without using the Advanced Search option. This is a popular extension to the major search engines, and users should be educated about this feature in order to utilize it successfully. Table 27-3 lists some of the popular properties.
Table 27-3. Properties
Armed with these different elements of search syntax, we can take a look at some examples and interpret what they would represent in Table 27-4.
Table 27-4. Queries and interpretation
|
Query |
Interpretation |
|---|---|
|
Find documents authored by Piotr Prussak in a training site. | |
|
Title:sharepoint–author:"bob fox” |
Find anything with a title “sharepoint” AND where Bob Fox is not the author. |
|
Department:HR department:IT |
Find anything where the custom column “department” is set to HR OR IT. |
|
Site:http://portal1 site:http://portal2 |
Find results from either of the portals. |
One key difference between use of standard keywords and properties is that when two Property Filters for the same property are used, the resulting query is an OR query and not an AND query.
What about security? The Enterprise Search will hide all results that the current user of the website is not entitled to view at query time. In other words, there is no chance that the user can see the result, unless they would have access to it via other means.
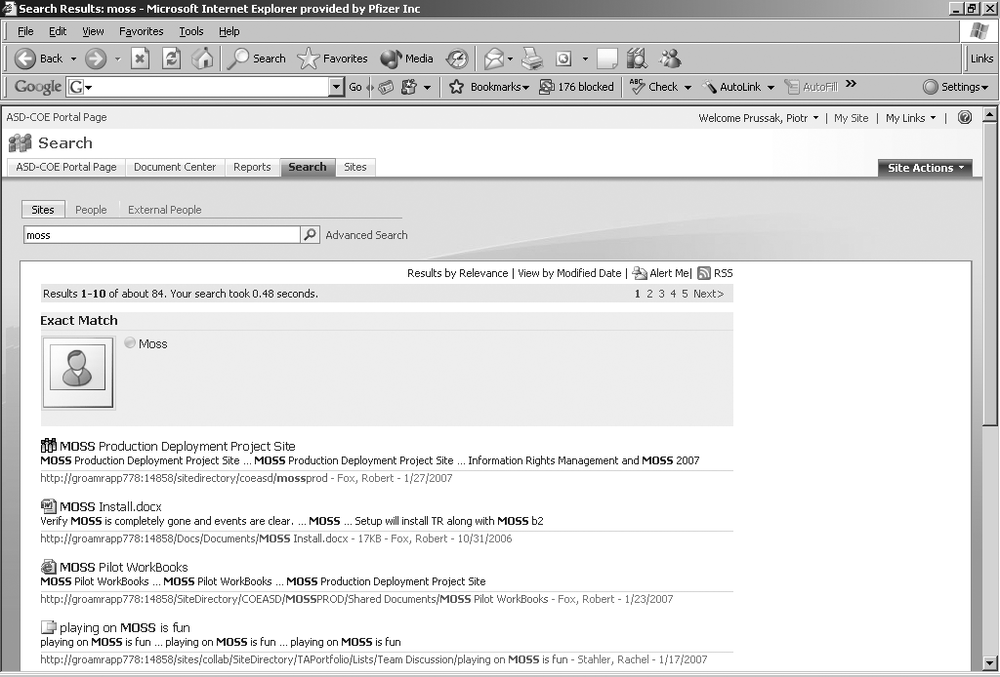
The results screen, in its simplest form (Figure 27-3), has a number of interesting elements. First, there is a repeat of the search query in the query box. Next, near the top, there are links allowing the user to change the ordering of the results, as well as to set up alerts or an RSS feed for the underlying search (which is processed once a day). The following line represents an approximate number of results, the processing time, and a simple paging mechanism.
Finally, the results are broken down into High Confidence Results, or Exact Matches (if there are any), and partial matches. The results display an icon, signifying the type of the result, title of the result, and partial text with hit highlights. Underneath each result, the URL as well as some additional metadata are shown.
For those who would prefer to change any of the elements of MOSS search, the layouts and the contents of the Search and results pages are quite customizable. Indeed, many things can be easily modified or reconfigured. Latter parts of the chapter are dedicated to the possible modifications of the Search features.
Tip
There are also several third-party products that further enhance the MOSS search capability. You can find a number of them at the Microsoft Partner Site: http://directory.partners.extranet.microsoft.com/.
Finally, the advanced search
screen (Figure 27-4) offers clear options to users
who would like a very targeted and specific search, but who may not be familiar
with all of the keywords and property filters that could be entered in the
search box otherwise. Advanced search allows users to specify the search terms
in a text entry box, to disambiguate a potential use of AND and OR, and select
the use of + and – symbols.
Additionally, the screen allows additional specification of the language, type of the target documents, and entry of any of the additional properties that would mimic the use of a property filter in the earlier examples. In order for a property to be listed in the Pick Property drop-down, the property value must be both crawled and managed. Both of these settings are covered in the “Administering Search Services” section.
The next natural step is customization of the Search features visible to the end user. Although there are many administrator-type and developer-type options available, there are also many things that can be done by information workers and power users of the portal. Search Center, after all, works on the same infrastructure as all other pages, and is based on the Web Part architecture. MOSS’s Search Center ships with five pages and 11 Web Parts. Although information workers should also be involved in fine-tuning configuration of Search services, knowledge of the Search Center pages is important, as it introduces concepts such as Keywords, Best Bets, Search Statistics, and content targeting.

Tip
You can’t really edit pages behind the simple WSS Search. WSS Search is typically employed when the This Site scope is used in the text box.
Before you start with Search Center, you have to make sure that your site has Search deployed, or that your site is linked to a portal with a Search Center. If there is no Search Center deployed, it can simply be created as a subsite.
To create a Search Center subsite from the Site Actions menu:
Select Create.
Select Sites and Workspaces.
Fill in typical site details (name, URL).
Select either Search Center With Tabs or Search Center from the Enterprise templates box.
Click Create.
The Search Center with Tabs template includes an in-page tab-like interface (which does not interfere with top navigation) and provides an additional People search tab. This template is a preferred interface when different Search screens might be developed for more specialized end user searches.
Warning
There may be a temptation to allow for a lot of personalization, but Search is one of the areas where this can lead to unnecessary confusion. With out-of-the-box settings, a Contributor can edit a search page only if she created it. As an administrator, you can always prevent people from creating pages by modifying permissions in the Pages library.
The Results page features seven Web Part zones, which allow you to add any Web Part from the Web Part catalog (the default query page has only two zones, and the Advanced Search has four zones). You can switch to the Edit Mode (Figure 27-5) by clicking on the Site Actions menu. In order to edit the page, it will need to be checked out, and in order for everyone to see the changes, the page will have to follow the standard process associated with editing Web Part pages: it must be checked in, published, and approved.

With the page in Edit Mode, you can now move, add, delete, or configure any of the Web Parts. Typically, the Results page is of most interest, as most of the prebuilt Web Parts are available. All of the Web Parts on this page work very well with each other, and they plug into the same result set available on the page. When adding new Web Parts within the Search Center, the Add Web Parts pop-up groups all Search-related Web Parts in one logical unit (Figure 27-6).

Table 27-5 shows the Web Parts that are directly related to Search. The majority of them are customizable even further, and some can provide data to other Web Parts.
Table 27-5. Web Part names and purposes
For instance, the Search Core Results WebPart can be easily configured to show different results, including the internal contents of the resulting text. The display is controlled by a selection of columns and a configurable XSLT. This is a very flexible Web Part and should be the first element of customization of any of the result pages.
In order to configure the Core Results WebPart, the page needs to be in Edit Mode, and the user needs to click the Edit button next to the Web Part. Unfortunately, due to the unusual size of the WebPart zone, the property editor may have to be minimized and the browser maximized in order to see the properties. Some of the most useful properties are listed in Table 27-6.
Table 27-6. Useful properties
|
Property |
Purpose |
|---|---|
|
Results Per Page |
Number of hits to show per page |
|
Sentences In Summary |
Length of the text under the title of the result |
|
Highest Result Page |
Maximum number of results that the user can reach |
|
Default Results View |
Ordering of the results |
|
Remove Duplicate Results |
Check if duplicate results should be collapsed |
|
Enable Search Term Stemming |
Check if keywords and results can be approximated using word stem (e.g., running versus run) |
|
Permit Noise Word Queries |
Check if previously defined noise words can be utilized in search |
|
Selected Columns |
XML definition of the columns to be retrieved |
|
XSL Editor |
XSLT style sheet that can be used to transform the results |
Working with existing pages and Web Parts may not necessarily be sufficient in every single case where some deeper level of customization is desired. For instance, there may be some fixed queries, or potentially a brand-new application developed with new Web Parts (similar to the Knowledge Network mentioned earlier). In such cases, new pages and new tabs can be added to the Search Center site, as seen in Figure 27-7.

From the Search Center, click on Site Actions.
Select Create Page.
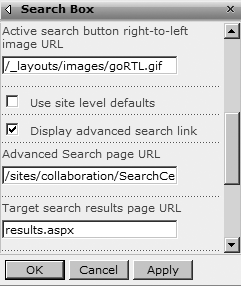
On a newly created Search Page, select the Search Box Web Part and click Edit.
In the Miscellaneous section (Figure 27-8), edit the Target Search Results Page URL to point to the newly created Results page.
Optionally, you may also edit the Advanced Search Page if you have created one.
Click Add New Tab to complete navigation.
Typically, you will also want to add a custom search Scope and content type via SSP to target search results.
So far we have taken a look at Search functionality from the end user’s (and perhaps a power user/developer’s) perspective. Now, switching to the IT professional or a business decision maker, we need to look at the features that make Search happen behind the scenes. From the overall feature perspective, there are some major features of Search that ship specifically with MOSS, and some that ship directly with Windows SharePoint Services. Following the direct comparison of the most important features, there are also some secondary and nontrivial features that are worth mentioning.
Warning
True wildcard search is not readily available within the basic User Interface, but it is supported via the APIs. Additionally, it is supported by some third-party tools, such as Ontolica.
Unlike the previous version, where WSS team sites were not capable of using the SharePoint 2003 Search, once a WSS site functions under the Office Server itself, it is capable of inheriting all of its features. Without the Office Server, the features are slightly limited (Table 27-7).
Table 27-7. WSS and MOSS Features
|
Common Features |
WSS |
MOSS |
|---|---|---|
|
Index SharePoint Content |
X |
X |
|
Index Web sites, Exchange, file shares, Notes, LOB |
X | |
|
Rich Results |
X |
X |
|
Alerts |
X |
X |
|
RSS |
X |
X |
|
Remove Duplicates |
X |
X |
|
Scopes, Managed Properties |
X | |
|
Best Bets, Results Removal, Query |
X | |
|
Tabs |
X | |
|
X | ||
|
Business Data Catalog |
X | |
|
Query API, Web Service |
X |
X |
|
Admin API |
X |
Tip
Results Removal is a new feature that allows quick removal of a URL from the results. As it occasionally happens, a popular document can be deleted. Instead of allowing the users to find the document in the search results and meet with disappointment (at least until the index is refreshed), the document can be manually removed from search results.
Clearly, the differences between the two products are quite significant in terms of Search technology, starting from the advanced indexing capabilities of MOSS down to the superior Web Parts. What about other esoteric features and improvements over other products and versions?
- Word stemming
This is the ability to properly trim endings of words at index and query time so that proper matches can be made. This also means users don’t have to create wild-card searches to find words that are closely related to one another; for example, “bathing” and “bather” will both use the stem “bath.” To use this feature you have to turn on Enable Search Term Stemming in the Search Core Results Web Part.
- Security trimming
The ability to properly filter results and display only the results to which the user has appropriate access.
- Improved relevancy
New logic within the indexes map the distance between terms as well as relevancy within a document. For example, if a term is in a headline, it is more important than in the body of the document.
- Query reporting
A great improvement for the server operator and the person who is responsible for managing overall quality of the data and search results within an organization. For example, people often look for particular HR documents, such as company vacations, but since every person may use a different search term, the administrator can set up keywords, best bets, and a thesaurus to point users to the document.
- Shared engine
The search engine is now shared among all of the other Microsoft applications. This means that all of the bug fixes and improvements will ideally trickle in faster than if there were multiple engines to maintain.
- Performance improvements (continuous propagation, security change crawl, change log crawl)
A lot of improvement went into the new indexing and gathering elements of the search, and they work significantly better and faster than in the past.
Because the Search component is actually the only element of the MOSS infrastructure that tends to span just about any physical piece of the environment, it is also the most challenging to set up and to configure. A simple introduction to its architecture and to the inner workings of the system will potentially avoid future setup nightmares and configuration pitfalls.
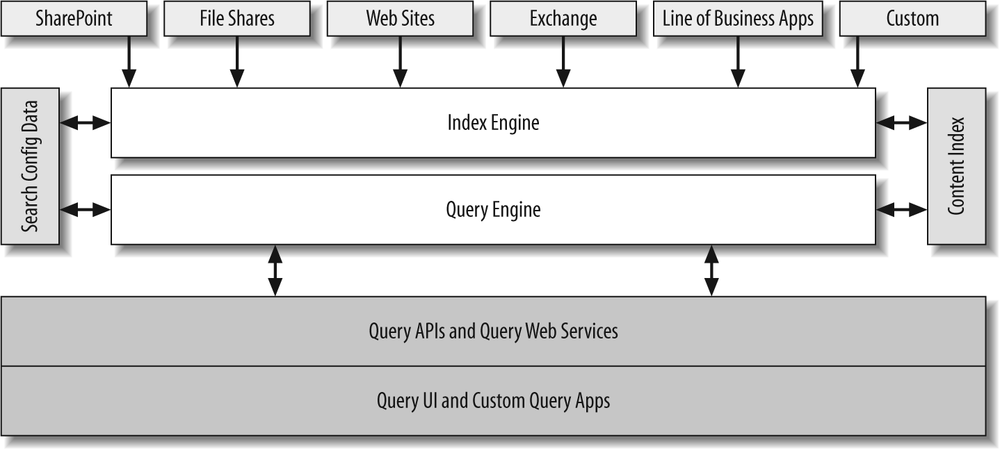
To start off, see Figure 27-9 for a graphical representation of communication paths between some of the core features and elements of Search. In the middle, we have the core elements, the Index engine, and the query engine behind Microsoft Search. The index engine retrieves search configuration data from the database and is responsible for crawling the data sources and compiling the index. Query Engine, on the other hand, only works with the built index (as well as some additional configuration data) to serve the Search results.
Warning
Contrary to popular opinion, MOSS Search does not perform a full-text search directly against the data in the database. The gatherer part of the Index engine actually walks through every known piece of content against a WebFront End (WFE) server using standard HTTP protocol, discovering the content before deciding whether it fits the criteria of being indexed.
Perhaps the best illustration is the actual flow of data within the Search, from the time a document is uploaded to the portal to the moment that the document is found via search by another end user:
Document is uploaded to the portal by the end user.
Index server retrieves data from the configuration database and retrieves rules, crawler rules, and impact rules.
Index server selects the appropriate protocol handler to work with the MOSS data source.
Index engine starts looking at the Web Front End server.
Index engine finds a new document via the change log and retrieves its metadata.
Index engine checks the rules to see whether the document should be included in the index.
Index engine retrieves the document itself.
Index engine opens an appropriate handler (IFilter) to do a full-text index of the document.
Index engine processes the document, and places the appropriate information in the content index database.
Database is propagated to the search engine.
Document can be found via search.
Although the data in the portal can be backed up with an off-the-shelf SQL backup tool, the backup of the index is slightly more complicated because the index includes database tables as well as the resulting index files. As such, you must use the built-in backup utilities to achieve a full fidelity index backup. With a basic SQL backup, you will back up the database part of the index, which means that upon a restore, index propagation will commence, and the end users will not be able to search immediately. Thus, as part of your disaster recovery plan, you should include the time to propagate the indexes.
Depending on the needs and characteristics of the deployment, you may choose a variety of configurations. The typical choices will be influenced by server geography, volume of data, and volume of searches. Table 27-8 describes these factors and their solutions. There are several important rules to observe:
There can be multiple Search servers that will answer the queries made by the end users or via the API.
There can be only one Index server per SSP.
You can have a dedicated front end server to be used for crawling content.
Table 27-8. Factor and solution
|
Factor |
Solution |
|---|---|
|
Multiple geographic sites |
Consider using multiple SSPs if the volume of data is significant in each site. |
|
Large volume of content |
Index daily, and use incremental updates combined with continuous propagation. If index times spill over to business hours, consider use of a dedicated server for crawling data. |
|
High frequency of updates |
Index more frequently, and observe closely the speed of updates as well as performance of the front end servers. |
|
Large volume of search queries |
Monitor search performance and add new Search servers as necessary. |
|
High impact of indexing on front end servers |
Utilize a dedicated front end server if the impact of the performance is noticeable to the end users. |
Warning
When using a dedicated WebFront End Server, the underlying mechanism adds entries in the HOSTS file on the Index server, which may not work if multiple NIC cards are used and host headers are not used. Since the entries are automatically added by SharePoint, this may not work and might be hard to troubleshoot.
Administration of Search services can be a daunting task. The larger the server deployment, and the more content stored, the harder things become. Ideally, administration and configuration should be a task for a broad team, and could potentially include application architects, server and network operators, SharePoint administrators, and analysts and information workers. The majority of the administrative elements begin at the SharePoint Operations Center during the initial configuration of the portal and the Shared Services Provider (SSP), and then move onto the individual Web Applications and Site Collections. Options that are configured during the initial setup of the farm are accessible from the Manage Search Service page within the Application Management section, which is covered later in “Advanced Configuration Options.”
Tip
When initially installed, MOSS does not automatically crawl any content; crawls have to be initiated manually, or scheduled via the Content Sources and Crawl Schedules page.
Assuming that an SSP has already been configured in a farm, the bulk of the Search configuration lies in the Configure Search Settings Page, as seen in Figure 27-10.

Key Search Crawl Settings properties and action pages that can be managed are listed in Table 27-9.
Table 27-9. Search Crawl settings
Warning
If you use an administrative account to crawl site content, and hide unpublished drafts from ordinary readers, the search results may show some undesirable parts of the document in the document summary, as the crawl account will have access to the unpublished document.
Additionally, Shared Services are also responsible for the Scope Administration pages and the Authoritative Pages (covered in the “Advanced Configuration Options” section later in this chapter).
In the Scope Administration pages, you can manage farm-wide scopes that are visible within the search boxes. Scopes can be configured as either shared per farm or applicable to a specific site. Additionally, scopes can target specific Search Pages as well as specific content. Scope rules can be made out of the following:
Web addresses
Properties (based on
Author,contentclass,Site, orSiteName)Content sources
All content
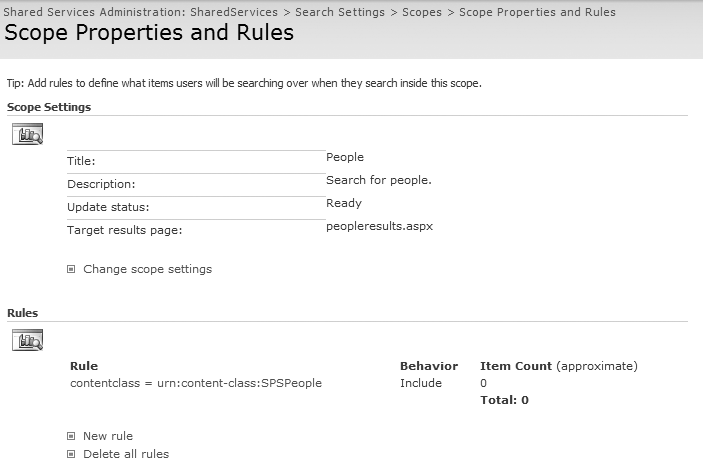
Further, each rule can be Included, Required, or Excluded. As you add new scopes to the system, it is important to
keep mental track of their exclusivity. If you want to have separate and independent
scopes for certain document types or websites, make sure that one scope includes a
rule (or requires it) and another one excludes that particular rule. In fact, the
All Sites scope excludes the SPSPeople content
class (shown in Figure 27-11), and as a result,
would never display people on the main search results page.
If, for instance, your portal depends on a particular document type, you can
create a scope rule where a contentclass property
restriction is equal to the document type in question. Similarly, a scope rule can
be based on a subsite or a custom content source, such as your Exchange public
folders.
The next few options are typically used with bigger farms, or when there is a need to gather data from external sources or to fine-tune the querying or search results.
One of the Search administration pages actually lies within the Application Management page, within the Manage Search Service section (Figure 27-12). It is a mishmash of farm-wide and application-specific settings, which generally ties the integration between the application, the farm, and the SSP on a single page. The Shared Services section simply indicates and links to the Shared Services Provider associated with a given WebApplication, as well as the management pages we’ve worked with throughout this chapter.

The Manage Search Service page is the place where you can change the options that were originally set during the configuration of the farm, either on the Farm-Level Search Settings page or via the Office SharePoint Server Search Indexing and Query link.
The Managing Farm-Level Search Settings deals with configuration for external searches, and allows you to configure information such as:
An email address associated with the crawler
Proxy settings to be used when crawling other servers
Connection and request acknowledgement timeouts
SSL certificate name warnings settings
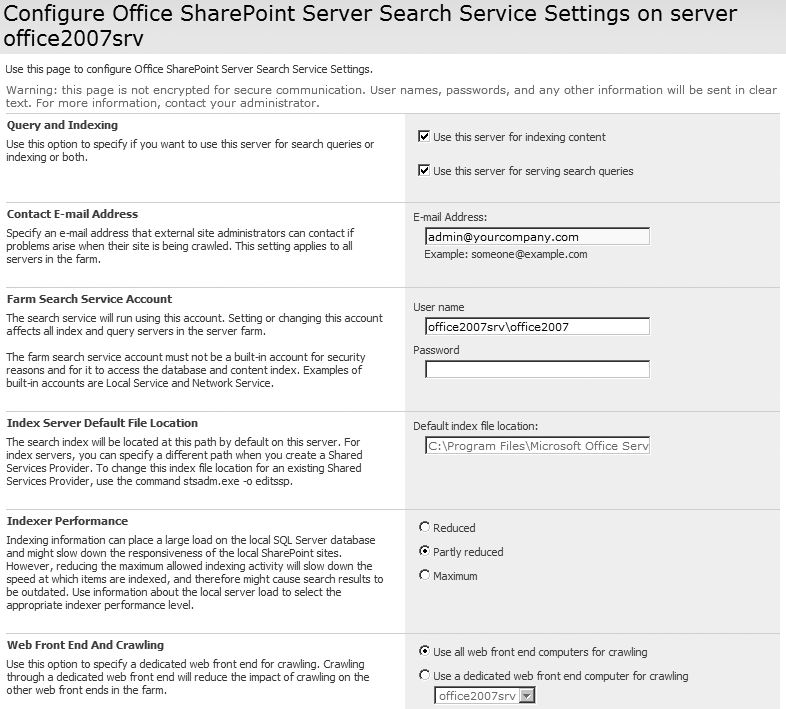
Next, in Figure 27-13, you can see the Configure Office SharePoint Server Search Service Settings On Server servername administration page. This page mixes server and farm settings for configuration of service-related properties. Table 27-10 lists the search configuration elements.
Table 27-10. Search configuration elements
|
Configuration element |
Description |
|---|---|
|
Query and Indexing |
Indicates the role for which the server will be used. Note that the Office SharePoint Server Search must be started for this to be available. |
|
Contact E-mail Address |
This is the email address associated with the crawling account. |
|
Farm Search Service Account |
This is an account that is used by the Windows service, not the account that is used to gather data. It must have privileges to use the search databases and to run as a service. |
|
Index Server Default File Location |
This is the location where index files are stored, but in order for it to be edited, you must use STSADM, utility in the BIN folder. You should monitor disk activity and place this on a fast, dedicated disk if necessary. |
|
Indexer Performance |
This allows the administrator to set the impact of indexing on SQL and internal server resources. |
|
This setting allows you to select a dedicated WFE as a target for crawling. Note that there are some situations in which a dedicated WFE does not work (described previously in the “Architecture of Indexing and Search” section). |
The last element of the farm-level management is the Impact Rules management page, which allows us to edit Crawler Impact Rules, as in Figure 27-14.
Crawler Impact Rules are used to throttle the retrieval of requests that are made against the WebFront End (WFE) server. In many cases, the WFE simply is not capable of serving as many pages as the crawler can request. This results in poor performance at the WFE, along with crawl errors associated with the data source. Most likely this type of problem indicates an underpowered server, combined with heavy ASP.NET processing, which results in longer processing of the pages. This can be fixed in two ways: by disallowing the crawl of the ASPX pages within the site (this is configured within the Site administration settings) or by changing the Request Frequency within an Impact Rule.
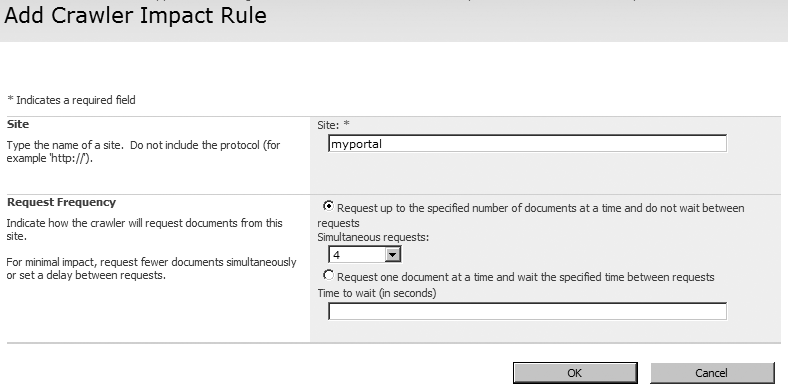
Each Impact rule is associated with a URL that is used for crawling a SharePoint site, and then a request frequency, which can be represented either in terms of the number of simultaneous requests or in terms of a delay between requests. You must look at the performance of the WFE server to determine the optimal request frequency, while also balancing out the need for a short indexing time.
Content Source configuration allows for indexing and management of schedules of different sources of data that flow through the index. Most commonly, this will be used to set up a schedule for a default data source, but also it will be used to add external content to the Search engine, such as external web sites or file shares.
Content Source configuration is available from the SSP, from the Content Sources And Crawl Schedules page. There you can see the listing of available Content Sources and their schedules. Clicking the New Content Source link opens the Con-tent Source Configuration Page (Figure 27-15).
After specifying the name, you have to specify the desired indexing handler or effectively indicate the appropriate Content Source Type, which can be one of the following:
SharePoint Sites
Web Sites
File Shares
Exchange Public Folders
Business Data
Next is the start address, which will typically be
http://servername or \servername share for a folder share.
Unlike previous versions of Index server, you can associate a single content
source with multiple addresses. In order for the Business Data crawl to take
place, the Business Data Catalog must first be configured within the Shared
Services Provider. For the Exchange Server, you’ll typically configure the
search of public folders via the HTTP protocol.
The Crawl Settings section adjusts dynamically and is context-sensitive to the Content Source Type (Table 27-11). Crawl Settings displays several options, ranging from single page crawls to unlimited crawl within the content source. It is unadvisable to use very broad settings, especially for web sites (e.g., unlimited page or server hops), as broad settings will potentially kill the content source and may never finish indexing. In fact, it may be easier and more economical in the long run to integrate results from external search engines into MOSS rather than index big sites.
Tip
When adding a People source to an existing SharePoint Sites index, you have to use an sps3:// moniker instead of the usual http:// in order to leverage it.

Table 27-11. MOSS Crawl Settings
|
Content Source Type |
Crawl Settings |
|---|---|
|
SharePoint Sites |
Crawl everything |
|
Crawl only the top level site | |
|
Web Sites |
Crawl all pages within the server |
|
Crawl single page | |
|
Custom | |
|
Allow x page hops | |
|
Allow x server hops | |
|
File Shares |
Crawl folder and all subfolders |
|
Exchange Public Folders |
Crawl folder only |
|
Business Data |
Crawl entire Business Data Catalog |
|
Crawl a specific BDC application |
The last setting for each Content Source is the schedule, which resembles a typical scheduling calendar. Besides the choice of Crawl Schedule frequency, which can be set at Daily, Weekly or Monthly intervals, there are additional settings that indicate how often the given schedule should be repeated and how long the crawl should last. Each Content Source can have two different types of crawls, Full Crawl or Incremental Crawl. Obviously, to build an index from scratch, you will need to start off with a Full Crawl, and the Incremental Crawl will intelligently pick up additions, deletions, and changes to the content source. There are, however, other times when the Full Crawl must be run:
Changes to the inclusion/exclusion rules
Changes to a crawl account
Changes to file types and IFilters
Changes to Property Mappings
Major changes to WSS sites that delete the Change Log
Tip
If you have a specific site that requires high-frequency updates, consider adding a new Content Source specific to that site and fine-tuning the Incremental Crawl schedule to a point where the index would always be fresh enough.
In most circumstances, a daily Incremental Crawl schedule should be sufficient.
Generally, the Authoritative pages make sense only in the context of using multiple Content Sources, and the concept of Result Relevance may not be applicable to single portal sites. Essentially, the Authoritative pages increase the relevancy of a page by decreasing the click distance to the source of truth. Administration is very simple, as there are four entry boxes, allowing for entry of the following:
Most Authoritative Pages
Second-Level Authoritative Pages
Third-Level Authoritative Pages
Sites to Demote
As such, when indexing a number of content sources and observing the quality of the search results (as described in the next section), there is a possibility that a page with better information could be presented further down the results listing than a page with the best match. Thus, in order to increase the rank position, the administrator should add the site that hosts the more relevant data as the Most Authoritative Page, and perhaps add the useless site as the Site to Demote.
This feature is useful when indexing many content sources that potentially have similar data—for instance, your intranet site versus your public Internet site. Most likely, your intranet would have the most relevant information.
One of SharePoint’s most desirable features for information officers is the ability to monitor query and results statistics via the Query Reporting Tool (Figure 27-16). The tool creates graphs as well as different types of reports that can be exported to Excel or PDF formats. These are available for each SSP within the Search Usage Reports section, and the Search Results page is available via the menu on the lefth and side of the page. Based on this information, you may want to fine-tune best bets, scopes, authoritative sites, and plan capacity of your Search services. This page displays the following reports:
Queries Over Previous 27 Days (bar chart)
Queries Over Previous 12 Months (bar chart)
Top Query Origin Site Collections Over Previous 30 Days (pie chart)
Queries Per Scope Over Previous 30 days (pie chart)
Top Queries Over Previous 30 Days (text summary)

Similarly, the Search Results Report has the following reports available:
Search Results Top Destination Pages (text summary)
Queries With Zero Results (text summary)
Most Clicked Best Bets (text summary)
Queries With Zero Best Bets (text summary)
Queries With Low Clickthrough (text summary)
The Search Results Reports page is very useful because it highlights the problem areas, or at least the areas where addition of Best Bets or Authoritative sites may increase the end users’ ability to find relevant information using Search.
Unfortunately, these pages are buried within the administrative features, and may not find an appropriate audience. The typical consumer of these reports should be the site collection administrator who is managing the Best Bets.
Looking away from the SSP, and at individual sites and portals, there are many advanced search settings that are configurable only from the Site Collection or Site level. In order to open these settings, you have to select Site Settings (or Modify All Site Settings) from the Site Actions drop-down menu. Depending on the site template and privileges, your Site Settings page may be hidden under a particular submenu. Figure 27-17 displays the Site Settings page at the Site Collection level, and highlights management pages that are relevant to Search.

Depending on the context of the Site Settings page, some of the management options that are listed in Table 27-12 and visible in Figure 27-18 may not be available; however, if they are available, their meaning and management screens will be identical.
Table 27-12. Search Configuration options
Finally, the Add/Edit Keyword page, as seen in Figure 27-18, can be launched at a site collection level from the Manage Keywords page. It provides a quick way for an information officer to enhance the search experience. Based on the Query and Search Result data, you can easily steer the users in a proper direction by providing additional synonyms, a definition, or even best bets to increase the value of the Search Results page (this is where the contents will eventually show up).
Similar to the result advertisements in Google, the targeted results show up on the righthand side of the page (refer back to Figure 27-1). Typically this feature is used when a large number of queries target a particular search term—for instance, “vacation” on an HR site, with no proper exit pages. In such a case, the administrator can associate the term “vacation” with a couple of synonyms, such as “holidays” or “days off,” and provide a link to the company policy on vacations.
A Keyword or a Keyword Phrase consists of the following elements: synonyms, best bets, definition, contact, and various dates associated with publishing and visibility. Synonyms are important because they allow association of various elements with a best bet or a definition. Best bets are important because they allow the site administrator to advertise a particular link or a location as a good result for a particular query. Similarly, a definition, as well as a contact, can provide additional clues to the end user about the applicability of the suggested result.

Warning
When managing a list, one of the options on the Customize List page is the Indexed Columns page. This indexing is not directly related to Search, but rather to CAML queries, similar to the way that SQL Server columns are indexed. If none of the Web Parts or custom code utilizes CAML, there is no need to add any columns for indexing.
Besides enhancing the search with a keyword or a best bet, the second typical scenario is the ability to add a site column that shows up in a custom list to the Advanced Search screen. For the sake of the exercise, we’re assuming that this column already exists and is called “Company Name”:
Open SSP and navigate to the Search Settings Page.
Open the Metadata Property Mappings page.
Click New Managed Property:
Perform a Full Crawl.
The content is now available to be searched via standard search.
Modify the Advanced Search Box Web Part on the Advanced Search page:
Expand the Properties section and open the Properties dialog box to add new properties that should be shown.
Add the following to the <PropertyDefs> node:
<PropertyDef Name="Company Name" DataType="text" DisplayName="Company" />
Add the following to the <ResultType> node:
<PropertyRef Name="Company Name" />
Click OK twice and exit the page Edit Mode.
Results should be visible on the screen.
Although WebPart and application development areas are covered in different chapters, Search has its own set of APIs available for consumption. The basic APIs are fully covered in the Object Model chapter, and the Search Web Service in the chapter on Web Services, but there are some additional technologies of interest:
WSS .Net APIs
— Microsoft.SharePoint.Search.Administrationnamespace— Microsoft.SharePoint.Search.Querynamespace— Microsoft.Office.Server.Search.Administrationnamespace— Microsoft.Office.Server.Search.Administration.Securitynamespace— Microsoft.Office.Server.Search.Querynamespace— Microsoft.Office.Server.Search.WebControlsnamespaceURL syntax for executing queries
IFilter technology
Warning
There are also several obsolete legacy Portal APIs that should not be used.
They are in the Microsoft.SharePoint.Portal
namespace, and have all been replaced by the Microsoft.Office.Server namespace.
The preceding list gives a good account of all extensibility options that are available to Search developers. The key APIs specific to execution and access to SharePoint are obviously the .NET APIs, but all of the work underneath is actually carried out via specialized SQL-like search queries. Also of some interest is the URL syntax for executing queries, as it essentially allows the developer to reuse the existing search infrastructure to quickly provide some customized searches.
The Enterprise Search extends the SQL-92 and SQL-99 standards to provide additional functionality in the area of search. For those who already know standard SQL, the query format is very familiar:
	SELECT <columns>
	FROM SCOPE( )
	WHERE <conditions>
	ORDER BY <columns>
The following table describes these standard clauses.
|
Clause |
Description |
|---|---|
|
|
Specifies columns to be returned |
|
|
Somewhat deprecated; has to be |
|
|
Specifies Search conditions that indicate a match |
|
|
Specifies sort order for the results |
Although the basic clauses are the same as in standard SQL, some other features and keywords may be unavailable, and there are two specialized predicates: CONTAINS and FREETEXT. Additionally, the main areas where Search queries extend SQL Search include the ability to use 127-character column names, accent insensitivity, use of a thesaurus, and a looser interpretation of the NULL predicate. A typical query to display a title, path, and author is:
	SELECT title, path, author FROM Scope() WHERE CONTAINS('author:Piotr Prussak') AND
	"scope"='Books' AND FREETEXT(DEFAULTPROPERTIES, 'MOSS') ORDER BY Path ASC
Warning
There are some deprecated elements from SharePoint Portal 2003
Search:
COALESCE_TABLE, RANKBY, UNIONALL, MATCHES,
								FROM<scope>
(now part of the WHERE clause), and CAST, as well as column weighting.
Unlike SQL Server queries, where columns are defined in tables or views,
the columns that are available for Searching are only defined in SSP’s
Search Settings on the Metadata Property Mappings page. What makes the
metadata search work well is the ability to map multiple site columns into a
single search column, where, for instance, a Contact Name column and an
Employee Name column could both be mapped to the same property LastName. Two additional common results
columns are Rank and LastModifedTime, which are often used to sort the
results.
Another possible way of utilizing MOSS Search is via the URL syntax. The decision to have either a piece of code that submits HTTP GET queries or screen-scrapes pages is up to you. The syntax is very simple, but it is somewhat more limited as compared to the other forms of Search. Typically, the URL queries are submitted to a specialized search page, such as results.aspx within the Search Center. In most circumstances, all parameters are combined, but be careful when submitting only a partial URL syntax, as the results page may fail to render results. The parameters are outlined in the following table.
|
Parameter |
Example |
Description |
|---|---|---|
|
k |
|
Specifies keyword to be searched |
|
s |
|
Specifies the scope |
|
v |
|
Specifies order, where v can be either
|
|
start |
|
Specifies a page to display |
A full URL query may look like this:
| Results.aspx?k=moss%20books&s=people&v=relevance&start=3 |
That URL query would look for the following:
Keyword = moss books
Scope = people
Order view = relevance
Start page = 3
Tip
IFilter development is outside of the scope of this book. There is more information to be found on various Microsoft and third-party websites specializing in this technology, such as the blog http://blogs.msdn.com/ifilter/ or MSDN’s http://msdn2.microsoft.com/en-us/library/ms691105.aspx and http://www.ifilter.org/.
Search Services are a very significant feature of MOSS. Because of Search’s complexity, it may take a diverse team some time to master all of its configurable elements. It will also be one area of your portal deployment that will typically require regular care and feeding. Not only should you be on the lookout for general performance of indexing and search in terms of numbers of errors, accuracy, or speed, but also study the search patterns of end users and tweak keywords, as along with best bets.
Last, for a happy Search Environment, here are some best practices:
Know the environment:
—Utilize dedicated front end servers for large or busy sites. —Schedule for off-hours, especially full updates. —Schedule wisely, when speed of updates is critical. —Use Crawler Impact Rules if crawling against a live front end. Use Automated Crawl Lists for each Web Application with a host header.
For global or multisite deployments, consider dedicated crawlers and SSPs for each site.
Use the same account for crawling, but use a non-administrator account.
Use MOSS Backup and Restore to back up indexes.
Pause indexes if needed, and do not stop them, as this triggers a full update.
Monitor performance and results.
Utilize Query and Results Reports to study user behavior.
Utilize Keywords, Best Bets, and Authoritative Sites to improve user experience.