
MOSS 2007 integrates with Microsoft Word 2007 and other Microsoft Office Suite applications in a variety of ways. The primary interface to Word documents in SharePoint is through Document Workspaces and libraries.
Tip
See Chapter 9 for more details on those document management tools.
Typically, Word is used for writing reports, documenting best practices, recording procedures, and creating other text-based documents. Often a group or a team collaborates to create a single document. SharePoint allows workgroups to create, share, and modify a single Word document through a portal site. SharePoint and Microsoft Word 2007 work together by:
Sharing Word documents with a specific team in a SharePoint Document Workspace.
Storing Word documents in a document library, either placing all documents in one library or creating types of document libraries based on content, team, or team location.
Controlling versioning of documents in document libraries.
Assigning specific tasks on a document to team members.
Creating email alerts for team members, and notifying them when a document has been created or modified.
Creating and modifying a web page from a Word document using document-to-page converter tools.
The following list shows the main topics covered in this chapter:
One of the benefits of managing documents in SharePoint is that you can organize them by content type. You may be used to thinking of documents in terms of their formatting, such as a Word document versus an Excel document and so on. Based on this perception, you would consider all Word documents to be the same. That’s fine if you want to put all of your Word documents in one single repository and all Excel documents in a separate one, but what if the content in those differently formatted documents are related?
For example, let’s say you are working on a proposal for a new software application. This proposal might include reports written in Word, spreadsheet information in Excel, and PowerPoint presentations. All these documents have different formats, but they contain content related to the same project. You might want to group all project-related documents under a content type of “Project Plans.”
Conversely, a single document format, such as Word, may contain many different content types. You can create proposals, legal documents, organizational tables, hardware requirement lists, and newsletters. Each document serves a different purpose and may start from a different template, or require a different review process.
SharePoint lets you classify documents in terms of the following properties:
Columns or metadata that you want to assign to a content type
Document templates you create for this content type
Customized forms you use with this content type
Workflow options for this content type
Relative to document libraries and Word, this means that it is common for a document library to contain Word documents comprising several different content types.
Configuring a library to support multiple content types means that the library the documents occupy does not determine the nature of the documents; rather, the content type does:
Open the desired document library, either by clicking its name in Quick Launch or by clicking View All Site Content and then clicking the library’s name.
Click Settings and then click Document Library Settings.
Under General Settings, click Advanced Settings.
In the Content Types section, click Yes to enable support for multiple content types.
Click OK to finish.
Now that the document library is enabled for multiple content types, you can add a content type to the library:
Open the desired document library, either by clicking its name in Quick Launch or by clicking View All Site Content and then clicking the library’s name.
Click Settings and then click Document Library Settings.
Under Content Types, click “Add from existing site content types.”
In the Content Types section, on the Select Site content types from list, click the arrow and select the desired group of content types.
In that group in the Available Site Content Types list, select the desired content type and then click Add.
To add additional content types, repeat steps 4 and 5 as necessary.
When you are finished adding content types to the “Content types to add” list, click OK.
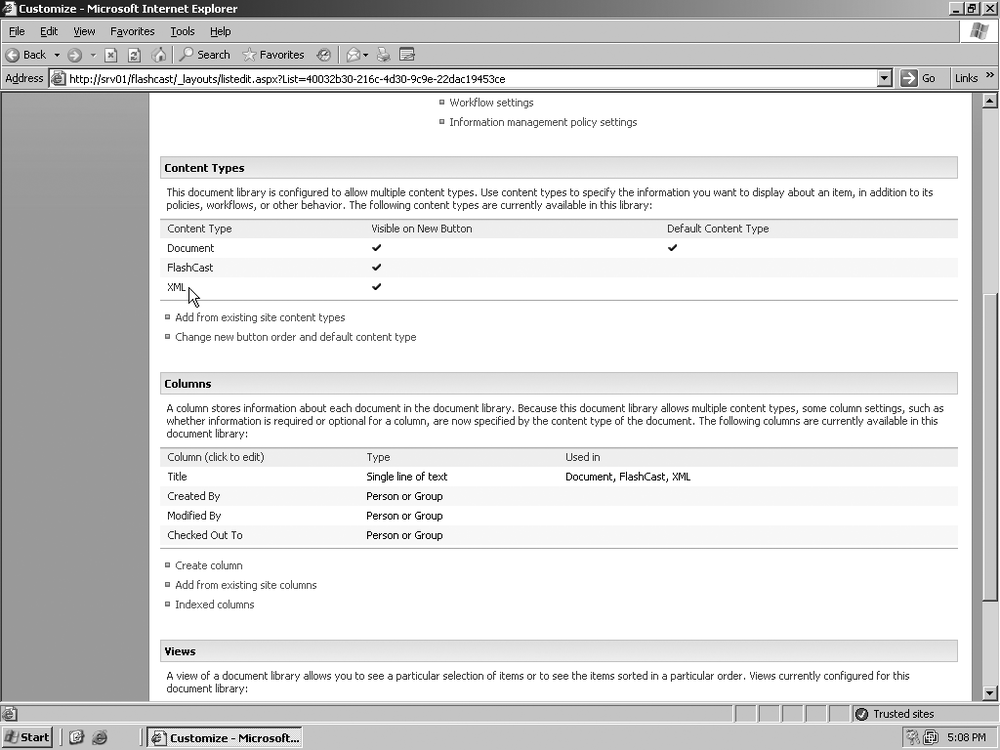
You can see this procedure at work in Figure 17-1.
If the content type you need does not exist, you can create it:
On your site, click Site Actions and select Site Settings from the menu.
In the Galleries column, click “Site content types.”
When the Site Content Type Gallery page opens, click Create.
On the New Site Content Type in the Name and Description section, type the name of the new content type and a brief description in the available fields.
In the “Select parent content type from” list, select the content group you will use as the basis for your new content type.
In the Parent Content Type list, select the parent content type you will use as the basis for your new content type.
In the Group section, choose to store the new content type in either an existing group or a new group.
Click OK to finish.
You can see an example of creating a content type in Creating a Content Type.

When you open a document library and click New, a list of existing content types will appear in the menu. For organizational purposes, you may want to change the order in which the content types appear. Also, by default, the first content type in the list is the default content type for your document library. You can move the name of the most commonly used content type in your library to the top and make it the default:
Open the desired document library, either by clicking its name in Quick Launch or by clicking View All Site Content and then clicking the library’s name.
Click Settings and then click Document Library Settings.
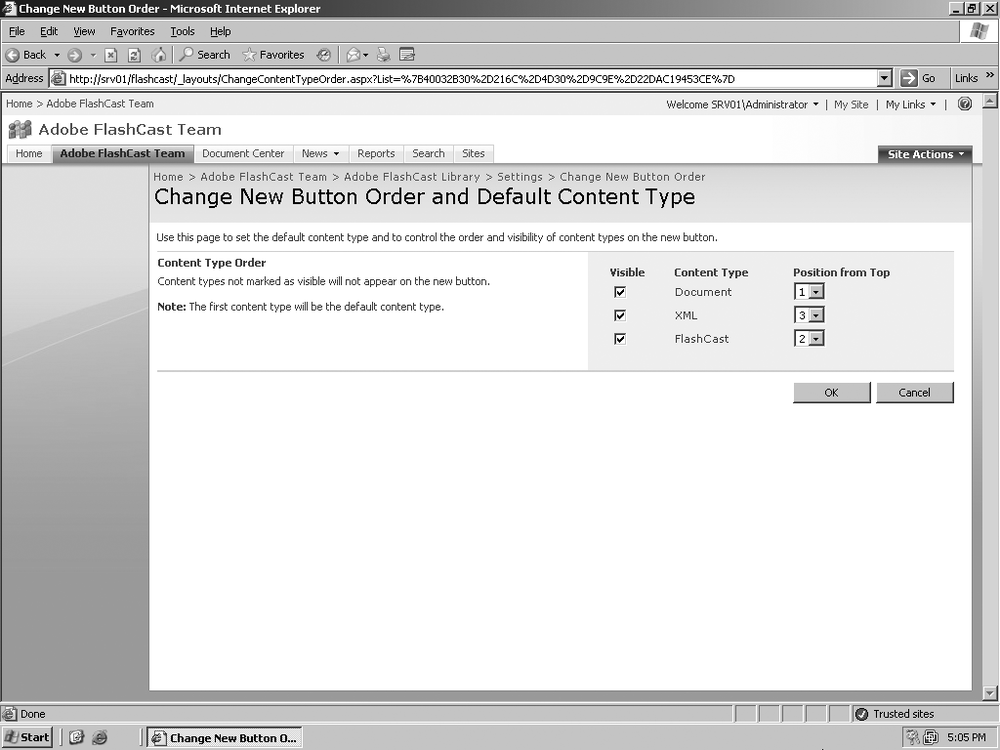
Under Content Types, click “Change new button order and default content type.”
In the Content Type Order section, if you want to remove the content type from the list, clear the checkbox next to the name of the item.
To change the position of the item in the new list, in the “Position from Top” column, click the drop-down arrow and select the number of positions you want to place the item from the top of the list.

Tip
For example, if you want the item to be at the top of the list, click the drop-down arrow and select 1.
You can see an example of how to accomplish this in Figure 17-3.
Most organizations have standard formats for different kinds of documents, such as contracts, proposals, estimates, and so on. Rather than recreating that format every time you need such a document, create the content type in a document once and then save it as a template. That way whenever you need to create a contract, you can use the contract content type template. Once the template is created, you need to associate the template with the content type in your document library. Before you begin the following steps, have the URL to the template handy or the path to the template on your server:
Open the desired document library, either by clicking its name in Quick Launch or by clicking View All Site Content and then clicking the library’s name.
Click Settings and then click Document Library Settings.
Under Content Types, click the name of the content type that you want to change
Under Settings, click Advanced.
In the Document Template section, click “Enter the URL of an existing document template” and then type or paste the URL to the document template in the available field.
If instead you want to upload the template, click “Upload a new document template” and then click Browse.
Browse to the template file using the Choose File dialog box, click the template’s name, and then click Open.
When the template is uploaded, click OK.
As a general guideline, you should keep your templates in a separate document library from your actual documents, to protect against a user accidentally changing the template document. Your template library should be accessible only by the people responsible for the template definition, whereas the document library using those templates needs to be accessible by the group responsible for actually creating the final content.
As you learned earlier in this chapter, two ways of defining a content type are creating columns or using metadata. Adding one or more columns lets you more specifically define the properties of the content type. Once you have more specifically defined the properties of content types, you can collect detailed data reports by tracking the specific metadata. Examples would be account number, sales region, product ID, and so on. You could create different content views for sales reports, divided by sales region, and a user in a particular region could access only those sales reports specifically assigned to her region:
Open the desired document library, either by clicking its name in Quick Launch or by clicking View All Site Content and then clicking the library’s name.
Click Settings, and then click Document Library Settings.
Under Content Types, click the name of the content type where you plan to add a column, as in Figure 17-4.
In the Columns section, click “Add from existing site or list columns.”
In the Select Columns section, click the “Select columns from” arrow and select the group you want to base the column on from the list.
Under “Available columns,” click the column that you want to add, and then click Add to move the column to the “Columns to add” list.
Click OK to add the column or columns, as shown in Figure 17-5.
A document workflow involves the process of an author creating a document and sending it to one or more approvers before it is published. Usually documents that are not yet approved are in a pending state and can be viewed only by the author and site members with View Lists rights. Once the document is approved, it is visible to any authenticated user or to anonymous users if that feature is enabled.
Tip
See Chapter 12 for more information on anonymous user access to SharePoint.
Before a Word document can enter an approval workflow, the document library must be enabled for this feature. Workflows operate differently depending on whether they are configured for a library, list, list content type, or site content type. This section focuses on adding workflows to document libraries.
Open the desired document library, either by clicking its name in Quick Launch or by clicking View All Site Content and then clicking the library’s name.
Click Settings, and then click Document Library Settings.
Under “Permissions and Management,” click Workflow settings.
On the Change Workflow Settings page, click “Add a workflow.”
On the “Add a Workflow” page, in the Workflow section, click the Approval workflow template.
On the “Add a Workflow” page, under Workflow in the “Select a workflow template” window, choose the type of workflow you want to add.
In the Task List section, use the “Select a task” list and choose an option from the list. The default is Tasks.
In the Workflow History section, click the “Select a history” list and choose a history list to use with the workflow. The default is Workflow history.
In the Start Option section, specify how, when, or by whom a workflow can be started, and then click Next.

It’s one thing to configure a workflow, but to really get to know how this process operates, it’s important to actually do a walkthrough. Once the workflow is created, you can see how it works by adding a document as a non-administrator:
Open the desired document library, either by clicking its name in Quick Launch or by clicking View All Site Content and then clicking the library’s name.
When the library opens, click the Upload button and then click the Browse button to navigate to the desired document.
When you have located the document, click Open to populate the Name field with the path to the document, and then click OK.
When the document appears in the document library, in the Document Approval column click In Progress, as shown in Figure 17-6.
On the Workflow Status, Document Approval page under Tasks, in the Title column, click the “Please approve” link.
On the “Tasks: Please approve” page, you can type an optional comment in the “Type comments to include with your response” field, and then click either Approve or Reject.

There are quite a number of specific ways that SharePoint and Word work together. The key concept to remember is that you don’t always have to open Word to work with Word, and you don’t always have to open SharePoint to work with SharePoint. It’s possible to get access from one to the other (or from any other Office 2007 application).
Though not exhaustive, the following section gives you an idea of how SharePoint and Word work together.
Often it is helpful to visually inspect different versions of a Word document in a document library. SharePoint and Word can make this possible:
Open the Word document stored in the document library, and click Review to open the Review ribbon.
Click the Compare arrow to open the list, and then click the specific type of comparison you want.
When the comparisons panes open, you will see the following:
The lefthand summary pane will show you a list of every version of the document in the library.
The righthand pane will show any to version that you want to compare.
The center pane holds a view of the document that is being compared to the original.
Close the view when you are finished.
Among the other sorts of lists you can use in SharePoint, you also can create a personal or professional blog. Blogs are an incredibly popular way to share your ideas and opinions in a linear fashion from one day to the next. Now you can choose to write entries in Word and then post them directly from your document.
Word 2007 is not enabled to publish to blogs by default, but you can configure this option manually:
In an open Word 2007 document, right-click in a blank area of the ribbon, and select Customize Quick Access Toolbar from the menu that appears.
When the Customize the Quick Access Toolbar and keyboard shortcuts window opens, under “Choose commands from,” use the drop-down menu and select File.
In the pane directly below that menu, scroll down and select TBD from the list, and then click the Add button to move TBD to the Quick Access Toolbar.
When the button appears in the File Menu Options area, click it to configure your blog account.
When the “Register a Blog Account” dialog box appears, click Register Now.
When the New Blog Account dialog box appears, click the drop-down arrow and select SharePoint from the menu.
In the New Community Server Account dialog box under User Name, enter your username in the field.
Enter your password in the Password field.
In the Blog Post URL field, enter the URL to your blog.
Under “Automatically upload picture to my picture storage location,” choose either “Don’t upload pictures in my blog post” or “Post images to the following location.”
If you chose the second option, enter the path to the location in the available field.
Click OK, and when the confirmation dialog box appears, click OK again.
Type your blog entry on the Word page.
If it’s not open on the ribbon, click the Blog Post tab, click the Publish button, and then click Publish from the list.
You may have to authenticate to your blog account again. If so, enter your username and password in the available fields and click OK.
The post you created in Word now appears on your SharePoint blog.