Chapter 4: Tracking Other Blogs
In This Chapter
![]() Understanding RSS and feed readers
Understanding RSS and feed readers
![]() Setting up Google Reader
Setting up Google Reader
![]() Reviewing your feeds fast with hot keys
Reviewing your feeds fast with hot keys
![]() Getting organized with folders and tags
Getting organized with folders and tags
Two things power the blogging world: writers and the community in which they function. The earlier chapters of this minibook talk about you, the writer. But that’s only half the equation.
Somehow, you need to get involved with the larger community, that is, the many bloggers and readers out there already talking about your subject. That involvement leads to links and references to you by other, more influential bloggers. If you want that kind of involvement, want to be noticed, and want to become a respected member of the community, you need to do one or more of the following:
• Connect with other bloggers via social media (see Book VII).
• Leave a pithy comment on an influential blog.
• Reference another blogger’s post in one of your own and link to that post.
• Write something highly relevant to current events.
All these methods require that you know what’s going on in your industry or community, as well as related news. To that end, you need to know how to track blogs. With that knowledge, you can then “listen” to the conversation that’s going on among related blogs and join in with useful information in the form of blog posts of your own. That’s what this chapter holds.
Note: This chapter is very similar to Book VII, Chapter 2. If you’ve already read that chapter, you can skim through this one. This chapter might also seem similar to Chapter 1 of this minibook, but it’s not. That chapter shows you how to find the right topic. This chapter focuses on how to track relevant blogs on an ongoing basis.
Understanding Feeds and Feed Readers
 Geekery ahead! This section is filled with terms like RSS and XML. These terms can help you understand how this stuff all works. If you got hives in computer class in high school, you might want to skip ahead.
All blogs (at least within the accepted definition of a blog) generate a list of updates in an RSS feed. RSS stands for really simple syndication, a standard way of delivering a list of headlines and articles or article summaries as a streamlined text file.
 RSS is built using Extensible Markup Language (XML), if you care about that sort of thing.
The raw content of an RSS feed looks like what you see in Figure 4-1.
Figure 4-1: Raw RSS. Blech.
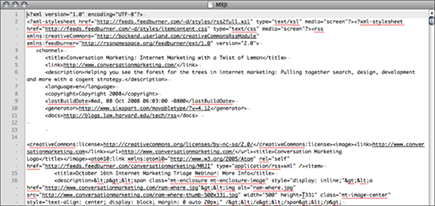
Information in this format isn’t very useful, is it? Well, not for the average humanoid, at least. However, this format allows a type of computer software — feed readers — to retrieve headlines and summaries from just about every blog on the Internet, and deliver them to you in a pretty, easy-to-read format, as shown in Figure 4-2. Much better!
Every time a blogger publishes a new post, the blogging software adds that post to the RSS feed. When you sign in to your feed reader, it checks the RSS feed for updates. Your feed reader then alerts you to the new post.
 Here’s the first takeaway for convenience and expediency: When you use an RSS feed reader, you can subscribe to the RSS feeds from websites you like and review the latest headlines in the reader instead of having to visit the website itself.
Figure 4-2: The same RSS feed, in Google Reader.

Here’s a bigger takeaway, which explains the power of feed readers: They enable you to collect information from many different websites, blogs, and other news sources (many nonblog sites publish RSS feeds, too). Then you can sort through it all, keep and organize the information you need, and ignore the rest.
Setting Up Google Reader
One of the most popular feed readers is Google Reader. It’s easy to use but includes powerful features for reviewing and organizing lots of information at once.
Although this section focuses on Google Reader, many other great tools are available. Regardless of the feed reader you use, though, the basic principles are the same, and you should be able to transfer the lessons from one feed reader to another.
If you have a Google account, you already have a Google Reader account, too. Visit www.google.com/reader and log in using your username and password.
If you don’t already have a Google account, set one up and then visit www.google.com/reader. See Book VII, Chapter 2 for more about setting up a Google account.
You see the Google Reader welcome page, as shown in the upcoming Figure 4-3.
Subscribing to feeds in Google Reader is easy. Follow these steps:
1. Click the Subscribe button, as shown in Figure 4-3.
A small box opens, right below the button.
Figure 4-3: Google Reader, the first time you log in.
2. Type the web address of the blog to which you want to subscribe.
3. Click Add.
Google Reader detects the blog’s RSS feed and subscribes to it.
 If a blog’s RSS feed isn’t set up correctly, Google Reader might not find the feed. No problem. Move on to the following set of steps, where you subscribe to a blog’s RSS feed from the blog’s homepage.
First, look for the RSS subscription icon or link. It’ll look something like the link shown in Figure 4-4.
Figure 4-4: Try subscribing from a blog homepage.

After you find the RSS subscription link or icon, follow these steps:
1. Click the link or icon.
2. Choose Google Reader.
3. Click OK.
Google Reader adds the feed.
If a blog’s RSS feed is really stubborn, you might have to add it to Google Reader manually. Don’t worry! It’s not as difficult as it sounds. Follow these steps:
1. On the blog’s homepage, find the RSS link or icon; refer to Figure 4-4.
2. Right-click the link.
3. From the menu that appears, choose Copy Link or whatever similar option your browser shows you.
4. Log in to Google Reader.
5. Click Add Subscription; refer to Figure 4-3.
6. Paste the link into the subscription field and then click Add.
Google Reader grabs the feed and adds it to your subscriptions.
If these methods don’t work, contact the blog author. Something’s wrong, and chances are that the author will appreciate the note (because he’s losing subscribers).
Google Reader saves all your subscriptions in your account. When you next log in to Google Reader, you’ll see those feeds, updated with the latest headlines from those sites and blogs.
Using Folders and Tags to Organize Your Feeds
If you have only five or six feeds to review, you can keep them all lumped together in a single folder, with no categorization. But you’ll probably end up with too many to keep organized in one folder, and you’ll rapidly lose track of different feeds. The best tools to aid you in organization, in any feed reader, are
• Folders: Use folders to group content into broad topics, such as search engine optimization or local news.
• Tags: Use tags to group articles, even if they’re in different folders.
Using folders to organize feeds
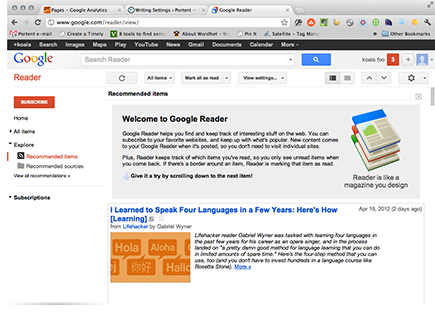
You could leave all your feeds mashed into one folder. But that’ll make one heck of a mess, as you can see in Figure 4-5.
Figure 4-5: Total feed higgledy-piggledy.
It’s hard to find want you need. So, to be neat, tidy, and organized, file those feeds in a folder.
When you organize all your feeds like this — grouping them into relevant folders — you get a much more usable feed environment, as you can see in Figure 4-6.
To create a folder and then add a feed to that folder, follow these steps:
1. Log in to Google Reader.
If you don’t have a Google Reader account, see the earlier section “Setting Up Google Reader.”
2. Click the feed that you want to place in a folder.
3. At the upper right, open the Feed Settings drop-down box, as shown in Figure 4-7.
4. Click New Folder. Name the folder and click Save.
The folders appear on the left-hand side of the screen. You can rearrange folder order by clicking and dragging, too.
Figure 4-6: A more organized set of feeds, using folders.
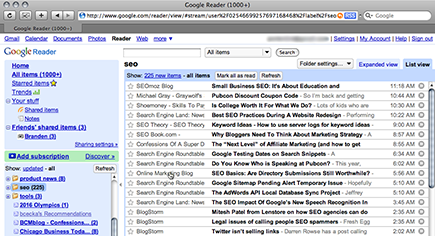
Figure 4-7: Open Feed Settings to create a folder.

Speed demon that you are now, you can also create many folders at once:
1. Log in to Google Reader.
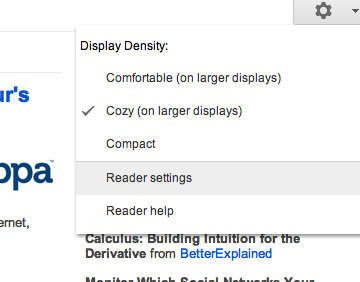
2. At the top right, click the settings button, then select Reader settings, as shown in Figure 4-8.
Figure 4-8: Reader settings access.
3. Click the Subscriptions tab.
You see a list of every feed you have as well as the feed’s folder assignment. Each feed that’s assigned to a folder shows the folder name on the right, as shown in Figure 4-9.
To add, change, or delete folders, select the Folders and Tags tab.
Folders are indeed fantastic tools, getting you halfway to a totally organized blogging radar screen, as it were. Try to use simple, clear folder names that you’ll recognize later. It’s tempting to just type New Folder for now, thinking you’ll come back and fix it later. Odds are, you won’t. Use a good label now, and you’ll be happier for it.
Figure 4-9: The Manage Subscrip- tions page.

Using tags to organize feeds
Here’s where the real world bumps heads a little with your new organizational system. What if you store two different articles in two categories, but those articles are still related? Say that you have a newspaper article about search engine optimization that ends up in your News folder, and a blog post with a great SEO tip that’s related to the newspaper article. You want to link the two somehow so that you can see them in the same “bucket” and remind yourself that they’re related. However, you don’t want to put their feeds in the same folder. The business section of the newspaper doesn’t always talk SEO. The SEO blog doesn’t always talk news.
This is where tags can be a great tool.
Tags are keywords or phrases that you assign to a single post instead of an entire feed. You could tag both the newspaper article and the blog post with SEO. Then you’d see both articles when you view the hits on your SEO tag.
Here’s how you add a tag to a post:
1. Click the post you want to tag.
2. Click Add Tags at the bottom of the post.
The Add Tags box appears right above the link.
3. Type the tags you want, separated by commas, and then click Save.
That’s it! You tagged your post.
Here’s how to tag posts without touching your mouse. While viewing the post in Google Reader, press T. You enter your tags in the Edit Tags field that appears.
You can view all articles with a given tag by either
• Clicking that tag at the bottom of the article
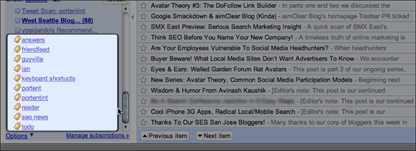
• Clicking the tag name in the lower-left corner of your Google Reader window. See Figure 4-10.
Figure 4-10: Tags listed in Google Reader.
When you use tags and folders together, you can save and organize a lot of information — fast.
Reviewing Feeds Fast with Hot Keys
Phew. All that tedious housekeeping is done (for now, at least). The question before you is how to skim through all your feeds every day. Answer: with hot keys!
Google Reader and most standard feed readers include hot keys, which allow you to use your mouse to rapidly view, tag, or manipulate each post.
In Google Reader, you want to know six critical hot keys:
|
Pressing This |
Does This |
|
J |
Moves you down to the next item |
|
K |
Moves you up to the previous item |
|
Shift+N |
Moves you to the next folder |
|
Shift+P |
Moves you up to the previous folder |
|
T |
Opens the tagging menu |
|
Shift+S |
Shares an item on your Shared Items page |
More on the Shared Items page in a bit.
To find many other hot keys, look in the Google Reader Help center by searching for keyboard shortcuts.
The most important thing to remember is that you’re not here to read the details on every item. You’re here to build a reference library. More on that in the upcoming section “Avoiding Information Insanity.”
Sharing with a Bundle
If you work on a team, you might want to make interesting items available to team members. Google Reader allows you to do this via Bundles.
The easiest way to share items is to create a bundle, a unique page listing all items in a folder or assigned a tag. You can bundle any feed items that are grouped under a tag or a folder.
Here’s how you create a bundle:
1. Create a tag and tag a few items.
See the earlier section “Using tags to organize feeds” to see how.
2. Hover your mouse over the tag you want to bundle.
3. Click the small black arrow that appears.
4. Click Create a Bundle, as shown in Figure 4-11.
Figure 4-11: Creating a bundle.

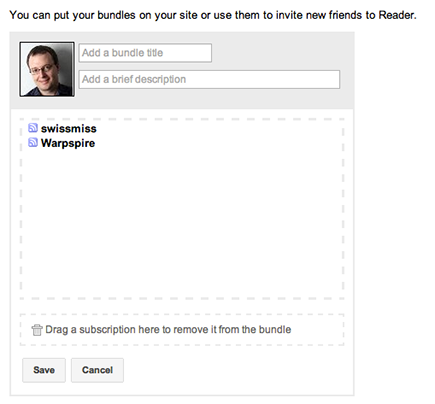
The page that appears lets you customize and save the bundle, as shown in Figure 4-12. You can add other tags, folders, or individual subscriptions by clicking-and-dragging them into the bundle, or delete them by dragging them to the trash can.
Figure 4-12: Editing a bundle.
5. Click Save.
Figure 4-13 shows the result. You can e-mail the link to those with whom you want to share posts, and they’ll be able to subscribe to all the items to which you add this now-public tag. You can also embed the bundle in your website or blog, or export it for reuse in other tools.
Figure 4-13: Share your bundle.

Bundles are doubly handy because they
• Create a page that folks can visit to see items you consider important.
• Create an RSS feed.
Now your team has two options for finding what they want.
Avoiding Information Insanity
You can easily get buried in articles, posts, and random information. You don’t want to end up with a pile of hundreds or thousands of items that’s so huge you throw up your hands and give up.
To avoid information insanity, try these rules:
• Organize; don’t read. The most important thing you can do is find interesting stuff and organize it for later. If you want to read a full article, go ahead! But don’t force yourself. Tag it and file it. That way, you can retrieve it later.
• Declare bankruptcy. Every now and then, if you’re so hopelessly behind in reviewing your feeds, you can just declare feed bankruptcy. Mark everything as read and start over. Something really compelling will likely be mentioned in future articles, so don’t worry about missing anything.
• Be picky. Don’t keep any feed subscriptions that you never read. Clean out your feed reader ruthlessly at least once per month.
With these tips and Google Reader in hand, you’re now armed and ready to start getting involved in the blogging world.