So far in this chapter, you've been reading from the point of view of the person accessing other computers on the network. This section details how to make the components of your computer available to other people on the network.
You share something the same way whether it's a drive, a folder, or printer: You highlight its icon, turn on sharing, type a name for the share, and adjust its settings. Thereafter, anyone else on the network can see icons for the resources you've shared by double-clicking My Network Places on their own desktops.
The first step in making a resource available to the network is to locate its icon. For example:
Disk drives. To locate the icon of the disk you want to share, double-click the My Computer icon on your desktop. You'll see icons for all the drives on your system. (When you make a drive available to the network, you also make every folder on it available.)
Folders. Sharing folders has distinct advantages over sharing an entire drive. By sharing only a folder or two, you can keep most of the files on your hard drive out of view from curious network comrades. Furthermore, sharing only a folder or two makes it easier for them to find files you've made available, because they don't have to root through your drive looking for the appropriate folder.
To specify the folder you want to share, locate its icon using either Windows Explorer or the My Computer icon (Section 5.1.1).
Printer Shares. Choose Start→Settings→Printers to open the Printers window, which has an icon for each printer your computer knows about. (See Chapter 16 for more on these printer icons.)
After you've located the icon of the drive, folder, or printer you want to share, proceed like this:
Right-click the resource's icon; from the shortcut menu, choose Sharing.
If you don't see a Sharing command, choose Properties instead, and then click the Sharing tab. Either way, you're now facing the Sharing tab of the Properties dialog box.
Click "Share this folder" or "Shared as" (see Figure 13-6).
Figure 13-6. The Sharing tab for a disk or folder. The Share name is what other people will see when they open their My Network Places desktop icons. Make this name as helpful as possible within the 12-letter length limit.
The other options on the dialog box spring to life.
Tip
When sharing an entire drive, you'll find that the "Share this folder" option is already selected, and the drive already has a share name (its drive letter plus a dollar sign, such as C$). Windows 2000 creates this kind of administrative share for every hard drive on the computer. To allow other users (including nonadministrators) on the network access to the drive, you must click the New Share button and supply another share name in the New Share dialog box. You can then go on to click the Permissions button to configure user access to the new share, as described later in this chapter.
Type a new name for the share, if you like.
As shown in Figure 13-6, you can choose a name for the resource you're sharing that's different from its folder name or drive letter. This technique prevents network users from knowing exactly where the shared folder is on your drive.

Tip
If you append a dollar sign ("$") to a share name, the system creates the share, but makes it invisible. Users browsing the network can't see the share in their Windows Explorer or My Network Places windows. They can, however, map a drive letter to it by manually typing the path to the share in the Map Network Drive dialog box—if they know about your secret share.
You can also use the Comment field to type additional information that further clarifies what's in the shared folder or disk. But remember that other people on the network won't see your comments unless they switch their My Network Places window into Details View (by choosing View→Details).
Tip
If you're sharing a printer on a network where some machines are running different versions of Windows, click the Additional Drivers button. (Those other machines need appropriate printer-driver software, even if the printer is elsewhere on the network.) A list of drivers appears; turn on the checkboxes for the versions of Windows that will be sharing the printer, and then click OK. (You may be asked to insert the to Windows 2000 Pro installation CD.)
If you were to simply click OK at this point, you would make this resource available to everyone on the network. But before leaving the dialog box, take a moment to survey the identification and security options.
When you make a folder or drive available to the network, you don't necessarily want to give your co-workers permission to run wild, trashing your files, renaming things at random, and vandalizing your JPG photos. In fact, you can limit people's access on an individual basis, thanks to the Permissions button shown in Figure 13-6.
When you click it, you get the dialog box shown on the left in Figure 13-7. Setting up permissions involves two steps: identifying the person (or group) to whom you're granting permission, and then specifying how much access you want to grant them.
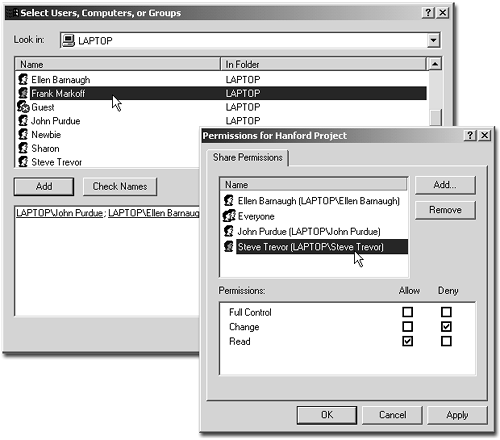
Figure 13-7. Lower right: The Share Permissions page lets you control how much access each person has to the folder you're sharing. Top left: Specify which people (or groups of people) can access your shared folder over the network. You can double-click their names or type names into the box at the bottom, separating each name with a semicolon.
At the top of the Permissions dialog box, you'll see a list of users and possibly groups of users. If you see only the Everyone icon there (the default), then any permission changes you make will apply to everyone on your network. You'll make the resource you're sharing fully or partially accessible to everyone at once, to the same degree.
That's fine for very public documents. But in many cases, you may prefer to share a folder or drive selectively. If you're in Accounting, for example, you might want to make the company salary spreadsheet accessible by the other accountants in your workgroup, but off-limits to everyone else in the company.
That's why the Add button (Figure 13-7, left) lets you add users or groups of users to the list—so that you can set up different levels of access for different people. Page Section 17.3.4 offers help in setting up accounts for individuals or groups—a task generally left to network administrators, except when you are the administrator (on a peer-to-peer network, for example).
Here's how you'd go about setting up permission to access a folder you've just shared, starting with the dialog box shown on the left in Figure 13-7:
Click Add.
Now the Select Users, Computers, or Groups dialog box appears (right in Figure 13-7). If you scroll down far enough into the list, you'll see the names of the other people on your network, and any groups you or your network administrator have created.
Note
If your computer is logged on to a domain, the list of users and groups you see here is being supplied by the domain controller. The list shows the accounts that have been created in the Active Directory by a network administrator.
If you're part of a workgroup, on the other hand, the list of users and groups is stored on your own computer. You may have to create new accounts for specific people (Section 17.3.4) in order to grant them access to your shares.
Double-click the name of the person or group for whom you're setting permissions.
The name appears in the bottom box. Repeat until the box lists everyone who's entitled to access the shared folder.
Click OK.
After a moment, you return to the Permissions dialog box.
Highlight Everyone and click Remove.
You've just ensured that only the users and groups you've specified can access your shared folder.
In the Permissions dialog box, the names of the people you've authorized appear at the top. Highlight the first name, and then use the Allow or Deny checkboxes at the bottom of the dialog box to restrict his vandalistic impulses like this:
No access. If you don't turn on any checkboxes, the person or group whose name you've selected can't access this shared resource at all. They won't even know it exists.
Read. Click the Allow checkbox for the Read line (and no other lines) for a "look, don't touch" policy. Other people on the network will be allowed to open and read what's inside this disk or folder, but won't be able to save changes, rename anything, delete anything, or deposit any new files.
Change. If you allow this kind of access, the people you've identified can open and edit the shared documents. They just can't delete the files or create new ones in this particular disk or folder.
Full. Full access gives your network friends the right to do whatever they want to your files and folders, exactly as though they were sitting at your computer—including deleting them.
When you've assigned the appropriate permissions to each person, click OK, then OK again. You'll see that the icon for the resource you just shared has changed; a hand now cradles the icon to help you remember what you've made available to your network colleagues.
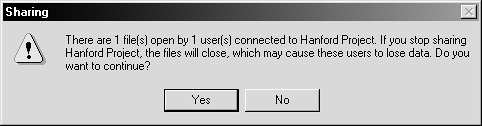
Removing sharing from a folder, drive, or printer is simply a matter of opening the Sharing dialog box for the icon in question. Click "Do not share" and then OK. If someone on the network is actively using the share, you'll see the advisory box shown in Figure 13-8.