
When you're on a network, it's likely that no printer is plugged directly into your computer—but somewhere in the building, connected to your machine by cables, sits a shared printer (or several). To find out what printers you can use, choose Start→Settings→Printers; the Printers window opens, showing the icons for any printers whose software you've installed, along with an Add Printer icon.
If the printer icons all have cryptic names, right-click each in turn, selecting Properties from each shortcut menu. The resulting dialog box usually provides more information (see Figure 13-9) about the type of printer and where it is.
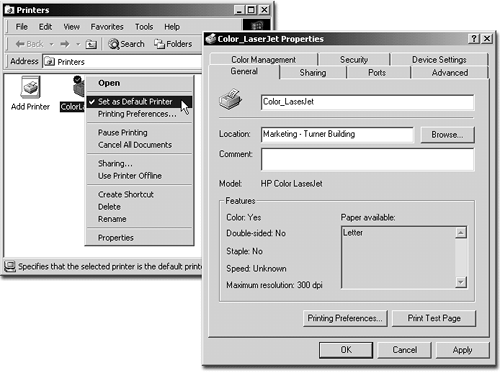
Figure 13-9. Left: The checkmark means this printer is the one your Windows programs will use by default (unless you specify a different printer). Right: If you right-click a printer and select Properties, you'll see all sorts of information about the printer (if your network administrator has supplied it), including its location and features.
If you're lucky enough to have several printers you can use, you need to set one as your default printer—the one your Windows printouts will go to unless you change the setting.
To specify your favorite printer, right-click its icon in the Printers window; choose Set As Default Printer from the shortcut menu (Figure 13-9, left).
When your generous manager buys a new printer for the network (and turns on Sharing for it), you'll be able to use it—but first you need to find it on the network and then tell your computer about it.
As noted on Section 2.2, Active Directory is a feature of Windows 2000 Server, the corporate-network version of Windows 2000. It's a central directory that lists (and lets administrators manage) applications, files, people—and printers.
If you work on an Active Directory-based network, you add a network printer to your Printers folder like this:
Choose Start → Settings → Printers. In the Printers window, double-click Add Printer.
The Add Printer wizard opens.
Click Next. Select Network Printer; click Next again.
Now you arrive at the Locate Your Printer screen.
If the "Find a printer in the Directory" option is available, select it and click Next.
If not, see the next section, "Locating a Printer by Browsing."
In the Find Printers dialog box, specify a printer name, location, or the features you need to use, if you like.
These options will help narrow the choices if you're in a big company. (Leave these fields blank if you want the search to list all of the printers in the directory.)
Click Find Now.
Windows 2000 contacts a domain controller on the network, which supplies a list of the printers that meet your criteria.
Highlight the name of the printer you want to add and click OK.
Indicate if this printer is to be your default printer. Click Next.
Review the choices you've made and click Finish.
Note
Selecting a network printer this way doesn't guarantee that the printer is turned on, functioning, filled with paper, or even physically there—only that it exists in the Active Directory. Check with your network administrator if you're unsure of which printer you should use.
Removing a printer from the Printers window is easy. Right-click the printer in the Printers folder and select Delete from the shortcut menu. After you confirm that you want to delete the printer's icon, it disappears.
If Active Directory isn't used on your network, you'll need to browse around to find the network printer you want. To do so, follow these steps.
Choose Start → Settings → Printers. In the Printers window, double-click Add Printer.
The Add Printer wizard opens.
Click Next. Select the Network Printer option and click Next again.
Now you arrive at the Locate Your Printer screen.
Select "Type the printer name." If you know the exact name that the printer has been given, type it in.
If not, click Next to browse for the printer. A list of shared printers on your network appears; highlight the one you want to add to your Printers window.
Click Next. Indicate if you want this printer to be your default printer. Click Next. Review the choices you've made and click Finish.
Once you've set up your machine to use the printers on your network, sending printouts to them isn't any more difficult than the everyday printing: With a document on the screen, choose File→Print, and proceed as described in Section 16.3.2.2.
POWER USERS' CLINIC : NTFS Permissions
Using the Permissions controls described on the previous pages gives certain people access to your shared folder over the network. However, anyone who sits down at your desk and logs into your computer can still see and use what's in the folder, because the Share Permissions feature only controls access over a network.
In addition to share permissions, Windows 2000 provides another, completely independent mechanism for controlling access to the drives, folders, and files on your computer. This mechanism, known as NTFS permissions, works only for drives that have been formatted using the NTFS drive-formatting scheme described on Section A.2.3.
Using NTFS permissions is most decidedly a power-user technique, however, because of the added complexity it introduces; entire books have been written on the topic of Windows 2000 security alone. For now, a pair of warnings is in order. First, note that, by default, Windows 2000 grants the Everyone group Full Control over all NTFS files and folders. When you modify the NTFS permissions for your files and folders, make sure that everyone who needs to access them has the appropriate permissions. For example, in order for a network user to access a shared folder, she must have both share permission and NTFS permission for that folder.

Furthermore, if you're not careful, it's entirely possible to "orphan" a file or folder (or even your entire drive) by revoking everyone's permission to it, even your own, making it completely inaccessible by anyone. Before you start working with NTFS permissions, it's a good idea to create an extra user account on your system (see Section 17.3.4) and grant it Full Control for all of your drives, just in case something goes wrong.
If you decide to proceed, here's how you restrict access to a shared folder so that only certain users and groups can access it, even when visiting your machine. Start by right-clicking the shared folder; choose Properties from the shortcut menu. (Note: NTFS permissions aren't just for shared folders. You can also use them to restrict access to individual files.)
In the Properties dialog box, click the Security tab. Click Add; double-click the names of the people to whom you want to grant access; click OK.
You return to the Security tab, where their names appear. So far, all of this should feel familiar. But look at the bottom of the dialog box, shown here: Now you have far greater control over who can do what—even when they're sitting at your machine.
By clicking the Allow and Deny checkboxes, you can specify exactly how much permission these group members will have. Turn on Read if you want them to be able to examine the contents of the folder, but not make changes. Read & Execute is primarily useful for applications; it means your selected colleagues can actually run the programs in question. Write means that people can make changes to the files or folders, and create new ones in the shared folder; Modify is the same as Write, but adds permission to delete the shared folder or file; Full Control even lets someone change the permissions you've just spent so much time setting up. If you're sharing a folder (instead of a file), you'll also see a List Folder Contents option, which, of course, lets your visitors see what's in the folder.
Finally, for best sanity preservation, turn off the "Allow inheritable permissions" checkbox at the bottom of the window. In the warning box, click Remove. ("Inheritable permissions" means that the user or group can inherit permissions to the selected file or folder from the folder that encloses it. For example, assigning somebody permission to access the C: drive also grants him the same permission to all of the folders on that drive, unless you select one of those subfolders, clear this checkbox, and assign him new permissions.)
Remove all other users and groups from the Security tab by clicking each name and then clicking Remove. (Leave an administrator account in place, however, if none of the group members are administrators; see Section 17.3 for details on Administrator accounts.)
Finally, click OK. You return to the desktop; now your file or folder is secure, both over the network and in person.