If you're on a corporate network, you probably already have access to an office printer (or several) on the network; the setting-up duties have been left to a network guru. This section covers installing and setting up a local printer (one that's plugged directly into your computer).
Tip
When Windows people talk about installing a printer, they're generally not talking about hooking up the actual printer to the PC. Instead, they refer to installing and setting up the printer's software and settings. Once you've installed a printer, a printer icon for it appears in your Start→Settings→Printers window.
If your printer is newish (roughly 1999 or later vintage), it's probably Plug-and-Play compatible. Windows 2000 will detect and install it without much help from you. All you have to do is reboot your computer after installation. An even more recent printer model, one that uses a USB or FireWire connection to your PC, is hot-pluggable: that is, you don't need to turn off the computer before plugging it in. This time, Windows 2000 will automatically detect the printer's presence and then perform the entire driver installation—no reboot required.
Tip
No special user rights are necessary to install a Plug-and-Play printer connected to your machine. Non-Plug-and-Play printers, on the other hand, require a user account with administrative privileges (see Section 17.3).
Once you've connected the printer to the computer according to the manufacturer's directions, plugged it in, and turned it on, the next steps depend on which kind of connection the printer uses:
Parallel port (also called the printer or LPT1 port). Turn on your computer. Select Start→Settings→Printers. Double click Add Printer. In the Add Printer Wizard, select "Local printer," and turn on "Automatically detect my Plug and Play printer." Follow the screen directions to complete the installation.
USB or FireWire (IEEE-1394). No need to even turn off your computer. As soon as you connect the printer to the computer, Windows 2000 announces that it has detected new hardware and proceeds to install and configure the printer's driver.
Infrared. Turn the printer on and position it so the infrared connectors on the printer and computer are no more than about three feet apart. After a few seconds, the computer will recognize the printer and install its driver without further fuss. If the infrared doesn't appear to be working, check in Device Manager (Section 16.5.1) to see if it is installed correctly.
In each case, an icon representing the printer now appears in your Printers window, bearing the name you gave it during the installation. You can double-click this icon to see the printouts in line to print (see Section 16.3.2.2).
If the installation process doesn't go smoothly, Windows 2000 offers a wizard that lets you perform the installation manually: the Add Printer Wizard.
Occasionally, Windows 2000 doesn't manage to detect a printer—even a very common printer. In that case, the Add Printer Wizard can bail you out.
To open the wizard, choose Start→Settings→Printers. The Printers window opens, where icons for any correctly installed printers appear—along with the Add Printer icon. Double-click it to start the wizard.
As you click through its screens, the wizard asks you to specify the printer's manufacturer and model, to provide a name for the printer, to specify if the printer is to be your default printer in Windows, whether or not you want to share the printer, and if you want to print a test page.
Windows 2000 will configure the printer and install the necessary driver (you may be asked for the Windows 2000 Pro installation disk). When it's all over, you'll find an icon for the printer in your Printers folder.
If your printer isn't even listed in the "Printers:" list (Figure 16-3), you may still be able to get it to work with Windows 2000. If the printer is new, check to see if it's on the Hardware Compatibility List. If so, get the driver from the manufacturer, or check the Microsoft site for drivers at http://www.microsoft.com/windows2000/upgrade/compat.
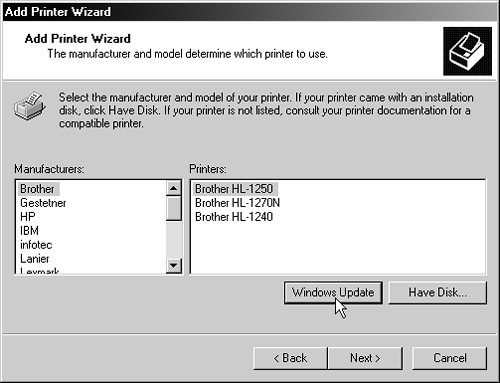
Figure 16-3. If the printer isn't on the first list (left) and you're connected to the Internet, click the Windows Update button to download the latest models (right).
Tip
If your printer isn't on the Hardware Compatibility List and no driver is available, check to see if the printer has a compatibility or emulation mode, in which it appears to the computer as a better known brand such as a Hewlett Packard LaserJet or Epson Stylus. Then you just need to install the printer exactly as if it were the model it emulates.
To install a printer for which you've obtained a driver, use the Add Printer Wizard, exactly as described in the previous section. But when you see the list of printer manufacturers and printer models, click the Have Disk button.
Windows prompts you to insert the manufacturer's installation disk. If the driver is on a floppy or CD, insert it; otherwise, click Browse to find the driver (one you downloaded, for example) on a local or network drive. (The file will have an .inf extension.) If the wizard finds more than one driver, or finds a driver that supports multiple printers, you may have to choose the correct one from a list.
Continue through the wizard's dialog boxes as described earlier; when it's all over, an icon for your printer appears in the Printers window.
Tip
To remove a printer from your computer, right-click the printer icon in the Printers window and select Delete from the shortcut menu. You'll be asked to confirm that you want to delete the printer or, in the case of a network printer, that you want to remove your connection to the printer.
Before deleting a printer, check to make sure the printer queue (see Section 16.3.2.2) is empty. Windows 2000 will try to clear the queue before deleting the printer, which can cause a print job to be lost.
You can change a long list of settings for any kind of printer; these properties are different for each printer model. In addition, you can edit the settings Windows 2000 calls Printing Preferences for each printer (called Document Defaults in Windows 98 and Windows NT).
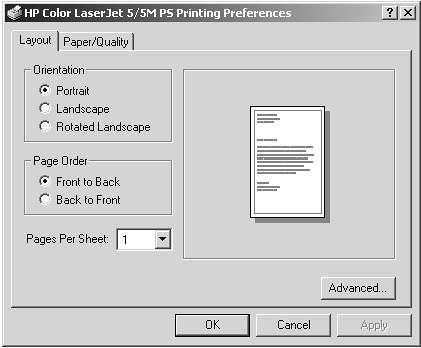
Printing Preferences configures how documents are printed—within the limitations of the printer itself. For example, on some printers, you can specify quality settings or the type of paper you're printing on.
To see Printing Preferences, right-click a printer icon in the Printers window; select Printing Preferences from the shortcut menu. Or select Layout or Paper/Quality tabs in the Print dialog box of the program you're using (Figure 16-4).
Even more settings are available in each printer's Properties dialog box, which appears when you right-click a printer icon and select Properties from the shortcut menu. This dialog box may have as many as eight tabs, filled with options. Some examples:
General tab. Describes the printer, shows its name, and lets you note its physical location (a handy tidbit if you work in a big corporation).
Sharing tab. Lets you share this printer so that other computers on the network can use it. (See Section 13.3.2 for more on printer sharing.)
Ports tab. Lets you specify and configure which ports your PC uses for printing, and contains the on/off switches for bidirectional support (which lets you printer report errors such as paper jams) and printer pooling (which lets several identical printers, connected to a single server, appear to Windows 2000 as though they're a single printer).
Advanced tab. Offers assorted options having to do with when the printer is available, which driver to use, whether or not to insert a blank page between printouts, and so on.
Color Management tab. For color printers only; lets you use the optional color profiles feature, which helps maintain color fidelity from screen to paper.
Security tab. Governs how much access a network user or group has to use this printer (see Chapter 17).
Device Settings tab. When available, shows you the printer's paper size, memory total, and other statistics.
Utilities tab. When available, offers options for head alignment, nozzle cleaning, and so on.
When you or others on the network send printouts (known as print jobs) to a printer, the jobs line up in a nice orderly queue, waiting for their turn to be printed. Unless you're on a network where access to the printer queue is controlled by a security policy, you can view and manage the queue by double-clicking a printer icon in the Printers folder (Figure 16-5).
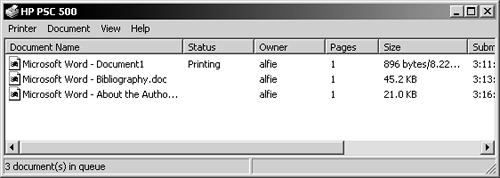
Figure 16-5. The print queue shows what documents are queued up, their current status, owner, number of pages, size in bytes, and date submitted.
While you're printing, a small icon of a printer appears in the system Tray. Double-click the icon to open the printer queue. Once the queue window is open, you can perform several useful printout-management tricks:
Tip
In an effort to minimize network traffic, the printer queue doesn't update the list of waiting printouts constantly. Press F5 often while you're viewing a network printer's queue to keep it updated.
The usual order in a print queue is first in, first out, but there may be times when you want to rearrange the order of the waiting print jobs. Perhaps you've sent a very long print job to the printer and don't want to cancel it, but you have a one-page job that you must have now.
To reorder the print jobs, just drag the name of the print job up or down the queue list.
If you have second thoughts about a print job that hasn't started printing yet, you can delete it from the queue easily enough; just right-click the document name and select Cancel from the shortcut menu.
If the document is already printing, the process is a bit iffier. Your printer has its own memory (the buffer) which stores the printout as it's sent from your PC. If you pause or cancel printing, you're only stopping the PC from sending more data to the printer. That's why a page or two may still print after you've paused or canceled a printout. If it's important to cancel the printout instantly, your best bet is to cancel the print job and then press the printer's reset button, if there is one, to clear its memory buffers. (To clear the buffers of some laser printers, you may have to turn them off and then on again.)
As long a print job is in the queue and hasn't started printing yet, you can pause it temporarily, permitting other jobs in the queue to continue printing, in effect moving ahead in line; just right-click the document and select Pause. To let the printout continue, right-click its name again and this time choose Resume.
You can also make a certain print job start over from the beginning—a useful practice if you discover that the first 14 pages of your white paper have been inadvertently printed on pink paper. To do so, right-click the document in the print queue and select Restart from the shortcut menu.
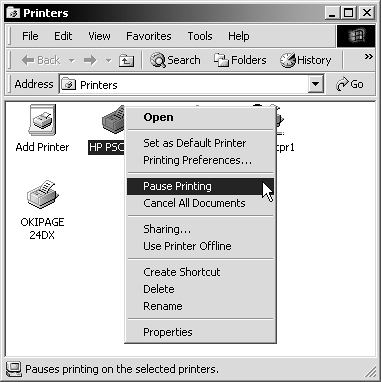
To pause all the print jobs on a printer, right-click the printer icon in the Printers folder and select Pause Printing from the shortcut menu. Choose Pause again to resume printing. To clear the entire print queue, right-click the printer icon and select Cancel All Documents from the shortcut menu (Figure 16-6).