
Fortunately, once you've purchased the hardware for your network, there's nothing else to buy; Windows 2000 Professional contains all the software you need to get your computers communicating.
The building blocks of the Windows 2000 networking architecture may sound technical, but there's no avoiding them; as you set up your network, you'll need to install at least one of each software component:
Network adapter drivers are the drivers for your networking card. Windows 2000 Professional includes drivers for most of the popular networking cards manufactured today. (Most cards come with a driver disk, as well.)
Clients are software modules that redirect your computer's requests for access to network file and printer resources. For example, when you use an application's File→Open menu and select a file on a network drive, the client redirects the request for access to the file from the local file system to the network share.
Protocols are the languages spoken by the computers on the network. For two systems to communicate, they must have at least one protocol in common.
Services are programs that load automatically whenever the PC starts up—in this context, modules that let Windows 2000 Professional share its own resources and provide other network services.
The following sections examine the installation of each of these modules in turn.
Most network cards today support the Plug-and-Play standard (see the next chapter). After installing the card, all you have to do to install its driver is turn on the computer; Plug and Play detects the new card and installs the appropriate driver.
In fact, if you perform a fresh installation of Windows 2000 Professional with the networking card already installed, the setup program installs the driver and all the software modules you need for basic network communications (as described in the following sections). If you add the networking card after installing Windows 2000, Plug and Play detects the card and installs its driver, but you must then install the other networking modules yourself.
If Windows 2000 detects your card, but doesn't have a driver for it, the system prompts you for the location of a driver. Virtually all NICs come with drivers on a floppy disk or CD-ROM; simply direct the program to the location of the driver files. The system does the rest. (See Chapter 16 for help with installing NICs that Plug and Play doesn't recognize.)
Once you've installed your network adapter and its driver, you're ready to install the other networking software components—including the client software. Here's how to go about it:
Choose Start → Settings → Control Panel. Open the Network and Dial-up Connections folder shortcut.
The Network and Dial-up Connections window appears.
Right-click the Local Area Connection icon; choose Properties from the shortcut menu.
If the Local Area Connection icon doesn't appear, then you haven't successfully installed your networking card and its software.
Click Install.
If you've just installed your card, the Local Area Connection Properties dialog box displays the adapter driver in the Connect Using box, and the Components box starts out blank (Figure 15-2, left.) The Install button lets you begin adding components.
Figure 15-2. Creating a small network involves adding at least three software components to this list, shown before (left) and after the installations are complete: a client, a protocol, and a service. If you turn on "Show icon in taskbar when connected," an icon appears in the Taskbar tray that indicates when you're connected to the network.
Highlight the Client component type and click Add.
The Select Network Component Type dialog box appears.
Highlight Client; click Add.
A list appears, showing the available clients in Windows 2000 Professional.
Select Client for Microsoft Networks and click OK.
The other option here, Client for NetWare Networks, is exclusively for Novell NetWare servers—something you probably don't have on your homemade, peer-to-peer network.
After a moment of thought, your PC shows the client module's name (Client for Microsoft Networks) in the Components list. Be sure that its checkbox is turned on.

At this point, you could click the Close button to complete the client installation. But if you leave the Local Area Connection Properties dialog box open, you can proceed with the next part of the networking software installation.
Your next step involves installing a protocol—a networking language. Windows 2000 Professional includes three protocol modules that you can use on your peer-to-peer network, but the computers on your network can't communicate unless you've installed at least one common protocol on each one.
If you've just followed the preceding steps to install the client module, continue as described here. (If not, follow the previous Steps 1 and 2 before proceeding with these steps.)
Click Install.
The Select Network Component Type dialog box appears.
Click Protocol, then Add.
Now the Select Network Protocol dialog box appears (see Figure 15-3), listing the protocols available in Windows 2000.
Figure 15-3. Windows 2000 Professional offers six protocol modules, but only the Internet Protocol (TCP/IP), NetBEUI Protocol, and NWLink IPX/SPX/NetBIOS Compatible Protocol modules are suitable for general networking. AppleTalk Protocol lets your PC talk to Macintosh computers, DLC Protocol module is for printing, and the Network Monitor Driver supports the Network Monitor application included with Windows 2000 Server.
Choose Internet Protocol (TCP/IP) if you'd like the various PCs on your network to be able to use a single Internet connection simultaneously (such as a phone line or cable modem), as described in Section 15.5. TCP/IP has other advantages, too: It's the networking language spoken by the Internet and the majority of the world's LANs, and it's almost infinitely expandable. Its disadvantage is that it requires a trek through some technical turf—you must configure each computer with its own unique IP address, as described in Section 15.4.3.1.)
On the other hand, if sharing a single Internet connection isn't one of the goals of your networking experiment, choose NetBEUI Protocol. It's much easier to set up than TCP/IP and provides the same basic network features.
NetBEUI (NetBIOS Extended User Interface) is used almost exclusively on small Microsoft Windows networks. Its primary advantage is that it requires no configuration. All you have to do is install the protocol module; your network is ready to go. The drawbacks of NetBEUI are that it doesn't work through a router (you can't connect several NetBEUI networks together to form a larger network), and you can't use it to access the Internet. (You can still use TCP/IP for individual dial-up connections to the Internet, while running NetBEUI on your internal network; you just can't share a single Internet connection among the networked PCs.)
Choose NWLink IPX/SPX/NetBIOS Compatible Transport Protocol only if you have a NetWare server on your network. (You'd know it if you did.)
Highlight one of the listed protocols and click OK.
After a moment, you return to the Local Area Connection Properties dialog box, where the name of the protocol you chose now appears in the list. You can close the dialog box now (or leave it open if you'd like to install another module). Make sure that the checkbox next to the protocol is filled before you close the dialog box.
At this point, as before, you could click the Close button to complete the protocol installation. But to finish up the networking software installation, leave the box open.

If you chose the TCP/IP protocol, as described in the preceding section, you must now configure each workstation with its own IP address that's unique on the network. (If you chose one of the other protocols, skip down to "Installing Services.") As noted above, TCP/IP's primary disadvantage is this configuration step, which isn't necessary for any of the other protocols.
Here's how to go about it. (If the Local Area Connection Properties dialog box isn't already open, open it using steps 1 and 2 in Section 15.4.1–334.)
Highlight "Internet Protocol (TCP/IP)" in the Components list and click the Properties button.
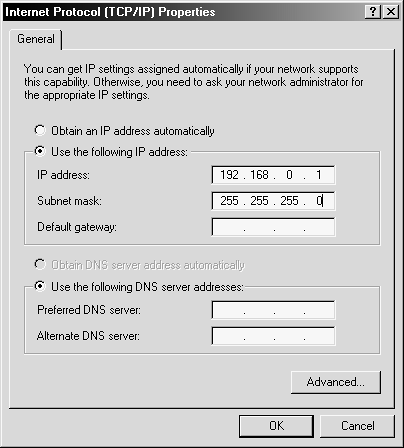
The Internet Protocol (TCP/IP) Properties dialog box appears, as shown in Figure 15-4.
Figure 15-4. The Internet Protocol (TCP/IP) Properties dialog box is where you configure the IP address for a network interface, as well as the other TCP/IP settings. If you have a second NIC in the system, the Network and Dial-up Connections control panel has a second Local Area Connection icon with its own Properties dialog box. You must assign the second NIC its own IP address and other settings. In the same way, if you have a dial-up connection to the Internet, it has its own IP address, assigned by your ISP.
Click "Use the following IP address."
Unless you have a device acting as a DHCP server on your network (such as a DSL/cable modem router or a Windows computer running Internet Connection Sharing), select "Use the following IP address."
Enter an IP address in the field provided.
An IP address consists of four integers between 0 and 255, separated by periods (such as 192.168.22.7). Part of the IP address identifies the network, and the other part identifies the computer itself (which is called the host in TCP/IP lingo).
Every Internet-connected computer in the world has its own, exclusive IP address that's been registered (usually by an ISP) with a body called the Internet Assigned Numbers Authority (IANA). You could conceivably obtain registered addresses for your networked PCs from an ISP; your machines could then connect to the Internet using one computer as a router. But there are several reasons why that's not a good idea. First, ISPs nearly always charge extra for registered IP addresses; second, connecting your computers to the Internet this way makes them vulnerable to attack from the insidious forces prowling cyberspace.
Instead, you can configure your workstations with a special sequence of IP addresses that have been set aside expressly for use on private networks. Because these addresses aren't accessible from the Internet, your systems are safe from outside intrusion, and it doesn't matter that other computers in the world may be using the same numbers.
These special addresses all begin with 192.168. The third number can be any integer, as long as it's the same on every computer on your network. For the fourth number, give each machine a different integer between 1 and 254.
For example, the IP addresses for your first computer might be 192.168.1.1; the second could be 192.168.1.2; the third could be 192.168.1.3, and so on (although there's no reason the final numbers have to be consecutive).
Click the Subnet Mask field and enter the value 255.255.255.0. Then click OK.
Clicking the OK button closes the Internet Protocol (TCP/IP) Properties dialog box and returns you to the Local Area Connection Properties dialog box. The changes you've made to the TCP/IP configuration won't take effect until you reboot the system.
The final networking component type is the service, a program that loads automatically when the computer boots. In this context, it means networking services included with Windows 2000 Professional—namely, the one called File and Printer Sharing for Microsoft Networks, which lets you grant other users access to your computer's files, folders, disks, and printers over the network. (Without this service, you can still access the shared resources on other machines, but other users can't access yours.)
To install the File and Printer Sharing for Microsoft Networks service, use the following procedure. (If the Local Area Connection Properties dialog box isn't already open, open it using steps 1 and 2 in Section 15.4.1–334.)
Click the Install button.
The Select Network Component Type dialog box appears.
Click Service, then Add.
Now you're in the Select Network Service dialog box.
Highlight File and Printer Sharing for Microsoft Networks; click OK.
You're back at the Local Area Connection Properties dialog box one last time.
Click the Close button.
If you've installed a number of networking components one after the other, having progressed steadily through this chapter, clicking the Close button completes the installations. Windows may now ask you to insert the Windows 2000 Professional CD-ROM; finally, when the installation procedure finishes, you'll be prompted to restart the computer.
Once the system restarts—and after you've repeated all of the steps described in this chapter on every PC on your network—your network is ready for action. You should be able to log on to the network, open My Network Places or Windows Explorer, and see icons representing the other computers on the network, exactly as described in Section 13.1.1. By double-clicking those computer icons, you can see and open the folders on the other PCs of the network—at least those that have been shared , a procedure described in Section 13.3.2.