As you know from Chapter 2, you can't use a Windows 2000 computer without first logging on; and for that, you need a username and password. They're your keys to your Windows 2000 account.
If you work in a company where somebody else maintains all the computers, understanding accounts (and the related concepts, groups and administrative rights) isn't essential to your everyday work. But if you maintain your own small network, or if you'd like a better understanding of the "Access denied" messages that may sometimes appear when you use your PC, an understanding of these notions may prove very valuable.
User accounts are extremely important in Windows 2000. Your user account determines your privileges—that is, exactly what you're allowed to do on the network and even on your own PC, including which files and folders you can open, which printers you can use, and which Control Panel settings you can change. Your user account also tells Windows which user profile to use when you log on, as described in Section 17.4.
Every Windows 2000 Pro computer comes with a special account called Administrator. If you log onto your PC as the Administrator, you can change any of its Control Panel settings, use the Computer Management tool (Section 17.3.4), install non-Plug-and-Play hardware—and, more important, you can add, delete, or change other people's accounts on this machine.
Tip
You don't necessarily have to have the Administrator account to make these kinds of changes; you can also have an account that's been added to the Administrator group , described below.
When you install Windows 2000, the setup program creates the Administrator account automatically; whoever performs the installation specifies the password. If you installed Windows 2000 yourself, you therefore know the password; you can access the Administrator account whenever you like.
But if you work in an office where someone else is responsible for installing, configuring, and maintaining your computer, whether or not you're given administrative access to the machine is up to them. The system administrator might give you the Administrator password, set up a local account for you under a different name with limited administration privileges, add your domain account to one of the local groups with administrative privileges (using the Users and Passwords control panel), or grant you no administrative access at all. It all depends on the policies of your company.
In a corporation with hundreds or thousands of employees, the network administrators would go quietly mad if they had to configure every user account's privileges individually—Read-Only access to this folder, Full access to that folder, no rights to back up the system, permission to log on, and so on. Fortunately, Windows 2000 lets administrators create groups with canned sets of identical privileges. When the company hires a new worker, all the network administrator has to do is add her user account to the appropriate existing group (such as Accounting or Creative).
Groups are especially handy when you're sharing a folder on your PC with other people on the network. You can simply tell Windows 2000 which group is allowed to see what's inside (as described in Section 13.3.2), and your security task is complete.
Note
If you belong to several groups, your privileges are cumulative; you get the maximum rights of both groups. For example, if the General group isn't allowed access to the Secret Projects folder, but you're also in an R&D group that is allowed to see it, you'll have access to it.
To save the network administrator's time, Windows 2000 Pro comes with several predefined groups, each with certain privileges already set up. Some of the most useful ready-made groups are:
Administrators. The Administrator account described above is part of this group, of course. But an administrator can add any other account to this group, giving them the full range of privileges on your machine (including managing users and groups like this one).
Power Users. People in this group can do many of the things administrators can do, including editing user accounts and groups, sharing and managing printers, and sharing and managing shared files. But they aren't allowed to perform some administrative tasks like backing up files, changing device drivers, or managing security and audit logs.
Users. Most people, on most Windows 2000 networks, belong to this group; in fact, every account (except Administrator and Guest accounts) belongs to this group. It offers basic access to the computer, with none of the administrative privileges described in the previous paragraphs, and without the right to share folders (page Section 13.3.2) or create local printers (Section 16.3).
Guests. People who connect to the network only occasionally may be members of this group. (The built-in Guest account belongs to this group, too.) You don't need a password to log onto the network as a member of the Guest group, but you can't do much on the network, either (as determined by the administrator).
Note
The Guest account is turned off by default, primarily for security reasons; if the Guest account is enabled on your machine, anyone on your network can see the folders you've shared (unless you've restricted access to them as described in Section 13.4.3). And if the shared folders are on a FAT drive (Section A.2.3), these anonymous users can even change or delete your files. Use the Guest account with caution.
Everyone. You'll see this group listed when you share a folder or printer; it refers, sure enough, to anyone who uses this computer, whether on the network or when seated in front of it.
Authenticated Users. This group is the same as Everyone, except that it omits the Guest account (and any other anonymous user).
As noted earlier, you can add, delete, and edit user accounts only if your account has Administrator or Power User privileges. If you fit that description, then you can use the Computer Management tool to perform almost every administrative task, including setting up user accounts.
To begin, choose Start→Programs→Administrative Tools→Computer Management, or right-click My Computer on the desktop and select Manage from the shortcut menu.
Note
The Administrative Tools folder only appears in the Start menu if you activate it by choosing Settings→Taskbar & Start Menu, clicking the Advanced tab, and turning on Display Administrative Tools.
To add a new user account to your computer, click the System Tools icon, then Local Users and Groups. On the right side of the window, right-click Users and select New User from the shortcut menu.
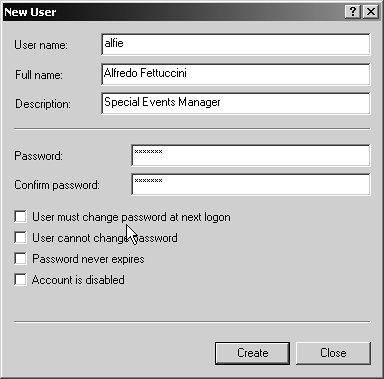
Supply a user name, full name, a password, and password rules (Figure 17-3). Click Create, then Close, to wrap up the task.
To make changes to an account you've created, open Computer Management, exactly as described above. Click the Local Users and Groups folder; on the right side of the window, double-click Users, then double-click the account's name. Finally, in the Properties dialog box, click the Member Of tab (see Figure 17-4). It shows you a list of the groups that include this user. If you'd like this person to become part of another group too, click Add, also shown in Figure 17-4.
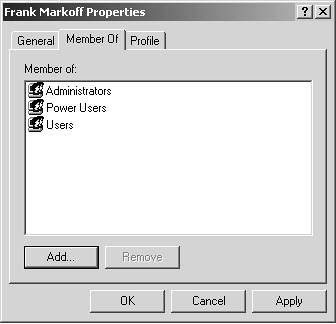
Figure 17-4. The Member Of dialog box shows you which groups this person belongs to. To add him to another group, click Add; in the resulting dialog box, double-click the group name (or several of them), and then click OK.
To rename or delete an account, just right-click it and choose Rename or Delete from the shortcut menu.
Tip
When you delete an account, you lose all of its settings, even if you later create another account with the same name. If somebody in your group is just going on sabbatical, disable her account instead of deleting it, so that you'll save yourself the trouble of re-creating all of her privileges and settings.
To do so, double-click her name in the Computer Management window, and then turn on "Account is disabled" (as shown in Figure 17-3). Click OK.
On a peer-to-peer network, there's no central server that maintains a list of users and groups. As a result, you have to re-create your groups on each computer. As you can imagine, this is a lot of work, and changing group membership is a real pain, because you have to make the change on every machine.
Fortunately, you don't have to set up a group on every machine. The group feature can still be useful just on one computer: when you want to limit access to a folder on your machine to certain people, for example.
See page Section 13.3.2 for a step-by-step description of sharing a folder and making it available only to a certain group of people. Those instructions don't cover creating the group to begin with, however; here's how to do it:
Open the Computer Management window.
To do so, right-click My Computer on the desktop and select Manage from the shortcut menu.
Click System Tools, then Local Users and Groups.
The right side of the screen shows two folders: Users and Groups.
Right-click Groups; choose New Group from the shortcut menu.
The New Group dialog box appears.
Type a name for your new group, and then click Add.
The Select Users or Groups window appears, listing every user you've set up (and several existing groups).
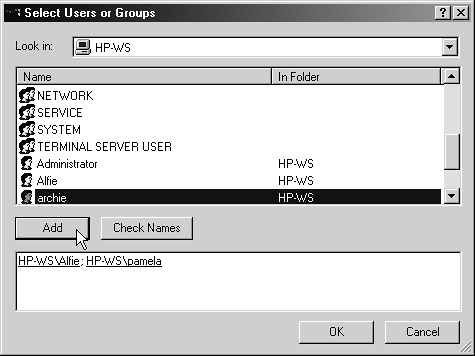
Add the members of your network to the new group, as shown in Figure 17-5 .
Figure 17-5. To add users to a group, double-click a name in the list (or click it once, then click Add). Repeat until the bottom box shows the name of everyone who's permitted to see your files. Remember to add yourself to the group if you plan on being able to access the group's files.
Check the "Look in:" drop-down list at the top of the Select Users or Groups dialog box to make sure you're adding user accounts from your local machine, and not from your domain (unless that's what you intend).
When you've added every name you want to add, click OK, then Close.
You return to the Computer Management window, which you can close, if you like. From now on, your newly created group will appear in the list that appears when you share a folder (see the illustration on Section 13.4.3.2).